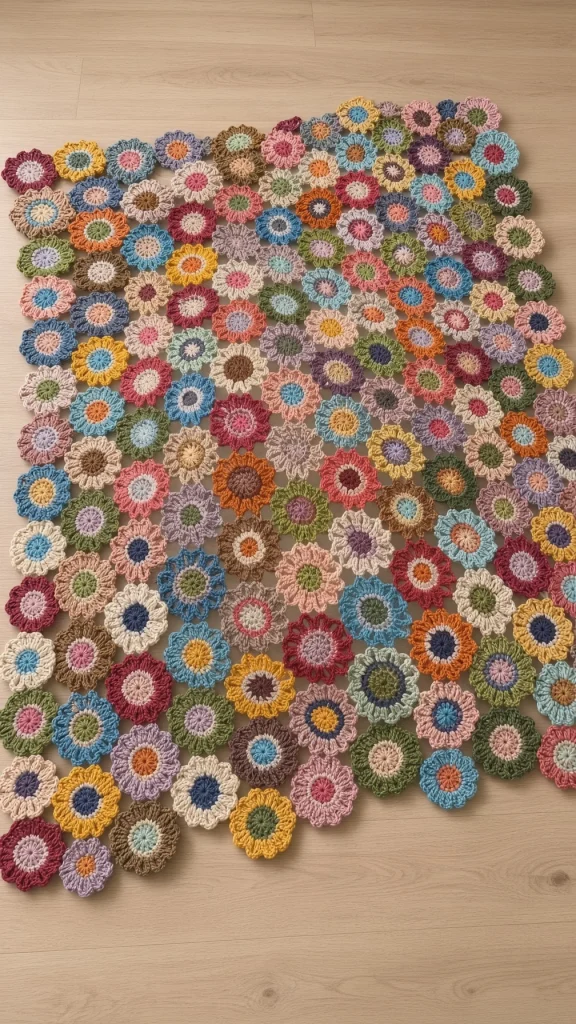
Scrappy Flower Hexagon Blanket
Beginner Friendly
Perfect for those just starting their crochet journey, with clear instructions and simple techniques
Single-Day Project
A satisfying project you can complete in a single afternoon or evening.
Handmade Gift
A beautiful keepsake — free forever. Read online or print at home.
About This Scrappy Flower Hexagon Blanket
This crochet flower blanket pattern builds a full throw out of 210 small two-color hexagon motifs, each one a twelve-petal flower with a contrasting center, joined to its neighbors as you go so there is no seaming at the end. Every motif uses two colors and nothing else, which makes it the best possible use for the bag of leftover DK that most crocheters accumulate — a single motif takes about four metres of center color and eight of petal color.
The construction is what keeps a project this size manageable. Each motif is finished and attached in one sitting of about twenty minutes, so the blanket grows in discrete, satisfying units rather than becoming an endless row you have to finish before you can put it down. The join-as-you-go method attaches each new hexagon to two or three completed neighbors at the last round, which means the blanket is structurally complete the moment the final motif goes on.
The color approach matters more than it looks. Working truly at random produces clumps, so the pattern includes a simple rule for placement that keeps the scatter even without requiring you to plan the whole thing in advance. Plan on 60 to 80 hours spread over weeks or months. It is advanced work because of the join-as-you-go technique and the sheer scale, not because any round is difficult — the motif itself is a straightforward five-round hexagon.
Materials
- DK weight wool or wool blend in assorted leftover colors approx. 2,600 m total (about 1,300 g) — see notes below
- At least 20 different colors the more the better; 30 or more gives the best scatter
- 3.5 mm crochet hook US E-4
- Tapestry needle blunt tip
- Stitch markers 4-6, for marking join positions
- Small project bag for carrying motifs in progress
- Blocking mats enough to lay out 110 x 140 cm, or block in sections
- Rustproof pins 60+
- Measuring tape and small sharp scissors
Abbreviations
begbeginningchchaindcdouble crochethdchalf double crochetMRmagic ringreprepeatrnd(s)round(s)RSright sidescsingle crochetskskipsl stslip stitchsp(s)space(s)st(s)stitch(es)Gauge and sizing
- Gauge: one motif measures 9 cm across from flat side to flat side, and 10 cm from point to point.
- Throw (as written): 14 motifs wide x 15 rows long = 210 motifs, approximately 110 x 140 cm.
- Baby blanket: 9 wide x 10 rows = 90 motifs, approximately 72 x 95 cm.
- Large throw: 18 wide x 19 rows = 342 motifs, approximately 142 x 180 cm.
- Each motif uses approximately 4 m of center color and 8 m of petal color, 12 m total.
- All instructions use US crochet terminology.
- Because hexagons offset, alternate rows have half a motif protruding at each end. The pattern includes half-motifs to square the edges, or you can leave the scalloped edge as shown.
Flower hexagon motif
- Rnd 1: With the center color, MR, ch 1, 12 sc in ring, pull ring closed, sl st to first sc. (12 sc)
- Rnd 2: Ch 1, 2 sc in each sc around, sl st to first sc. (24 sc) Fasten off the center color, leaving a 10 cm tail.
- Rnd 3 (petals): Join the petal color with a sl st in any sc. Ch 1, *sk next sc, (2 dc, ch 1, 2 dc) in next sc, sk next sc, sl st in next sc; rep from * 5 more times, working the last sl st into the base of the first petal. (6 petals) Wait — this uses 4 sc per repeat and 6 repeats consumes 24 sc exactly. (6 petals, each with 4 dc and a ch-1 tip)
- Rnd 4 (second petal tier): Ch 1, working into the same round as Rnd 3 from behind the petals, *sc in the sl st between petals, ch 4; rep from * around, sl st to first sc. (6 sc, 6 ch-4 sps) The chains pass behind the first petal tier.
- Rnd 5: Sl st into first ch-4 sp, ch 1, *(2 dc, ch 1, 2 dc) in the ch-4 sp, sl st in next sc; rep from * around, sl st to the base of the first petal. (6 more petals, 12 petals total)
- Rnd 6 (hexagon round): Ch 1, *(2 sc, ch 2, 2 sc) in the ch-1 tip of the next Rnd-5 petal — this is a hexagon corner; sc in next 2 dc, sc in the ch-1 tip of the Rnd-3 petal behind, sc in next 2 dc; rep from * around, sl st to first sc. (6 corner ch-2 sps, 7 sc between each pair of corners = 42 sc plus 24 corner sc = 66 sts)
- Fasten off, leaving a 15 cm tail. The motif should measure 9 cm flat side to flat side, blocked.
- For the first motif of the blanket, stop here. For every motif after it, work Rnd 6 as the join-as-you-go round described in the next section.
Join as you go
- Every motif after the first is joined during Rnd 6. Work Rnd 6 normally until you reach a side that must attach to a completed motif.
- To join a corner: work (2 sc, ch 1) in the petal tip, then sl st into the corresponding corner ch-2 sp of the completed motif, ch 1, and work 2 sc back into the same petal tip. The two corners now share a point.
- To join a side: instead of working the 7 sc across the side normally, work each sc and then a sl st into the corresponding sc of the completed motif’s side, working from the joining corner back toward the next corner. Match stitch for stitch across all 7.
- Work the remaining unjoined sides of Rnd 6 normally, then sl st to first sc and fasten off.
- Motif 1 of each row joins to 1 or 2 neighbors. Interior motifs join to 3 neighbors — the one before it in the row and the two above it in the previous row.
- Always join in the same direction, working left to right along each row and top to bottom through the blanket. Consistency here is what keeps the hexagon grid from walking diagonally.
- Check the join every ten motifs by laying the work flat. If the blanket is starting to curve, one join is tighter than the rest — find it and redo it before adding more.
Color placement
- Truly random placement clumps. Use this rule instead: no color may appear as the petal color within two motifs of itself in any direction, and no color may be the center of two adjacent motifs.
- Sort your leftovers into four rough value groups: darks, mediums, brights and pales. Aim for roughly equal numbers of each across the blanket.
- Pair each motif so its two colors differ in value, not just in hue. A pale pink center in a pale cream petal disappears; a pale center in a dark petal reads clearly from across the room.
- Keep a running tally of how many motifs each color has appeared in. When one color reaches 15 uses, retire it until the others catch up.
- Make 20 motifs, lay them out in their grid positions, and look at the result before making 20 more. Correcting a clump at motif 40 is easy; at motif 180 it means unpicking joins.
- If you are short on variety, use a single neutral — cream or oatmeal — as the petal color for every fourth motif. The repeated neutral acts as a visual rest and makes the brights read as deliberate.
Half motifs for straight edges
- Because hexagons offset, alternate rows sit half a motif short at each end. Make 15 half motifs to square both side edges, or skip this section and keep the scalloped edge.
- Row 1: With the center color, ch 4, 6 dc in the 4th ch from hook. Turn. (7 dc counting the turning ch)
- Row 2: Ch 1, 2 sc in each dc across, sc in the top of the turning ch. Turn. (13 sc) Fasten off the center color.
- Row 3 (petals): Join the petal color at the first sc. Ch 1, *sk next sc, (2 dc, ch 1, 2 dc) in next sc, sk next sc, sl st in next sc; rep from * twice more. Turn. (3 petals)
- Row 4: Ch 1, working behind the petals, *sc in the sl st between petals, ch 4; rep from * across, ending sc in the last st. Turn. (4 sc, 3 ch-4 sps)
- Row 5: Ch 1, *(2 dc, ch 1, 2 dc) in the next ch-4 sp, sl st in next sc; rep from * across. Turn. (3 petals, 6 total)
- Row 6 (edge and join): Work as Rnd 6 of the full motif but across the three petal sides only, joining to the two neighboring full motifs as you go, and working a plain row of sc along the straight edge. Fasten off.
- Make 15 half motifs, alternating colors as for the full motifs.
Border
- Rnd 1: Join a neutral — cream or oatmeal — with a sl st at any point on the outer edge. Ch 1, work sc evenly around the entire blanket: 1 sc in each sc along every motif side, 2 sc in each outer corner ch-2 sp, and sc2tog at each inner notch between two motifs. Sl st to first sc.
- Rnd 2: Ch 1, sc in each sc around, working 3 sc at each of the four blanket corners and sc2tog at each remaining notch, sl st to first sc. After this round the outline should be visibly straighter.
- Rnd 3: Ch 1, hdc in each st around, working 3 hdc at each blanket corner, sl st to first hdc.
- Rnd 4: Ch 1, sc in each st around, working 3 sc at each blanket corner, sl st to first sc.
- Rnd 5 (picot finish): Ch 1, *sc in next 3 sts, ch 3, sl st in the 3rd ch from hook; rep from * around, sl st to first sc.
- Fasten off and weave in. A wider border than this will overwhelm the motifs, which are only 9 cm themselves.
Finishing
Weave in the ends as you go, not at the end. Each motif has four tails, which means 840 tails across the blanket. Weaving them in the moment each motif is joined takes two minutes and is bearable; leaving them all until the end is how blankets sit unfinished in cupboards for years.
Run each tail under at least six stitches on the wrong side, change direction once, and trim close. Wool and wool blend grip well enough that this holds; if you are using a slippery blend, split the tail and weave the two halves in opposite directions.
Block the finished blanket in sections if you do not have 110 x 140 cm of mat space. Mist each section, pin the hexagon corners so the sides sit straight, let it dry, then move to the next. Overlapping the sections by about 20 cm avoids a visible line where one blocked area meets the next.
Hand wash in cool water with a wool-safe detergent, or machine wash on a wool cycle if every yarn in it is superwash — one non-superwash motif will felt while the rest do not, and there is no fixing that. Dry flat, never hang, and reshape while damp.
Tips for Success
- Make motifs in batches of ten in the same two colors, then switch. Constant color changing doubles the number of tails and slows you down considerably without improving the scatter.
- Keep a small bag with a hook, a needle, and enough yarn for four motifs as portable work. A motif takes twenty minutes and is the ideal size for a train journey or a waiting room.
- Lay the blanket out flat every twenty motifs. Clumping and curving are both far easier to fix when you notice them early, and you cannot see either while the work sits in your lap.
- Count 66 stitches on Rnd 6 of the first few motifs until the rhythm is automatic. If motifs differ in stitch count the joins will not line up stitch for stitch.
- Match your join tension to your motif tension. Tight joins pucker the blanket into a bowl, and with 210 motifs the cumulative effect is dramatic.
Common Mistakes to Avoid
- Working Rnd 4 into the petal stitches instead of behind them. The chains must pass behind the first petal tier so those petals stay standing forward. If your motif looks flat with six petals rather than layered with twelve, this is why.
- Joining in inconsistent directions. If some motifs join left-to-right and others right-to-left, the grid walks diagonally and by row eight the blanket is a parallelogram. Pick a direction on motif two and never change it.
- Letting one color dominate. The most common failure of a scrappy blanket is that the crocheter’s largest leftover balls get used most, and that color forms a visible pattern. Cap each color at 15 motifs.
- Leaving all the ends until the end. Eight hundred tails is not a finishing task, it is a second project, and it is the single most common reason a blanket like this never gets finished.
- Mixing superwash and non-superwash wool. They behave completely differently in water, and the first wash will shrink some motifs and not others, permanently distorting the blanket.
Ways to Customize This Pattern
- Use a single consistent center color across all 210 motifs with random petals. The repeated center creates a visual grid that organizes the scatter without reducing the color variety.
- Make a cushion cover from 19 motifs joined in a hexagonal panel, backed with a plain crocheted or fabric square — a good way to test the motif before committing to a blanket.
- Work a gradient rather than a scatter: start with pales at one end and work through to darks at the other, keeping the colors within each row close in value.
- Join with a contrast color by working Rnd 6 of every motif in the same neutral. The blanket gains a honeycomb outline that pulls the whole thing together and simplifies the color decisions considerably.
- Make a baby blanket at 90 motifs first. It uses the identical technique, finishes in a quarter of the time, and tells you whether you want to commit to the full throw.
Frequently asked questions
About 2,600 m in total for the throw, which is roughly 1,300 g of DK. More useful than the total is the per-motif figure: 12 m each. A 50 g ball of DK holds around 125 m, so one standard ball makes about ten motifs. Count your leftovers in balls rather than weighing them and you will know quickly whether you have enough.
Yes, but with 210 motifs it is a substantially worse experience. Joining at the end means handling a growing pile of loose hexagons, matching 580 seams by hand, and doing all of that as one long task at the point where you most want to be finished. Join-as-you-go spreads the same work across the whole project in twenty-second increments.
One or more joins are tighter than the fabric around them. Lay the blanket out and look for where the curve begins — that is where the tight join is. Undo it, redo it with the slip stitches barely snugged, and check again. It is almost never a stitch count problem and almost always tension.
No. The scalloped edge left by offsetting hexagons is perfectly attractive and is what the original shows. The half motifs are there if you want a straight-sided blanket, which suits a bed better than a sofa throw. The border rounds will straighten the edge somewhat either way.
At twenty minutes per motif including joining and weaving in, 210 motifs is about 70 hours, plus a few for the border and blocking. Spread over evenings that is two to three months for most people. Treat it as a long-running project you pick up between other things rather than something to push through, and it stays enjoyable.
The finished Scrappy Flower Hexagon Blanket

