Advanced
For experienced crocheters who enjoy complex shaping, fine detail, and ambitious construction
Multi-Day Project
A rewarding 12+ hour journey — perfect for dedicated crafters who love detailed work.
Handmade Gift
A beautiful keepsake — free forever. Read online or print at home.
About This Seaglass Lattice Crochet Bedspread
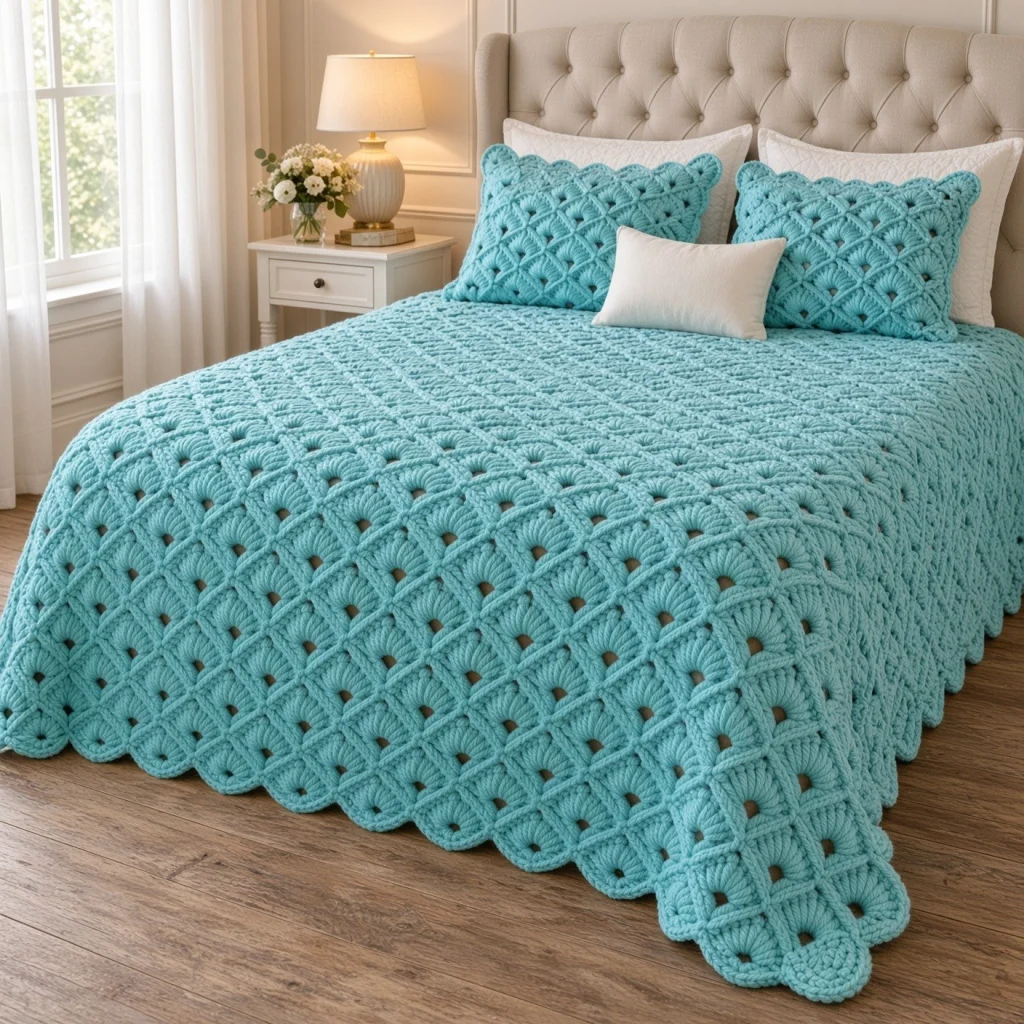
This crochet bedspread pattern turns one simple shell square into a full queen-size coverlet with a raised lattice grid, a small open eyelet at every intersection and a deep scalloped shell edge. The squares are joined as you go on their final round, so when the last one is attached the blanket is already a blanket — no sewing marathon, no four hundred loose ends added at the end. The grid you see across the surface is not embroidered or added afterwards; it is the joined final rounds of the squares standing proud against the dense shell centres, which is what gives the fabric that quilted, hand-pressed look.
It is a long project, and honest numbers help: 420 squares for the bedspread, plus 32 more for the two shams. Most people work a square in eight to twelve minutes once the round sequence is memorised, which puts the whole set somewhere around 90 to 120 hours spread over several weeks or months. Nothing in it is hard in isolation — double crochet, chain spaces, a seven-double-crochet shell — but the project is advanced because of the join-as-you-go corners, the shared-corner maths at the four-square intersections, the large-scale border count and the blocking discipline needed to keep 420 squares the same size.
It suits a crocheter who wants a heirloom-scale piece to live with for a while: good television crochet, portable in square-sized pieces, and satisfying to watch grow row by row across a bed. Work it in a single aqua shade as photographed, and the texture does all the work.
Materials
- Aran / worsted weight cotton-acrylic blend in turquoise aqua approx. 4.6 kg total — roughly 46 × 100 g skeins (about 7,800 m / 8,530 yd); the bedspread alone takes around 38 skeins
- 5.0 mm (US H-8) crochet hook or size needed to match gauge
- 3.5 mm hook optional, for tightening the magic ring centres
- Tapestry needle blunt, large eye, for weaving ends
- Stitch markers at least 20, for marking row position in the layout
- Blocking mats and rustproof pins enough to block 12-16 squares at a time
- Two square pillow inserts, 50 cm / 20 in for the shams
- Sharp scissors and a tape measure
Abbreviations
chchainsl stslip stitchscsingle crochethdchalf double crochetdcdouble crochetMRmagic ringsp(s)space(es)st(s)stitch(es)skskiprndroundreprepeatbegbeginningJAYGjoin as you goGauge and Sizing
- Gauge, square: one finished Shell Lattice Square measures 11.5 cm (4½ in) along each side after blocking, worked with a 5.0 mm hook in aran weight yarn.
- Gauge, fabric: 14 hdc and 11 rows = 10 cm (4 in) — used only for the pillow sham back panels.
- Bedspread layout: 20 squares wide × 21 squares long = 420 squares. Joined panel measures approx. 230 × 241.5 cm; the three-round border adds about 6 cm all round, for a finished size of approx. 242 × 254 cm (95 × 100 in), suitable for a queen bed with a short drop.
- To resize, add or remove whole squares. Each square added across the width adds 11.5 cm; each square added down the length adds 11.5 cm. Keep the width count even so the scalloped border parity works out as written.
- Pillow sham: 4 × 4 squares per sham front, 32 squares for the pair. Finished sham measures approx. 46 cm plus a 2.5 cm scalloped flange, fitting a 50 cm insert snugly.
Shell Lattice Square (First Square)
- Rnd 1: MR, ch 3 (counts as first dc), 15 dc into ring, pull the ring closed, sl st to top of beg ch-3. (16 dc)
- Rnd 2: ch 1, sc in same st, ch 3, sk next dc, [sc in next dc, ch 3, sk next dc] 7 times, sl st to first sc. (8 sc, 8 ch-3 sps)
- Rnd 3: sl st into first ch-3 sp, ch 3 (counts as dc), 2 dc in same sp, ch 2, 3 dc in same sp (first corner made), ch 1, 3 dc in next ch-3 sp, ch 1, *(3 dc, ch 2, 3 dc) in next ch-3 sp, ch 1, 3 dc in next ch-3 sp, ch 1; rep from * twice more, sl st to top of beg ch-3. (36 dc, 4 ch-2 corner sps, 8 ch-1 sps)
- Rnd 4: sl st in next 2 dc and into the ch-2 corner sp, ch 3 (counts as dc), 2 dc in same sp, ch 2, 3 dc in same sp, *dc in next 3 dc, dc in next ch-1 sp, dc in next 3 dc, dc in next ch-1 sp, dc in next 3 dc**, (3 dc, ch 2, 3 dc) in next ch-2 corner sp; rep from * around, ending final rep at **, sl st to top of beg ch-3. (68 dc — 11 dc along each side plus 6 dc at each corner; 4 ch-2 corner sps)
- Count check before Rnd 5: between any two corner ch-2 sps you should have exactly 17 dc (3 corner dc + 11 side dc + 3 corner dc).
- Rnd 5 (lattice round, first square only — no joining): sl st in next 2 dc and into the ch-2 corner sp, ch 1, (sc, ch 2, sc) in same corner sp, *[ch 2, sk 2 dc, sc in next dc] 5 times, ch 2, sk 2 dc**, (sc, ch 2, sc) in next ch-2 corner sp; rep from * around, ending final rep at **, sl st to first sc. (28 sc; 24 side ch-2 sps and 4 corner ch-2 sps)
- Fasten off, leaving a 10 cm tail. Weave the tail in now — do not let ends accumulate.
- Each finished square has 6 ch-2 spaces and 5 sc along every side, plus one ch-2 space at each corner. These are the spaces you will join into.
Joining Squares (Square 2 Onward)
- Work Rnds 1-4 of every subsequent square exactly as the first square.
- Rnd 5 is worked as a join-as-you-go round: wherever the instructions say ch 2 along a side that touches a finished square, work instead ch 1, sl st into the corresponding ch-2 sp of the neighbouring square, ch 1. The stitch count of the round does not change.
- One-sided join (a square meeting a single neighbour): work Rnd 5 as written until you reach the corner ch-2 sp where the join begins. Work (sc, ch 1, sl st into the corresponding corner ch-2 sp of the neighbour, ch 1, sc) in that corner sp. Then along the joining side, replace all 6 ch-2 sps with ch 1, sl st into the matching ch-2 sp of the neighbour, ch 1 — matching space for space, first to first, last to last. Finish the far corner of that side the same joined way, then work the remaining sides as normal ch-2 spaces.
- Two-sided join (an L-shaped join, two neighbours): join along the first side as above, then continue straight on into the second joining side without a break. The shared corner between the two neighbours is joined into both of their corner spaces: sc in your corner sp, ch 1, sl st into the corner sp of neighbour A, ch 1, sl st into the corner sp of neighbour B, ch 1, sc in your corner sp.
- Four-square intersections: when three squares already meet at a point, slip stitch into the point where the earlier joins sit rather than into each individual corner space again. One slip stitch through the existing join is enough — stacking four slip stitches makes a visible lump.
- Keep every join slightly loose. If the slip stitch pulls, the grid dimples and the square measures short; the lattice should lie flat and square under light tension.
- Work the bedspread in rows of 20 squares, completing one full row of 20 before starting the next. Mark the first square of each row with a stitch marker so you can always find your place.
- Repeat until 420 squares are joined in a 20 × 21 grid. Weave in all remaining ends and block the whole panel section by section before working the border.
Blanket Border
- Border Rnd 1 (foundation): join yarn with sc in the corner ch-2 sp of any corner square, 2 more sc in the same sp (3 sc corner made). Then work across each square edge as follows: [2 sc in next ch-2 sp, sc in next sc] 5 times, 2 sc in next ch-2 sp, then 1 sc in the corner ch-2 sp / join point between squares. (18 sc per square edge)
- Continue across the full side, working 3 sc in the corner ch-2 sp of each of the four blanket corners. Sl st to first sc. (378 sc on each long side, 360 sc on each short end, 3 sc at each corner = 1488 sc total)
- Border Rnd 2 (lattice arcs): sl st into the first sc after any corner group. ch 1, sc in same sc, ch 3, sk 2 sc, [sc in next sc, ch 3, sk 2 sc] to the corner group — 120 repeats along each short end, 126 repeats along each long side, counting the first.
- At each corner: sk the first sc of the 3-sc corner group, (sc, ch 3, sc) in the centre corner sc, ch 3, sk the last sc of the corner group, then begin the next side. Sl st to first sc at the end of the round. (500 ch-3 sps, 500 sc)
- Border Rnd 3 (scalloped shells): sl st into the ch-3 sp sitting at any blanket corner point. ch 3 (counts as dc), 6 dc in same sp (first shell made), *sc in next ch-3 sp, 7 dc in next ch-3 sp; rep from * around, ending with sc in the last ch-3 sp, sl st to top of beg ch-3. (250 seven-dc shells, 250 sc)
- Because every side and corner segment contains an even number of arcs, a shell falls at each of the four corner points automatically. If yours does not, your Rnd 2 count is off by one somewhere — recount that side rather than fudging the shells.
- Fasten off, weave in the end along the back of the shell round, and block the border firmly so the scallops open out into clean half-circles.
Pillow Sham Front (Make 2)
- Work 16 Shell Lattice Squares, joining as you go in the same way as the bedspread, in a 4 × 4 grid. Panel measures approx. 46 cm square after blocking.
- Weave in all ends on the back of the panel and block flat before assembly.
- Set aside; the border rounds are worked after the back panels are in place.
Pillow Sham Back Panels (Make 2 Per Sham)
- Panel A, Row 1: ch 66, hdc in 3rd ch from hook and in each ch across, turn. (64 hdc)
- Panel A, Rows 2-34: ch 2 (does not count as a st), hdc in each hdc across, turn. (64 hdc) Panel A measures approx. 46 × 31 cm. Fasten off.
- Panel B, Row 1: ch 66, hdc in 3rd ch from hook and in each ch across, turn. (64 hdc)
- Panel B, Rows 2-24: ch 2, hdc in each hdc across, turn. (64 hdc) Panel B measures approx. 46 × 22 cm. Fasten off.
- Edging on one long edge of each panel (this becomes the envelope opening): join yarn at a corner, ch 1, sc in each hdc across, turn; ch 1, sc in each sc across. Fasten off. (64 sc)
- Block both panels to exactly 46 cm wide so they match the square panel.
Sham Assembly and Flange
- Lay the sham front right side down. Place Panel A on top, wrong side down, aligning its top edge with the top edge of the front. Place Panel B over it, aligning its bottom edge with the bottom edge of the front; the two edged edges overlap by about 7 cm across the middle. Pin all round.
- Sham Rnd 1 (join round): with the square front facing you and both back panels held behind, work through both layers. Join yarn with 3 sc in the corner ch-2 sp of a corner square, then across each square edge: [2 sc in next ch-2 sp, sc in next sc] 5 times, 2 sc in next ch-2 sp, 1 sc in the corner sp / join point. (18 sc per square edge)
- Work 3 sc in each of the four corners. Catch the back panel stitches or row ends evenly as you go — roughly 18 sc to every 11.5 cm of back panel edge. Sl st to first sc. (72 sc per side, 3 sc at each corner = 300 sc)
- Sham Rnd 2 (lattice arcs, front layer only from here): sl st into the first sc after any corner group. ch 1, sc in same sc, ch 3, sk 2 sc, [sc in next sc, ch 3, sk 2 sc] to corner — 24 repeats per side, counting the first. At each corner: sk 1 corner sc, (sc, ch 3, sc) in the centre corner sc, ch 3, sk 1 corner sc. Sl st to first sc. (104 ch-3 sps, 104 sc)
- Sham Rnd 3 (scalloped flange): sl st into the ch-3 sp at any corner point, ch 3 (counts as dc), 6 dc in same sp, *sc in next ch-3 sp, 7 dc in next ch-3 sp; rep from * around, sl st to top of beg ch-3. (52 shells, 52 sc)
- Fasten off, weave in ends, block the flange flat. Repeat the whole sham for the second one.
Finishing
Blocking is what turns this from a pile of squares into a coverlet. Work in sections: lay the joined panel on a bed or clean floor, mist it with water, pat the lattice lines straight with your hands, and let it dry flat with the grid lines running true. Pay particular attention to the four-square intersections, which want to dome slightly — press them flat and pin them while damp. The scalloped border needs the most attention of all: pin every shell individually into a half-circle, because a border that dries half-folded never recovers on its own.
Check the back once more for missed ends before the bedspread goes on the bed. With 420 squares there will be a few hiding, and they are much easier to deal with now than after the piece has been washed. Weave each end along a dc post rather than through the open chain spaces, where it would show from the front.
To dress the bed, centre the bedspread with an even drop on both sides, then place the two shams at the head with the scalloped flanges sitting flat against the pillows. Launder on a cool gentle cycle in a large machine or by hand in the tub, support the full wet weight when you lift it, and dry flat — this is a heavy piece and hanging it wet will stretch the lattice permanently.
Tips for Success
- Batch your work: make 20 squares through Rnd 4 in one sitting, then do all 20 Rnd 5 joining rounds while sitting with the growing panel. It is far faster than carrying the whole blanket around for every square.
- Close your magic rings tightly and secure the tail with a half-hitch before weaving. A loose centre on a shell square opens into a visible hole that the surrounding dc cannot hide.
- Keep the ch-2 corner spaces of Rnd 4 generous — if they are tight, the six corner dc of Rnd 5’s base crowd and the square corners curl rather than meeting flat at the intersections.
- Count the 17 dc between corner spaces at the end of every Rnd 4. That single check catches almost every error before it gets joined into the blanket, where fixing it means unpicking neighbours.
- Use a yarn from the same dye lot wherever possible, and if you must change lots, alternate skeins every other square across a row so the shift falls diagonally and reads as texture rather than a stripe.
Common Mistakes to Avoid
- Joining slip stitches pulled too tight. The lattice puckers and the panel measures short across 20 squares. Work the join loosely, with the hook pulled through to the full height of a chain, and check the panel lies flat every few rows.
- Mismatched spaces along a joining side. If you join your 6 ch-2 spaces into the neighbour’s spaces out of order, one square ends up offset and the grid goes crooked. Line the two squares up flat before starting the side and match first space to first space.
- Skipping the wrong number of dc in Rnd 5. The repeat is [ch 2, sk 2 dc, sc in next dc] five times, then ch 2, sk 2 dc — six spaces, five sc. Skipping 2 dc six times instead leaves a stitch stranded at the corner and the square will not join evenly.
- Working the border Rnd 2 arcs without recounting per side. The short ends take exactly 120 repeats and the long sides 126; if you run out of stitches early, the shells will not land on the corners in Rnd 3. Count each side as you go rather than at the end.
- Blocking squares only at the end. Unblocked squares relax by up to half a centimetre each, and across 20 squares that is 10 cm of unplanned width. Block a test batch first and use that measurement for your layout maths.
Ways to Customize This Pattern
- Shade gradient: work the first six rows of squares in the deepest aqua, then step one shade lighter every four rows for a coverlet that fades toward the foot of the bed.
- Two-tone squares: work Rnds 1-3 in a pale seafoam and Rnds 4-5 in the main turquoise, so the shell centres glow lighter inside a solid lattice grid.
- Throw size: a 12 × 14 square layout (168 squares) with the same three-round border makes a 150 × 173 cm sofa throw in roughly a third of the time.
- Deeper drop: add a fourth border round before the shells — sc in each sc and 2 sc in each ch-3 sp of Rnd 2, then repeat Rnds 2 and 3 — to add about 7 cm of fall on each side for a higher bed.
- Table runner: join 3 × 12 squares, border both long sides and ends as written with proportionally fewer repeats, and work it in a crisp mercerised cotton for a firmer drape.
Frequently asked questions
With squares blocking to 11.5 cm, a full/double (about 200 × 240 cm) takes 17 × 20 = 340 squares, and a king (about 265 × 254 cm) takes 22 × 21 = 462 squares. Keep the width count even and the border instructions work exactly as written, with 18 sc per square edge in Rnd 1 and one Rnd 2 repeat per 3 sc.
Yes. Work Rnd 5 with plain ch-2 spaces on every square, then whip stitch the squares together through the back loops of the sc stitches and through each ch-2 space. It gives a slightly flatter seam but takes considerably longer across 420 squares, and the raised lattice effect is softer because the joined chains are what lift the grid.
A finished queen-size piece in a cotton-acrylic blend weighs around 4 kg, which is heavy but normal for a coverlet. If you want it lighter, use a smooth acrylic or acrylic-bamboo aran, which will bring it closer to 3 kg at the same gauge. Avoid pure cotton at this size — it adds weight and stretches downward over time.
Variation usually comes from tension drift in Rnd 4, the all-double-crochet round. Measure a square straight off the hook before blocking: it should be about 11 cm across Rnd 4’s outer edge. If your later squares run large, drop to a 4.5 mm hook for Rnd 4 only; if they run small, go up to 5.5 mm for that round. Blocking can rescue a 2-3 mm difference, but no more than that.
The pattern as written uses an envelope back, so the insert slides in and out and the whole cover can be washed separately. If you prefer a sewn-shut sham, skip the two back panels and simply work the Rnd 1 join round through the front panel only, then add a plain hdc back panel of 64 sts × 50 rows and whip stitch it on three sides before inserting the pillow form.
The finished Seaglass Lattice Crochet Bedspread

