Serrated Leaf Vine Table Runner Crochet Pattern
Beginner Friendly
Perfect for those just starting their crochet journey, with clear instructions and simple techniques
Single-Day Project
A satisfying project you can complete in a single afternoon or evening.
Handmade Gift
A beautiful keepsake — free forever. Read online or print at home.
About This Serrated Leaf Vine Table Runner Crochet Pattern
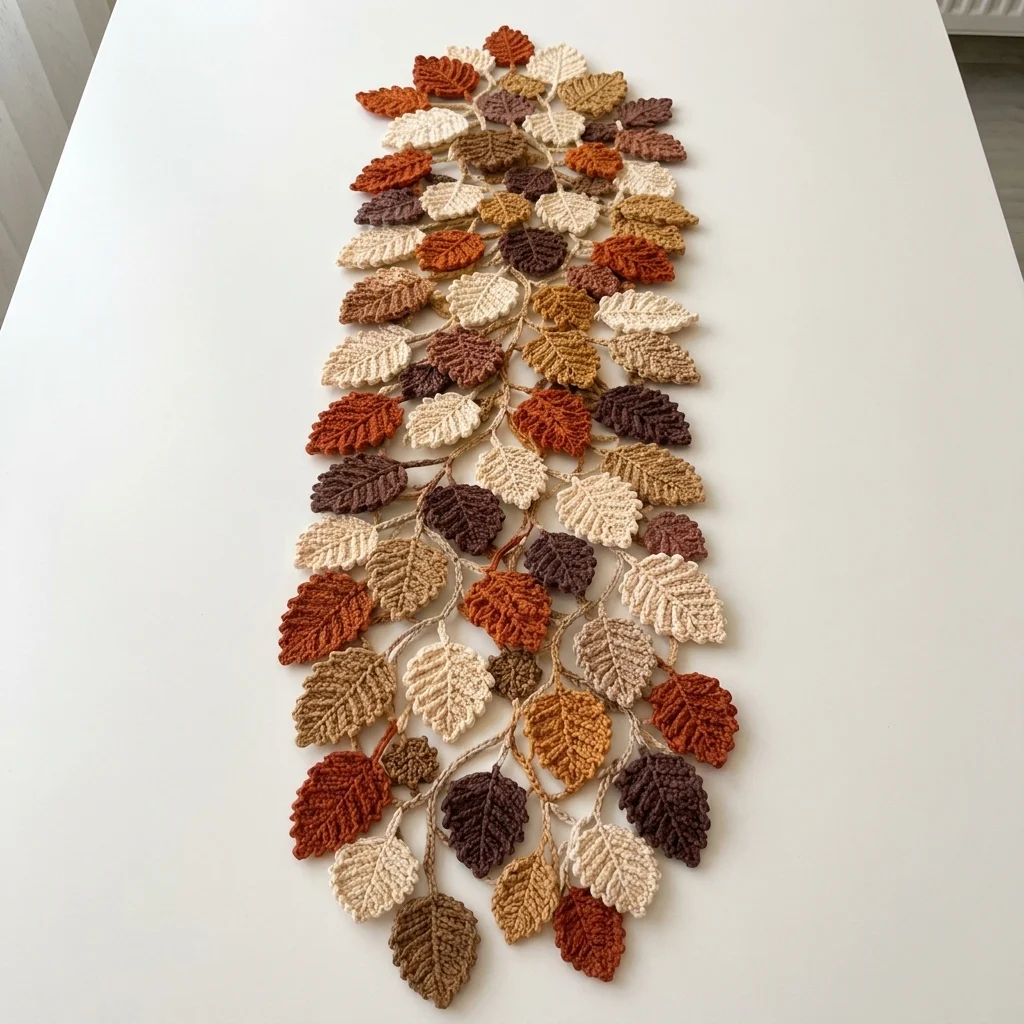
This crochet leaf vine table runner pattern gathers over 60 small, serrated-edge leaves in five autumn shades and ties them along branching jute cords, so the finished piece looks like a fallen branch laid down the center of the table rather than a flat panel. Each leaf is worked individually with a raised center rib and tiny picot-like serrations along both edges, then knotted directly onto the cord at slightly staggered heights.
What makes this design distinctive is the branch structure itself: one long main cord runs the full length of the runner, with 8-10 shorter side cords knotted off it at intervals, each holding a cluster of 4-6 leaves. That branching, rather than a straight double row, is what gives the finished piece its organic, tumbled look, wider in the middle and tapering at both ends. Expect to spend 18-22 hours total, most of it in repeated small leaves rather than any single complex section.
This is an advanced pattern, best suited to someone who doesn’t mind repetitive small-motif work and wants practice with picot edging and cord-based assembly, rather than someone looking for a quick single-piece project.
Materials
- DK weight yarn, cream ~35g
- DK weight yarn, tan/camel ~35g
- DK weight yarn, rust orange ~35g
- DK weight yarn, chocolate brown ~35g
- DK weight yarn, burgundy wine ~35g
- Natural jute cord or twine ~6 meters
- Crochet hook 3.25 mm (US D/3)
- Tapestry/yarn needle
- Fabric glue or clear-drying craft glue optional, for cord ends
- Sharp scissors
Abbreviations
chchainsl stslip stitchscsingle crochethdchalf double crochetdcdouble crochetpicotch 2, sl st in first ch of the 2st(s)stitch(es)reprepeatFOfasten offSerrated Leaf Motif (make approximately 65: mix of all five colors)
- Ch 10. This forms the leaf’s center rib and starting point.
- Round 1, first side: starting in 2nd ch from hook, sl st in first ch, then work up the side of the chain: *sc in next ch, picot, sc in same ch; rep from * along 4 more ch, ending with 3 sc in the last ch at the tip to round it.
- Continue down the second side of the same chain: *sc in next ch, picot, sc in same ch; rep from * along the remaining 5 ch back to the base, ending sl st in base ch to close.
- Ch 2 more at the base to form a short stem, then sl st back down those 2 ch. FO leaving a 15 cm tail for attaching to the cord.
- Repeat to make approximately 65 leaves total, roughly 13 in each of the 5 colors.
Main Vine Cord
- Cut one length of jute cord approximately 140 cm long for the main spine of the runner.
- Lay the cord flat and mark 9 points along its length, spaced roughly 12-15 cm apart, leaving about 10 cm bare at each end for tapering.
- These marked points are where the shorter side-branch cords will attach in the next section.
Side Branch Cords
- Cut 9 shorter lengths of jute cord, varying between 15-30 cm, longer toward the center of the runner and shorter toward both ends, to build the tapered silhouette shown in the photo.
- Fold each side cord in half and knot it onto the main cord at its marked point using a simple lark’s head knot, so two strands hang or extend from each attachment point.
- Trim the paired strands at each branch point to slightly uneven lengths so the branches don’t look perfectly symmetrical.
Attaching Leaves
- Using the yarn tail left on each leaf’s stem, tie or whipstitch each leaf directly onto the main cord or a branch cord at its base, mixing colors so no two adjacent leaves along any single stretch of cord match.
- Layer 3-5 leaves per branch cord and 4-6 leaves at each point where a branch meets the main cord, overlapping them slightly to hide the knots underneath.
- Work outward from the center of the runner toward both tapered ends, checking overall color balance every few branches rather than only at the very end.
- Once all leaves are attached, trim any exposed cord ends close to the last knot and dab a small amount of glue on the trimmed ends if you want extra security.
Finishing
Lay the finished runner flat and gently fluff and rearrange the leaves so they fall naturally, overlapping in places rather than lying in a strict flat plane; this is what gives it the tumbled, branch-like look in the photo. Check the underside for any stray cord ends or loose knots and secure them with a small stitch or dab of glue. This runner sits on top of the table rather than lying perfectly flat, so plan your centerpiece and place settings around its natural width.
Tips for Success
- Keep serrations small and evenly spaced; oversized picots make the leaf look spiky rather than naturally toothed like a birch or elm leaf.
- Vary leaf color placement as you attach rather than batching all of one color together, so the finished piece reads as blended rather than striped.
- Cut side-branch cords in a range of lengths before you start attaching leaves, not one at a time, so you can see and balance the overall taper as you go.
- Attach leaves at slightly different angles along each cord rather than all facing the same direction, to help the finished piece look tumbled rather than combed flat.
- Work the darkest colors, brown and burgundy, more heavily toward the center and lighter colors toward the tapered ends for a natural gradient effect.
Common Mistakes to Avoid
- Spacing branch attachment points evenly along the whole cord produces a stiff, ladder-like shape instead of an organic taper. Fix: cluster branches more densely toward the center and further apart near the ends.
- Tying leaves on with long dangling tails looks messy from underneath. Fix: trim tails short and secure with a small stitch after tying each leaf on.
- Making all leaves the same size flattens the visual texture. Fix: vary chain length slightly, 9-11 chains, across different leaves for subtle size variation.
- Using stiff cord that won’t hold a curve makes the branches sit too rigidly. Fix: soften the jute by gently twisting and flexing each length by hand before attaching leaves.
- Overcrowding leaves at branch points hides the branching structure entirely. Fix: leave small gaps of visible cord between some leaf clusters so the vine structure still shows through.
Ways to Customize This Pattern
- Reduce the leaf count and cord length for a shorter garland-style piece instead of a full table runner.
- Swap the five-color autumn palette for greens and creams for a spring or everyday version.
- Use a single dominant color with only small pops of a second color for a more subdued, neutral look.
- Add small crocheted acorns or berries tucked among the leaf clusters for extra texture.
- Make two shorter versions instead of one long runner to use as a pair of side-by-side table accents.
Frequently asked questions
Yes, though the finished look will be softer and less rustic. Jute holds a knot well and keeps the branches slightly stiff, which helps the runner keep its shape; ribbon will drape more and may need extra stitching at each knot to stay secure.
Around 65 leaves fills a runner of this size comfortably. If you want a fuller, denser look like heavier autumn foliage, add another 10-15 leaves distributed across the branch clusters.
No, and that’s intentional. Because leaves are tied on at varying angles and overlap in layers, this runner has natural dimension and won’t press completely flat, similar to a real branch of leaves laid down the table.
Add a small overhand knot in the cord right where each leaf sits before tying the leaf’s tail around it; the knot gives the yarn something to grip so leaves stay put once positioned.
The finished Serrated Leaf Vine Table Runner Crochet Pattern

