Simple Daisy Chain Crochet Dresser Scarf
Beginner Friendly
Perfect for those just starting their crochet journey, with clear instructions and simple techniques
Single-Day Project
A satisfying project you can complete in a single afternoon or evening.
Handmade Gift
A beautiful keepsake — free forever. Read online or print at home.
About This Simple Daisy Chain Crochet Dresser Scarf
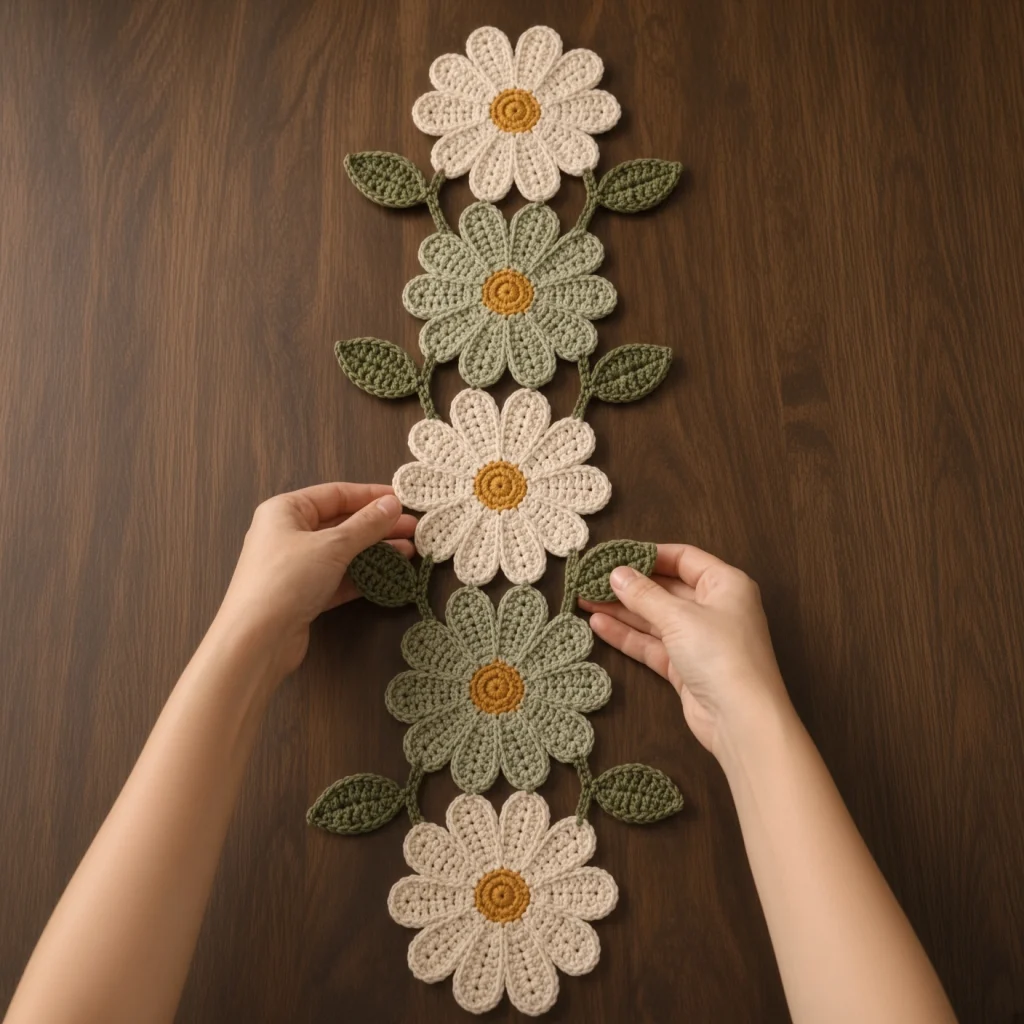
This crochet daisy dresser scarf pattern is a chain of five flat daisies linked by curved green stems, narrow enough for a dresser top, a console table or a shelf where a full table runner would be too wide. Each daisy is eight petals worked individually in rows out from a mustard centre, then pulled together by a single outline round that runs all the way around the flower and gives the petals their defined edge.
The construction is what makes it worth the time. Petals worked in rows can be shaped properly, widening over three rows and narrowing over three, so they come to a soft point rather than the blunt oval you get from a shell stitch worked in the round. The outline round then unifies eight separate pieces into one flower and stops the petals flopping. It takes about eight minutes per daisy and it is the difference between a flower and a wheel.
Expect 8 to 10 hours, which makes this the quickest project in the daisy set. Three cream flowers alternate with two in a pale sage, with a darker olive used for all the stems and leaves so the greens read as two distinct things rather than one muddled shade. DK cotton keeps the petals crisp and the whole piece washable. Written in US terms throughout.
Materials
- DK / light worsted cotton in cream approx. 60 g, 3 daisies
- DK / light worsted cotton in pale sage approx. 40 g, 2 daisies
- DK / light worsted cotton in olive green approx. 50 g, stems and leaves
- DK / light worsted cotton in mustard gold approx. 15 g, centres
- 3.0 mm crochet hook one size down from the ball band, for firm petals
- Tapestry needle blunt, large eye
- Stitch markers at least 8, one per petal position
- Rust-proof pins and a blocking mat around 60 pins, every petal tip needs one
- Spray bottle and a steam iron with a pressing cloth
- Tape measure and sharp scissors
Abbreviations
MRmagic ring
chchain
scsingle crochet
hdchalf double crochet
dcdouble crochet
sl stslip stitch
incincrease (2 sc in the same stitch)
sc2togsingle crochet 2 stitches together
sc3togsingle crochet 3 stitches together
st / stsstitch / stitches
reprepeat
RSright side
FOfasten off
Before you start: make one whole daisy including the outline round and measure it. Everything else in this pattern is calculated from an 11 cm flower, and five of them plus four junctions is what gives 75 cm. If your daisy comes out at 9 cm, the finished piece will be nearer 60 cm, which is a different item on a dresser.
Gauge and Working Notes
- Gauge: a finished daisy measures about 11 cm across, a leaf about 4.5 cm, and a stem arc about 5.5 cm.
- The centre is worked in the round with the RS facing. The petals are worked in rows, turning at the end of each one. The outline round returns to working in the round.
- The ch 1 at the start of each petal row does not count as a stitch.
- Work all eight petals of a daisy before starting the outline round. Until the outline is on, the petals will look loose and slightly wonky, which is normal.
- Do not cut the yarn between petals if you can avoid it. Slip stitch down the side of the finished petal and along the centre to the next petal position, which saves sixteen ends per flower.
- Leave a 25 cm tail on every leaf and stem arc. You will use it to sew that piece into place, so one tail does both jobs.
- Make and block all five daisies before joining anything. The spacing is judged with the blocked flowers laid out.
Daisy Centre (make 5)
- Round 1: with mustard gold, 8 sc in MR (8)
- Round 2: 2 sc in each st around (16)
- Round 3: (sc in the next st, inc) rep 8 times (24)
- Sl st into the first sc and FO, leaving a 15 cm tail. Weave it in on the back now.
- Finished centre about 3.5 cm across. Twenty-four is not arbitrary: eight petals use exactly 3 sts each, so every stitch of Round 3 is used once and the petals sit at even intervals with no gap to fudge.
- Mark every third stitch of Round 3 with a marker, giving 8 marked stitches. These are your petal starting points.
Daisy Petals (8 per daisy, 40 in total)
- Row 1: join cream or sage in a marked st of Round 3, ch 1, sc in that st and in the next 2 sts, turn (3 sc).
- Row 2: ch 1, 2 sc in the first st, sc in the next st, 2 sc in the last st, turn (5 sc).
- Row 3: ch 1, 2 sc in the first st, sc in the next 3 sts, 2 sc in the last st, turn (7 sc).
- Row 4: ch 1, sc in each st across, turn (7 sc).
- Row 5: ch 1, sc in each st across, turn (7 sc).
- Row 6: ch 1, sc2tog, sc in the next 3 sts, sc2tog, turn (5 sc).
- Row 7: ch 1, sc2tog, sc in the next st, sc2tog, turn (3 sc).
- Row 8: ch 1, sc3tog (1 st).
- Ch 1, then sl st down the side of the petal back to Round 3 and sl st along the centre to the next marked stitch. Work the next petal from Row 1.
- Repeat until you have 8 petals, using all 24 sts of Round 3. Do not fasten off, since the outline round continues from here.
- Each petal measures about 3.5 cm long and 2 cm at its widest, which with the 3.5 cm centre gives a flower of about 11 cm.
Daisy Outline Round (5 daisies)
- Continue in the same colour from the last petal, working around the whole flower with the RS facing.
- On each petal: work 1 sc into the row-end of each of Rows 1 to 7 going up the first side (7 sc), 3 sc into the single stitch at the tip, then 1 sc into the row-end of each of Rows 7 down to 1 on the second side (7 sc), for 17 sc per petal.
- Work 1 sc into the valley between each pair of petals as you pass it (8 valleys).
- Sl st into the first sc to close (144 sc: 8 petals at 17 sc plus 8 valley sc).
- FO leaving a 25 cm tail. Weave it in on the back, following the line of the outline round.
- Keep the valley sc firm and the tip sc loose. A tight tip rounds the petal off, and a loose valley lets two petals drift apart and show the centre through the gap.
- Make 5 daisies: 3 cream and 2 pale sage, so the colours alternate down the length with cream at both ends.
Stem Arc (make 8)
- With olive green, ch 16.
- Sl st into the back bump of the 2nd ch from hook and into the back bump of each remaining ch (15 sl sts, about 5.5 cm).
- FO leaving a 25 cm tail at each end. You need both ends, since each arc is sewn to two different flowers.
- Work into the back bump, not the top loops, and keep the slip stitches loose. This is the one thing that keeps a cord flat instead of twisting into a spring, and it cannot be fixed afterwards.
- Do not block the arcs straight. They need to curve outward between the flowers, and a pressed-flat cord gives you a ladder rather than a stem.
- Make 8: two per junction, one curving out to the left and one to the right.
Leaf (make 8)
- With olive green, ch 9.
- Round 1, first side: sc in the 2nd ch from hook, hdc in the next ch, dc in the next 3 ch, hdc in the next ch, sc in the next ch (7 sts, one chain free at the far end).
- Round 1, tip: 3 sc into that last free chain (10).
- Round 1, second side: working along the free loops on the underside of the foundation chain, sc in the next ch, hdc in the next ch, dc in the next 3 ch, hdc in the next ch, sc in the next ch (17).
- Round 1, base: 2 sc into the remaining chain at the base, sl st into the first sc (19).
- Round 2: ch 1, sc in the next 7 sts; at the tip work sc in the next st, 3 sc in the centre st, sc in the next st; sc in the next 7 sts; at the base work 2 sc in each of the last 2 sts; sl st into the first sc (23).
- FO leaving a 20 cm tail. Finished leaf about 4.5 cm long.
- Keep the foundation chain visible on the front of the leaf. It reads as the central spine and it is the only thing that distinguishes a leaf from a plain pointed oval.
Assembly
- Block all five daisies before joining. Damp each one, pin every petal tip out to a soft point, and let them dry completely. Unblocked petals sit rounded and slightly cupped, and the difference is very visible in a row of five.
- Lay the daisies in a vertical column in colour order: cream, sage, cream, sage, cream. Leave about 5 cm between each pair, measured from outline to outline.
- Stagger the column by about 1 cm alternately left and right rather than stacking every flower dead centre. A perfectly aligned column reads as a chart, and the small offset is what makes the chain look like it grew.
- At each junction, sew one stem arc from a petal valley on the lower left of the upper daisy to a petal valley on the upper left of the lower daisy, curving it outward so the arc bows away from the centre line.
- Sew the second arc of the junction as a mirror image on the right. Stitch each arc end with four or five stitches into the outline round of the flower, never into a petal tip, which would pull the tip out of shape.
- Repeat at all 4 junctions, using all 8 arcs.
- Sew one leaf at the outer midpoint of each arc, pointing away from the centre of the piece, stitching it at the base only so the tip lifts off the surface.
- Check the total length before the last junction goes in. Five daisies at 11 cm plus four junctions at 5 cm gives about 75 cm, and adjusting a junction gap by a centimetre either way is much easier than unpicking one later.
Finishing
Weave in every end along the outline round on the back of a daisy, following the line of the stitches for at least 3 cm and splitting the yarn once along the way. Do not weave tails along a stem arc, where a doubled strand shows as a visible thickening on something this slim. If you slip stitched between petals as suggested, each flower should have only four or five ends rather than twenty.
Block the assembled piece a second time. Every join redistributes tension across both pieces, so the individual blocking you did earlier has already shifted. Soak it in cool water, roll it in a towel to take out the excess, then lay it flat and pin the two end daisies first to set the 75 cm length, then every petal tip on all five flowers, then each leaf tip. Pin the stem arcs into the curve you want rather than letting them dry however they fall, because that curve is the only movement in the design.
Let it dry a full day and do not lift it while damp. Once dry, run your fingers under each leaf tip so it sits slightly proud of the surface, and check that no petal has dried folded under its neighbour. If one has, steam that flower from 15 cm away with the iron never touching the work and flatten the petal while the cotton is warm.
Tips for Success
- Slip stitch between petals instead of cutting. Eight petals per flower across five flowers is forty chances to create two more ends, and weaving eighty tails into an open piece like this is genuinely an evening’s work you can skip entirely.
- Mark every third stitch of the centre before starting the petals. Counting three stitches forty times is where errors creep in, and a petal that starts one stitch late throws the spacing of every petal after it.
- Make all five daisies in one or two sittings. Petal tension drifts between sessions, and five flowers laid in a row makes any size difference obvious in a way that a single flower never would.
- Sew the stem arcs into petal valleys, never into petal tips. The valley is anchored by the outline round and takes the pull, while a tip will distort within a few weeks of the piece being moved around.
- Pin the arcs into their curve when blocking. They are the only part of the piece with nothing holding their shape, and they dry however you leave them.
Common Mistakes to Avoid
- Skipping the outline round. It looks like a finishing detail and it is actually structural: without it the eight petals stay separate, flop independently and show the mustard centre through the gaps.
- Blunt petal tips. Row 8 is sc3tog worked as a single stitch. Working it as three separate sc, or as sc2tog plus an sc, rounds the tip off and the flower stops reading as a daisy.
- Stem arcs that corkscrew. Almost always slip stitches worked into the top loops rather than the back bump, or worked too tight. Redo the arc rather than trying to steam it straight, since it takes two minutes.
- A perfectly aligned column. Five flowers stacked dead centre with identical 5 cm gaps looks mechanical. Stagger them and vary the gaps by half a centimetre.
- Leaves sewn down along their whole edge. Flat leaves kill the small amount of depth this piece has. Stitch the base only so the tip lifts.
- Blocking once, before assembly. The joins pull the flowers slightly out of shape, so the piece needs a second block after everything is sewn.
Ways to Customize This Pattern
- Change the length by whole daisies. Each flower plus its junction adds about 16 cm, so seven gives a 107 cm table runner and three gives a 43 cm shelf piece.
- Work all five daisies in different colours from oddments. No flower needs more than 20 g, so this is a good stash project, and a mixed palette suits a child’s room better than the cream and sage.
- Turn a single daisy into a coaster or a mug rug by working two extra rows into each petal, which brings the flower to about 14 cm.
- Make matching placemats by working four daisies joined in a square block with arcs on all four sides.
- Add a bud at the outer end of a few extra arcs: 6 sc in a magic ring, increase to 12, two even rounds, then decrease and close, stuffed with a scrap of the same yarn.
- Hang it vertically as a wall chain by adding a chain loop at the top of the first daisy, which suits a narrow wall between two doors.
Frequently asked questions
Why work the petals in rows rather than as shells in the round?
Because rows let you shape the petal. Widening over Rows 2 and 3 and narrowing over Rows 6 to 8 gives a petal that is broad in the middle and pointed at the tip, which is what a daisy petal actually looks like. A shell worked in one round always comes out as a blunt oval, however many stitches you put in it. Rows are slower, about eight minutes per flower, and it is the main reason this design reads the way it does.
My petals stick up instead of lying flat. What went wrong?
The increases in Rows 2 and 3 are worked too tightly, so the petal base cannot spread and the whole petal tips upward. Test it by pinning one flower flat while damp: if it lies flat under pins and lifts again once dry, redo the petals more loosely. If it will not pin flat at all, the centre has too few stitches for eight petals and needs an extra increase round.
Can I use worsted weight cotton instead of DK?
Yes, with a 4.0 mm hook and every stitch count exactly as written. The daisy comes out at about 14 cm rather than 11, the junctions need a ch 20 arc instead of ch 16, and the finished piece grows to roughly 95 cm. That may be exactly what you want for a dining table, but check the width too, since it will go from 19 cm to about 24 cm.
Is it sturdy enough to put a lamp or a vase on?
For a light object, yes. The outline round makes each daisy firm and the arcs are short enough not to stretch. For anything heavy or with a small base, put a coaster or a felt pad underneath, because the weight will press the join between two petals and the piece will develop a permanent dent there.
How do I wash it?
Hand wash in cool water with a mild detergent, supporting the whole piece rather than lifting it by one end, since the stem arcs carry the weight of two flowers each when it is wet. Press the water out against the side of the basin and never wring. Lay it flat and re-pin the end daisies, every petal tip and the arc curves as you did the first time. Cotton comes back to shape every wash as long as you reblock it.
This crochet daisy dresser scarf pattern is a chain of five flat daisies linked by curved green stems, narrow enough for a dresser top, a console table or a shelf where a full table runner would be too wide. Each daisy is eight petals worked individually in rows out from a mustard centre, then pulled together by a single outline round that runs all the way around the flower and gives the petals their defined edge.
The construction is what makes it worth the time. Petals worked in rows can be shaped properly, widening over three rows and narrowing over three, so they come to a soft point rather than the blunt oval you get from a shell stitch worked in the round. The outline round then unifies eight separate pieces into one flower and stops the petals flopping. It takes about eight minutes per daisy and it is the difference between a flower and a wheel.
Expect 8 to 10 hours, which makes this the quickest project in the daisy set. Three cream flowers alternate with two in a pale sage, with a darker olive used for all the stems and leaves so the greens read as two distinct things rather than one muddled shade. DK cotton keeps the petals crisp and the whole piece washable. Written in US terms throughout.
Materials
- DK / light worsted cotton in cream approx. 60 g, 3 daisies
- DK / light worsted cotton in pale sage approx. 40 g, 2 daisies
- DK / light worsted cotton in olive green approx. 50 g, stems and leaves
- DK / light worsted cotton in mustard gold approx. 15 g, centres
- 3.0 mm crochet hook one size down from the ball band, for firm petals
- Tapestry needle blunt, large eye
- Stitch markers at least 8, one per petal position
- Rust-proof pins and a blocking mat around 60 pins, every petal tip needs one
- Spray bottle and a steam iron with a pressing cloth
- Tape measure and sharp scissors
Abbreviations
MRmagic ringchchainscsingle crochethdchalf double crochetdcdouble crochetsl stslip stitchincincrease (2 sc in the same stitch)sc2togsingle crochet 2 stitches togethersc3togsingle crochet 3 stitches togetherst / stsstitch / stitchesreprepeatRSright sideFOfasten offGauge and Working Notes
- Gauge: a finished daisy measures about 11 cm across, a leaf about 4.5 cm, and a stem arc about 5.5 cm.
- The centre is worked in the round with the RS facing. The petals are worked in rows, turning at the end of each one. The outline round returns to working in the round.
- The ch 1 at the start of each petal row does not count as a stitch.
- Work all eight petals of a daisy before starting the outline round. Until the outline is on, the petals will look loose and slightly wonky, which is normal.
- Do not cut the yarn between petals if you can avoid it. Slip stitch down the side of the finished petal and along the centre to the next petal position, which saves sixteen ends per flower.
- Leave a 25 cm tail on every leaf and stem arc. You will use it to sew that piece into place, so one tail does both jobs.
- Make and block all five daisies before joining anything. The spacing is judged with the blocked flowers laid out.
Daisy Centre (make 5)
- Round 1: with mustard gold, 8 sc in MR (8)
- Round 2: 2 sc in each st around (16)
- Round 3: (sc in the next st, inc) rep 8 times (24)
- Sl st into the first sc and FO, leaving a 15 cm tail. Weave it in on the back now.
- Finished centre about 3.5 cm across. Twenty-four is not arbitrary: eight petals use exactly 3 sts each, so every stitch of Round 3 is used once and the petals sit at even intervals with no gap to fudge.
- Mark every third stitch of Round 3 with a marker, giving 8 marked stitches. These are your petal starting points.
Daisy Petals (8 per daisy, 40 in total)
- Row 1: join cream or sage in a marked st of Round 3, ch 1, sc in that st and in the next 2 sts, turn (3 sc).
- Row 2: ch 1, 2 sc in the first st, sc in the next st, 2 sc in the last st, turn (5 sc).
- Row 3: ch 1, 2 sc in the first st, sc in the next 3 sts, 2 sc in the last st, turn (7 sc).
- Row 4: ch 1, sc in each st across, turn (7 sc).
- Row 5: ch 1, sc in each st across, turn (7 sc).
- Row 6: ch 1, sc2tog, sc in the next 3 sts, sc2tog, turn (5 sc).
- Row 7: ch 1, sc2tog, sc in the next st, sc2tog, turn (3 sc).
- Row 8: ch 1, sc3tog (1 st).
- Ch 1, then sl st down the side of the petal back to Round 3 and sl st along the centre to the next marked stitch. Work the next petal from Row 1.
- Repeat until you have 8 petals, using all 24 sts of Round 3. Do not fasten off, since the outline round continues from here.
- Each petal measures about 3.5 cm long and 2 cm at its widest, which with the 3.5 cm centre gives a flower of about 11 cm.
Daisy Outline Round (5 daisies)
- Continue in the same colour from the last petal, working around the whole flower with the RS facing.
- On each petal: work 1 sc into the row-end of each of Rows 1 to 7 going up the first side (7 sc), 3 sc into the single stitch at the tip, then 1 sc into the row-end of each of Rows 7 down to 1 on the second side (7 sc), for 17 sc per petal.
- Work 1 sc into the valley between each pair of petals as you pass it (8 valleys).
- Sl st into the first sc to close (144 sc: 8 petals at 17 sc plus 8 valley sc).
- FO leaving a 25 cm tail. Weave it in on the back, following the line of the outline round.
- Keep the valley sc firm and the tip sc loose. A tight tip rounds the petal off, and a loose valley lets two petals drift apart and show the centre through the gap.
- Make 5 daisies: 3 cream and 2 pale sage, so the colours alternate down the length with cream at both ends.
Stem Arc (make 8)
- With olive green, ch 16.
- Sl st into the back bump of the 2nd ch from hook and into the back bump of each remaining ch (15 sl sts, about 5.5 cm).
- FO leaving a 25 cm tail at each end. You need both ends, since each arc is sewn to two different flowers.
- Work into the back bump, not the top loops, and keep the slip stitches loose. This is the one thing that keeps a cord flat instead of twisting into a spring, and it cannot be fixed afterwards.
- Do not block the arcs straight. They need to curve outward between the flowers, and a pressed-flat cord gives you a ladder rather than a stem.
- Make 8: two per junction, one curving out to the left and one to the right.
Leaf (make 8)
- With olive green, ch 9.
- Round 1, first side: sc in the 2nd ch from hook, hdc in the next ch, dc in the next 3 ch, hdc in the next ch, sc in the next ch (7 sts, one chain free at the far end).
- Round 1, tip: 3 sc into that last free chain (10).
- Round 1, second side: working along the free loops on the underside of the foundation chain, sc in the next ch, hdc in the next ch, dc in the next 3 ch, hdc in the next ch, sc in the next ch (17).
- Round 1, base: 2 sc into the remaining chain at the base, sl st into the first sc (19).
- Round 2: ch 1, sc in the next 7 sts; at the tip work sc in the next st, 3 sc in the centre st, sc in the next st; sc in the next 7 sts; at the base work 2 sc in each of the last 2 sts; sl st into the first sc (23).
- FO leaving a 20 cm tail. Finished leaf about 4.5 cm long.
- Keep the foundation chain visible on the front of the leaf. It reads as the central spine and it is the only thing that distinguishes a leaf from a plain pointed oval.
Assembly
- Block all five daisies before joining. Damp each one, pin every petal tip out to a soft point, and let them dry completely. Unblocked petals sit rounded and slightly cupped, and the difference is very visible in a row of five.
- Lay the daisies in a vertical column in colour order: cream, sage, cream, sage, cream. Leave about 5 cm between each pair, measured from outline to outline.
- Stagger the column by about 1 cm alternately left and right rather than stacking every flower dead centre. A perfectly aligned column reads as a chart, and the small offset is what makes the chain look like it grew.
- At each junction, sew one stem arc from a petal valley on the lower left of the upper daisy to a petal valley on the upper left of the lower daisy, curving it outward so the arc bows away from the centre line.
- Sew the second arc of the junction as a mirror image on the right. Stitch each arc end with four or five stitches into the outline round of the flower, never into a petal tip, which would pull the tip out of shape.
- Repeat at all 4 junctions, using all 8 arcs.
- Sew one leaf at the outer midpoint of each arc, pointing away from the centre of the piece, stitching it at the base only so the tip lifts off the surface.
- Check the total length before the last junction goes in. Five daisies at 11 cm plus four junctions at 5 cm gives about 75 cm, and adjusting a junction gap by a centimetre either way is much easier than unpicking one later.
Finishing
Weave in every end along the outline round on the back of a daisy, following the line of the stitches for at least 3 cm and splitting the yarn once along the way. Do not weave tails along a stem arc, where a doubled strand shows as a visible thickening on something this slim. If you slip stitched between petals as suggested, each flower should have only four or five ends rather than twenty.
Block the assembled piece a second time. Every join redistributes tension across both pieces, so the individual blocking you did earlier has already shifted. Soak it in cool water, roll it in a towel to take out the excess, then lay it flat and pin the two end daisies first to set the 75 cm length, then every petal tip on all five flowers, then each leaf tip. Pin the stem arcs into the curve you want rather than letting them dry however they fall, because that curve is the only movement in the design.
Let it dry a full day and do not lift it while damp. Once dry, run your fingers under each leaf tip so it sits slightly proud of the surface, and check that no petal has dried folded under its neighbour. If one has, steam that flower from 15 cm away with the iron never touching the work and flatten the petal while the cotton is warm.
Tips for Success
- Slip stitch between petals instead of cutting. Eight petals per flower across five flowers is forty chances to create two more ends, and weaving eighty tails into an open piece like this is genuinely an evening’s work you can skip entirely.
- Mark every third stitch of the centre before starting the petals. Counting three stitches forty times is where errors creep in, and a petal that starts one stitch late throws the spacing of every petal after it.
- Make all five daisies in one or two sittings. Petal tension drifts between sessions, and five flowers laid in a row makes any size difference obvious in a way that a single flower never would.
- Sew the stem arcs into petal valleys, never into petal tips. The valley is anchored by the outline round and takes the pull, while a tip will distort within a few weeks of the piece being moved around.
- Pin the arcs into their curve when blocking. They are the only part of the piece with nothing holding their shape, and they dry however you leave them.
Common Mistakes to Avoid
- Skipping the outline round. It looks like a finishing detail and it is actually structural: without it the eight petals stay separate, flop independently and show the mustard centre through the gaps.
- Blunt petal tips. Row 8 is sc3tog worked as a single stitch. Working it as three separate sc, or as sc2tog plus an sc, rounds the tip off and the flower stops reading as a daisy.
- Stem arcs that corkscrew. Almost always slip stitches worked into the top loops rather than the back bump, or worked too tight. Redo the arc rather than trying to steam it straight, since it takes two minutes.
- A perfectly aligned column. Five flowers stacked dead centre with identical 5 cm gaps looks mechanical. Stagger them and vary the gaps by half a centimetre.
- Leaves sewn down along their whole edge. Flat leaves kill the small amount of depth this piece has. Stitch the base only so the tip lifts.
- Blocking once, before assembly. The joins pull the flowers slightly out of shape, so the piece needs a second block after everything is sewn.
Ways to Customize This Pattern
- Change the length by whole daisies. Each flower plus its junction adds about 16 cm, so seven gives a 107 cm table runner and three gives a 43 cm shelf piece.
- Work all five daisies in different colours from oddments. No flower needs more than 20 g, so this is a good stash project, and a mixed palette suits a child’s room better than the cream and sage.
- Turn a single daisy into a coaster or a mug rug by working two extra rows into each petal, which brings the flower to about 14 cm.
- Make matching placemats by working four daisies joined in a square block with arcs on all four sides.
- Add a bud at the outer end of a few extra arcs: 6 sc in a magic ring, increase to 12, two even rounds, then decrease and close, stuffed with a scrap of the same yarn.
- Hang it vertically as a wall chain by adding a chain loop at the top of the first daisy, which suits a narrow wall between two doors.
Frequently asked questions
Because rows let you shape the petal. Widening over Rows 2 and 3 and narrowing over Rows 6 to 8 gives a petal that is broad in the middle and pointed at the tip, which is what a daisy petal actually looks like. A shell worked in one round always comes out as a blunt oval, however many stitches you put in it. Rows are slower, about eight minutes per flower, and it is the main reason this design reads the way it does.
The increases in Rows 2 and 3 are worked too tightly, so the petal base cannot spread and the whole petal tips upward. Test it by pinning one flower flat while damp: if it lies flat under pins and lifts again once dry, redo the petals more loosely. If it will not pin flat at all, the centre has too few stitches for eight petals and needs an extra increase round.
Yes, with a 4.0 mm hook and every stitch count exactly as written. The daisy comes out at about 14 cm rather than 11, the junctions need a ch 20 arc instead of ch 16, and the finished piece grows to roughly 95 cm. That may be exactly what you want for a dining table, but check the width too, since it will go from 19 cm to about 24 cm.
For a light object, yes. The outline round makes each daisy firm and the arcs are short enough not to stretch. For anything heavy or with a small base, put a coaster or a felt pad underneath, because the weight will press the join between two petals and the piece will develop a permanent dent there.
Hand wash in cool water with a mild detergent, supporting the whole piece rather than lifting it by one end, since the stem arcs carry the weight of two flowers each when it is wet. Press the water out against the side of the basin and never wring. Lay it flat and re-pin the end daisies, every petal tip and the arc curves as you did the first time. Cotton comes back to shape every wash as long as you reblock it.
The finished Simple Daisy Chain Crochet Dresser Scarf

