Spider-Man Amigurumi Pattern with Embroidered Webs
Advanced
For experienced crocheters who enjoy complex shaping, fine detail, and ambitious construction
Weekend Project
A satisfying weekend make — start Friday, finish Sunday, enjoy forever.
Handmade Gift
A beautiful keepsake — free forever. Read online or print at home.
About This Spider-Man Amigurumi Pattern with Embroidered Webs
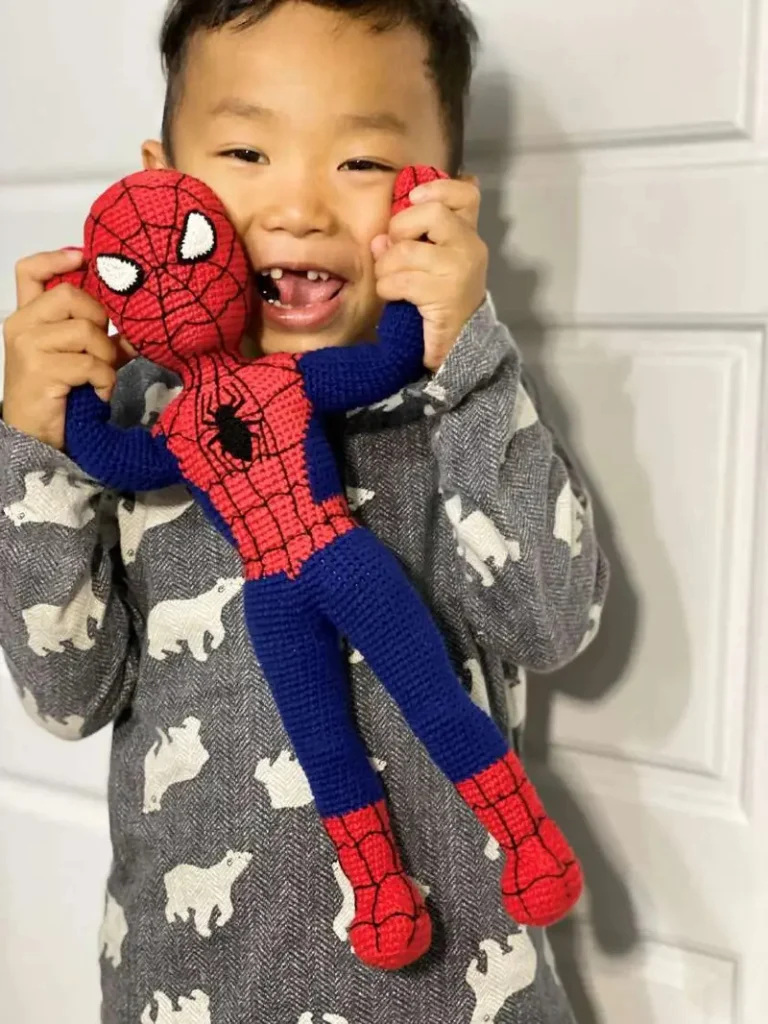
This Spider-Man amigurumi pattern recreates the reference doll’s oversized red mask, long blue limbs, red boots, and black embroidered web lines. Separate white eye patches and a raised chest spider give the suit its distinctive appearance.
Allow approximately 18–24 hours for crocheting, sewing, and embroidery. This advanced project suits makers comfortable with oval shaping, fitted appliqués, and detailed surface stitching. The flexible, sewn limbs create the relaxed proportions of the photographed doll.
Materials
- DK cotton or cotton-blend yarn in bright red Approximately 65 g / 150 m
- Matching DK yarn in deep royal blue Approximately 65 g / 150 m
- Matching DK yarn in white Approximately 5 g / 12 m
- Black embroidery cotton Approximately 20 m; use 3 strands for webs and 6 strands for eye borders and spider
- 2.75 mm crochet hook Or size needed for the stated gauge
- Polyester stuffing Approximately 80–100 g
- Tapestry needle, embroidery needle, stitch markers, pins, scissors, and measuring tape For shaping and assembly
Abbreviations
chchainscsingle crochet, US terminologyinc2 single crochet in one stitchdecsingle crochet 2 stitches together; use an invisible decrease in roundssl stslip stitchMRmagic ringststitchRround or row, as identified in the sectionGauge, Dimensions, and Working Notes
- Gauge: 24 sc and 28 rows or rounds measure 10 × 10 cm in firm single crochet. Make a swatch with ch 25, sc in the second chain and across for 24 sc; work 29 more rows of 24 sc. Ch 1 and turn between rows. Measure the central 10 cm without stretching.
- At this gauge, expect approximately 35 cm total height, a 22.5 cm head circumference, a 17.5 cm torso circumference, and arms approximately 10 cm long. Stuffing and sewing depth affect these measurements.
- Work in continuous rounds unless rows are specified. Mark the first stitch of every round. Turning chains do not count as stitches. Numbers in parentheses give the completed stitch count.
- Repeat instructions in parentheses the specified number of times. For color changes, complete the final pull-through of the preceding stitch with the new color.
- For row pieces, ch 1 and turn after every row except the last. Work decreases through both loops in flat pieces. Secure all internal ends before stuffing.
- The doll uses crocheted and embroidered eyes; no safety eyes are needed. All parts are sewn on, with no wire or internal joints.
Head — Red
- R1: 6 sc in MR. (6)
- R2: Inc in every st. (12)
- R3: (Sc 1, inc) 6 times. (18)
- R4: (Sc 2, inc) 6 times. (24)
- R5: (Sc 3, inc) 6 times. (30)
- R6: (Sc 4, inc) 6 times. (36)
- R7: (Sc 5, inc) 6 times. (42)
- R8: (Sc 6, inc) 6 times. (48)
- R9: (Sc 7, inc) 6 times. (54)
- R10–19: Sc in every st for 10 rounds. (54 each round)
- R20: (Sc 7, dec) 6 times. (48)
- R21: (Sc 6, dec) 6 times. (42)
- R22: (Sc 5, dec) 6 times. (36)
- R23: (Sc 4, dec) 6 times. (30)
- Pause to embroider the head web as described below, leaving the eye areas clear. Begin stuffing, keeping the face smooth.
- R24: (Sc 3, dec) 6 times. (24)
- R25: (Sc 2, dec) 6 times. (18)
- R26–27: Sc in every st for 2 rounds. (18 each round) Finish stuffing the head and neck firmly. Sl st in the next st and fasten off with a long sewing tail. Leave the neck opening unclosed.
White Mask Eyes — Make Two
- Row 1: Ch 7. Starting in the second chain, sc 6. (6)
- Row 2: Sc 6. (6)
- Row 3: Sc 4, dec. (5)
- Row 4: Dec, sc 3. (4)
- Row 5: Sc 2, dec. (3)
- Row 6: Dec, sc 1. (2)
- Row 7: Dec. (1) Fasten off with a long white sewing tail.
- Make a black outline by working closely spaced blanket stitches around the entire edge with 6 strands of embroidery cotton. Do not pull the edge tight. Each patch should measure approximately 2.5 × 2.5 cm.
- Turn one patch over to mirror the other. Position the broad ends toward the upper outer face and the narrow tips toward the lower inner face. Place them approximately between head R10 and R17, leaving 4 visible head stitches between the closest inner edges. Sew down with white yarn just inside the black border.
Torso — Blue Foundation
- R1: 6 sc in MR, starting at the seat. (6)
- R2: Inc in every st. (12)
- R3: (Sc 1, inc) 6 times. (18)
- R4: (Sc 2, inc) 6 times. (24)
- R5: (Sc 3, inc) 6 times. (30)
- R6: (Sc 4, inc) 6 times. (36)
- R7: (Sc 5, inc) 6 times. (42)
- R8–20: Sc in every st for 13 rounds. (42 each round)
- R21: (Sc 5, dec) 6 times. (36)
- R22–24: Sc in every st for 3 rounds. (36 each round)
- R25: (Sc 4, dec) 6 times. (30)
- R26: (Sc 3, dec) 6 times. (24) Stuff the torso firmly, leaving the shoulder edge flexible.
- R27: (Sc 2, dec) 6 times. (18)
- R28: Sc in every st. (18) Sl st in the next st and fasten off. Leave the opening for the neck seam.
Red Suit Panels — Make Two
- Work from the lower waist toward the shoulders. Row 1: Ch 15; sc in the second chain and each remaining chain. (14)
- Rows 2–10: Sc 14 for 9 rows. (14 each row)
- Row 11: Inc, sc 12, inc. (16)
- Rows 12–15: Sc 16 for 4 rows. (16 each row)
- Row 16: Inc, sc 14, inc. (18)
- Rows 17–20: Sc 18 for 4 rows. (18 each row)
- Row 21: Dec, sc 14, dec. (16)
- Row 22: Dec, sc 12, dec. (14)
- Row 23: Dec, sc 10, dec. (12)
- Row 24: Dec, sc 8, dec. (10) Fasten off with a long sewing tail. Each panel is approximately 8.5 cm long, 5.8 cm wide at the waist, and 7.5 cm at its widest point.
- Embroider panel webs before attachment. Center one panel on the front and one on the back, with their foundation edges at torso R6 and their top edges near R28. Ease the row edges against the curved torso and sew around the perimeter. Leave the blue side strips visible.
Boots and Legs — Make Two
- Begin in red. R1: Ch 6. Starting in the second chain, sc 4, work 3 sc in the last chain; continue along the opposite side with sc 3, then 2 sc in the remaining side of the first worked chain. (12) The starting end is the heel; the 3-sc end is the toe.
- R2: Inc, sc 3, inc in each of the next 3 st, sc 3, inc in each of the last 2 st. (18)
- R3: (Sc 1, inc), sc 3, (sc 1, inc) 3 times, sc 3, (sc 1, inc) 2 times. (24)
- R4: (Sc 2, inc), sc 3, (sc 2, inc) 3 times, sc 3, (sc 2, inc) 2 times. (30)
- R5–7: Sc in every st for 3 rounds. (30 each round)
- R8: Sc 6, dec 6 times, sc 12. (24) The decreases shape the toe.
- R9: Sc 6, dec 3 times, sc 12. (21)
- R10: Sc 6, dec 3 times, sc 9. (18)
- R11: Sc in every st. (18)
- R12: (Sc 2, inc) 6 times. (24)
- R13–17: Sc in every st for 5 rounds. (24 each round) Embroider the boot web before stuffing the foot firmly.
- Change to blue. R18–34: Sc in every st for 17 rounds. (24 each round) Add stuffing gradually.
- R35: (Sc 2, dec) 6 times. (18)
- R36–40: Sc in every st for 5 rounds. (18 each round) Stuff the upper leg moderately, leaving the final 2 rounds lightly filled for a flexible hip seam.
- Sl st in the next st and fasten off with a long sewing tail. Leave the top opening unclosed. Each leg measures approximately 14 cm from sole to top, with a forward-projecting foot.
Hands and Arms — Make Two
- Begin in red at the hand tip. R1: 6 sc in MR. (6)
- R2: Inc in every st. (12)
- R3: (Sc 1, inc) 6 times. (18)
- R4–7: Sc in every st for 4 rounds. (18 each round)
- R8: (Sc 4, dec) 3 times. (15)
- R9–10: Sc in every st for 2 rounds. (15 each round) Embroider the glove web and stuff the hand.
- Change to blue. R11–22: Sc in every st for 12 rounds. (15 each round)
- R23: (Sc 4, inc) 3 times. (18)
- R24–28: Sc in every st for 5 rounds. (18 each round)
- R29: (Sc 1, dec) 6 times. (12) Stuff the arm lightly, leaving the shoulder soft. Sl st in the next st and fasten off with a long sewing tail.
- Flatten the opening and sew through both layers, pairing the 12 stitches into 6 stitch pairs. Keep this closed edge horizontal when attaching it to the torso.
Red Shoulder Caps — Make Two
- Row 1: Ch 7; sc in the second chain and across. (6)
- Row 2: Inc, sc 4, inc. (8)
- Rows 3–6: Sc 8 for 4 rows. (8 each row)
- Row 7: Dec, sc 4, dec. (6)
- Row 8: Sc 6. (6) Fasten off with a long sewing tail.
- Embroider one central lengthwise black line and two gently curved cross lines on each cap. After attaching the arms, center a cap over each shoulder seam. Sew one short edge to the torso panel and curve the remaining fabric over the upper blue arm; stitch its perimeter down without flattening the shoulder.
Black Web Embroidery
- Use 3 strands of black embroidery cotton and short backstitches, approximately one crochet stitch long. Catch the crochet fabric without pulling it inward. Secure ends inside each piece before closing or attaching it.
- Head: Choose a web hub at the center front around R17, between and slightly below the eyes. Mark eight spokes extending toward the crown, temples, cheeks, and neck. Continue the side spokes around the back so the mask has an all-over web. Interrupt lines beneath the eye patches.
- Connect adjacent spokes with gently bowed cross lines approximately 3 crochet rounds apart. On the face, place three nested arcs above the hub and two below it; continue the spacing around the sides and back. Use pins to check spacing before stitching.
- Suit panels: Work five lengthwise lines, one down the center and two on each side, spaced approximately 3 stitches apart through the narrower waist. Add curved cross lines at panel rows 3, 7, 11, 15, 19, and 23. Keep the center front chest area available for the spider.
- Boots: Place a central line from the front cuff down the shin and over the toe. Add two side lines on each boot and cross lines near R4, R8, R12, and R16. Connect around the ankle with short curved segments, avoiding long exposed loops.
- Hands: Add four lengthwise lines spaced around the glove, from R2 to R10. Join them with curved cross lines around R4 and R7. Keep all lines snug against the surface.
Chest Spider
- With 6 strands of black embroidery cotton, outline a vertical oval approximately 1 cm wide and 1.4 cm tall, centered on front panel rows 15–18. Fill it with closely placed satin stitches.
- Add a smaller filled circle immediately above the oval for the spider’s head, approximately 0.5 cm across.
- Embroider four bent legs on each side. Begin them along the sides of the body at four different heights. Extend the upper two pairs outward and upward; extend the lower two pairs outward and downward.
- Make each leg in two backstitched segments, approximately 0.7–1 cm per segment. Keep the full motif within the front panel and secure every thread end inside the torso-facing side.
Finishing
Attach the suit panels and embroider the chest spider before joining the head. Pin the head’s 18-stitch opening to the torso’s 18-stitch opening, matching one stitch to one stitch. Face the eye patches toward the center of the front panel. Sew around once, add a little stuffing through the remaining gap if needed, then close and reinforce the seam with a second pass.
Pin the open leg tops beneath the torso, with their inner edges meeting at the center and both toes pointing forward. Shape each 18-stitch opening into an oval against the lower torso around R3–7. Sew all the way around each opening, catching firm torso stitches, and reinforce the inner hip seams. Keep the lightly stuffed top sections flexible so the legs hang naturally.
Attach each flattened arm top at a side of the torso across R23–25, with the hands facing forward. Sew through all six stitch pairs, then make a second securing pass. Add the red shoulder caps over these seams. Check the eye placement, secure any remaining embroidery ends, and massage the stuffing into an even shape. The finished doll should have a broad mask, slim torso, and long, relaxed limbs like the reference.
Tips for Success
- Use the same yarn brand and weight for red and blue. A thicker red yarn makes the suit panels stand away from the blue torso.
- Photograph the pinned eyes straight on before sewing. Their outer upper corners should sit higher than their inner tips.
- Keep a marker at the heel-side start of each boot. The clustered decreases must remain over the toe to produce matching feet.
- Draw the web layout with contrasting removable basting thread first. Replace one section at a time with black backstitch.
- Fill the neck firmly but leave the upper arms and hips softer. This supports the head while preserving the reference doll’s flexible limbs.
Common Mistakes to Avoid
- Pulling embroidery too tight creates dimples in the red fabric. Ease each line flat before securing the thread inside.
- Adding an extra stitch when working around the boot foundation twists the shaping. Count 12 stitches after R1 and keep the toe-end increases centered.
- Sewing the suit panels onto an unstuffed torso can cause puckering later. Stuff the torso to its final firmness before pinning the panels.
- Overfilling the tops of the legs forces them outward. Remove stuffing from the final two rounds before attaching the hips.
- Covering the entire upper arm with the shoulder cap hides too much blue. Center the cap over the attachment seam and leave the long lower arm exposed.
Ways to Customize This Pattern
- Use a darker navy blue with the same bright red for a deeper suit palette while keeping every stitch count unchanged.
- Make the eyes slightly narrower by omitting Row 2 on both patches; retain the black border and mirrored placement.
- Embroider a small black spider on the back panel using a 0.7 cm body and shorter legs.
- For a larger display doll, use thicker yarn and a hook that produces dense fabric. Keep the counts unchanged and calculate the new height from a gauge swatch.
Frequently asked questions
The blue foundation creates uninterrupted side sections and supports the fitted red front and back. Separate panels also let you embroider the web and chest spider before sewing them onto the stuffed doll.
Yes, but it is harder to secure the ends neatly. Use a long needle, take shallow stitches through the crochet fabric, and bury secured ends inside. The easiest sequence is embroidery first, stuffing second, and final assembly last.
Pack the lower head and neck firmly, match all 18 neck stitches, and sew the seam twice. Avoid stretching the torso opening. If the head still leans, reopen a short section and add stuffing directly beneath the neck.
No. The long legs and soft hips are intended for a relaxed, held or seated pose like the reference. Support the doll against a cushion for display.
The finished Spider-Man Amigurumi Pattern with Embroidered Webs

