Spiral Coaster and Maple Leaf Cluster Crochet Pattern
Beginner Friendly
Perfect for those just starting their crochet journey, with clear instructions and simple techniques
Single-Day Project
A satisfying project you can complete in a single afternoon or evening.
Handmade Gift
A beautiful keepsake — free forever. Read online or print at home.
About This Spiral Coaster and Maple Leaf Cluster Crochet Pattern
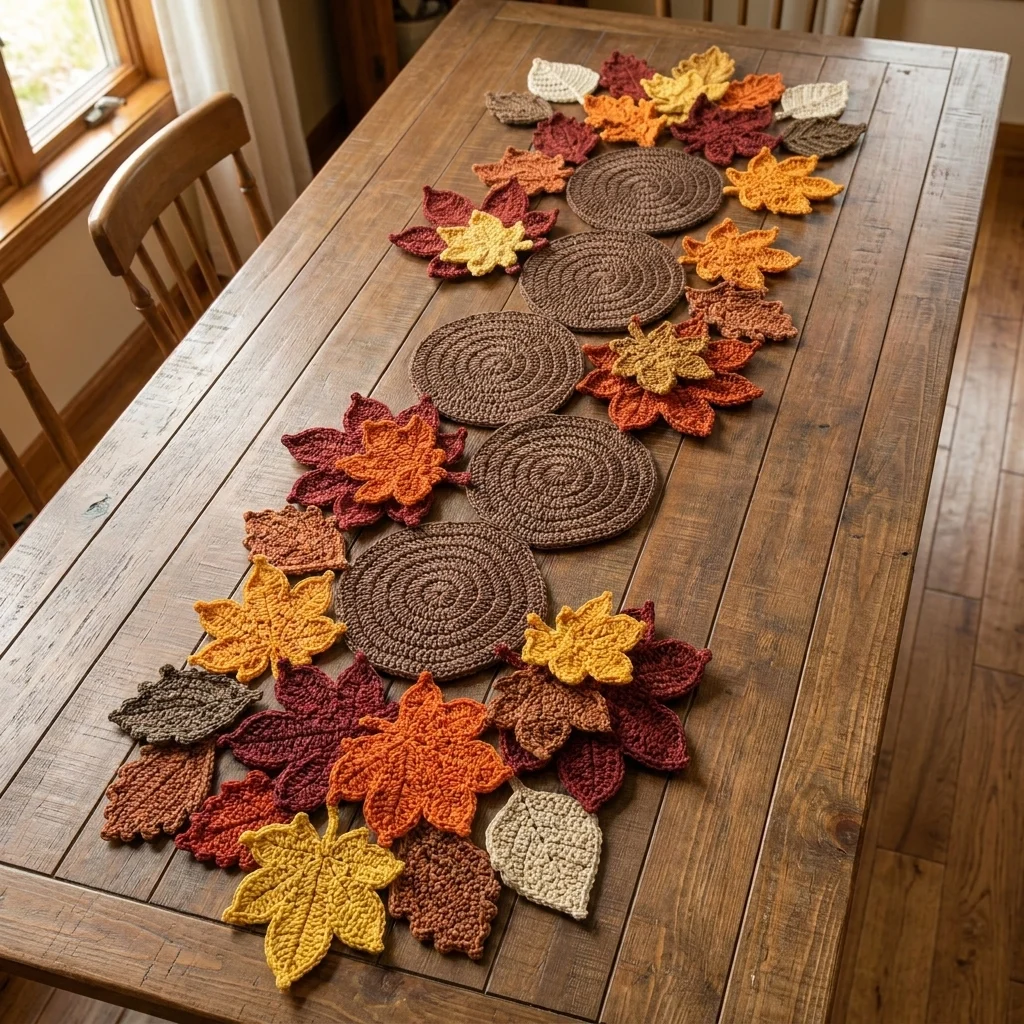
This crochet maple leaf coaster pattern pairs 4 flat spiral base mats, worked in rich brown to look like tree-bark rounds, with loose clusters of maple leaves and simple pointed leaves in rust, gold, burgundy, and cream. Laid out in a line down the table, the coasters and leaf clusters together read as a runner-style arrangement, but each coaster also works on its own under a mug or candle.
What makes this design distinctive is the spiral construction on the base mats: each one is worked as a continuous flat spiral rather than in defined rounds with a fastened-off join, giving it visible concentric rings that mimic a cut log or tree ring. Surrounding and layering two different leaf shapes, a classic 5-lobed maple leaf and a simple single-pointed leaf, around each coaster is what gives the set its full, textured look rather than a plain single-motif design. Expect to spend 14-18 hours total across 4 coasters and about 30 mixed leaves.
This is an advanced pattern, best suited to someone comfortable working a true continuous spiral without a defined round join, alongside varied lobe-shaped leaf motifs, rather than someone who wants a single repeated technique.
Materials
- Worsted weight yarn, dark brown ~120g, 4 coasters
- Worsted weight yarn, rust orange ~40g, leaves
- Worsted weight yarn, mustard gold ~40g, leaves
- Worsted weight yarn, burgundy wine ~40g, leaves
- Worsted weight yarn, cream ~20g, leaves
- Worsted weight yarn, taupe/grey-brown ~20g, leaves
- Crochet hook 4 mm (US G/6)
- Tapestry/yarn needle
- Steam iron and pressing cloth, or blocking mat and pins
- Sharp scissors
Abbreviations
chchainsl stslip stitchscsingle crochethdchalf double crochetdcdouble crochetMRmagic ringincincrease (2 sc in one st)st(s)stitch(es)reprepeatFOfasten offSpiral Base Coaster (make 4, in dark brown)
- Round 1: 6 sc in MR. Do not join; work in a continuous spiral throughout, using a stitch marker to track the start of each round. (6 sts)
- Round 2: inc in each st around. (12 sts)
- Round 3: *sc 1, inc; rep from * around. (18 sts)
- Round 4: *sc 2, inc; rep from * around. (24 sts)
- Round 5: *sc 3, inc; rep from * around. (30 sts)
- Round 6: *sc 4, inc; rep from * around. (36 sts)
- Round 7: *sc 5, inc; rep from * around. (42 sts)
- Round 8: *sc 6, inc; rep from * around. (48 sts)
- Round 9: sc around even, working through the back loop only on this final round to create a slightly raised outer ring edge. (48 sts)
- Sl st into the next st to finish neatly, FO leaving a short tail. Repeat for 4 coasters total.
Maple Leaf Motif (make approximately 18: mix of rust, gold, and burgundy)
- Ch 4, sl st in first ch to form a small foundation ring.
- Lobe 1, top center: ch 10. Starting in 2nd ch from hook: sl st, sc 2, hdc 2, dc 2 (8 sts). Sl st into ring.
- Lobe 2, upper right: ch 8. Starting in 2nd ch from hook: sl st, sc 2, hdc 2, dc 1 (7 sts). Sl st into ring.
- Lobe 3, lower right: ch 5. Starting in 2nd ch from hook: sl st, sc 2, hdc 1 (4 sts). Sl st into ring.
- Lobe 4, lower left: repeat Lobe 3 exactly. Sl st into ring.
- Lobe 5, upper left: repeat Lobe 2 exactly. Sl st into ring.
- Sl st into base of Lobe 1 to close. FO leaving a 10-15 cm tail for veining. Repeat for approximately 18 maple leaves total.
Simple Pointed Leaf (make approximately 14: mix of cream and taupe/grey-brown)
- Ch 9. Starting in 2nd ch from hook: sl st, sc 2, hdc 2, dc 2, 3 dc in last ch.
- Continue down the other side: dc 2, hdc 2, sc 2, sl st in last ch.
- FO leaving a 10-15 cm tail for veining. Repeat for approximately 14 leaves total.
Embroidering the Veins
- Thread each leaf’s tail onto a tapestry needle.
- For maple leaves, work a straight or backstitch line from the center ring up the middle of the top lobe, then a shorter line out to each of the remaining 4 lobe tips.
- For simple pointed leaves, work a single straight vein line up the center of the leaf from base to tip.
- Weave in the tail on the wrong side once veining is complete.
Blocking All Pieces
- Steam-block each coaster flat, pinning the outer edge into a clean, even circle.
- Steam and pin each leaf flat, maple leaves with all 5 lobes spread evenly, simple leaves flat and straight. Let dry completely before styling.
Styling the Set
- Lay the 4 blocked coasters in a straight line down the center of the table, spacing them evenly to suggest a runner without joining them together.
- Cluster a mix of maple leaves and simple leaves around the top and bottom coasters in the line, overlapping several leaves together into a loose fan shape rather than laying them flat and separate.
- Scatter smaller pairs or trios of leaves loosely between the middle coasters, mixing colors and leaf shapes so no two adjacent leaves match.
- Leave the coasters themselves unattached to the leaves so each piece can be used and washed separately, or lightly tack a few leaves to the coaster edges if you prefer a fixed arrangement.
Finishing
If you choose to tack any leaves to a coaster edge for a fixed centerpiece look, sew through the leaf’s base only, at 1-2 points, so the leaf still lifts slightly off the surface. Weave in any remaining tails. Because this set is designed to be modular, store the coasters and leaf clusters separately between uses and simply rearrange them fresh each time you set the table.
Tips for Success
- Use a stitch marker on every spiral round; without a joining slip stitch to mark round boundaries, it’s easy to lose track of where each round starts.
- Check that each coaster lies flat every 2-3 rounds; too few increases will cup upward, too many will ruffle at the edge.
- Mix maple and simple leaf shapes together in every cluster rather than grouping by shape, for the varied, natural look shown in the photo.
- Block leaves before arranging your final layout; unblocked lobes curl and make it harder to judge how a cluster will actually sit.
- Keep leaf clusters loose and slightly overlapping rather than laid out in a tidy row, to match the casual, scattered styling in the photo.
Common Mistakes to Avoid
- Joining each spiral round with a slip stitch by habit turns the piece into a joined-round circle with a visible seam instead of a true spiral. Fix: keep working continuously without joining, using a stitch marker only to track your round count.
- Making all leaves the same size flattens the visual texture of a cluster. Fix: vary chain lengths slightly across different leaves within the same batch.
- Arranging leaf clusters in a perfectly symmetrical fan looks stiff. Fix: let leaves overlap at slightly different angles and depths within each cluster.
- Skipping the back-loop-only final round on the coaster loses its subtle raised rim detail. Fix: work Round 9 through the back loop only as instructed.
- Fixing coasters and leaves together permanently removes the set’s modularity. Fix: keep pieces separate unless you specifically want a fixed centerpiece.
Ways to Customize This Pattern
- Make only 2 coasters with smaller leaf clusters for a compact pair instead of a full set of 4.
- Work the coasters in a lighter tan instead of dark brown for a softer, less bark-like look.
- Add a crocheted acorn or two to each leaf cluster for extra seasonal detail.
- Scale the coasters up slightly and use them as trivets under serving dishes instead of individual place settings.
- Swap the leaf palette for greens and creams for a spring or everyday version of the same set.
Frequently asked questions
No, they’re designed to be modular. You can rearrange the coasters and leaves differently each time you set the table, or tack a few leaves down permanently if you’d rather have a fixed centerpiece piece.
Curling usually means too few increases for the round you’re on. Recount stitches after every round against the pattern and add an extra increase if the piece is starting to dome upward instead of staying flat.
They work well as functional coasters under mugs or glasses. Worsted weight cotton or a cotton-acrylic blend will hold up best to regular use and occasional washing.
Roughly 30-32 leaves total, mixed maple and simple shapes, covers clusters similar to the photo. Add more if you want fuller clusters at each end, or fewer for a more minimal, scattered look.
The finished Spiral Coaster and Maple Leaf Cluster Crochet Pattern

