Advanced
For experienced crocheters who enjoy complex shaping, fine detail, and ambitious construction
Single-Day Project
A satisfying project you can complete in a single afternoon or evening.
Handmade Gift
A beautiful keepsake — free forever. Read online or print at home.
About This Spiral Mandala Crochet Bedspread
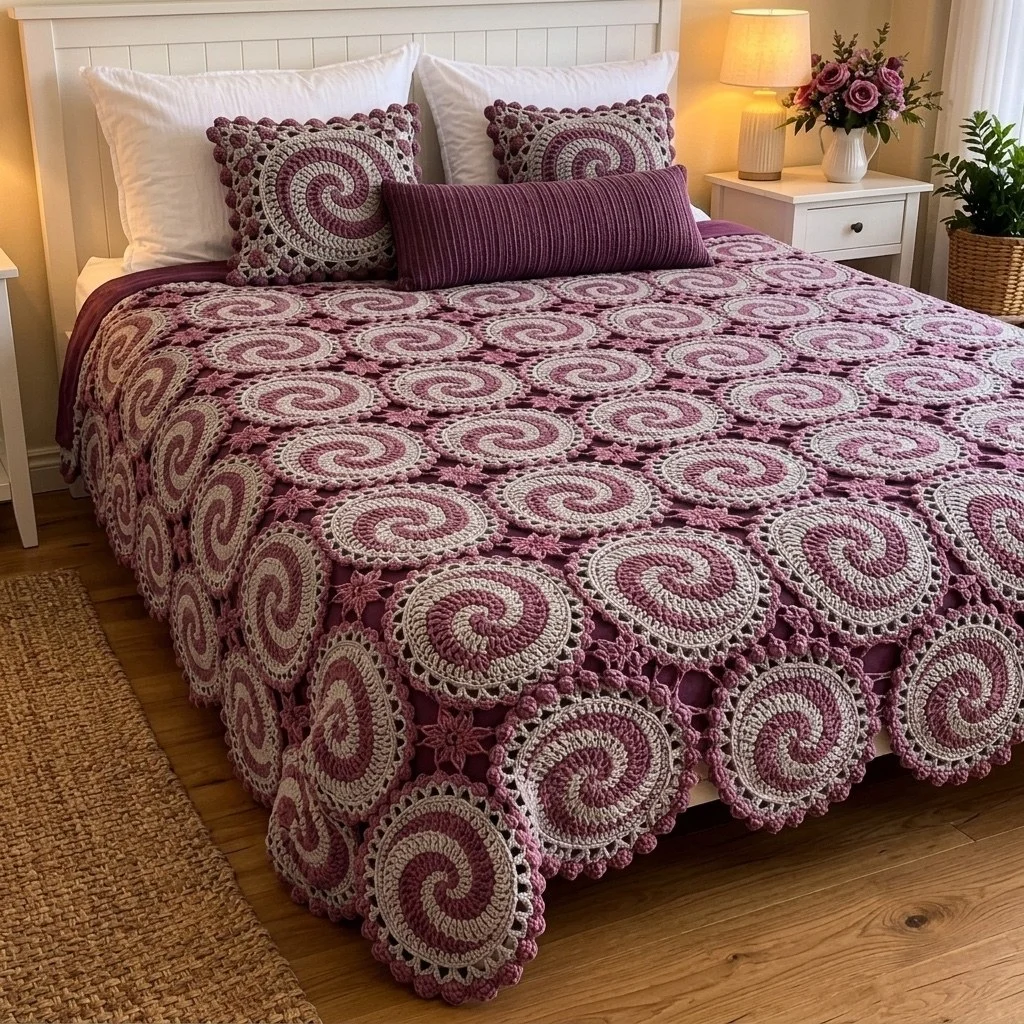
This spiral mandala crochet bedspread pattern turns one repeated circle into a whole bed covering, and the trick that makes it work is the three-colour spiral at the centre of every motif. Instead of changing colour once per round, you keep three balls attached — plum, dusty rose and cream — and each one works only its own third of the round. The colours chase each other outward, and after fifteen rounds you have a clean pinwheel with no visible jog and no cut ends to weave in except at the very edge.
Each motif is then finished with an open cream mesh ring, a solid cream round, and a rose bobble-and-chain scallop that does double duty as the joining round. Motifs are joined as you go at four points, which leaves a small four-pointed gap wherever four circles meet; a tiny six-petal rose flower is sewn into each of those gaps so the surface reads as one continuous fabric rather than a grid of coasters. The outer edge is left as the natural scalloped silhouette of the circles, reinforced with two short rounds so it holds its shape after washing.
This is a long project, not a hard one. A single motif takes most people 45 to 60 minutes once the spiral is familiar, and the full 9 x 10 motif bedspread works out to roughly 70 to 90 hours including joining, flowers and edging. It suits a confident crocheter who is comfortable with magic rings, bobbles and counting — the kind of maker who wants a portable, repeatable project to carry around for a few months. If that sounds like too much, the same motif makes a cushion cover or a pram blanket in a weekend, and the construction is identical.
Materials
- DK weight cotton yarn in deep plum (A) approx. 1200 g / 24 x 50 g balls
- DK weight cotton yarn in dusty rose (B) approx. 1300 g / 26 x 50 g balls, includes bobbles and flowers
- DK weight cotton yarn in warm cream (C) approx. 1200 g / 24 x 50 g balls
- 3.5 mm crochet hook or size needed for gauge
- Blunt tapestry needle for flowers and ends
- Stitch markers at least 6, to mark colour segments and join points
- Three small yarn bowls or zip bags to keep the three working balls from tangling
- Blocking mats and rust-proof pins or a steam iron for cotton
- Measuring tape
Abbreviations
MRmagic ringchchainsl stslip stitchscsingle crochetsc2togsingle crochet 2 stitches togetherdcdouble crochetbobobble: 5 unfinished dc in same st, yarn over, pull through all 6 loopsskskipspspacest(s)stitch(es)rndroundreprepeatRSright sideFOfasten offA / B / Cplum / dusty rose / creamGauge and Sizing
- Gauge: Rnds 1-9 of the spiral measure 8 cm across, blocked. If your disc is bigger, drop to a 3.25 mm hook; if smaller, go up to 3.75 mm.
- One finished motif measures approximately 18 cm across after blocking, including the bobble scallop edge.
- The bedspread as written uses 90 motifs in a 9 across by 10 down grid, giving roughly 160 x 180 cm — a generous cover for a standard double bed with a short drop on three sides.
- To resize, count 18 cm per motif in each direction. A single-bed cover is 6 x 9 motifs (~108 x 162 cm); a sofa throw is 5 x 7 motifs (~90 x 126 cm).
- You will also need 72 filler flowers for a 9 x 10 grid — one for every point where four motifs meet, calculated as (columns − 1) x (rows − 1).
- Make one complete motif first, block it, and measure before cutting into the rest of the yarn.
Spiral Centre (make 90)
- Rnd 1: With A, make a MR and work 3 sc into it. Drop A to the front. With B, work 3 sc into the ring. Drop B. With C, work 3 sc into the ring. Pull the ring closed gently but not fully — 9 sts (3 per colour). Place a marker in the first st of each colour.
- Rnd 2: Pick up A, 2 sc in each of next 3 sts (6 A sts). Drop A, pick up B, 2 sc in each of next 3 sts (6 B sts). Drop B, pick up C, 2 sc in each of next 3 sts (6 C sts) — 18 sts (6 per colour).
- Rnd 3: With each colour in turn, work (sc in next st, 2 sc in next st) 3 times over that colour’s own 6 sts — 27 sts (9 per colour).
- Rnd 4: With each colour in turn: (sc in next 2 sts, 2 sc in next st) 3 times — 36 sts (12 per colour).
- Rnd 5: With each colour in turn: (sc in next 3 sts, 2 sc in next st) 3 times — 45 sts (15 per colour).
- Rnd 6: With each colour in turn: (sc in next 4 sts, 2 sc in next st) 3 times — 54 sts (18 per colour).
- Rnd 7: With each colour in turn: (sc in next 5 sts, 2 sc in next st) 3 times — 63 sts (21 per colour).
- Rnd 8: With each colour in turn: (sc in next 6 sts, 2 sc in next st) 3 times — 72 sts (24 per colour).
- Rnd 9: With each colour in turn: (sc in next 7 sts, 2 sc in next st) 3 times — 81 sts (27 per colour). Measure here: the disc should be 8 cm across.
- Rnd 10: With each colour in turn: (sc in next 8 sts, 2 sc in next st) 3 times — 90 sts (30 per colour).
- Rnd 11: With each colour in turn: (sc in next 9 sts, 2 sc in next st) 3 times — 99 sts (33 per colour).
- Rnd 12: With each colour in turn: (sc in next 10 sts, 2 sc in next st) 3 times — 108 sts (36 per colour).
- Rnd 13: With each colour in turn: (sc in next 11 sts, 2 sc in next st) 3 times — 117 sts (39 per colour).
- Rnd 14: With each colour in turn: (sc in next 12 sts, 2 sc in next st) 3 times — 126 sts (42 per colour).
- Rnd 15: With each colour in turn: (sc in next 13 sts, 2 sc in next st) 3 times — 135 sts (45 per colour).
- Ramp down: with A, sl st loosely in the next 2 sts and FO. Repeat with B, then with C. These slip stitches sit on top of the next colour’s stitches and smooth away the step at the end of each arm.
- Weave in all six ends on the wrong side now, before the border rounds cover the fabric.
Motif Border Rounds (all 90 motifs)
- Rnd 16 (C): With RS facing, join cream with a sl st in any Rnd 15 st. Ch 1, then work (sc in next 14 sts, 2 sc in next st) 9 times around — 144 sts. Where a slip stitch from the ramp-down lies on top of a stitch, work your sc into the Rnd 15 stitch underneath it. Sl st to first sc to join.
- Rnd 17 (C): Ch 5 (counts as dc + ch 2), sk 3 sts, *dc in next st, ch 2, sk 3 sts; rep from * around, ending with the last skip — 36 dc and 36 ch-2 sps. Sl st to 3rd ch of beg ch-5. This is the open mesh ring.
- Rnd 18 (C): Ch 1, sc in same st, *3 sc in next ch-2 sp, sc in next dc; rep from * around, ending 3 sc in last ch-2 sp — 144 sts. Sl st to first sc. FO C and weave in.
- Rnd 19 (B) — bobble scallop: Join rose in any st. Ch 1, sc in same st, *ch 3, sk 2 sts, bo in next st, ch 3, sk 2 sts, sc in next st; rep from * around, ending the last repeat by working the final sc into the st where you began (work it as a sl st to the first sc instead) — 24 bobbles, 24 sc and 48 ch-3 sps. FO, leaving the ends for later if this motif will be joined.
- Mark the join points: counting the bobbles 1 to 24 from your starting sc, place markers on bobbles 1, 7, 13 and 19. These four evenly spaced bobbles are where the motif meets its neighbours above, below, left and right.
- Work Rnd 19 complete and unjoined on the very first motif only. Every following motif is joined during Rnd 19 — see the next section.
Joining the Motifs (join as you go)
- Lay out the grid in rows of 9 motifs, 10 rows deep. Work the bedspread row by row: finish row 1 left to right, then start row 2 and join each new motif to the one beside it and the one above it.
- Before joining a motif, turn it so that marked bobble 1 points toward the neighbour on its left, bobble 7 points up, bobble 13 points right and bobble 19 points down. Keep this orientation identical on every motif so all the spirals turn the same way.
- Work Rnd 19 of the new motif as written until you reach the ch-3 immediately before a bobble that must join. Instead of ch 3, work ch 1, sl st into the matching ch-3 sp of the finished neighbour, ch 1, then continue.
- At the joining bobble itself: make the bobble as usual, then ch 1, sl st into the top of the matching bobble on the neighbour, ch 1, and carry on.
- At the ch-3 immediately after that bobble: ch 1, sl st into the next ch-3 sp of the neighbour, ch 1, then sc in the next st of your own motif. Each contact point is therefore three small joins, which keeps the circles touching cleanly.
- Motifs in the middle of the blanket join at two points on a first pass (left and up) and will be joined to by later motifs on their right and below — you never go back and sew.
- Keep the joining slip stitches the same tension as your chains. Pulled tight, they cup the fabric; left loose, gaps open between circles.
- Weave in each motif’s rose ends as soon as it is joined. Leaving 90 motifs’ worth of ends for the end of the project is miserable.
Filler Flowers (make 72)
- Rnd 1 (B): Make a MR, ch 1, work 6 sc into the ring. Pull closed firmly. Sl st to first sc — 6 sts.
- Rnd 2 (B): Ch 1, *(sl st, ch 2, 3 dc, ch 2, sl st) all in next st; rep from * 6 times, one petal in each sc — 6 petals.
- FO leaving a 30 cm tail for sewing. Do not weave this tail in.
- The finished flower should measure about 4 cm across — just large enough to cover the four-pointed gap where four motifs meet.
- Flatten each flower with your fingers and give the batch a light steam before sewing; crisp petals sit much flatter on the blanket.
Outer Edging
- Rnd 1 (C): With RS facing, join cream in any free ch-3 sp on an outer motif at one corner of the blanket. Ch 1, then work around the entire outer edge as follows: *3 sc in ch-3 sp, sc in top of next bobble, 3 sc in next ch-3 sp, sc in next sc; rep from * along each free section of every outer motif.
- At each inner angle where two outer motifs are joined to each other, work sc2tog over the last st of one motif and the first st of the next. This single decrease pulls the valley in and stops it flaring.
- The edging follows the scalloped circle outline — do not try to chain across the dips to make a straight edge, as the scalloped silhouette is the whole point of the design. Sl st to first sc and FO.
- Rnd 2 (B): Join rose in any st of Rnd 1. Ch 1, sl st in same st, *sk 2 sts, 5 dc in next st, sk 2 sts, sl st in next st; rep from * around the whole edge. Where the stitch count of a scallop does not divide evenly, skip one extra stitch at the top of the curve rather than squeezing in a half shell.
- At each inner angle, skip the sc2tog entirely and work a single sl st into the stitch on each side of it.
- Sl st to the first sl st, FO and weave in. The rose shell round should sit flat and echo the bobble scallops on the motifs themselves.
Finishing
Sew the flowers on first. Lay the joined blanket flat, find every point where four motifs meet, and pin a flower over the small four-pointed gap. Thread the long rose tail on a tapestry needle and stitch the tip of each petal down to the nearest bobble or ch-3 space, catching only the top loops so no stitching shows on the back. Six small anchor stitches per flower is enough; the flower is decorative, not structural, and over-sewing makes a stiff lump that shows through the surface.
Then block the whole piece. Cotton of this size is too heavy for pins alone, so wet block it: soak the bedspread in cool water, press out the water without wringing, roll it in towels, then lay it out flat on a clean sheet. Square the grid up by eye, measure the two diagonals to check they match, and pat the scalloped edge into even curves. Leave it until completely dry — with this much cotton that can take two full days, so turn it once halfway through and run a fan if the room is humid.
Finally, go over the back and check for any ends you missed, especially at the motif centres where six strands come together. Trim nothing shorter than 3 cm. Once dry, the bedspread sits best over a plain-coloured blanket or bed cover in deep plum, which fills the little gaps between the circles with solid colour and makes the spirals read more sharply.
Tips for Success
- Keep the three balls in separate bowls or bags on your lap in a fixed left-to-right order, always dropping each colour toward the centre of the work. Done consistently, the strands never twist, and you can work a whole motif without stopping to untangle.
- Make your bobbles with a slightly looser yarn over on the fifth unfinished dc. Cotton has no give, and a tight final loop makes the bobble sit back toward the wrong side instead of popping forward.
- Work a batch of ten motifs through Rnd 15 before doing any border rounds. The spiral is the part that needs concentration; the three cream and rose rounds are easy television crochet and go quickly in bulk.
- Check each motif’s four marked bobbles before joining. Rotating a motif by even one bobble position throws the whole row off, and you will not notice until the next row refuses to line up.
- Steam-block each motif lightly as you finish it rather than only blocking at the end. Flat circles join accurately; curled ones fight you at every slip stitch.
Common Mistakes to Avoid
- Working one colour into another colour’s stitches. Each colour works only over the stitches it made in the previous round. If an arm starts widening or a colour runs out of stitches early, count back — the error is almost always one stitch borrowed at a segment boundary.
- Stacking the increases. Within a colour segment the increase must fall at the end of each of the three repeats, not at the same spot every round. Stacked increases create three hard corners and the motif turns into a triangle.
- Pulling the magic ring fully closed on Rnd 1. With nine stitches from three colours, a hard-closed ring puckers and the first two rounds cone upward. Snug it until the hole just disappears, no further.
- Joining with tight slip stitches. The ch1–sl st–ch1 joins should be the same tension as a normal chain. Tight joins pucker the four-motif gaps so badly that the filler flowers will not lie flat on top of them.
- Skipping the sc2tog at the inner angles of the edging. Without those decreases the valleys between outer motifs ruffle, and no amount of blocking will flatten them afterwards.
Ways to Customize This Pattern
- Make the matching cushion covers: work two complete motifs, hold them wrong sides together and join through both bobble rounds with a rose sc seam, inserting a 40 cm cushion pad before closing. Two motifs side by side make a longer bolster-style cover.
- Change the palette while keeping the three-colour structure: charcoal, soft teal and ivory, or rust, mustard and natural linen. Keep one light colour so the spiral arms stay readable from across the room.
- Make a four-colour spiral instead. Start with 3 sc per colour from four balls (12 sts in the ring) and increase by 3 per colour per round exactly as written; the arms will be narrower and the pinwheel busier.
- Turn one motif into a round seat pad or small rug by working it in aran cotton with a 5 mm hook, which gives a disc of about 26 cm, and adding a second plain sc round behind the mesh for extra body.
- Back the finished bedspread with a plain cotton sheet in deep plum, tacked at each motif centre. It closes the small gaps, adds warmth, and makes the piece hang with more weight over the sides of the bed.
Frequently asked questions
Yes, for the spiral centre. That is what creates the unbroken pinwheel — if you cut and rejoin each colour every round you will have 45 ends per motif and a visible step where each arm starts. The three balls only need to stay attached through Rnd 15, which is roughly half an hour of work, and then you cut all three at once.
Work on about 40 g of DK cotton per motif, split roughly evenly between the three colours, plus around 3 g per filler flower. Multiply by your motif count and add 10 percent for the edging. For the 9 x 10 layout given here that comes to approximately 3.7 kg in total, so buy in dye-lot batches and keep the cream consistent, as it shows lot differences most.
You can, and the bedspread will be lighter and warmer. Two things change: acrylic bobbles are softer and less defined, so go down a hook size for Rnd 19 to keep them crisp, and acrylic will not hold a wet block the way cotton does, so steam it carefully instead. Avoid anything with a halo, which buries the spiral.
Small variation is normal across 90 motifs made over several months. The bobble joining round absorbs a difference of up to about half a centimetre without showing. If a motif is noticeably larger, it usually means your tension loosened during the border rounds — rework Rnds 16 to 19 on that motif with a 3.25 mm hook rather than redoing the spiral.
Wash cool on a gentle cycle in a large machine or in the bath, and never lift it while it is sopping — the weight of wet cotton stretches the joins. Support it from underneath, press the water out, and dry flat. Store it folded loosely with the scalloped edge on the outside rather than compressed in a vacuum bag, which flattens the bobbles permanently.
The finished Spiral Mandala Crochet Bedspread

