Spring Meadow Crochet Flower Table Runner
Beginner Friendly
Perfect for those just starting their crochet journey, with clear instructions and simple techniques
Single-Day Project
A satisfying project you can complete in a single afternoon or evening.
Handmade Gift
A beautiful keepsake — free forever. Read online or print at home.
About This Spring Meadow Crochet Flower Table Runner
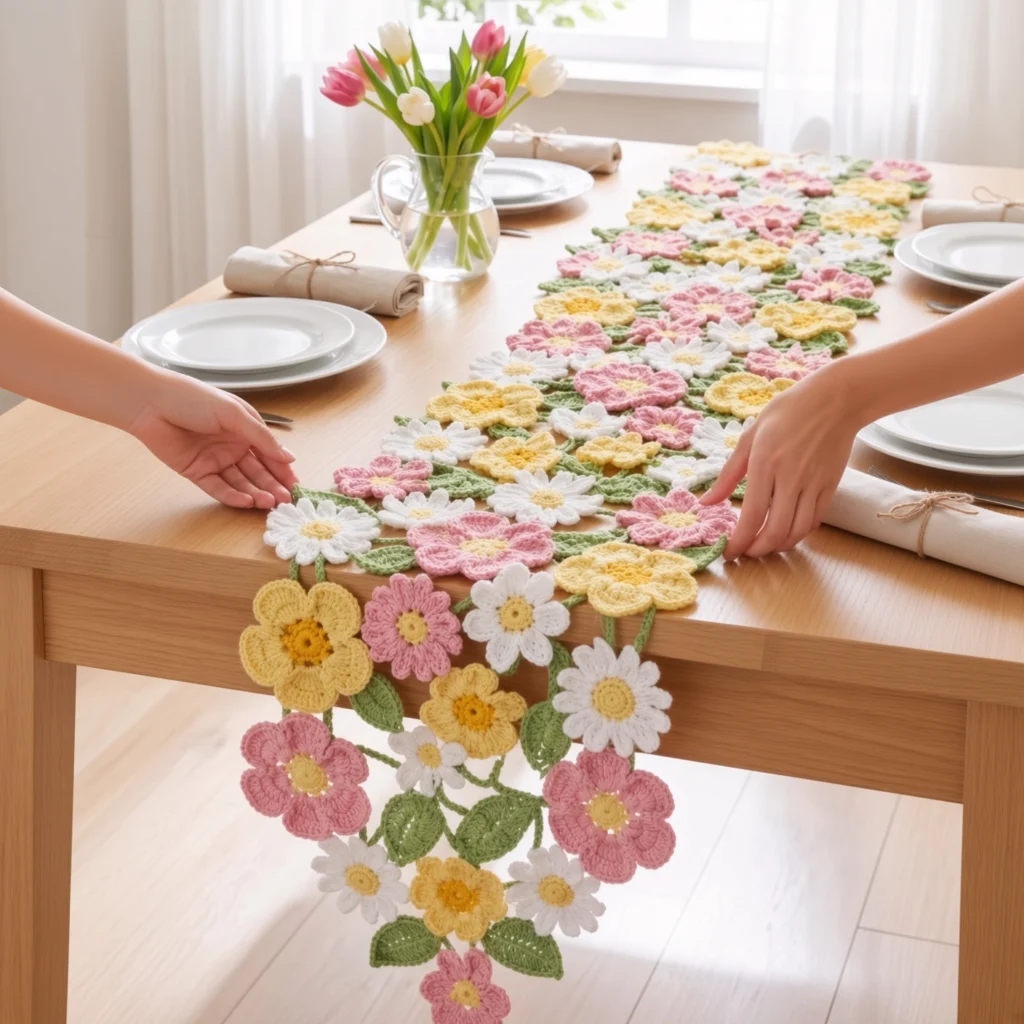
This crochet flower table runner pattern is built from four separate flower motifs and a shaped leaf, joined directly to each other as you work so there is no backing fabric and no long seam at the end. The runner reads as a scattered spring meadow rather than a tidy grid: white daisies with eighteen narrow petals, soft pink blossoms with two offset petal layers, pale yellow buttercups with a raised gold centre, and small daisies tucked into the gaps along the edges. Leaves fill the spaces where three flowers meet, which is what keeps the whole thing flat instead of ruffled.
It is a long project, but not a difficult one round by round. Each individual flower takes fifteen to twenty minutes. The real work is in the volume and in the layout: thirty-seven full-size flowers, eight small daisies and twenty leaves for a runner around 120 cm long. Expect 25 to 30 hours in total. Most crocheters find it goes fastest if they batch the work, making all the daisies in one sitting, all the pink blossoms in another, then laying everything out before a single motif gets joined.
This one suits a crocheter who is comfortable working into front and back loops separately, working stitches into a chain space, and reading a layout plan. It is a good project for evenings in front of the television because the motifs are small and repetitive, and a good use of cotton scraps if you already have a spring palette in your stash. The finished runner is washable, lies flat on a hard table, and drapes nicely over the ends.
Materials
- DK cotton yarn, white approx. 120 g
- DK cotton yarn, soft pink approx. 110 g
- DK cotton yarn, pale butter yellow approx. 110 g
- DK cotton yarn, deep gold approx. 40 g (flower centres)
- DK cotton yarn, sage green approx. 130 g (leaves and stems)
- 3.0 mm crochet hook or size to reach gauge
- Tapestry needle for weaving in ends
- Stitch markers at least 6, for marking join points
- Rust-proof pins and a large flat surface for laying out and blocking
- Spray bottle or steam iron for blocking
- Sharp scissors
Abbreviations
MRmagic ringchchainsl stslip stitchscsingle crochethdchalf double crochetdcdouble crochettrtreble crochetst / stsstitch / stitchesFLOfront loop onlyBLOback loop onlyspspacerndroundreprepeatJAYGjoin as you goGauge and motif sizes
- Work the white daisy centre through Rnd 3. It should measure 3.5 cm across. If it is bigger, drop to a 2.5 mm hook; if smaller, go up to a 3.5 mm hook.
- Finished white daisy: approx. 9 cm across.
- Finished pink blossom: approx. 8.5 cm across.
- Finished yellow buttercup: approx. 8 cm across.
- Finished mini daisy: approx. 5 cm across.
- Finished leaf: approx. 6 cm long, plus a 3 cm stem.
- Motif sizes matter more than stitch gauge here. If your flowers are consistently 1 cm larger, the runner will simply come out longer and wider, which is fine as long as all motifs of the same type match each other.
White Daisy (make 13)
- With deep gold, Rnd 1: 6 sc in MR. Pull the ring closed. (6 sts)
- Rnd 2: 2 sc in each st around. (12 sts)
- Rnd 3: *sc in next st, 2 sc in next st* rep 6 times. Sl st to join. Fasten off gold and weave in the end now. (18 sts)
- Rnd 4: Join white in any st of Rnd 3, ch 1, sc in each st around. Sl st to join. (18 sts)
- Rnd 5 (petal round): *ch 7, sl st in 2nd ch from hook, sc in next 2 ch, hdc in next 3 ch, sl st in next st of Rnd 4* rep 18 times. The last chain of each ch-7 stays unworked and forms the slack at the base of the petal. (18 petals)
- Sl st to join, fasten off, leaving a 15 cm tail for joining later.
- The petals will want to curl forward as you work. That is correct. They flatten during blocking.
Pink Blossom (make 12)
- With deep gold, Rnd 1: 5 sc in MR. Pull the ring closed. (5 sts)
- Rnd 2: 2 sc in each st around. Sl st to join, fasten off gold. (10 sts)
- Rnd 3: Join soft pink in any st, ch 1, sc in each st around. Sl st to join. Do not fasten off. (10 sts)
- Rnd 4 (front petal bases): Working in FLO of Rnd 3 only: *ch 3, skip next front loop, sl st in next front loop* rep 5 times. (5 ch-3 sps)
- Rnd 5 (front petals): In each ch-3 sp work (sl st, ch 1, hdc, 5 dc, hdc, ch 1, sl st). Sl st to the base of the first petal and fasten off. (5 petals)
- Rnd 6 (back petal bases): Turn the flower over. Join soft pink in any free BACK loop of Rnd 3, choosing a loop that sits directly behind the gap between two front petals: *ch 4, skip next back loop, sl st in next back loop* rep 5 times. (5 ch-4 sps)
- Rnd 7 (back petals): In each ch-4 sp work (sl st, ch 2, hdc, 7 dc, hdc, ch 2, sl st). Sl st to the base of the first petal. (5 petals)
- Fasten off, leaving a 15 cm tail. The five larger back petals should peek out between the five front petals, giving the doubled look in the photo. If they line up directly behind the front petals instead, you started Rnd 6 one loop off.
Yellow Buttercup (make 12)
- With deep gold, Rnd 1: 5 sc in MR. Pull the ring closed. (5 sts)
- Rnd 2: 2 sc in each st around. (10 sts)
- Rnd 3: Working in BLO, sc in each st around. Sl st to join, fasten off gold. This pushes the gold centre up into a small raised cup and leaves the front loops of Rnd 2 free. (10 sts)
- Rnd 4: Join pale butter yellow in any free FRONT loop of Rnd 2, ch 1, sc in each free front loop around. Sl st to join. (10 sts)
- Rnd 5 (petal bases): *ch 3, skip next st, sl st in next st* rep 5 times. (5 ch-3 sps)
- Rnd 6 (petals): In each ch-3 sp work (sl st, ch 2, 2 dc, 3 tr, 2 dc, ch 2, sl st). Sl st to the base of the first petal. (5 petals)
- Fasten off, leaving a 15 cm tail. The trebles make each petal broad and slightly cupped, which is what gives this flower its buttercup shape next to the flatter daisies.
Mini Daisy (make 8)
- With deep gold, Rnd 1: 6 sc in MR. Sl st to join, fasten off gold. (6 sts)
- Rnd 2: Join white in any st, ch 1, 2 sc in each st around. Sl st to join. (12 sts)
- Rnd 3 (petal round): *ch 5, sl st in 2nd ch from hook, sc in next 2 ch, hdc in next ch, sl st in next st of Rnd 2* rep 12 times. (12 petals)
- Sl st to join, fasten off, leaving a 10 cm tail. These are gap fillers, so make them all at once and set them aside until the layout stage.
Leaf (make 20)
- With sage green, ch 12.
- Rnd 1, first side: sl st in 2nd ch from hook, sc in next 2 ch, hdc in next 2 ch, dc in next 3 ch, hdc in next 2 ch. One chain remains unworked at the tip. (10 sts)
- Tip: 5 sc in the last ch. (5 sts)
- Rnd 1, second side: working along the opposite side of the foundation chain, hdc in next 2, dc in next 3, hdc in next 2, sc in next 2, sl st in last ch. Sl st to the first sl st to join. (10 sts, 25 sts total)
- Stem: ch 9, sl st in 2nd ch from hook and in each remaining ch back to the leaf. Sl st into the base of the leaf to secure. (8 sl st stem)
- Fasten off, leaving a 15 cm tail. The unworked foundation chain running down the middle is the leaf vein. Do not add a separate surface chain for it.
- Make 4 of the 20 leaves with a longer 14-ch stem. These go at the two tapered ends of the runner where the gaps are wider.
Layout Plan
- The runner is built in 16 staggered rows running along its length, spaced about 7.5 cm centre to centre. Total 37 full-size flowers, 8 mini daisies, 20 leaves.
- Row 1: 1 flower (the point at one end).
- Row 2: 2 flowers.
- Rows 3, 5, 7, 9, 11, 13: 3 flowers each, one in the left column, one centre, one right.
- Rows 4, 6, 8, 10, 12: 2 flowers each, sitting in the gaps between the columns of the row below.
- Row 14: 3 flowers. Row 15: 2 flowers. Row 16: 1 flower (the point at the other end).
- Colour rule: no two flowers of the same type may touch, either side by side within a row or diagonally into the row above. Working left to right and rotating white, pink, yellow gives this automatically on the 3-flower rows; on the 2-flower rows, pick the two types that were not directly below.
- Lay the flowers out on a bed or floor in this arrangement before joining anything. Photograph the layout with your phone so you can rebuild it if it gets disturbed.
- Leaves go into the triangular gaps where three flowers meet along the centre of the runner, roughly one leaf per gap, stems pointing toward the nearer end of the runner. Mini daisies fill the shallower gaps along the two long outer edges.
- To lengthen: add 2 rows (one 3-flower, one 2-flower) for each extra 15 cm, which is 5 more flowers, 1 mini daisy and 3 more leaves. To shorten, remove rows in the same pairs so the stagger stays correct.
Joining the Motifs
- All joining is done on the final petal round of each flower using join-as-you-go, so leave the last round of every motif unworked until it is time to place that motif. In practice: make each flower through its second-to-last round, then complete the final petal round with the flower held in position against its neighbours.
- Work in row order, starting from Row 1 and moving along the runner. Each new motif joins to the motifs already in place below and beside it, never to motifs that have not been placed yet.
- Minimum two join points per motif, three wherever the layout allows. A flower joined at only one petal will spin and the runner will ruffle.
- Daisy petal join: work the petal to its tip, so you have just made the sl st in the 2nd ch from hook. Insert the hook through the tip stitch of the corresponding petal on the neighbouring motif, yarn over, pull a loop through, then pull that loop through the loop on your hook. Continue back down the chain as normal.
- Dc or tr petal join: work the petal to its centre stitch (the 3rd dc on a pink front petal, the 2nd tr on a buttercup petal). Drop the working loop off the hook, insert the hook front to back through the centre stitch of the corresponding petal on the neighbouring motif, pick the dropped loop back up and pull it through. Then work the remaining stitches of the petal.
- Pink blossoms join through their larger BACK petals (Rnd 7), not the front ones. The front petals stay free and sit on top, which is what gives the runner its layered texture.
- Buttercups and daisies join through their only petal round.
- Keep every joining slip stitch loose. It should have the same tension as the stitch beside it. Tight joins pucker the runner and cannot be eased out by blocking.
- Leaves are joined last, after all flowers are connected. Slip stitch the leaf tip to one petal, the widest point of one side to a second petal, and the end of the stem to a third. Three anchor points per leaf keeps it from flipping over.
- Mini daisies are joined at 2 or 3 petal tips into the edge gaps, using the same daisy petal join described above.
- Weave in each motif’s ends as soon as it is joined. Once the surrounding motifs are attached, the back of a flower becomes very hard to reach.
Finishing
Go over the whole runner from the back and check for any ends you missed. Trim them close, but not flush, because cotton works itself loose.
Block the finished runner face down on a padded surface, towels over a carpet work well. Pin the two long edges straight first, then pin the two end points, then work inward pinning each outer petal so the flowers sit round rather than oval. Spray until damp all the way through, pat the petals flat, and leave to dry completely, which takes about a day for cotton. Do not skip this step. Unblocked, the daisy petals curl forward and the runner sits about 4 cm narrower than it should.
To wash later, hand wash cool with a gentle detergent, press the water out between towels without wringing, and dry flat in the same pinned position. It will need a light re-block each time.
Tips for Success
- Make three white daisies before anything else and lay them on top of each other. If they are not the same size, your tension is drifting and every later motif will need adjusting. Fix it now, not at row 12.
- Batch by motif type, not by row. Making 13 daisies in a row builds muscle memory for the petal round and roughly halves the time per flower by the end.
- Use stitch markers to mark the petals that will become join points before you start joining a row. It stops you from working past the join by accident.
- Keep the layout photo open on your phone while you join. It is very easy to place a yellow buttercup next to another yellow buttercup once you are twelve rows in and stop checking.
- Steam the gold centres lightly before joining. They are the densest part of each flower and tend to dome upward if left alone.
Common Mistakes to Avoid
- Joining each motif at only one point. The flower pivots on that single stitch, neighbouring motifs pull unevenly, and the runner develops a wave that no amount of blocking will remove. Always use two join points, three where the layout allows.
- Pulling the joining slip stitch tight. This is the single most common cause of a puckered runner. The joining stitch should sit at the same tension as the petal stitches around it. If you can see the join gathering the fabric, undo it.
- Working Rnd 6 of the pink blossom into the wrong back loops, so the large petals sit directly behind the small ones instead of between them. Before starting Rnd 6, turn the flower over and pick the back loop that sits behind a gap, not behind a petal.
- Forgetting to work Rnd 3 of the buttercup in back loops only. Without it there are no free front loops on Rnd 2 to attach the petals to, the gold centre stays flat instead of cupped, and the flower ends up a third smaller than the others.
- Chaining too tightly on the daisy petal round. A tight ch-7 will not turn back on itself and the petal comes out stubby and twisted. Chain loosely, or go up a hook size for the chain only.
Ways to Customize This Pattern
- Autumn colourway: swap white for cream, soft pink for rust, pale yellow for burnt orange, and sage green for olive. The same motifs read completely differently and it suits a wooden table year round.
- Matching placemats: work a 4-row block, 3 flowers in rows 1 and 3, 2 flowers in rows 2 and 4, with 4 leaves. That gives an oval mat roughly 32 x 30 cm. Four mats use about the same yarn as one third of the runner.
- Wider runner for a large table: add a fourth column, so the 3-flower rows become 4-flower rows and the 2-flower rows become 3-flower rows. Finished width goes to about 42 cm.
- Beaded centres: sew a small pearl or seed bead into the middle of each mini daisy before joining. Skip this if the runner will be washed often.
- Window valance: work the runner to your window width instead of your table length, then add a row of ch-30 loops along one long edge to slide onto a curtain rod. The flowers show beautifully against light.
Frequently asked questions
Yes, and it is a reasonable choice if you find join-as-you-go fiddly. Complete every motif, block them all flat first, then lay out the runner and whip stitch petal to petal at the same two or three points per motif described in the joining section. Sewn joins are slightly bulkier on the back and take longer overall, but they are much easier to undo if you change your mind about a colour placement.
Small variation is fine and actually looks more natural. Differences over about 1 cm will cause problems, because the join points stop lining up and the runner buckles. If your later flowers are tighter than your early ones, which is the usual direction, sort all the motifs by size and use the largest ones in the centre rows and the smallest at the two tapered ends. The size change becomes a gradient rather than a lump.
It lies flat overall, but the pink blossoms are about 3 mm thicker than the daisies and buttercups because of the second petal layer. On a hard table with plates directly on top you will feel a slight wobble. If that bothers you, place the pink blossoms in the outer columns rather than the centre column when you lay out, so the middle of the runner where serving dishes sit stays level.
Each extra 15 cm of length adds 5 flowers, 1 mini daisy and 3 leaves, which is roughly 45 g of yarn total, spread across the colours. For a 150 cm runner instead of 120 cm, add about 90 g overall, so around 25 g extra green and 20 g extra of each flower colour. Buy dye lots together if you can, since the flowers are large enough that a lot change shows.
The finished Spring Meadow Crochet Flower Table Runner

