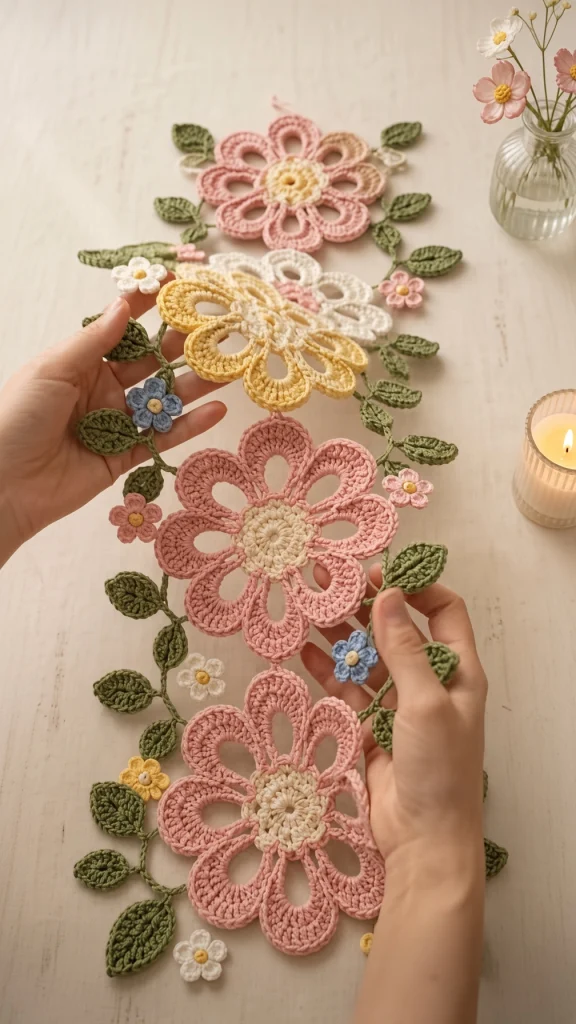
Spring Meadow Flower Table Runner
Beginner Friendly
Perfect for those just starting their crochet journey, with clear instructions and simple techniques
Single-Day Project
A satisfying project you can complete in a single afternoon or evening.
Handmade Gift
A beautiful keepsake — free forever. Read online or print at home.
About This Spring Meadow Flower Table Runner
This crochet flower table runner pattern joins five large open-petal blooms into a column and links them with a leafy chain vine that winds down both sides, scattered with tiny five-petal flowers along the way. There is no backing fabric — the vine is the structure, and every motif attaches to it or to its neighbor, which is what gives the runner its light, grown-on-the-table look rather than the look of appliqués stuck to a panel.
The large bloom is the technical piece. Each petal is a closed loop rather than a solid shape: a chain ring worked with dc on the outside and sc on the inside, so you get an open eye at the center of every petal. Eight of them radiate from a two-tone center in cream and butter. That open petal construction is slower than a solid petal — about ninety minutes per bloom — but it is the whole reason the runner reads as delicate instead of heavy.
Around them, twenty-two olive leaves are worked directly onto the vine cord as you go, so there is no separate sewing step for the foliage. The fourteen mini flowers in white, pale pink, butter and cornflower blue are made separately and tucked into the gaps at the end. Plan on 18 to 24 hours total. This is advanced work because of the open petals and because the vine layout is arranged by eye, but the palette is soft enough to leave out all spring and summer.
Materials
- DK cotton in soft rose pink approx. 180 m (about 90 g) — 3 large blooms and mini flowers
- DK cotton in butter yellow approx. 110 m — 1 large bloom, petal centers, mini flowers
- DK cotton in cream approx. 130 m — 1 large bloom, bloom centers, mini flowers
- DK cotton in olive green approx. 220 m (about 110 g) — vine cord and all leaves
- DK cotton in cornflower blue approx. 25 m — mini flowers
- Small amount of golden yellow for mini flower centers
- 3 mm crochet hook US C-2/D-3
- 2.5 mm hook for the mini flowers
- Tapestry needle blunt tip
- Rustproof pins 50+
- Blocking mats or a towel-covered board at least 100 x 35 cm
- Stitch markers 8-10
- Measuring tape and small sharp scissors
Abbreviations
begbeginningchchaindcdouble crochethdchalf double crochetMRmagic ringreprepeatrnd(s)round(s)RSright sidescsingle crochetskskipsl stslip stitchsp(s)space(s)st(s)stitch(es)Gauge and sizing
- Gauge: 18 sc and 20 rows = 10 cm x 10 cm, blocked.
- One large bloom measures approximately 17 cm across, blocked.
- Leaf: approximately 5 cm long. Mini flower: approximately 3 cm across.
- Finished runner: approximately 92 cm long by 28 cm wide measured across the leaves.
- All instructions use US crochet terminology.
- To lengthen, add one large bloom per 18 cm, plus 4 leaves, 3 mini flowers and 20 cm of extra vine cord.
Large bloom: center (make 5 — 3 rose, 1 butter, 1 cream)
- Rnd 1: With butter yellow, MR, ch 1, 8 sc in ring, pull ring closed, sl st to first sc. (8 sc)
- Rnd 2: Ch 1, 2 sc in each sc around, sl st to first sc. (16 sc)
- Rnd 3: Ch 1, *sc in next sc, 2 sc in next sc; rep from * around, sl st to first sc. (24 sc) Fasten off butter yellow.
- Rnd 4: Join cream with a sl st in any sc. Ch 1, *sc in next 2 sc, 2 sc in next sc; rep from * around, sl st to first sc. (32 sc)
- Rnd 5: Ch 1, *sc in next 3 sc, 2 sc in next sc; rep from * around, sl st to first sc. (40 sc)
- Rnd 6: Ch 1, working in back loops only, sc in each sc around, sl st to first sc. (40 sc) The back-loop ridge is what separates the center visually from the petals.
- Rnd 7: Ch 1, working in both loops, sc in next 4 sc, 2 sc in next sc, *sc in next 4 sc, 2 sc in next sc; rep from * around, sl st to first sc. (48 sc)
- Fasten off. The center should measure about 6 cm across. Make 5 centers, all in the same butter-and-cream combination.
Large bloom: open petals
- Each bloom has 8 petals, worked one at a time and joined to the center as you go. Work all 8 petals of one bloom in the same petal color: rose for three blooms, butter for one, cream for one.
- Petal Rnd 1: With the petal color and a hook one size larger, ch 14, sl st in first ch to form a ring. Switch back to the 3 mm hook.
- Petal Rnd 2: Ch 1, work 28 sc into the ring, sl st to first sc. (28 sc) The ring should stay open in the middle — this hole is the eye of the petal.
- Petal Rnd 3: Ch 1, sc in next 4 sc, hdc in next 3 sc, 2 dc in each of next 7 sc, hdc in next 3 sc, sc in next 11 sc, sl st to first sc. (35 sts) The doubled section forms the rounded outer tip; the plain section is the petal base that meets the center.
- Petal Rnd 4: Ch 1, sc in each st around to the 7 stitches at the petal base (the last 7 sc of the plain section), sl st in each of those 7, sl st to first sc. (28 sc, 7 sl st) Fasten off, leaving a 25 cm tail.
- Make 8 petals per bloom, 40 petals in total across the five blooms.
- Joining the petals: lay the center flat and arrange all 8 petals evenly around it, each one with its flat base against the center’s outer round. There are 48 sc in the center round, so each petal base covers 6 stitches. Mark the center into 8 groups of 6 before pinning.
- Sew each petal base to its 6 marked center stitches using the petal’s own tail, taking small whip stitches through the back loops so the seam disappears between the two colors.
- Sew each petal to its two neighbors for about 4 stitches where their bases touch. This is what makes the bloom hold together as a disc rather than a ring of loose petals.
- The finished bloom should measure 17 cm across, blocked. Make 5.
Vine cord with leaves
- The vine is one long cord with leaves worked off it at intervals. You will make two vine lengths, one for each side of the runner, each with 11 leaves.
- Vine base: with olive, ch 120. This gives roughly 95 cm of cord once the leaves pull it in slightly.
- Row 1: Sl st in the 2nd ch from hook and in the next 5 ch. *Work a leaf as follows: ch 9, sc in 2nd ch from hook, sc in next ch, hdc in next 2 ch, dc in next 2 ch, hdc in next ch, sc in last ch (8 sts along the first side); ch 2, then working along the opposite side of the leaf chain: sc in next ch, hdc in next ch, dc in next 2 ch, hdc in next 2 ch, sc in next 2 ch (8 sts along the second side); sl st into the vine chain at the base of the leaf. Leaf complete. Sl st in next 5 ch of the vine.* Rep from * to * until 11 leaves are made, then sl st in each remaining ch to the end.
- Fasten off, leaving a 40 cm tail. Each leaf should measure about 5 cm and should alternate which side of the vine it falls on — simply flip the leaf over as you start it to change sides.
- Make 2 vine lengths, each with 11 leaves, for 22 leaves in total.
- Center veins: with olive, work a short line of surface slip stitch up the middle of each leaf from base to tip. Keep it loose — a tight vein curls the leaf and it will not sit flat on the table.
Mini flowers (make 14: 4 white, 4 pale pink, 3 butter, 3 cornflower blue)
- Rnd 1: With golden yellow and the 2.5 mm hook, MR, ch 1, 5 sc in ring, pull closed, sl st to first sc. (5 sc) Fasten off golden yellow.
- Rnd 2: Join the petal color with a sl st in any sc. *Ch 2, work 3 dc in the same sc, ch 2, sl st in the same sc, sl st in next sc; rep from * 4 more times. (5 petals)
- Fasten off, leaving a 20 cm tail for sewing. The flower should measure about 3 cm across.
- Make 4 in white, 4 in pale pink, 3 in butter and 3 in cornflower blue, 14 in total.
Layout and joining
- Block all 5 blooms, both vine lengths and all 14 mini flowers before joining. Pin each bloom to a true 17 cm circle and pin each leaf out individually so the tips stay pointed. Let everything dry completely.
- Lay the 5 blooms in a vertical column on your blocking surface, spaced so their outer petals just touch, about 18 cm center to center. Order them rose, butter, rose, cream, rose from top to bottom so no two of the same color sit adjacent.
- Lay one vine length down each side of the column, weaving it so it passes behind each bloom and emerges between them, with the leaves fanning outward. The vine should wander 3 to 4 cm in and out rather than running dead straight — that wander is what makes it read as a growing stem.
- Pin both vines in place, then step back and look at the whole thing. Adjust any leaf that overlaps a bloom awkwardly or leaves an obvious bare patch before you sew anything.
- Sew the vines first. Tack each vine cord to the nearest bloom petal every 4 or 5 cm with a single stitch through the cord, using the olive tail. Where the vine passes behind a bloom, catch it at two points so it cannot slide.
- Join adjacent blooms to one another where their petals touch: whip stitch across about 5 stitches where one petal’s outer edge meets its neighbor’s. Four joins in total, one between each pair.
- Keep every join loose enough to lie flat. A tight seam pulls two blooms into each other and the runner will buckle at that point.
- Tuck the 14 mini flowers into the gaps: place them where the vine curves away from a bloom, where two leaves leave a space, and near the top and bottom ends where the composition thins out. Scatter the four colors so no two of the same shade are close together.
- Sew each mini flower through its golden center only, catching a vine cord or a leaf base underneath wherever possible so the flower has something solid to sit on.
- Weave all tails into the backs of the motifs themselves. This runner has open space between pieces, so a tail run across a gap will be plainly visible from the front.
Finishing
Give the assembled runner a final block once every join is sewn. Mist it with water rather than soaking, then pin the center column of blooms straight first so the spine is true, and work outward from there to the vines and leaf tips. Every leaf gets its own pin at the tip, pulled gently so the point stays sharp.
Do not press the open petals flat against the mat. Their slight lift is part of the design, and flattening them removes the shadow that makes the eye of each petal read clearly. Pin only the outermost edge of each petal, leaving the body of it unpinned.
Check the back before it dries. Loose tails and any stitch that crosses an open gap will show badly on a piece with this much negative space, so trim and re-weave anything questionable while you can still get at it.
Let it dry fully, at least ten hours. Store the runner rolled around a cardboard tube rather than folded — a crease across an open petal is difficult to block out and tends to distort the ring permanently. Hand wash in cool water with mild detergent, squeeze out in a towel without wringing, and re-block flat while damp. Never hang it to dry, since the vine joins will stretch under the weight of the blooms below.
Tips for Success
- Chain the petal ring loosely with a larger hook. A tight ch-14 ring cannot hold 28 sc without closing up, and the open eye is the entire point of the petal — if you cannot see through it, the petal is wrong.
- Mark the bloom center into 8 groups of 6 stitches before attaching any petals. Eyeballing the spacing gives you seven evenly placed petals and one crammed into a gap, every time.
- Sew each petal to its neighbors as well as to the center. Petals attached only at the base flop outward and the bloom loses its shape the first time it is handled.
- Work the leaves directly onto the vine rather than making them separately. It saves 22 sewing operations and the leaf base sits flush with the cord instead of forming a lump.
- Lay out the whole runner and pin it before you sew a single stitch. The vine placement is the difference between a composed piece and a pile of flowers, and you cannot judge it one join at a time.
Common Mistakes to Avoid
- Petals that curl into a cup instead of lying flat. This happens when Rnd 3 puts all seven increases too close together. They must be spread across seven consecutive stitches at the tip, with the plain sc and hdc sections on either side unchanged — count before you continue.
- Working 28 sc into a ring that is too tight. The stitches crowd, the hole closes, and the petal ends up as a solid oval. If your first petal has no visible eye, redo the ring with a larger hook before making the other 39.
- A bloom center that ruffles. Each round should add exactly 8 stitches. If Rnd 5 comes out at 44 or 48 instead of 40, you have an extra increase and the center will wave rather than lie flat under the petals.
- Pulling the leaf veins tight. Tight surface slip stitch curls the leaf lengthwise into a tube. The vein should sit on the surface with visible slack.
- Sewing the mini flowers directly onto open space. With nothing underneath, they sag and twist. Always catch a vine cord or leaf base beneath each one, even if it means moving the flower a centimeter from where you first pinned it.
Ways to Customize This Pattern
- Work all five large blooms in the same soft rose and keep the vine and mini flowers as they are. The runner becomes quieter and reads as a single flowering branch rather than a mixed meadow.
- Make one large bloom with four leaves as a standalone doily or table centerpiece — the bloom is already 17 cm and holds its shape well on its own once blocked.
- Swap the pastels for deep coral, terracotta and plum with a darker sage vine for a version that suits an autumn table without changing a single stitch count.
- Add a small pearl or glass bead at the center of each mini flower instead of the golden yellow ring, for a version that catches candlelight on a dinner table.
- Add a sixth and seventh bloom for a 128 cm runner, extending each vine to ch 170 with 15 leaves and adding 6 more mini flowers.
Frequently asked questions
The ch-14 ring was worked too tightly, so the 28 sc of Rnd 2 filled it completely. Chain the ring with a hook a full size larger than your working hook, and do not pull the joining slip stitch snug — it should sit loose enough that the ring still has slack before you start stitching into it. Once the stitches are in, the ring cannot be opened up again.
Yes. Work the last round of each petal and join it to the center with slip stitches as you go, the way you would join motifs. It is faster, but the seam is stiffer and cannot be adjusted once made, so only do this after you have marked the center into 8 groups of 6 and are confident about the placement. Sewing gives a softer, flatter join on a piece this delicate.
It does, as long as the vines are tacked to the blooms every 4 or 5 cm and adjacent blooms are joined petal to petal. The vine is doing structural work here, not just decoration. If yours feels floppy, add more tacking points along the vine rather than more joins between blooms — the vine is what keeps everything in line.
Yes, with a 4 mm hook. Each bloom grows to about 22 cm and the finished runner to roughly 118 cm, which suits a longer table. You will need about 40 percent more yarn, and the open petal eyes will be proportionally smaller, so consider chaining the petal ring to 16 instead of 14 to keep the airy look.
The petal rings are the vulnerable part of this design, since they have an open center that a fingernail or a plate edge can hook. If the runner will be used rather than displayed, work an extra round of sc around the inside of each petal ring to thicken the edge, which makes it far less likely to snag at the cost of a slightly smaller eye.
The finished Spring Meadow Flower Table Runner

