Stacked Pumpkin Amigurumi Door Hanger Pattern
Beginner Friendly
Perfect for those just starting their crochet journey, with clear instructions and simple techniques
Single-Day Project
A satisfying project you can complete in a single afternoon or evening.
Handmade Gift
A beautiful keepsake — free forever. Read online or print at home.
About This Stacked Pumpkin Amigurumi Door Hanger Pattern
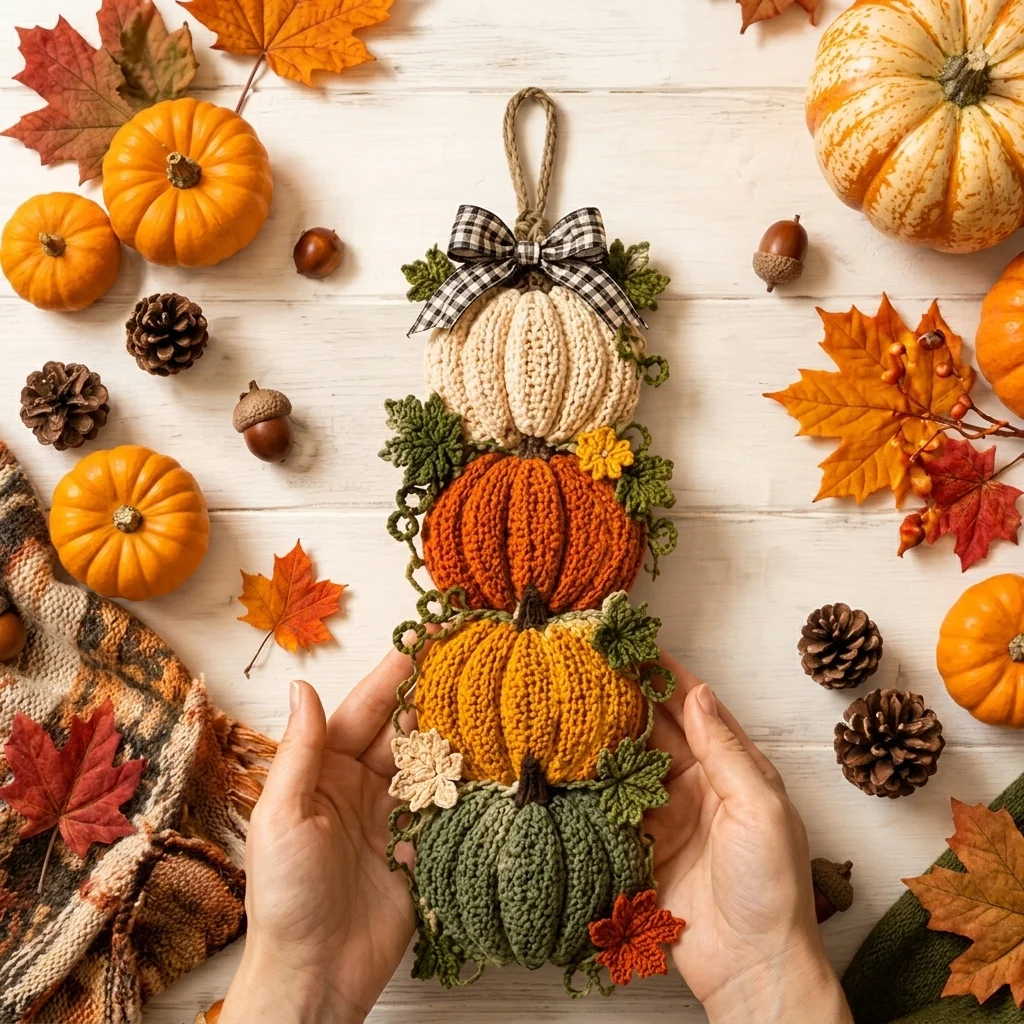
This crochet pumpkin door hanger pattern stacks four ribbed amigurumi pumpkins, cream, rust orange, mustard gold, and sage green, one on top of the next, joined by a stem-to-base seam and decorated with crocheted vine leaves, tiny curlicue tendrils, small flowers, and a jute hanging loop finished with a plaid bow. Each pumpkin is worked as its own stuffed piece with visible vertical ribbing, then stacked and secured along a single central axis.
What makes this design distinctive is the ribbing technique: instead of a plain smooth sphere, each pumpkin body is worked in front-post and back-post double crochet columns that create the deep vertical grooves real pumpkins have, and each one gets its own short crocheted stem in brown before the pieces are joined. Expect to spend 12-16 hours total across four pumpkins, the vine and leaf details, and final assembly.
This is an advanced pattern, best suited to someone comfortable with post stitches and multi-piece assembly, rather than someone making their first amigurumi.
Materials
- Worsted weight yarn, cream ~50g, top pumpkin
- Worsted weight yarn, rust orange ~60g, second pumpkin
- Worsted weight yarn, mustard gold ~60g, third pumpkin
- Worsted weight yarn, sage green ~60g, bottom pumpkin
- Worsted weight yarn, brown ~20g, stems
- Worsted weight yarn, olive green ~30g, vine leaves and curlicues
- Small amounts of mustard and cream yarn for accent flowers
- Small amount of rust orange yarn for one accent leaf
- Fiberfill stuffing ~150g total
- Crochet hook 4 mm (US G/6)
- Jute cord ~40 cm, for hanging loop
- Black and white plaid ribbon ~50 cm, for bow
- Tapestry/yarn needle
- Sharp scissors
Abbreviations
chchainsl stslip stitchscsingle crochethdchalf double crochetdcdouble crochetFPdcfront post double crochetBPdcback post double crochetMRmagic ringincincrease (2 sc in one st)decdecrease (sc2tog)st(s)stitch(es)reprepeatFOfasten offPumpkin Body (make 4: 1 cream, 1 rust orange, 1 mustard gold, 1 sage green)
- Round 1: 6 sc in MR. (6 sts)
- Round 2: inc in each st around. (12 sts)
- Round 3: *sc 1, inc; rep from * around. (18 sts)
- Round 4: *sc 2, inc; rep from * around. (24 sts)
- Round 5: *sc 3, inc; rep from * around. (30 sts)
- Round 6: *sc 4, inc; rep from * around. (36 sts)
- Round 7: switch to dc. *dc 1, FPdc around next st 2 rounds below, BPdc around next st; rep pattern of alternating FPdc/BPdc columns evenly around to set up 12 ribs. (36 sts)
- Rounds 8-11: continue working FPdc over FPdc sts and BPdc over BPdc sts from the round below, maintaining 12 ribbed columns and 36 sts, to build the pumpkin’s rounded ribbed sides.
- Round 12: *sc 4, dec; rep from * around. (30 sts)
- Round 13: *sc 3, dec; rep from * around. (24 sts). Begin stuffing firmly now, adding more as the opening narrows.
- Round 14: *sc 2, dec; rep from * around. (18 sts)
- Round 15: *sc 1, dec; rep from * around. (12 sts)
- Round 16: dec around. (6 sts) Finish stuffing to firm and even.
- FO, leaving a long tail. Thread through remaining 6 sts, pull tight to close, and secure.
Stems (make 4, in brown)
- Round 1: 6 sc in MR. (6 sts)
- Round 2: inc around. (12 sts)
- Rounds 3-6: sc around even. (12 sts)
- Round 7: *sc 2, dec; rep from * around. (9 sts)
- Rounds 8-9: sc around even. (9 sts) Stuff lightly.
- FO, leaving a long tail for attaching to the top of each pumpkin.
Vine Leaves (make 8, in olive green)
- Ch 8. Starting in 2nd ch from hook: sl st in next ch, sc in next 2 ch, hdc in next 2 ch, dc in next 2 ch, 3 dc in last ch.
- Continue down the other side: dc in next 2 ch, hdc in next 2 ch, sc in next 2 ch, sl st in last ch.
- FO leaving a short tail for attaching. Repeat for a total of 8 leaves, 2 per pumpkin.
Curlicue Tendrils (make 6, in olive green)
- Ch 15. Starting in 2nd ch from hook: 3 hdc in each ch across the entire chain.
- FO leaving a short tail. The extra stitches per chain make the strip curl naturally into a spiral once released.
- Repeat for a total of 6 tendrils, distributed between pumpkins as shown in the photo.
Accent Flowers (make 2: 1 mustard, 1 cream)
- Ch 2. Round 1: 8 sc in 2nd ch from hook, do not join, work in a continuous spiral.
- Round 2: *ch 3, sl st in same st, sl st in next st; rep from * around all 8 sts to form 8 small petals.
- FO leaving a short tail for attaching.
Accent Leaf (make 1, in rust orange, for the bottom pumpkin)
- Ch 7. Starting in 2nd ch from hook: sl st, sc 2, hdc 2, 3 dc in last ch, then work back down the other side: dc 2, hdc 2, sl st.
- FO leaving a short tail for attaching.
Assembly and Stacking
- Attach each stem to the top center of its matching pumpkin, sewing firmly around the base of the stem so it stands upright.
- Stack the pumpkins in this order top to bottom: cream, rust orange, mustard gold, sage green. Sew the base of each upper pumpkin directly to the stem area of the pumpkin below it, stitching securely all the way around so the stack holds its shape and doesn’t twist.
- Fold the jute cord in half to form a loop and sew the ends firmly into the top center of the cream pumpkin, on top of or just behind its stem, so the whole stack can hang from it.
- Tie the plaid ribbon into a bow and sew it in place just below the hanging loop, at the top of the cream pumpkin.
Finishing
Distribute the vine leaves in pairs around the seam where each pumpkin meets the next, tucking the leaf bases into the join so they look like they’re growing out of the seam rather than sitting flat on top. Curl the tendrils gently around your finger before attaching so they hold their spiral shape, then tack each one down at one end near a leaf pair, leaving the rest of the curl free. Attach the two accent flowers and the single accent leaf near the lower pumpkins as shown in the photo, angling them slightly for a natural, asymmetrical look rather than lining everything up in a straight row.
Tips for Success
- Stuff each pumpkin firmly and evenly before closing; soft spots are much more visible on a ribbed surface than a plain smooth one.
- Keep FPdc and BPdc columns stacked directly over the same stitches round after round; drifting columns blur the ribbed effect.
- Sew each pumpkin-to-pumpkin join with the seam facing straight down the back of the stack so it’s hidden when the piece hangs on a door.
- Curl tendrils around a pencil or your finger right after finishing them, while the yarn still has some memory from being worked, for a tighter spiral.
- Test the hanging loop’s strength before adding all the leaf and flower details; it’s much easier to reinforce it now than after everything else is sewn on.
Common Mistakes to Avoid
- Understuffing the pumpkins makes the ribbing look saggy instead of taut. Fix: stuff firmly in small amounts throughout the decrease rounds, not all at once at the end.
- Sewing pumpkins together off-center makes the whole stack lean. Fix: check that each pumpkin’s stem lines up with the center of the one above and below before stitching.
- Making all the leaves and tendrils identical in placement looks mechanical. Fix: vary the angle and spacing of leaves at each seam for a more natural vine look.
- Using a thin cord for the hanging loop risks it stretching or breaking under the weight of four stuffed pumpkins. Fix: use a sturdy jute cord and reinforce the stitching at both ends of the loop.
- Attaching the bow before the hanging loop is fully secured can hide a weak spot. Fix: test the loop’s strength first, then add the bow last.
Ways to Customize This Pattern
- Make only 2 or 3 pumpkins instead of 4 for a shorter hanger.
- Swap the plaid bow for a solid ribbon or a crocheted bow in a matching yarn.
- Use a single color for all four pumpkins with only the stems in contrasting brown for a more subtle, monochrome look.
- Add a small crocheted acorn or berry cluster tucked among the leaves for extra texture.
- Swap sage green for deep purple at the bottom for a different seasonal color story.
Frequently asked questions
This usually means the FPdc and BPdc columns aren’t lining up round to round. Check that each post stitch is worked directly around the post of the same-type stitch from the previous round, not shifted over by one.
A well-secured loop sewn through several layers of the top pumpkin’s stitches comfortably holds all four stuffed pumpkins. If you’re using a thinner cord, double it up before sewing for extra strength.
Yes. Work fewer increase rounds for a smaller pumpkin or add 1-2 extra even rounds during the ribbed section for a larger one, adjusting stuffing amounts to match.
No, the extra stitches per chain create enough natural curl on their own. Rolling them around your finger right after finishing helps set the spiral without any stiffening needed.
The finished Stacked Pumpkin Amigurumi Door Hanger Pattern

