Advanced
For experienced crocheters who enjoy complex shaping, fine detail, and ambitious construction
Single-Day Project
A satisfying project you can complete in a single afternoon or evening.
Handmade Gift
A beautiful keepsake — free forever. Read online or print at home.
About This Star Flower Hexagon Blanket
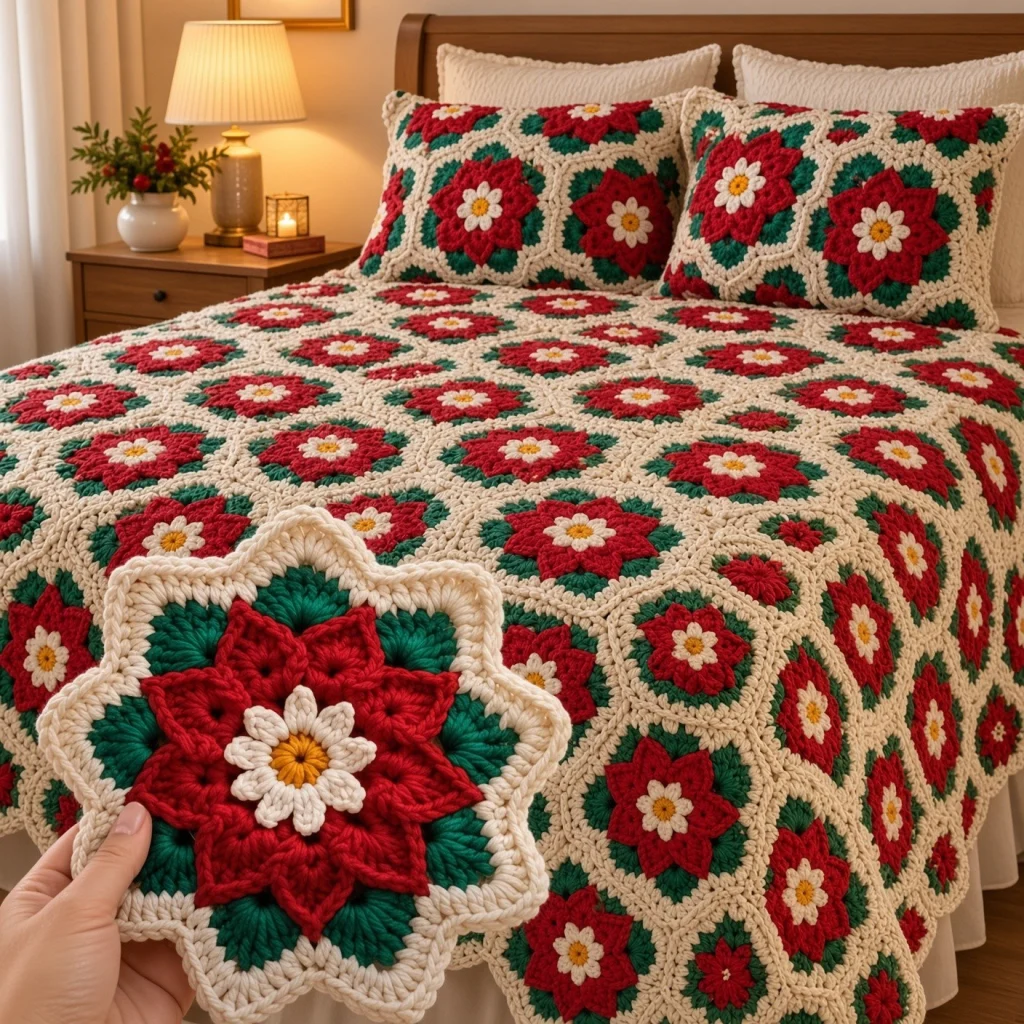
This star flower hexagon blanket crochet pattern builds a full-size throw out of one richly layered motif, repeated until the whole thing glows. Each hexagon starts with a gold centre, grows a ring of small white petals, then two offset layers of deep red star points that sit up off the fabric, and finally a ring of green that tacks every petal tip down before a cream frame squares it into a hexagon. The raised petals are what make this blanket look like heirloom work rather than a plain granny project — they are worked into the posts of the very first round, behind the layers that came before, so the flower stacks forward in real relief.
It is an honest commitment. A single motif takes most people around 35–45 minutes once the rhythm clicks, and the full throw uses 44 whole motifs plus 8 half motifs to square off the side edges, so budget roughly 35–45 hours including joining and the border. The good news is that it is completely portable: every motif is small, self-contained, and finished before you move on, so you can work it in short sittings and never lose your place. Motifs are joined as you go on the final cream round, which means no giant sewing session waiting for you at the end.
This one is for crocheters who are comfortable working in the round, reading stitch counts, and working into the back of previous rounds. If you have made overlay mandalas or layered flower squares before, you already have every skill this needs. If you have only ever made flat granny squares, read the motif section slowly the first time through — once you have made two, the other fifty will feel automatic.
Materials
- Aran / worsted weight yarn in cream approx. 1650 g — background, frames, half motifs and border
- Aran / worsted weight yarn in deep red approx. 620 g — star petals
- Aran / worsted weight yarn in jade green approx. 400 g — leaf ring
- Aran / worsted weight yarn in white approx. 140 g — small daisy petals
- Aran / worsted weight yarn in gold approx. 80 g — flower centres
- 5.0 mm crochet hook or size needed for gauge
- Blunt tapestry needle for weaving in ends
- Stitch markers at least 8, for marking corners and joining points
- Sharp scissors
- Blocking mats and rust-proof pins optional but strongly recommended
Abbreviations
MRmagic ringchchainsl stslip stitchscsingle crochethdchalf double crochetdcdouble crochettrtreble crochetFPscfront post single crochetsc2togsingle crochet 2 stitches together (decrease)st(s)stitch(es)spspacereprepeatRSright sideGauge and Motif Notes
- Gauge: one finished motif through Round 11 measures 18 cm flat side to flat side and 21 cm point to point.
- Work with the right side facing at all times. Every round is joined with a sl st and, unless told otherwise, the yarn is fastened off at the end of the colour block.
- Leave 10 cm tails and weave each one in as you finish a motif. Saving them all for the end on a 52-piece blanket is a trap.
- Make 44 full motifs and 8 half motifs in total.
- Stitch counts are given at the end of each round in brackets. Check them every time — the hexagon corners will not land correctly if a round is off by even one stitch.
Motif Part 1: Gold Centre and White Petals
- Rnd 1 (gold): MR, ch 3 (counts as first dc), 11 dc in ring, pull ring closed, sl st to top of ch-3. (12 dc) Fasten off gold.
- Rnd 2 (white): Join white with a sl st in any dc of Rnd 1. *Ch 2, (dc, tr, dc) in same st, ch 2, sl st in same st, sl st in next st; rep from * 11 more times, working the final sl st into the first joining st. (12 small petals) Fasten off white.
- Press the white petals gently flat with your fingers — they should sit in a tidy daisy with the gold centre showing.
Motif Part 2: Red Star Petals
- Rnd 3 (red): Working behind the white petals, join red with a sl st around the post of any Rnd 1 dc. Ch 1, FPsc around the same post, *ch 4, skip the next Rnd 1 post, FPsc around the next post; rep from * 4 more times, ch 4, sl st to first FPsc. (6 FPsc and 6 ch-4 loops)
- Rnd 4 (red): Sl st into the first ch-4 loop. In each ch-4 loop around work (sc, hdc, 3 dc, hdc, sc), sl st to first sc. (6 inner petals of 7 sts each) Do not fasten off if you are confident; otherwise fasten off and rejoin for Rnd 5.
- Rnd 5 (red): Working behind the Rnd 4 petals, join red with a sl st around the post of any Rnd 1 dc that was skipped in Rnd 3. Ch 1, FPsc around the same post, *ch 6, FPsc around the post of the next skipped Rnd 1 dc; rep from * 4 more times, ch 6, sl st to first FPsc. (6 FPsc and 6 ch-6 loops, sitting between the Rnd 4 petals)
- Rnd 6 (red): Sl st into the first ch-6 loop. In each ch-6 loop around work (sc, hdc, 2 dc, tr, ch 1, tr, 2 dc, hdc, sc), sl st to first sc. (6 large outer petals of 10 sts and one ch-1 tip each) Fasten off red.
- You now have a twelve-point red star in two layers: six short petals and six long ones, alternating. Check that the long petals point into the gaps before moving on.
Motif Part 3: Green Leaf Ring
- Rnd 7 (green): Join green with a sl st in the ch-1 space at the tip of any large red petal. Ch 1, sc in the same sp, *ch 5, sc in the centre dc (the 4th st) of the next short red petal, ch 5, sc in the ch-1 tip of the next large red petal; rep from * around, ending ch 5, sc in centre dc of last short petal, ch 5, sl st to first sc. (12 sc and 12 ch-5 loops) This round tacks every petal tip down and sets the relief.
- Rnd 8 (green): Ch 1, sc in the same st, *5 sc in next ch-5 sp, sc in next sc; rep from * around, ending 5 sc in last ch-5 sp, sl st to first sc. (72 sc) Fasten off green.
- Lay the motif flat. It should be a smooth green-rimmed circle with the red star floating on top. If it cups, your Rnd 7 chains are too tight; if it ruffles, they are too loose.
Motif Part 4: Cream Hexagon Frame
- Rnd 9 (cream): Join cream with a sl st in any sc of Rnd 8. Ch 2 (does not count as a st), *(2 hdc, ch 2, 2 hdc) in next st — corner made, hdc in each of next 11 sts; rep from * 5 more times, sl st to first hdc. (90 hdc and 6 ch-2 corner sps; 15 hdc between corner groups)
- Rnd 10 (cream): Ch 2, *(2 hdc, ch 2, 2 hdc) in next ch-2 corner sp, hdc in each of next 15 sts; rep from * 5 more times, sl st to first hdc. (114 hdc and 6 ch-2 corner sps; 19 hdc along each side between corners)
- Rnd 11 (cream, joining round): Ch 1, *(sc, ch 2, sc) in next ch-2 corner sp, sc in each of next 19 sts; rep from * 5 more times, sl st to first sc. (126 sc; 21 sc per side counting the corner stitches) Fasten off, leaving a 10 cm tail.
- For the first motif only, work Rnd 11 exactly as written. All later motifs are joined to their neighbours during this round — see the Layout and Joining section before you work it.
Half Motif (make 8)
- Row 1 (cream): Ch 43, sc in 2nd ch from hook and in each ch across, turn. (42 sc)
- Row 2: Ch 1, sc in each st across, turn. (42 sc)
- Row 3: Ch 1, sc2tog, sc in each st to last 2 sts, sc2tog, turn. (40 sc)
- Rows 4-21: Rep Row 2 on every even-numbered row and Row 3 on every odd-numbered row, so that you decrease on Rows 5, 7, 9, 11, 13, 15, 17, 19 and 21. (22 sc after Row 21)
- Row 22: Ch 1, sc in each st across, turn. (22 sc) Do not fasten off.
- Edging round: Ch 1 and work around the whole half motif with RS facing: along the top short edge work 21 sc (sc in each st, skipping one st at the centre to even the count); (sc, ch 2, sc) in the corner; 21 sc evenly down the first slanted side (one sc per row end, skipping one row end at the centre); 2 sc in the base corner; 42 sc along the foundation edge; 2 sc in the next base corner; 21 sc evenly up the second slanted side; (sc, ch 2, sc) in the last corner; sl st to first sc. Fasten off.
- The 42-stitch foundation edge becomes the straight outer edge of the blanket. The top edge and both slanted edges each measure 21 sts and join to three neighbouring hexagons.
Layout and Joining
- Lay the blanket out as 8 horizontal rows of point-up hexagons, alternating 6 motifs and 5 motifs per row: rows 1, 3, 5 and 7 hold 6 motifs; rows 2, 4, 6 and 8 hold 5 motifs, set in by half a hexagon at each side. That is 44 full motifs.
- Each 5-motif row leaves a notch at its left and right edge. Fill each notch with one half motif, straight edge facing out. That is 8 half motifs.
- Shuffle the finished motifs before joining so that any slight tension differences are scattered across the blanket rather than clustered in one corner.
- Join as you go on Rnd 11: work the round normally until you reach a side that meets a finished neighbour. At the corner, work sc, ch 1, sl st into the corresponding ch-2 sp of the neighbour, ch 1, sc back in your own corner sp.
- Along a joined side, work sc in your next st, then *sl st into the matching st of the neighbour’s Rnd 11, sc in your next st; rep across all 19 side stitches, then join the next corner the same way.
- Where three motifs meet at one point, always slip stitch into the corner space of the motif that was joined first. This keeps the junctions flat and prevents a hole.
- Join half motifs in exactly the same way during their edging round, matching 21 sts to 21 sts along each of their three short edges.
- Work outward in rows rather than jumping around, and keep the blanket spread flat on a table as it grows — it is much easier to spot a misaligned motif early.
Border
- Rnd 1 (cream): With RS facing, join cream at any point along the left edge. Sc evenly all the way around the blanket: work sc in each stitch along a straight edge, 3 sc in each outer point (the ch-2 sp at the tip of a hexagon), and sc2tog across each inner valley where two motifs meet.
- Rnd 2 (cream): Ch 2, hdc in each st around, working 3 hdc in the centre st of each outer point and skipping one st at each inner valley. Before joining, add or skip a stitch or two on the final side so that your total is a multiple of 4, then sl st to the first hdc.
- Rnd 3 (cream, scallop): Ch 1, sc in first st, *skip 1 st, 5 dc in next st, skip 1 st, sl st in next st; rep from * around, sl st to join. Fasten off and weave in the tail.
- The scallop round sits best after blocking, so do not panic if it looks slightly bunched while the blanket is still on your lap.
Finishing
Weave in every remaining tail on the wrong side, splitting the yarn as you go so nothing works loose in the wash. Pay particular attention to the red tails at the back of Rounds 3 and 5 — they sit under two layers of petals and are the most likely to pop through to the front, so run them along the back of the green round rather than the flower centre.
Block the finished blanket. Soak it in cool water with a little wool wash, press out the excess between towels without wringing, then lay it flat and pin each hexagon point so the edges are straight and every motif is the same size. Keep the red petals free of the pins — you want them standing proud, not flattened. Let it dry fully, which can take a day or two for a piece this dense. Blocking is what turns a lumpy pile of motifs into a flat, even blanket, so it is worth the wait.
Once dry, give the scalloped border a quick press with your hands to settle it, and check each three-motif junction from the back. Any junction that looks loose can be reinforced with a few invisible stitches in cream using the tapestry needle.
Tips for Success
- Make three motifs before committing to the full blanket, and measure them. If they come out larger or smaller than 18 cm flat to flat, change hook size now — a 2 mm difference per motif becomes 12 cm across the finished width.
- Work Rounds 3 and 5 with the motif folded slightly forward so the petals fall out of your way. Trying to force the hook past them flat is what makes those post stitches feel impossible.
- Keep the ch-4 and ch-6 loops in Rounds 3 and 5 relaxed but not baggy. Those chains control how far the red petals lift off the fabric, and they should be just long enough to arch, not slump.
- Count the corner spaces on Rnd 9 before you move on. Six corners with 15 hdc between them is the only configuration that will tile correctly, and it is far quicker to redo one round than to discover the problem on motif forty.
- Wind your cream yarn into working-size balls and keep one dedicated to frames and one to joining. Switching between a nearly-empty ball and a full one mid-join is where tension wobbles creep in.
Common Mistakes to Avoid
- Working Round 5 into the same posts as Round 3. The two red layers must alternate. If your long petals sit directly on top of the short ones, undo Round 5 and re-anchor it in the six posts you skipped.
- Pulling Round 7 too tight. Because it anchors petal tips, over-tightening drags the star into a dome. If the motif will not lie flat, redo Round 7 with looser chains before adding the cream frame.
- Crocheting the hexagon corners into the wrong stitch on Rnd 9. The corner goes into a single stitch, not a space, and the eleven plain hdc that follow are worked into the next eleven sc. Miscounting here gives you a wavy, lopsided motif.
- Joining motifs into the wrong corner space at a three-way junction. Always slip stitch into the first-joined motif’s corner. Joining into the second one leaves a visible hole that no amount of blocking will close.
- Skipping the gauge check on the half motifs. If your rows are taller than your stitches are wide, the trapezoid will not fill the notch. Add or remove two plain rows between decreases until the three short edges truly measure 21 stitches’ worth of length.
Ways to Customize This Pattern
- Make a matching pillow cover by joining 7 motifs into a flower-shaped panel, repeating for the back, and joining the two panels with a round of cream sc around three and a half sides before inserting a cushion pad.
- Change the palette completely while keeping the layered construction: soft pink petals with sage green and oatmeal cream give a faded-quilt look, and deep plum with teal and charcoal makes a far more modern throw.
- Work the background in scrap colours instead of a single cream. Keeping the flower colours constant and randomising the frames turns the same motif into a warm, patchwork-style blanket.
- Size it down to a baby blanket with 15 full motifs in rows of 4 and 3 plus 4 half motifs, worked in DK yarn and a 4 mm hook for a finished piece around 65 x 80 cm.
- Skip the half motifs entirely and let the side edges stay zigzagged, then work five rounds of plain cream hdc into the border before the scallop — this gives a scalloped-edge throw with a softer, less formal outline.
Frequently asked questions
You can leave them out. The half motifs exist purely to square off the left and right edges so the blanket hangs straight over the side of a bed. If you prefer the zigzag edge, make 44 full motifs only and work two extra plain rounds in the border to firm up the points before the scallop.
Almost always it is Round 7. That round should pull the petal tips gently down onto the green ring while the chains arch over the middle of each petal. If Round 7 is worked into the base of the petals rather than the tips, or if the chains are too long, the layers collapse. Re-check that you anchored into the ch-1 tip of each large petal and the centre dc of each short one.
Yes. Work Rnd 11 as written on every motif, then whip stitch through the back loops of matching stitches with cream yarn, or use a flat slip stitch seam. Sewing gives a slightly flatter seam but adds several hours and a lot of ends on a 52-piece blanket, which is why the pattern joins on the final round.
In acrylic or an acrylic-cotton blend, yes — wash cool on a gentle cycle and dry flat. In pure cotton it will still wash well but becomes very heavy when wet, so support the whole blanket when lifting it out. Avoid wool for this design unless it is superwash, because the raised petals felt and flatten quickly.
More than you would expect. The two red layers eat roughly 14 g per motif because each petal is worked over a chain loop rather than flat fabric, so budget around 620 g of red for the full throw. Buy the red all in one dye lot if you can — it is the colour the eye lands on first, and a lot change halfway through the blanket is very noticeable.
The finished Star Flower Hexagon Blanket

