Sunflower Granny Square Blanket & Pillow Shams
Advanced
For experienced crocheters who enjoy complex shaping, fine detail, and ambitious construction
Weekend Project
A satisfying weekend make — start Friday, finish Sunday, enjoy forever.
Handmade Gift
A beautiful keepsake — free forever. Read online or print at home.
About This Sunflower Granny Square Blanket & Pillow Shams
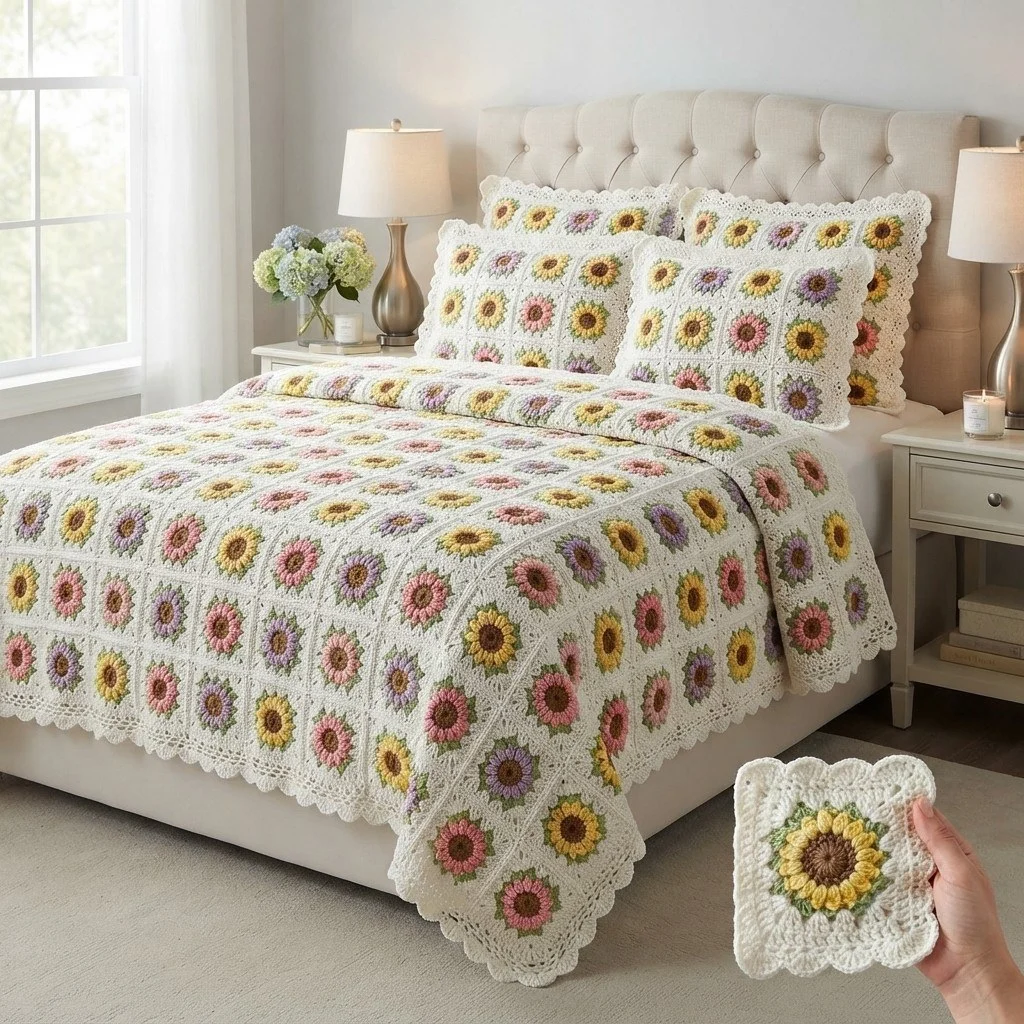
This sunflower granny square blanket pattern turns one textured motif into a full bedspread with two matching pillow shams, worked in soft cream with flower centres in golden yellow, pale lemon, soft pink and lavender. Each square has a raised brown centre, two offset rounds of puff-stitch petals, a green leaf round and a cream frame, so the flowers sit up off the surface instead of lying flat. The squares are joined as you go on the final round, which means there is no seaming marathon waiting for you at the end.
It is a long project, but a very portable one. A single square takes most people 25 to 35 minutes once the puff rhythm clicks, and the full set — 120 squares for the bedspread and 12 squares for each sham — works out at roughly 60 to 80 hours of hooking spread over a few months. The border and the scalloped edge add another evening or two. Because every piece is built from the same motif, you can start it without committing to the final size: make squares, lay them out, and decide how wide the bedspread needs to be when you can actually see it on the bed.
This one is for crocheters who are comfortable with puff stitches, counting multi-round motifs and keeping a colour plan straight across a hundred-plus pieces. If you have made granny squares before but never joined as you go, the joining round here is a gentle way in: it is a plain single crochet round with four corner joins per square, and the written counts tell you exactly where each join lands. The surface embroidery at the end — seed stitches in the flower centres and short leaf veins at the corners — is what makes the finished blanket look like a designed textile rather than a pile of motifs.
Materials
- DK cotton yarn in cream approx. 2000 g for the bedspread, plus 450 g for both shams
- DK cotton yarn in golden yellow approx. 400 g (36 flowers)
- DK cotton yarn in pale lemon approx. 300 g (36 flowers)
- DK cotton yarn in soft pink approx. 300 g (36 flowers)
- DK cotton yarn in lavender approx. 300 g (36 flowers)
- DK cotton yarn in leaf green approx. 350 g (all 144 squares)
- DK cotton yarn in chocolate brown approx. 250 g (all 144 centres)
- Small amount of deep brown and dark green for surface embroidery leftovers are fine
- 4.0 mm crochet hook main hook
- 3.5 mm crochet hook for the sham back panels, for a firmer fabric
- Blunt tapestry needle for joining ends and embroidery
- Stitch markers at least 8
- Two pillow forms, 50 x 70 cm one per sham
- Rust-proof pins and a blocking mat or towel-covered bed for blocking squares
Abbreviations
MRmagic ringchchainsl stslip stitchscsingle crochethdchalf double crochetdcdouble crochetpuffpuff stitch (see Before you start)st(s)stitch(es)spspacereprepeatRSright sideWSwrong sideJAYGjoin as you goFLOfront loop onlySunflower Centre and Petals (Rnds 1-4)
- Rnd 1 (chocolate brown): MR, ch 2 (does not count as a st), 12 dc in ring, pull ring closed, sl st to top of first dc. 12 dc
- Rnd 2 (chocolate brown): ch 2, 2 dc in each st around, sl st to top of first dc. 24 dc Fasten off brown, leaving a 10 cm tail.
- Rnd 3 (petal colour): join with a standing puff in any st of Rnd 2, ch 1 to close, *skip next st, puff in next st, ch 1; rep from * 10 more times, skip last st, sl st to top of first puff. 12 puffs, 12 ch-1 sps (all 24 sts of Rnd 2 are used: one puff and one skipped st per repeat).
- Rnd 4 (same petal colour): sl st into first ch-1 sp, ch 1, (puff, ch 1, puff, ch 1) in each ch-1 sp around, sl st to top of first puff. 24 puffs, 24 ch-1 sps This second layer sits between the first-layer petals and gives the flower its depth. Fasten off petal colour.
- Check before moving on: the motif should measure about 9 cm across and lie flat. If it cups, your puffs are too tight; if it ruffles, close them more firmly.
Leaf Round and Squaring Off (Rnds 5-6)
- Rnd 5 (leaf green): join with sl st in any ch-1 sp of Rnd 4, ch 3 (counts as first dc), 1 dc in same sp, *2 dc in next ch-1 sp, 1 dc in next ch-1 sp; rep from * 11 more times, ending 1 dc in last ch-1 sp, sl st to top of ch-3. 36 dc (12 repeats of 3 dc over 24 spaces.)
- Rnd 6 (leaf green) — this round forms the four corners: ch 3 (counts as first dc), (1 dc, ch 2, 2 dc) in same st, dc in each of next 8 sts, *(2 dc, ch 2, 2 dc) in next st, dc in each of next 8 sts; rep from * 2 more times, sl st to top of ch-3. 48 dc and 4 ch-2 corner sps (each repeat uses 9 sts of Rnd 5: 4 x 9 = 36.) Fasten off green.
- The square should now measure about 11 cm along each side, with 12 dc between corner spaces on every side.
Cream Frame and Joining Round (Rnds 7-9)
- Rnd 7 (cream): join with sl st in any ch-2 corner sp, ch 3 (counts as first dc), (2 dc, ch 2, 3 dc) in same corner sp, dc in each of next 12 sts, *(3 dc, ch 2, 3 dc) in next corner sp, dc in each of next 12 sts; rep from * 2 more times, sl st to top of ch-3. 72 dc and 4 ch-2 corner sps (4 sides x 18 sts.)
- Rnd 8 (cream): sl st into corner sp, ch 3 (counts as first dc), (2 dc, ch 2, 3 dc) in same corner sp, dc in each of next 18 sts, *(3 dc, ch 2, 3 dc) in next corner sp, dc in each of next 18 sts; rep from * 2 more times, sl st to top of ch-3. 96 dc and 4 ch-2 corner sps (4 sides x 24 sts.)
- Rnd 9 (cream) — joining round for a stand-alone square: sl st into corner sp, ch 1, (sc, ch 2, sc) in same corner sp, sc in each of next 24 sts, *(sc, ch 2, sc) in next corner sp, sc in each of next 24 sts; rep from * 2 more times, sl st to first sc. 104 sc and 4 ch-2 corner sps Fasten off and weave in the cream end.
- Make the very first square this way, complete. Every square after it is worked to the end of Rnd 8, then finished with the join-as-you-go version of Rnd 9 in the next section.
- Blocked size: about 15 x 15 cm. Block one finished square before making 143 more, and adjust hook size if yours comes out more than 1 cm off.
Making and Arranging the Squares
- Total for the set: 144 squares — 120 for the bedspread (10 across x 12 down) and 12 for each of the two shams (4 across x 3 down).
- Petal colour split: 36 golden yellow, 36 pale lemon, 36 soft pink, 36 lavender. Every square uses the same brown centre, green leaf round and cream frame.
- Colour layout for the bedspread: work in diagonal stripes. Number the columns 1 to 10 and the rows 1 to 12, then set each square’s petal colour by (row + column) divided by 4: remainder 0 = golden yellow, 1 = soft pink, 2 = lavender, 3 = pale lemon. This gives the scattered-but-even look in the photo with no two same-colour flowers side by side.
- Sham layout: use the same diagonal rule starting at row 1, column 1, so the shams read as part of the same cloth.
- Block all squares before joining. Pin each one to 15 x 15 cm, spray with water, and let it dry fully. Unblocked puff squares vary by up to a centimetre and the join will fight you.
- Lay the blanket squares out on the bed in their final grid before you join anything, and photograph the layout so you can rebuild it if the pile gets knocked over.
Join-As-You-Go Round (Rnd 9 Joining Version)
- Work each new square through the end of Rnd 8. Place it RS up, next to the square or squares it will attach to, before you begin Rnd 9.
- Join cream with sl st in the corner sp that will sit at the start of the joining edge, ch 1, sc in same sp, ch 1, sl st into the matching ch-2 corner sp of the neighbouring square, ch 1, sc in same corner sp of the working square.
- Joining a side: *sc in next st of the working square, sl st into the corresponding sc of the neighbour’s Rnd 9, skip no stitches; rep from * across all 24 sts of that side, so each of the 24 sc is anchored to its partner. Keep the slip stitches loose or the seam will pull in.
- At the next corner: sc in corner sp, ch 1, sl st into the neighbour’s corner sp, ch 1, sc in the same corner sp of the working square. Where four squares meet, slip stitch into the centre of the existing corner join rather than into a single square, so all four corners sit level.
- Free sides (no neighbour yet): work them plain — (sc, ch 2, sc) in corner sp, sc in each of next 24 sts.
- Stitch count stays 104 sc and 4 ch-2 corner sps on every square, joined or not. Fasten off and weave in as you finish each square rather than saving them up.
- Join the bedspread in rows: complete row 1 left to right, then join each square of row 2 along its top edge and then its left edge, and so on.
Bedspread Border
- Rnd 1 (cream): join in any outer corner ch-2 sp, ch 1, (sc, ch 2, sc) in corner, then sc in each st along the edge, working 1 sc into each square-to-square seam as you pass it, and (sc, ch 2, sc) in each of the remaining three outer corners. Sl st to first sc. Count each side and note the number.
- Rnd 2 (cream): ch 2, hdc in each st around, (2 hdc, ch 2, 2 hdc) in each corner sp, sl st to first hdc. On this round, add or skip a stitch here and there on each side so that every side ends on a multiple of 6. Write the four numbers down.
- Rnd 3 (cream): ch 1, sc in each st around, (sc, ch 2, sc) in each corner sp, sl st to first sc. Stitch counts per side stay at the multiples of 6 set in Rnd 2.
- Rnd 4 (cream) — scalloped edge: ch 1, sc in first st, *skip 2 sts, 7 dc in next st, skip 2 sts, sc in next st; rep from * along each side, working (sc, ch 2, sc) in each corner sp and starting the repeat fresh after every corner. Each repeat consumes 6 sts, which is why Rnd 2 had to come out even.
- Rnd 5 (cream): ch 1, sc in first sc, *sl st in each of the next 7 dc of the shell, sc in next sc; rep from * around, sl st to first sc. This slip-stitch outline firms up the scallop so it holds its shape after washing. Fasten off.
Pillow Sham Front Panel (make 2)
- Join 12 squares into a 4-across by 3-down panel using the same JAYG method. Finished panel: about 60 x 45 cm.
- Rnd 1 (cream): join in any outer corner sp, ch 1, (sc, ch 2, sc) in corner, sc in each st along each side with 1 sc into each seam, (sc, ch 2, sc) in each corner, sl st to first sc.
- Rnds 2-4 (cream): ch 2, hdc in each st around, (2 hdc, ch 2, 2 hdc) in each corner sp, sl st to first hdc. Three rounds total, adding 8 sts per round. On Rnd 4, adjust each side to a multiple of 6 and note the numbers.
- This three-round hdc band becomes the inner part of the flange. Fasten off and set the panel aside.
Pillow Sham Back Panels (make 4, two per sham)
- With the 3.5 mm hook and cream, ch 92.
- Row 1: hdc in 3rd ch from hook and in each ch across, turn. 90 hdc
- Rows 2-70: ch 2, hdc in each st across, turn. 90 hdc each row. The panel should measure about 60 cm wide by 30 cm tall.
- Row 71 (closing edge): ch 1, sc in each st across. Do not turn. 90 sc Fasten off.
- Make a second identical panel for the same sham, then two more for the second sham. The two back panels overlap by about 15 cm down the middle of the sham back, which is how the pillow form goes in and out.
- Optional closure row: along the sc edge of each panel, work a row of (sc in each of next 8 sts, ch 2, skip 2 sts) for buttonholes if you prefer buttons to a plain overlap.
Assembling the Shams and Working the Flange
- Lay a front panel WS up. Place one back panel over the lower half and the second over the upper half, both RS down, so their sc edges overlap across the middle by about 15 cm. Pin generously — the overlap must stay square.
- Rnd 1 (cream, through both layers): join in any corner of the front panel, ch 1, sc through the front panel and back panel together all the way around, working 3 sc in each corner. Where only the front panel exists at the overlap edge, still work into the front panel so the count stays even.
- Rnd 2 (cream, front panel only from here): ch 2, hdc in each st around, (2 hdc, ch 2, 2 hdc) in each corner, sl st to first hdc. Adjust each side to a multiple of 6.
- Rnd 3 (cream): ch 1, sc in each st around, (sc, ch 2, sc) in each corner, sl st to first sc.
- Rnd 4 (cream) — scalloped flange edge: ch 1, sc in first st, *skip 2 sts, 7 dc in next st, skip 2 sts, sc in next st; rep from * around, (sc, ch 2, sc) in each corner, restarting the repeat after every corner.
- Rnd 5 (cream): ch 1, sc in first sc, *sl st in each of next 7 dc, sc in next sc; rep from * around, sl st to first sc. Fasten off and weave in all ends.
- Insert the pillow form through the back overlap and smooth the flange flat.
Surface Detail: Seed Centres and Leaf Veins
- Thread the tapestry needle with deep brown. On each flower centre, work 8 to 10 short straight stitches, 3 to 4 mm long, scattered at random angles across Rnd 2. This breaks up the flat dc surface and reads as seeds.
- Bring the needle up through the centre of the magic ring to start and finish each flower, and carry the thread only within the brown area so nothing shows through the cream.
- With dark green, work four short surface slip-stitch lines on the green round, one at each corner of the square, running from the petal edge outward across 3 dc. These read as leaf veins and visually pull the flower into its square.
- Keep the embroidery tension loose. Pulled-tight stitches dimple the fabric and the dimple will not block out.
- Do the embroidery after blocking but before joining, while each square still lies flat on your lap. On a finished bedspread it is a far more awkward job.
Finishing
Weave in every end on the wrong side, splitting the yarn as you go so nothing works loose in the wash. On the squares, run the brown and petal-colour tails under the green round rather than across the cream frame, where they would show as shadows through the lighter stitches. Give yourself a full evening for the ends — on 144 squares there are a lot of them, and doing a handful after each batch of squares is far less painful than facing them all at once.
Block the finished bedspread by laying it flat on a clean sheet, misting it evenly with water, patting the squares into alignment and pinning the scalloped edge out point by point. Let it dry completely, which with cotton can take a day and a half. Block the shams the same way with the pillow forms removed and a towel inside each one, so the flange dries flat and the front panel does not stretch. After this first block the bedspread can be machine washed cool and dried flat; the scallops will keep their shape as long as you pin them out the first time.
Tips for Success
- Work the puff rounds one hook size tighter than feels natural. Puffs loosen with wear and a slack petal round makes the flower sag into the square after a few months on a bed.
- Make squares in batches by round, not one at a time: do twenty brown centres, then twenty petal rounds, then twenty green rounds. Your tension stays far more consistent and the whole thing goes noticeably faster.
- Mark the first stitch of every round with a stitch marker on Rnds 6, 7 and 8. The corner increases are easy to miscount when the dc sides get long, and a square with 23 stitches on one side will not join cleanly.
- Keep one perfect blocked square as your reference and hold every new batch against it. Catching a tension drift at square 30 is a small fix; catching it at square 100 is not.
- When joining as you go, keep the slip stitches loose enough that the seam stretches as much as the squares do. A tight join line shows as a visible ridge once the blanket is spread on a bed.
Common Mistakes to Avoid
- Uneven puff loops. If one of the four loops in a puff is shorter than the others, the petal leans. Pull every loop up to the same height as a dc and check the first few puffs of each round before carrying on.
- Skipping the wrong stitch on Rnd 3. The round must use all 24 stitches of Rnd 2 — one puff and one skipped stitch per repeat. Ending with 11 or 13 puffs throws off Rnd 4 and the square will never square up. Count your puffs before fastening off.
- Joining unblocked squares. Puff motifs come off the hook slightly cupped, and joining them in that state locks the cupping in permanently. Block first, every time.
- Forgetting to set the border sides to a multiple of 6. The 7-dc scallop eats exactly 6 stitches per repeat, so a side with 97 stitches will leave a stranded half-shell at the corner. Adjust on the hdc round, not on the scallop round.
- Carrying the brown embroidery thread across the back of the cream frame. It shadows through the light yarn. Start and finish each centre with its own short length instead.
Ways to Customize This Pattern
- Change the bed size by changing the grid: 8 x 10 squares gives roughly a 120 x 150 cm throw, 12 x 14 gives about 180 x 210 cm for a larger bed. The border and scallop instructions work unchanged at any grid size.
- Swap the four pastel petal colours for a single colour — all golden yellow with brown centres gives a strict sunflower-field look, while all cream flowers on a cream ground gives a textured, tone-on-tone bedspread.
- Replace the green Rnd 5 with a second cream round if you want the flowers to float on the background with no leaf ring. Keep the same stitch counts, just change the yarn.
- Make a single square into a cushion front by working Rnds 1-8, then four more cream hdc rounds, and backing it with a 35 cm plain hdc panel and the same scalloped edge.
- Use the motif as a table runner: join 3 x 9 squares, skip the hdc flange rounds and go straight to the scalloped edge for a lighter, flatter finish.
Frequently asked questions
Each blocked square is about 15 cm, so divide your target width and length by 15 and round up. For a standard double bed with a 25 cm drop on three sides, 10 across by 12 down (120 squares) gives roughly 150 x 180 cm. Add the five border rounds, which grow the piece by about 6 cm on every side.
Yes, but it changes the drape. Cotton gives the crisp, flat squares and well-defined puffs shown here and is heavy enough to hang properly over the edge of a bed. DK acrylic is lighter and the puffs are softer and less sculptural; wool blooms after blocking and will make the flowers look fuller but the whole piece warmer and less washable. Whatever you choose, check that one square still blocks to 15 cm.
You can sew them. Work Rnd 9 plain on every square, then whipstitch through the back loops of each sc pair, or slip stitch the squares together with cream. Sewing is slower and adds bulk at the four-square corners, but it does let you rearrange the colour layout after the squares are finished, which join-as-you-go does not.
A few millimetres is normal and blocking will hide it. More than a centimetre means tension is drifting, usually because the puffs are getting looser as your hands relax. Measure one square from every batch of ten against your reference square, and if you see drift, switch down to a 3.75 mm hook for the puff rounds only on the remaining squares.
The curl comes from the hdc rounds pulling tighter than the sc rounds. Work the three hdc flange rounds loosely, keep the corner increases at a full (2 hdc, ch 2, 2 hdc), and always finish with the Rnd 5 slip-stitch outline over the scallops. Pin the flange out flat for its first block with the pillow form removed and it will stay put afterwards.
The finished Sunflower Granny Square Blanket & Pillow Shams

