Sunflower Lace Table Runner
Beginner Friendly
Perfect for those just starting their crochet journey, with clear instructions and simple techniques
Single-Day Project
A satisfying project you can complete in a single afternoon or evening.
Handmade Gift
A beautiful keepsake — free forever. Read online or print at home.
About This Sunflower Lace Table Runner
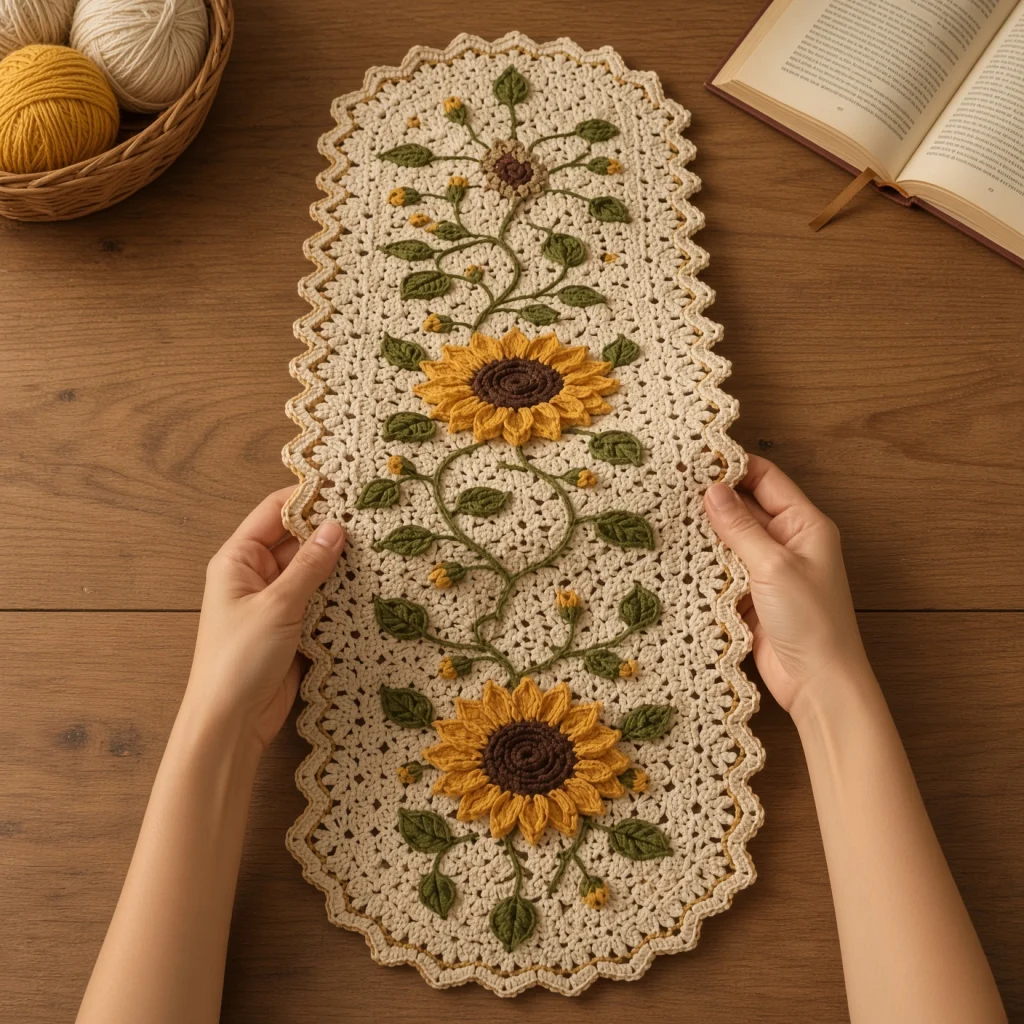
This crochet sunflower lace table runner puts two large golden blooms and a winding leafy vine onto a cream V-stitch lace panel with softly rounded, scalloped ends. The lace is worked flat in one piece with shaping at both ends so the runner narrows into a curve rather than stopping square, and the whole outline is finished with a picot scallop edged in a thin line of gold that catches the eye without shouting.
The appliqué is what carries the design. Each sunflower is two layers of pointed petals in two golds with a coiled brown center worked in surface slip stitch, so the seed head has real texture instead of reading as a flat brown circle. A third, smaller bud head sits at the top of the runner, half-open and turned away, which is the detail that makes the vine look like it is still growing. Around them, eighteen leaves in two greens and a scattering of small gold buds follow a stem that curves from one end of the panel to the other.
Plan on five or six hours for the lace panel and border, about eight for the flowers and their centers, and the rest for leaves, buds, vine and assembly — roughly 20 to 26 hours. It is advanced work because of the end shaping in the lace and because the vine layout has to be arranged by eye rather than counted. Nothing in it is technically hard; it simply rewards not rushing the placement.
Materials
- DK cotton in cream approx. 420 m (about 210 g) — lace panel and border
- DK cotton in golden yellow approx. 90 m — outer petals and buds
- DK cotton in deep amber approx. 70 m — inner petals and buds
- DK cotton in dark chocolate brown approx. 60 m — flower centers and bud head
- DK cotton in olive green approx. 80 m — leaves and vine
- DK cotton in medium sage green approx. 60 m — leaves
- DK cotton in warm gold approx. 35 m — border trim line
- 3.5 mm crochet hook US E-4
- 3 mm hook for the small buds and the vine cord
- Tapestry needle blunt tip
- Rustproof pins 50+
- Blocking mats or a towel-covered board at least 95 x 35 cm
- Stitch markers 6-8
- Measuring tape and small sharp scissors
Abbreviations
begbeginningchchaindcdouble crochetdc2togdouble crochet 2 stitches togetherhdchalf double crochetMRmagic ringpicotch 3, sl st in 3rd ch from hookreprepeatrnd(s)round(s)RSright sidescsingle crochetskskipsl stslip stitchsp(s)space(s)st(s)stitch(es)V-stV-stitch: (dc, ch 1, dc) in the same st or spGauge and sizing
- Gauge: 5 V-stitches and 9 rows = 10 cm x 10 cm, blocked.
- Lace panel at its widest: approximately 27 cm. With the border: approximately 30 cm.
- Large sunflower: approximately 13 cm across. Bud head: approximately 6 cm. Leaf: approximately 6 cm long.
- Finished runner: approximately 88 cm long by 30 cm wide.
- All instructions use US crochet terminology.
- To lengthen, add rows to the straight center section in any number — every 9 rows adds about 10 cm. Add one sunflower per 24 cm of extra length, plus 4 leaves and 3 buds.
Lace panel: first end shaping
- With cream, ch 16.
- Row 1 (RS): Dc in 6th ch from hook, ch 1, dc in the same ch (first V-st made), *sk next 2 ch, V-st in next ch; rep from * across to the last 2 ch, sk 1 ch, dc in last ch. Turn. (4 V-sts, 2 edge dc)
- Row 2: Ch 3 (counts as dc), V-st in the ch-1 sp of each V-st across, working 2 V-sts into the first and last V-st sp, dc in the top of the turning ch. Turn. (6 V-sts)
- Row 3: Ch 3, 2 V-sts in the first V-st sp, V-st in each V-st sp across to the last, 2 V-sts in the last V-st sp, dc in the top of the turning ch. Turn. (8 V-sts)
- Row 4: Rep Row 3. (10 V-sts)
- Row 5: Rep Row 3. (12 V-sts)
- Row 6: Ch 3, V-st in the first V-st sp, 2 V-sts in the next V-st sp, V-st in each V-st sp across to the second-to-last, 2 V-sts in that sp, V-st in the last sp, dc in the top of the turning ch. Turn. (14 V-sts)
- Rows 7-8: Rep Row 6. (Row 7: 16 V-sts. Row 8: 18 V-sts)
- The panel is now at full width. Place a marker in Row 8 so you can find the end of the shaping later.
Lace panel: straight center
- Row 9: Ch 3 (counts as dc), V-st in the ch-1 sp of each V-st across, dc in the top of the turning ch. Turn. (18 V-sts)
- Rows 10-60: Rep Row 9. (18 V-sts in each row)
- The straight section should measure about 58 cm. Together with the two shaped ends the panel comes to roughly 82 cm before the border.
- Place a marker in Row 60 before starting the second end shaping.
Lace panel: second end shaping
- Row 61: Ch 3, V-st in the first V-st sp, sk next V-st sp, V-st in each V-st sp across to the last 2 sps, sk next sp, V-st in the last sp, dc in the top of the turning ch. Turn. (16 V-sts)
- Rows 62-63: Rep Row 61. (Row 62: 14 V-sts. Row 63: 12 V-sts)
- Row 64: Ch 3, sk first V-st sp, V-st in each V-st sp across to the last sp, sk that sp, dc in the top of the turning ch. Turn. (10 V-sts)
- Rows 65-66: Rep Row 64. (Row 65: 8 V-sts. Row 66: 6 V-sts)
- Row 67: Ch 3, sk first V-st sp, V-st in next 4 V-st sps, sk last sp, dc in the top of the turning ch. Turn. (4 V-sts)
- Fasten off. Both ends should now mirror each other. Compare them side by side before moving on — if one is visibly more pointed, redo the shaping rather than relying on blocking to even them out.
Border
- Rnd 1 (cream): Join cream with a sl st at any point on the outer edge. Ch 1, work sc evenly around the entire panel: 2 sc in each V-st ch-1 sp along both short ends, 2 sc into the end of each row along both long edges, and 3 sc at each of the four points where the shaping meets the straight section. Sl st to first sc. Your total should be a multiple of 6 — aim for about 372 sc, adjusting by 1 or 2 stitches at the row ends where it will not show.
- Rnd 2 (cream): Ch 1, sc in each sc around, sl st to first sc. (372 sc)
- Rnd 3 (cream scallops): Ch 1, sc in first sc, *sk next 2 sc, 5 dc in next sc, sk next 2 sc, sc in next sc; rep from * around, sl st to first sc. (62 scallops)
- Rnd 4 (gold trim): Join warm gold with a sl st in any sc between scallops. Ch 1, *sc in next dc, sc in next dc, picot, sc in next dc, sc in next dc, sc in next dc, sl st in next sc; rep from * around, sl st to first sc. (62 picots, one at the crown of each scallop) The gold should read as a thin line following the scallop edge, not as a solid band.
- Fasten off and weave in ends. Block the panel flat now, before any appliqué goes on.
Sunflowers (make 2)
- Outer petal layer, Rnd 1: With golden yellow, MR, ch 1, 14 sc in ring, pull closed, sl st to first sc. (14 sc)
- Outer petal layer, Rnd 2: *Ch 9, sc in 2nd ch from hook, sc in next ch, hdc in next 2 ch, dc in next 3 ch, sl st in next sc of Rnd 1; rep from * 13 more times. Sl st to the base of the first petal. (14 petals of 8 sts) Fasten off, leaving a 25 cm tail.
- Inner petal layer, Rnd 1: With deep amber, MR, ch 1, 14 sc in ring, pull closed, sl st to first sc. (14 sc)
- Inner petal layer, Rnd 2: *Ch 7, sc in 2nd ch from hook, sc in next ch, hdc in next 2 ch, dc in next ch, sl st in next sc of Rnd 1; rep from * 13 more times. Sl st to the base of the first petal. (14 petals of 6 sts) Fasten off, leaving a 25 cm tail.
- Stack the amber layer on the golden layer, rotating it so its petals sit in the gaps below. Sew the two centers together with a ring of small stitches about 8 mm out from the middle — the petals stay free.
- Center, Rnd 1: With dark brown, MR, ch 1, 8 sc in ring, pull closed, sl st to first sc. (8 sc)
- Center, Rnd 2: Ch 1, 2 sc in each sc around, sl st to first sc. (16 sc)
- Center, Rnd 3: Ch 1, *sc in next sc, 2 sc in next sc; rep from * around, sl st to first sc. (24 sc)
- Center, Rnd 4: Ch 1, *sc in next 2 sc, 2 sc in next sc; rep from * around, sl st to first sc. (32 sc)
- Center, Rnd 5: Ch 1, working in back loops only, sc in each sc around, sl st to first sc. (32 sc) Fasten off, leaving a 35 cm tail. The disc should measure about 5 cm.
- Coil detail: with brown, work a continuous line of surface slip stitch spiraling from the outer edge of the disc inward to the center, keeping about 7 mm between passes. Two full passes give the seed-head texture. Fasten off on the wrong side.
- Sew the center onto the petal stack, stitching around its outer edge through the back loop of the final round.
- The finished flower should measure about 13 cm across. Make 2.
Bud head (make 1)
- Rnd 1: With dark brown, MR, ch 1, 8 sc in ring, pull closed, sl st to first sc. (8 sc)
- Rnd 2: Ch 1, 2 sc in each sc around, sl st to first sc. (16 sc)
- Rnd 3: Ch 1, *sc in next sc, 2 sc in next sc; rep from * around, sl st to first sc. (24 sc)
- Rnd 4: Ch 1, working in back loops only, sc in each sc around, sl st to first sc. (24 sc) Fasten off, leaving a 25 cm tail. The head should measure about 4 cm.
- Partial petal ring: with golden yellow, join at any point on the outer edge. *Ch 7, sc in 2nd ch from hook, sc in next ch, hdc in next 2 ch, dc in next ch, sl st in next 2 sc of the brown disc; rep from * 6 more times, then fasten off. (7 petals covering roughly half the disc)
- The bud head should measure about 6 cm with its partial petals. This is the half-open flower that sits at the top of the runner, turned so the petal-free side faces outward.
Leaves (make 18: 10 olive, 8 sage)
- Ch 13.
- Rnd 1: Sc in 2nd ch from hook, sc in next 2 ch, hdc in next 2 ch, dc in next 3 ch, hdc in next 2 ch, sc in next ch (11 sts along the first side); (sc, ch 2, sc) in the last ch — leaf tip made. Working along the opposite side of the foundation ch: sc in next ch, hdc in next 2 ch, dc in next 3 ch, hdc in next 2 ch, sc in next 3 ch (11 sts along the second side); ch 2, sl st to first sc — leaf base made. (24 sts, plus a ch-2 point at each end)
- Fasten off, leaving a 25 cm tail for sewing. The foundation chain stays visible down the middle as the center vein — do not cover it.
- The leaf should measure about 6 cm long. Make 10 in olive and 8 in sage.
Vine and small buds
- Main vine: with olive and the 3 mm hook, ch 110. Sl st in the 2nd ch from hook and in each ch across. Fasten off, leaving a 50 cm tail. (109 sl st)
- Side stems (make 6): with olive, ch 18. Sl st in the 2nd ch from hook and in each ch across. Fasten off, leaving a 25 cm tail. (17 sl st)
- Small buds (make 12: 7 golden yellow, 5 deep amber): with the 3 mm hook, MR, ch 1, 6 sc in ring, pull closed. Work 2 more rnds of 6 sc, then sc2tog 3 times and fasten off, pulling the tail through to close. (each bud about 1.2 cm)
- Bud calyx: with olive, work 4 sc around the base of each bud and add a ch-5 stem, sl st back down the chain. Fasten off, leaving a 20 cm tail.
Assembly
- Block the lace panel first and let it dry completely. Sewing onto unblocked V-stitch lace guarantees a wavy finished runner.
- Lay the main vine down the panel in a long, loose S-curve, running from about 8 cm below the top end to about 8 cm above the bottom end, wandering no more than 5 cm either side of the center line. Pin every 5 cm.
- Place the two sunflowers on the vine: one with its center about 26 cm from the top end, the other about 26 cm from the bottom end. Place the bud head near the top, about 12 cm from the end, angled away from the center line.
- Attach the 6 side stems to the main vine at intervals, angling them outward toward the side edges — three to the left, three to the right.
- Arrange the 18 leaves along the main vine and the side stems, alternating olive and sage so no two of the same green touch. Vary the angle by 20 or 30 degrees between neighbors; leaves at identical angles read as a border rather than foliage.
- Tuck the 12 small buds at the ends of the side stems and in the gaps between leaves, scattering the two golds.
- Step back and look at the whole layout before stitching. Adjust anything that crowds or leaves a bare patch — this is the part you cannot fix later.
- Sew the vine and side stems first, tacking each cord to the lace every 3 cm with a single stitch, always passing the needle around a dc post or through a ch-1 space rather than splitting a stitch.
- Sew the leaves next, stitching along the center chain only and leaving the outer edges free so each leaf lifts slightly.
- Sew each sunflower through its brown center only, with 10 small stitches radiating outward under the golden petal layer. Leave every petal tip free.
- Attach the bud head and the small buds last, stitching through the base of each so the head sits proud of the fabric.
- Weave all tails into the backs of the appliqués themselves. Lace this open will show a colored tail run through it from the front.
Finishing
Give the runner a final light block once everything is sewn on. Mist it with water rather than soaking, which stops the lace and the appliqués relaxing at different rates. Pin the straight center section square first, then work outward to both shaped ends, making sure they mirror each other before you pin the scallops. Each scallop crown gets its own pin, pulled gently outward so the gold picot sits at the point of the curve.
Do not pin the petals or leaf tips flat. Press them with your fingertips so they settle and then leave them — the lift in those pieces is why they are worked separately. The brown centers should sit slightly domed above the petals; if one has gone flat, work a few extra stitches under its rim to lift it.
Let it dry fully, at least ten hours. Store the runner rolled around a cardboard tube rather than folded, since a crease across a flower center is difficult to block out. Hand wash in cool water with mild detergent, squeeze out in a towel without wringing, and re-block flat while damp. Never hang it to dry — V-stitch lace stretches badly lengthwise under the weight of the appliqué.
Tips for Success
- Count your V-stitches at the end of every row through both shaping sections. The end shaping changes the count on almost every row, and an error at Row 4 will not be visible until Row 64 when the second end refuses to match the first.
- Work the final dc of every row into the top of the turning chain, not into the space beside it. This single habit is what keeps the long edges of the panel straight.
- Make both sunflowers and both centers in one sitting. Tension drifts between sessions, and two flowers that differ by even 5 mm look obviously mismatched on a runner this size.
- Keep the surface slip stitch on the flower centers loose. Tight spirals cup the disc into a dome that will not sit flat against the petals.
- Sew the vine before the leaves and flowers. It runs underneath everything else, and attaching it last means threading a needle around pieces that are already fixed in place.
Common Mistakes to Avoid
- Ends that do not mirror each other. The first end increases over 8 rows and the second decreases over 7, so they will never match exactly unless you follow the row counts precisely. Lay the finished panel flat and fold it in half lengthwise before adding the border — if the ends are visibly different, fix it now.
- Rotating both petal layers to the same position. If the amber petals sit directly on top of the golden ones the flower looks thin and flat. Each layer must fall in the gaps of the one below.
- Working the gold trim round too densely. If the gold covers every stitch of the scallop it becomes a solid band and overwhelms the cream. It should be a thin outline following the curve, with the cream still dominant.
- Sewing through the lace at random. Always pass the needle around a dc post or through a ch-1 space, never splitting a stitch. Split stitches distort the V-stitch and pucker visibly on the right side.
- Sewing the full outline of each sunflower down. A fully sewn flower reads as a flat patch. Only the center is attached, and if you can lift an outer petal with a fingernail you have done it right.
Ways to Customize This Pattern
- Work the border trim in olive green instead of gold, which ties the edge to the vine and gives a softer, more botanical finish.
- Make a matching pair of placemats: work the panel at 18 V-stitches across by 26 rows with square ends, add the same border, and appliqué one sunflower with four leaves and a short vine.
- Swap the sunflowers for dahlias by working both petal layers with rounded tips — replace the final dc in each petal with 2 hdc — and keeping the coiled brown center.
- Work the lace panel in soft sage instead of cream, keeping the golds and browns, for a runner that suits a painted or pale table better than cream does.
- Add 18 more rows to the straight center and a third sunflower for a 108 cm runner, plus 6 more leaves, 4 more buds and 20 cm more vine cord.
Frequently asked questions
Rippling means you have gained V-stitches somewhere in the straight section, usually by working an extra V-stitch into the turning chain space at the start of a row. Count the V-stitches on your current row — if you have 19 instead of 18, find the extra one, rip back to it and continue. Marking the turning chain with a stitch marker at the start of each row prevents it recurring.
Yes. Work Rows 9 to 60 only, starting from a ch 58 foundation, and the runner becomes a straight rectangle about 66 cm long. Add or subtract rows to suit your table. You lose the softness the curved ends give, but it is considerably simpler and the appliqué placement works the same way.
The texture comes entirely from the surface slip stitch spiral, and it only reads if the passes are close enough together — about 7 mm apart. If yours are spaced wider, the brown disc shows through between them and the coil disappears. Add a third pass between the existing two rather than starting over.
Yes, with a 2.5 mm hook. The panel comes out around 22 cm wide and 65 cm long, which suits a small table or a sideboard. Scale the appliqué the same way — the sunflowers will finish around 9 cm — and reduce to 12 leaves, since the smaller panel will not hold 18 without looking crowded.
The lace panel handles weight well, but the appliqué does not — a vase base sitting on a petal will crush it and leave a permanent dent. If the runner will hold anything, place it on a clear section of lace between the two flowers, or add a plain lace section by working 10 extra rows in the middle with no vine crossing it.
The finished Sunflower Lace Table Runner

