Sunflower Meadow Lace Crochet Table Runner
Beginner Friendly
Perfect for those just starting their crochet journey, with clear instructions and simple techniques
Single-Day Project
A satisfying project you can complete in a single afternoon or evening.
Handmade Gift
A beautiful keepsake — free forever. Read online or print at home.
About This Sunflower Meadow Lace Crochet Table Runner
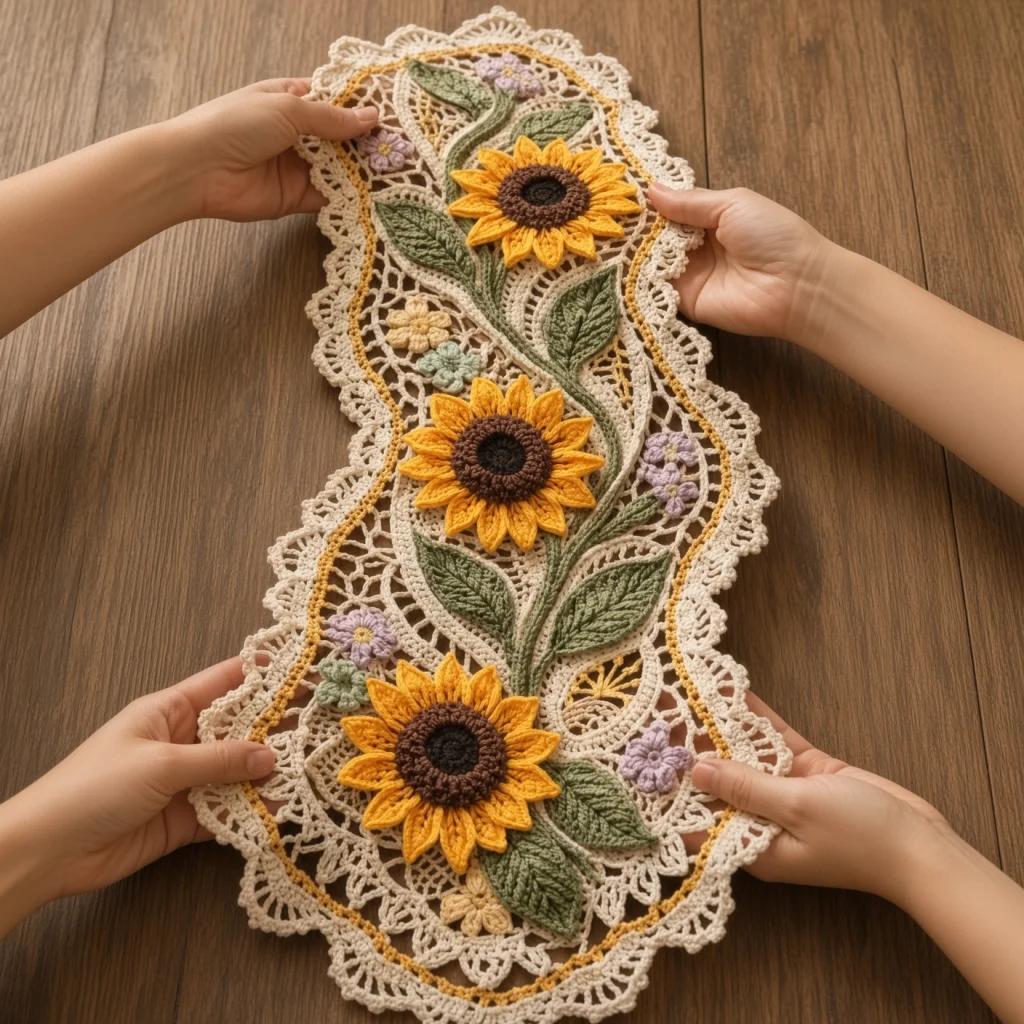
This crochet sunflower table runner pattern has two halves that barely resemble each other. The base is a single continuous oval of cream lace, fifteen rounds worked outward from one long foundation chain, moving from a fine filet mesh centre through an arc band to a broad wavy edge finished with sixty-eight picot scallops. The bouquet on top is solid: three raised sunflowers with brown textured centres and two layers of pointed gold petals, six veined leaves, a curving stem band that threads between them, and twelve small blossoms in lilac, mint and cream scattered across the mesh.
The contrast is the whole design. Open lace under dense appliqué gives the flowers somewhere to sit without competing with them, and the two thin gold lines worked in surface slip stitch around the edge pick up the sunflower petals and tie the two halves together. Skip the gold lines and the runner reads as two separate projects sharing a table.
Expect 20 to 25 hours, roughly twelve of them on the base. The lace rounds are rhythmic once the increase rule makes sense: six increases at each end of every double crochet round, three at each end of every single crochet round, and never anything along the straight sides. The appliqué is slower per piece but there are only twenty-eight pieces, and the sunflowers are the most satisfying thing in the autumn set to make. Written in US terms throughout.
Materials
- DK / light worsted cotton in cream approx. 220 g, base and small blossoms
- DK / light worsted cotton in golden yellow approx. 50 g, petals and the two surface lines
- DK / light worsted cotton in sage green approx. 70 g, leaves and stems
- DK / light worsted cotton in dark brown approx. 20 g, sunflower centres
- DK / light worsted cotton in lilac approx. 10 g
- DK / light worsted cotton in soft mint approx. 10 g
- 3.5 mm crochet hook lace base only, keeps the mesh open
- 3.0 mm crochet hook all appliqué pieces, keeps the petals firm
- Tapestry needle blunt, large eye
- Stitch markers at least 6, four of them a different colour for the oval end zones
- Rust-proof pins and blocking mats around 100 pins, every scallop needs one
- Spray bottle and a steam iron with a pressing cloth
- Tape measure and sharp scissors
Abbreviations
MRmagic ringchchainscsingle crochethdchalf double crochetdcdouble crochettrtreble crochetsl stslip stitchBLOback loop onlysurface sl stslip stitch worked over the surface of finished fabricsp / spsspace / spacesst / stsstitch / stitchesreprepeatRSright sideFOfasten offGauge and Working Notes
- Gauge on the 3.5 mm hook, blocked: 13 dc and 7 rounds to 10 cm. On the 3.0 mm hook, a sunflower measures about 12 cm across and a leaf about 9 cm.
- Every round of the base is worked with the RS facing and joined with a sl st. Do not turn, or the texture rounds will alternate front and back.
- The increase rule is the whole geometry: 6 increases at each end of every dc or mesh round, 3 at each end of every sc round, and none along the straight sides.
- Mark the two end zones on Round 1 with a different colour of marker and move them up every round. The end zone is the curved section, roughly 30 stitches at each end early on and growing as you go.
- Spread the increases evenly across each end zone rather than stacking them, or you get two visible spokes radiating from each end.
- Work into each ch-1 space of the mesh rounds, not around it. Working around the chain twists the square and the grid starts to look wobbly across five rounds.
- The gold lines are surface slip stitch worked over the finished base, not rounds built into it. Work them after the base is complete and before blocking.
- Leave a 25 cm tail on every appliqué piece. You will use it to sew that piece down, so one tail does both jobs.
- Complete and block the base before making a single flower. The bouquet is positioned on blocked fabric, and lace grows noticeably when blocked.
Lace Base, Foundation and Rounds 1 to 3
- With cream and the 3.5 mm hook, ch 146.
- Round 1: sc in the 2nd ch from hook and in each of the next 143 ch (144 sc), 6 sc in the last ch; working now along the opposite side of the foundation chain, sc in each of the next 144 ch, then 6 sc in the remaining chain at the base; sl st into the first sc (300 sc, with 6 sc at each end).
- Place a marker at the centre of each 6-sc end group.
- Round 2: ch 1, sc in each st around, working 2 sc in each of 3 evenly spaced sts within each end zone; sl st into the first sc (306 sc).
- Round 3: ch 3 (counts as first dc), dc in each st around, working 2 dc in the same st 6 times within each end zone; sl st into the top of the ch-3 (318 dc).
- Count at the end of Round 3 before continuing. Every round after this adds 6 or 12 to a known number, so an error here is the one error that cannot be traced later.
Filet Mesh Centre, Rounds 4 to 8
- Round 4: ch 4 (counts as dc plus ch 1), skip the next st, *dc in the next st, ch 1, skip the next st*; rep from * around. Within each end zone, work (dc, ch 1, dc) into a single st 6 times instead of the plain repeat, which adds 2 sts each time. Sl st into the 3rd ch of the beginning ch-4 (330 sts: 165 dc and 165 ch-1 sps).
- Round 5: work as Round 4, treating each ch-1 sp as a stitch and working into the space itself, with the same 6 increases at each end (342 sts).
- Round 6: as Round 5 (354 sts).
- Round 7: as Round 5 (366 sts).
- Round 8: as Round 5 (378 sts).
- Hold the work up to the light and check the grid runs straight along the two sides. If it wanders, an increase has been worked outside an end zone.
Arc Band, Rounds 9 to 12
- Round 9: ch 1, sc in each st and ch-1 sp around, working 2 sc in the same st 3 times within each end zone; sl st into the first sc (384 sc). This round closes the mesh and gives the arcs something solid to sit on.
- Round 10: ch 3 (counts as first dc), dc in each st around, working 2 dc in the same st 6 times within each end zone; sl st to join (396 dc).
- Round 11 (arc round): ch 1, sc in the same st, *ch 5, skip the next 5 sts, sc in the next st*; rep from * around, which uses 6 sts per repeat and gives 66 ch-5 arcs. Sl st into the first sc.
- Round 12: *work 6 sc into the next ch-5 arc, sl st into the sc between arcs*; rep from * around, sl st to join (396 sc).
- Keep the ch-5 arcs loose and even. An arc worked tight pulls two sc together and the band scallops inward instead of lying flat, which shows all the way round.
Wavy Edge, Rounds 13 to 15
- Round 13: ch 3 (counts as first dc), dc in each st around, working 2 dc in the same st 6 times within each end zone; sl st to join (408 dc).
- Round 14 (wave round): ch 1, *sc in the next 3 sts, hdc in the next 3 sts, dc in the next 3 sts, tr in the next 6 sts, dc in the next 3 sts, hdc in the next 3 sts, sc in the next 3 sts*; rep from * around, using 24 sts per repeat and giving 17 repeats. Sl st into the first sc (408 sts).
- Each repeat rises from single crochet to treble and back down, which pushes the outline out where the trebles fall and pulls it in where the single crochets fall. That is the broad wave, and at this gauge each one spans about 11 cm.
- Round 15 (picot scallop round): ch 1, *skip the next 2 sts, work 5 dc in the next st, ch 3, sl st into the 3rd ch from hook for a picot, work 5 dc in the same st, skip the next 2 sts, sl st in the next st*; rep from * around, using 6 sts per repeat and giving 68 scallops. Sl st to join and FO.
- Keep the sl st between scallops loose. A tight one pulls two neighbouring scallops together and the wave flattens out where it should be deepest.
Gold Surface Lines
- Line 1: with golden yellow and the 3.0 mm hook, hold the yarn behind the fabric, insert the hook from the front into any stitch of Round 9, pull a loop through, and work a line of surface sl sts all the way around that round, one into each stitch.
- Line 2: repeat around Round 13, which places the second gold line just inside the wavy edge.
- Sl st into the first stitch to close each line and FO, weaving the tail into the back of the base.
- Keep every surface sl st loose and even. A tight line gathers the lace behind it and the runner will not block flat, which is by far the most common problem with this design.
- Both lines should read as thin threads of colour, not as bands. If yours look heavy, you are working them too tightly rather than using the wrong yarn.
Sunflower Centre (make 3)
- Round 1: with dark brown and the 3.0 mm hook, 6 sc in MR (6)
- Round 2: 2 sc in each st around (12)
- Round 3: working in BLO, (sc in the next st, 2 sc in the next st) rep 6 times (18)
- Round 4: working in BLO, (sc in the next 2 sts, 2 sc in the next st) rep 6 times (24)
- Round 5: working through both loops, sc in each st around (24). Sl st into the first sc and FO, leaving a 15 cm tail.
- Finished centre about 4 cm across, with a raised textured surface and one round of free front loops on the underside, at Round 3, which carries the lower petal layer.
- Push the centre gently from behind with your thumb so it domes slightly. A flat centre makes the whole sunflower look like a wheel.
Sunflower Petals (make 3 sets)
- Lower layer: turn the centre over and join golden yellow in any free front loop of Round 3, which has 18 available loops.
- *Ch 4, sc in the 2nd ch from hook, hdc in the next ch, dc in the next ch, sl st into the same free loop, sl st into the next free loop*; rep from * around. Each repeat uses 2 loops, so 18 loops gives 9 short pointed petals. Sl st to join and FO, leaving a 15 cm tail.
- Upper layer: turn the flower back to the front and join golden yellow in any st of Round 5, which has 24 sts.
- *Ch 5, sc in the 2nd ch from hook, hdc in the next ch, dc in the next 2 ch, sl st into the same st of Round 5, sl st into the next st*; rep from * around. Each repeat uses 2 sts, so 24 sts gives 12 long pointed petals. Sl st to join and FO, leaving a 25 cm tail.
- Each sunflower now has 21 petals across two layers, with the shorter lower ones showing between the longer upper ones. Finished flower about 12 cm across.
- The upper petals are one chain longer than the lower ones on purpose. If the lower layer disappears completely behind them, your upper petals are too long, not the lower ones too short.
- Make 3 sunflowers.
Leaf (make 6)
- With sage green and the 3.0 mm hook, ch 15.
- Round 1, first side: sc in the 2nd ch from hook, sc in the next ch, hdc in the next 2 ch, dc in the next 5 ch, hdc in the next 2 ch, sc in the next 2 ch (13 sts, one chain free at the far end).
- Round 1, tip: 3 sc into that last free chain (16).
- Round 1, second side: working along the free loops on the underside of the foundation chain, sc in the next 2 ch, hdc in the next 2 ch, dc in the next 5 ch, hdc in the next 2 ch, sc in the next 2 ch (29).
- Round 1, base: 2 sc into the remaining chain at the base, sl st into the first sc (31).
- Round 2: ch 1, sc in the next 13 sts; at the tip work sc in the next st, 3 sc in the centre st, sc in the next st; sc in the next 13 sts; at the base work 2 sc in each of the last 2 sts; sl st into the first sc (35). FO leaving a 25 cm tail.
- Central vein: with the same green, work a line of about 10 surface sl sts up the centre of the leaf from base to tip, following the foundation chain. Keep them loose, since a tight vein puckers the leaf into a boat.
- Make 6. Finished leaf about 9 cm long.
Stem Bands
- Main stem: with sage green and the 3.0 mm hook, ch 121.
- Row 1: sc in the 2nd ch from hook and in each ch across, turn (120 sc).
- Row 2: ch 1, sc in each st across (120 sc). FO leaving a 30 cm tail. The band measures about 1 cm wide and 44 cm long.
- Branch stems, make 6: ch 21, then work 2 rows of sc as above (20 sc per row). FO leaving a 20 cm tail. Each measures about 7 cm.
- A two-row band rather than a chain cord is what lets the stem hold a curve without twisting. Do not substitute a slip stitch cord here, because it will corkscrew under the weight of a sunflower.
- Do not block the stems straight. They need to curve, and a pressed-flat band gives you a ruled line rather than a growing stem.
Small Blossom (make 12)
- Round 1: with golden yellow and the 3.0 mm hook, 5 sc in MR, sl st into the first sc (5). FO gold, leaving a 10 cm tail.
- Round 2: join lilac, mint or cream in any st. Work (ch 2, 2 dc, ch 2, sl st) all into the next st; rep 4 more times, once into each of the 5 sts (5 petals).
- Sl st to join and FO, leaving a 20 cm tail. Finished blossom about 2.5 cm across.
- Make 12: 6 lilac, 3 mint, 3 cream. The cream ones almost disappear against the lace base, which is the point. They add texture without adding another colour.
Assembly
- Block the base flat before placing anything. Soak it, pin the two ends to set the 90 cm length, the sides to set 28 cm, then pin every one of the 68 picot scallops individually so the wave sets properly. Let it dry a full day.
- Lay the main stem band down the centre of the blocked base in a long S curve, running from one end toward the other and drifting from side to side rather than straight down the middle.
- Position the 3 sunflowers along the stem, spaced about 25 cm apart, with each one sitting on a different part of the curve so they are not in a straight line.
- Attach the 6 branch stems to the main stem at points where it curves, angling them outward, and place one leaf at the end of each.
- Scatter the 12 small blossoms across the open mesh on both sides of the stem, mostly in the gaps between sunflowers where the lace would otherwise look empty. Keep them off the wavy edge, which needs to stay clear.
- Photograph the layout from directly above before sewing anything. You will move pieces during assembly and this is the only reliable way back.
- Sew in this order: main stem, branch stems, leaves, sunflowers on top of the stem ends, then blossoms last.
- Stitch the stem bands down along both long edges with a running stitch, not just at the ends, or the band will lift away from the lace in the middle of every curve.
- Attach each sunflower by stitching through the brown centre from the back at six points around the disc, so it cannot rotate and the petals stay free to lift.
- Stitch each leaf at its base only, so the tip lifts off the lace, and each blossom through its gold centre plus two opposite petals.
Finishing
Weave in every end on the back of a solid section: the stem bands, the sunflower centres, the leaves. Never weave a tail through the mesh or along a lace round, where a doubled strand is visible from the front and from a metre away. There are around 70 ends on this runner once you count the surface lines, so work through them piece by piece rather than saving them up.
Block the assembled runner a second time even though the base was blocked already. Every appliqué stitch pulls the lace slightly, and the mesh under a 12 cm sunflower will have drawn in by a few millimetres in each direction. Soak, roll in a towel, lay flat, and pin the ends, the sides and all 68 scallops again. Pin the stem into the curve you want rather than letting it dry however it falls, because that curve is the only movement in the design.
Let it dry a full day and do not lift it while damp. Once dry, lift each upper sunflower petal with your fingers so it stands proud of the lower layer, and run a finger under each leaf tip. If a petal has dried folded under, steam that flower from 15 cm away with the iron never touching the work and flatten it while the cotton is warm. Do not steam the lace base at all once it is blocked.
Tips for Success
- Write the stitch count for each round on paper and tick it off: 300, 306, 318, 330, 342, 354, 366, 378, 384, 396, 396, 408, 408. Recounting 400 stitches of mesh to find an error three rounds later costs an evening.
- Use the 3.5 mm hook for the base and the 3.0 mm for the appliqué, every time. It is one hook size, and it is the difference between open lace under solid flowers and a runner where everything reads at the same density.
- Work the two gold surface lines before blocking, not after. A blocked base has no give left in it, and a surface line added afterwards will gather it whatever you do.
- Make all three sunflowers back to back. Petal tension drifts between sessions and three flowers in a row on the same runner makes any size difference obvious.
- Lay the whole bouquet out on the blocked base and leave it overnight before sewing. The composition is asymmetric on purpose and a second look in daylight almost always moves one sunflower.
Common Mistakes to Avoid
- Increasing along the straight sides. The sides must hold a fixed count for the full length of the runner. Even two stray increases per round turn the oval into a lozenge, and it shows most at the wave round where the repeats stop lining up.
- Mesh worked around the ch-1 space instead of into it. The square twists and the grid looks wobbly, which is very visible across five rounds of open mesh with nothing to distract from it.
- Tight gold surface lines. This is the single most common fault here. The lace behind a tight line gathers permanently and no amount of blocking releases it. Work both lines noticeably loose.
- Working the centre rounds through both loops. Without the free front loops at Round 3 there is nowhere to attach the lower petal layer, and the sunflower ends up as one flat ring of petals.
- Stems tacked only at each end. The band lifts away from the lace at every curve and catches on cutlery. Run a line of stitches along both long edges.
- Blocking once, before the appliqué. The flowers draw the mesh in underneath them, so the runner needs a second block after everything is sewn.
Ways to Customize This Pattern
- Change the length through the foundation chain alone. The finished runner is roughly the chain length plus 25 cm, so 213 chains gives about 120 cm. Every round count rises by twice the extra chains, and the increase rule is unchanged.
- Leave the bouquet off entirely. The lace oval with its two gold lines stands alone as a formal runner and takes about 12 hours instead of 22, and the flowers can be added later without undoing anything.
- Swap the sunflowers for poppies by working the same centre in black and the petals in scarlet with a rounded rather than pointed shape, which turns the piece into a summer meadow.
- Make a matching oval mat by working the same fifteen rounds on a 30 chain foundation, giving a 55 by 28 cm centrepiece with one sunflower instead of three.
- Move the bouquet to one end rather than running it down the middle, which suits a long table where a centrepiece would otherwise sit on top of the flowers.
- Work the lace base in a colour and the appliqué in cream for a reversed version, which is unexpected and takes exactly the same time.
Frequently asked questions
Because a round of gold is a band and the design needs a line. Even a single crochet round in gold comes out about 4 mm deep, which reads as a stripe and competes with the sunflowers. Surface slip stitch sits on top of a cream round and gives a thread of colour about 2 mm wide, which is what ties the edge to the petals without pulling attention away from them.
Either the treble stitches in Round 14 are worked short, or the picot scallops in Round 15 were pinned flat rather than into the wave when you blocked. The wave depends entirely on the height difference between the six trebles and the six single crochets in each repeat, so check that your trebles are genuinely twice the height of your single crochets. Then reblock, pinning the treble sections out and the single crochet sections in.
Yes, and it suits this design well, but everything has to be recalculated. Size 10 thread with a 1.75 mm hook gives a base about half the size, so you would need roughly double the foundation chain and double the round counts to reach 90 cm. The appliqué would also need to shrink to match, since a DK sunflower on thread lace looks like it landed there from another project.
Spread the load. Each sunflower is sewn through its centre at six points rather than one, and each one sits on the stem band rather than directly on the mesh, so the band carries the weight along its length instead of concentrating it in a few mesh squares. If you do place a flower directly on the mesh, sew it to at least eight points and expect that square of lace to sag slightly over time.
Hand wash in cool water with a mild detergent, supporting the whole runner rather than lifting it by one end, since wet lace under three solid flowers takes real strain. Press the water out against the side of the basin and never wring, because twisting flattens the petal layers permanently. Lay it flat, re-pin the ends, the sides and all 68 scallops, and lift the sunflower petals with your fingers while it is still damp so they dry standing proud.
The finished Sunflower Meadow Lace Crochet Table Runner

