Sunflower Vine Table Runner
Beginner Friendly
Perfect for those just starting their crochet journey, with clear instructions and simple techniques
Single-Day Project
A satisfying project you can complete in a single afternoon or evening.
Handmade Gift
A beautiful keepsake — free forever. Read online or print at home.
About This Sunflower Vine Table Runner
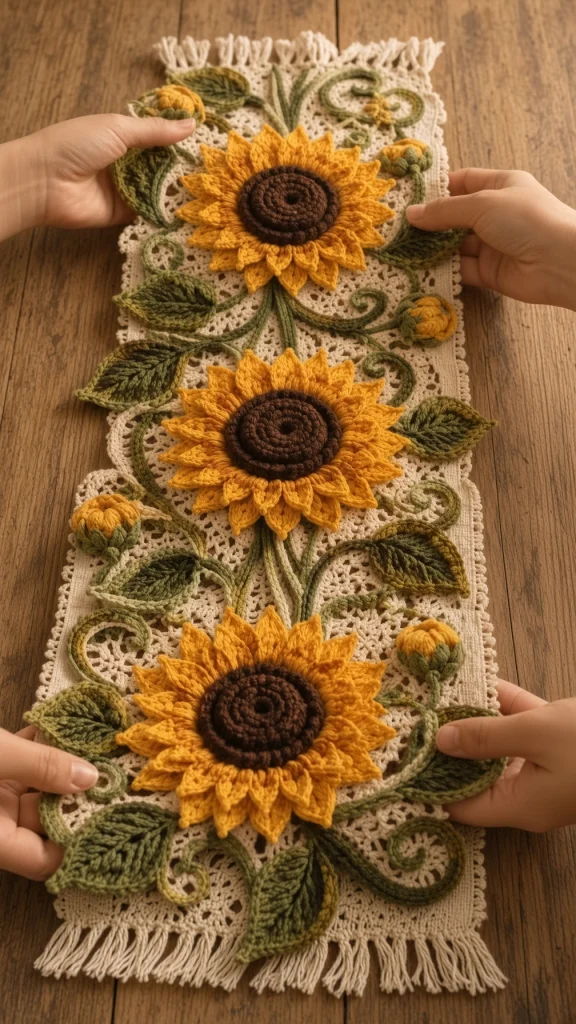
This crochet sunflower table runner pattern puts three large layered blooms down a cream mesh panel, surrounded by leaves, small closed buds and thin tendrils that curl across the fabric. The base is quiet on purpose — a plain filet mesh worked in cream cotton with a picot edging and knotted fringe at both ends — so that everything the eye lands on is the appliqué sitting on top of it.
The blooms are what make this piece. Each one is three stacked layers of petals in two golds, rotated so the lower layers show through the gaps, and each center is a coiled spiral of brown cotton sewn down in concentric rings rather than a flat disc. That coil is the detail that reads as a real sunflower head, and it takes about twenty minutes per flower. The leaves are worked in three different greens with a visible center chain, the buds are small stuffed cups with a green calyx, and the tendrils are slip-stitched cords that curl on their own once released from the hook.
Plan on four or five hours for the mesh panel, edging and fringe, around twelve for the three blooms and their centers, and the rest for leaves, buds, tendrils and assembly — roughly 22 to 28 hours in total. It is an advanced project because of the number of separate pieces and because the vine layout has to be arranged by eye. None of the individual stitches are difficult, but the assembly rewards taking your time.
Materials
- Worsted weight cotton in cream approx. 600 m (about 330 g) — mesh panel, edging, fringe
- Worsted weight cotton in golden yellow approx. 130 m (about 70 g) — outer and inner petals
- Worsted weight cotton in deep amber or marigold approx. 90 m — middle petal layer and buds
- Worsted weight cotton in dark chocolate brown approx. 70 m — flower centers
- Worsted weight cotton in dark forest green approx. 70 m — leaves
- Worsted weight cotton in medium sage green approx. 70 m — leaves and bud calyxes
- Worsted weight cotton in light olive green approx. 60 m — leaves and tendrils
- 4 mm crochet hook US G-6
- 3.5 mm hook for the tendrils, so they curl tightly
- Tapestry needle blunt tip, large enough for worsted cotton
- Rustproof pins 40+, for pinning the layout before sewing
- Blocking mats or a towel-covered board at least 90 x 40 cm
- Stiff card, 9 cm deep for cutting the fringe
- Measuring tape and small sharp scissors
Abbreviations
begbeginningchchaindcdouble crochethdchalf double crochetMRmagic ringpicotch 3, sl st in 3rd ch from hookreprepeatrnd(s)round(s)RSright sidescsingle crochetsc2togsingle crochet 2 stitches togetherskskipsl stslip stitchsp(s)space(s)st(s)stitch(es)WSwrong sideGauge and sizing
- Gauge in mesh: 9 mesh units (9 dc and 9 ch-1 sps) and 9 rows = 10 cm x 10 cm, blocked.
- Mesh panel before edging: approximately 30 cm wide x 80 cm long.
- Finished runner with edging: approximately 84 cm long x 32 cm wide, plus 9 cm of fringe at each end.
- Sunflower: approximately 14 cm across. Bud: approximately 4 cm. Leaf: approximately 8 cm long.
- All instructions use US crochet terminology.
- To lengthen the runner, add rows in any number — every 9 rows adds about 10 cm. Add one sunflower for every 26 cm of extra length, plus 3 leaves, 1 bud and 2 tendrils.
Mesh panel
- With cream, ch 60 loosely.
- Row 1 (RS): Dc in 4th ch from hook (the skipped ch-3 counts as the first dc), *ch 1, sk next ch, dc in next ch; rep from * across. (30 dc, 29 ch-1 sps)
- Row 2: Ch 4 (counts as dc + ch 1), turn, sk first dc and next ch-1 sp, dc in next dc, *ch 1, sk next ch-1 sp, dc in next dc; rep from * across, working the final dc in the 3rd ch of the turning ch. (30 dc, 29 ch-1 sps)
- Rows 3-72: Rep Row 2. (30 dc, 29 ch-1 sps in each row)
- At the end of Row 72, do not fasten off. The panel should measure about 30 cm x 80 cm. Continue directly into the edging.
Edging
- Rnd 1 (RS): Ch 1, 3 sc in the corner you are standing in. Work 59 sc across the top short edge (1 sc in each dc and 1 sc in each ch-1 sp); 3 sc in corner; 144 sc down the long edge (2 sc into the end of each row); 3 sc in corner; 59 sc across the bottom short edge; 3 sc in corner; 144 sc up the second long edge; sl st to first sc. (418 sc)
- Rnd 2: Ch 1, sc in each sc around, working 3 sc in the center sc of each corner, sl st to first sc. (426 sc)
- Rnd 3: Ch 1, sc in each sc around, working 3 sc in the center sc of each corner, sl st to first sc. (434 sc)
- Rnd 4 (picot round): Ch 1, sc in first sc, *sc in next 2 sc, picot; rep from * around, adjusting at the corners so a picot falls on each corner st, sl st to first sc. (about 144 picots; the exact number will depend on where you start, and any small difference will not be visible)
- Fasten off and weave in ends. The picot round gives the soft scalloped edge that frames the appliqué without competing with it.
Sunflower petals (make 3 complete flowers)
- Outer layer, Rnd 1: With golden yellow, MR, ch 1, 16 sc in ring, pull closed, sl st to first sc. (16 sc)
- Outer layer, Rnd 2: *Ch 11, sc in 2nd ch from hook, sc in next ch, hdc in next 2 ch, dc in next 4 ch, hdc in next ch, sl st in next sc of Rnd 1, sl st in the following sc; rep from * 7 more times. Sl st to the base of the first petal. (8 long petals of 10 sts) Fasten off, leaving a 25 cm tail.
- Middle layer, Rnd 1: With deep amber, MR, ch 1, 16 sc in ring, pull closed, sl st to first sc. (16 sc)
- Middle layer, Rnd 2: *Ch 10, sc in 2nd ch from hook, sc in next ch, hdc in next 2 ch, dc in next 3 ch, hdc in next ch, sl st in next sc of Rnd 1; rep from * 15 more times. Sl st to the base of the first petal. (16 petals of 9 sts) Fasten off, leaving a 25 cm tail.
- Inner layer, Rnd 1: With golden yellow, MR, ch 1, 16 sc in ring, pull closed, sl st to first sc. (16 sc)
- Inner layer, Rnd 2: *Ch 8, sc in 2nd ch from hook, sc in next ch, hdc in next 2 ch, dc in next 2 ch, sl st in next sc of Rnd 1; rep from * 15 more times. Sl st to the base of the first petal. (16 petals of 7 sts) Fasten off, leaving a 25 cm tail.
- Stack the three layers: outer at the bottom, middle next, inner on top. Rotate each layer so its petals sit in the gaps of the one below. Sew the three centers together with a ring of small stitches about 1 cm out from the middle — the petals stay completely free.
- Make 3 complete petal stacks. Each should measure about 14 cm across.
Coiled flower centers (make 3)
- With dark brown, ch 4, sl st in first ch to form a ring.
- Rnd 1: Ch 1, 8 sc in ring, sl st to first sc. (8 sc)
- Rnd 2: Ch 1, 2 sc in each sc around, sl st to first sc. (16 sc)
- Rnd 3: Ch 1, *sc in next sc, 2 sc in next sc; rep from * around, sl st to first sc. (24 sc)
- Rnd 4: Ch 1, *sc in next 2 sc, 2 sc in next sc; rep from * around, sl st to first sc. (32 sc)
- Rnd 5: Ch 1, *sc in next 3 sc, 2 sc in next sc; rep from * around, sl st to first sc. (40 sc)
- Rnd 6: Ch 1, working in back loops only, sc in each sc around, sl st to first sc. (40 sc) The back-loop round creates the outermost ridge of the coil.
- Fasten off, leaving a 40 cm tail. The disc should measure about 6 cm across.
- To create the coiled look, work surface slip stitch with brown in a spiral over the finished disc: start at the outer edge, work a continuous line of surface slip stitch spiraling inward to the center, keeping about 8 mm between each pass. Fasten off on the wrong side. Three spiral passes give a convincing seed head.
- Make 3 centers.
Leaves (make 10: 4 dark green, 4 sage, 2 light olive)
- Ch 17.
- Rnd 1: Sc in 2nd ch from hook, sc in next 2 ch, hdc in next 3 ch, dc in next 4 ch, hdc in next 3 ch, sc in next 2 ch (15 sts along the first side); (sc, ch 2, sc) in the last ch — leaf tip made. Working along the opposite side of the foundation ch: sc in next 2 ch, hdc in next 3 ch, dc in next 4 ch, hdc in next 3 ch, sc in next 3 ch (15 sts along the second side); ch 2, sl st to first sc — leaf base made. (32 sts, plus a ch-2 point at each end)
- Rnd 2: Sl st into the ch-2 base sp, ch 1, (sc, ch 2, sc) in same sp. First side: sc in next 3 sts, hdc in next 3 sts, dc in next st, 2 dc in next st, dc in next 2 sts, 2 dc in next st, dc in next st, hdc in next 3 sts, sc in next 3 sts. (17 sts) (sc, ch 2, sc) in the ch-2 tip sp. Second side: rep the same 17-st sequence. Sl st to first sc. (38 sts, plus a ch-2 point at each end)
- Fasten off, leaving a 40 cm tail for sewing. The foundation chain stays visible down the middle as the center vein — do not cover it. The leaf should measure about 8 cm long.
- Make 4 in dark forest green, 4 in medium sage and 2 in light olive. Three values of green is what keeps the foliage from reading as a flat band of color.
Buds (make 4)
- Bud body, Rnd 1: With deep amber, MR, ch 1, 6 sc in ring, pull closed. Do not join; work in a continuous spiral, marking the first st of each rnd. (6 sc)
- Bud body, Rnd 2: 2 sc in each sc around. (12 sc)
- Bud body, Rnd 3: *Sc in next sc, 2 sc in next sc; rep from * around. (18 sc)
- Bud body, Rnds 4-6: Sc in each sc around. (18 sc)
- Bud body, Rnd 7: *Sc in next sc, sc2tog; rep from * around. (12 sc)
- Bud body, Rnd 8: Stuff firmly with a scrap of the same amber cotton, then [sc2tog] 6 times. (6 sc) Fasten off, thread the tail through the remaining 6 front loops and pull tight to close.
- Calyx: with medium sage, ch 1, work 12 sc around the base of the stuffed bud, catching Rnd 3. Then *ch 5, sc in 2nd ch from hook, sc in next 3 ch, sl st in next 2 sc of the base round; rep from * 5 more times. (6 calyx points) Fasten off, leaving a 30 cm tail.
- Make 4 buds. Each should measure about 4 cm including the calyx points.
Tendrils (make 6)
- With light olive and the 3.5 mm hook, ch 45.
- Row 1: Work 3 sc in the 2nd ch from hook, then 3 sc in each ch across. (132 sc)
- Fasten off, leaving a 40 cm tail. Working three stitches into every chain forces the cord to spiral on its own — do not try to straighten it.
- Make 6. Each will settle into a curl about 12 cm long when relaxed.
Assembly
- Block the mesh panel first, before any appliqué goes on. Pin it square to 84 x 32 cm and let it dry completely. Sewing onto unblocked mesh is the fastest way to end up with a wavy runner.
- Lay the runner flat, right side up, portrait orientation. Mark the vertical center line with pins at 10 cm intervals.
- Place the three sunflowers on the center line: the first with its center 20 cm from the top edge, the second at 42 cm, the third at 64 cm. That leaves 22 cm between flower centers and about 6 cm of clear mesh at each end before the fringe.
- Arrange the 10 leaves around the flowers before sewing anything. Group 3 leaves around each flower, angled outward, and place the last leaf where the composition looks thin. Alternate the three greens so no two leaves of the same value touch.
- Tuck the 4 buds into the outer edges — two on the left side and two on the right, sitting between flowers rather than beside them, so they fill the gaps in the vine.
- Lay the 6 tendrils in loose S-curves connecting the flowers, letting some run off toward the side edges. Let them keep their natural curl; the point is the loose spiral, not a tidy line.
- Step back and look at the whole layout before stitching. Adjust anything that crowds or leaves a gap — this is the part you cannot fix later. Pin everything down once you are satisfied.
- Sew the tendrils first, since they run underneath everything else. Tack each one to the mesh every 3 cm with a single stitch through the cord.
- Sew the leaves next, stitching along the center chain only and leaving the outer edges free so they lift.
- Sew each sunflower through its center only, with 10 small stitches radiating out under the outer petal layer. Leave every petal tip free.
- Sew the coiled center onto each flower last, stitching around its outer edge into the petal stack beneath, then attach the buds through the base of each calyx.
- Weave all tails into the backs of the appliqués themselves, never into the mesh, where a colored tail will show through from the front.
Fringe
- Cut a piece of stiff card 9 cm deep. Wrap cream cotton around it and cut along one edge to make strands roughly 18 cm long. You will need about 120 strands in total.
- Hold 4 strands together and fold in half. Using a hook, draw the folded loop through a picot at the short end of the runner from front to back, then pull all 8 loose ends through the loop and tighten.
- Attach a tassel into every second picot across each short end — about 15 tassels per end, 30 in total.
- Comb the fringe straight with your fingers and trim level with scissors, cutting against a ruler so both ends match. The finished fringe should hang about 9 cm.
Finishing
Give the runner a light second blocking once everything is sewn on. Mist it with water rather than soaking — a full soak makes the appliqué and the mesh relax at different rates, and you will fight to bring them back into line. Pin the four corners square first, then the long edges, then press the petals gently flat with your hand without pinning their tips down. You want the flowers settled but still lifting off the fabric.
Leave the tendrils unpinned entirely. Their curl is what gives the vine its movement, and pinning them flat while damp will train it out of them permanently.
Let it dry fully, at least ten hours, before moving it. Wash by hand in cool water with mild detergent, squeeze out in a towel without wringing, and re-block flat while damp. Never hang it to dry — the mesh stretches lengthwise under the weight of the appliqués and will not come back.
Tips for Success
- Count 30 dc every tenth row of the mesh. Filet mesh gains or loses a stitch at the turning chain more easily than almost any other stitch pattern, and the error stays invisible until the panel is a parallelogram.
- Work the final dc of every row into the 3rd chain of the turning chain, not into the space beside it. That one habit is what keeps the long edges straight.
- Make all three sunflowers, including their coiled centers, before sewing any of them down. Laying them out together lets you check that the petal layers are rotated consistently, and they rarely are on the first try.
- Keep the surface slip stitch on the flower centers loose. Tight spirals cup the disc into a dome and it will not sit flat against the petals.
- Sew the tendrils before the leaves and flowers. They pass underneath everything, and attaching them last means threading a needle around pieces that are already fixed.
Common Mistakes to Avoid
- Chaining the foundation too tightly. A tight ch 60 pulls Row 1 in and the bottom of the runner will be visibly narrower than the top. If the chain feels stiff, redo it with a hook one size larger, then switch back for Row 1.
- Rotating all three petal layers to the same position. If the petals stack directly on top of one another the flower looks thin and flat. Each layer must sit in the gaps of the one below — check by holding the stack up to the light before you sew the centers together.
- Working the second side of a leaf into the wrong loop of the foundation chain. You want the free loop along the bottom, worked stitch for stitch opposite the first side. If the leaf comes out lopsided, count both sides before starting Rnd 2.
- Sewing the full outline of each sunflower down. A fully sewn flower reads as a flat patch. Only the center is attached, and if you can lift an outer petal with a fingernail you have done it right.
- Sewing through the mesh at random. Always pass the needle around a dc post or through a ch-1 space, never splitting a stitch. Split stitches distort the mesh and pucker visibly on the right side.
Ways to Customize This Pattern
- Work the coiled centers in a much darker near-black brown and the petals in a single flat gold for a graphic, modern version that reads clearly from across a room.
- Make a matching pair of placemats: work the mesh at 30 dc across by 28 rows, add the same edging, and appliqué one sunflower with two leaves and a single tendril off-center.
- Skip the fringe and finish both short ends with the picot edging only, for a cleaner runner that suits a modern table and washes more easily.
- Swap the sunflowers for dahlias by working all three petal layers with rounded tips — replace the final dc in each petal with 2 hdc and a sc — keeping the same coiled center.
- Work the mesh panel in soft denim blue instead of cream. The golds stay warm against it and the runner shifts from harvest to summer without changing a single flower.
Frequently asked questions
Two things cause this. First, check that the three layers are rotated so the petals interleave rather than stack. Second, make sure you sewed the layer centers together about 1 cm out from the middle rather than right at the center hole — sewing too close to the middle lets the layers splay apart and lie flush with the fabric. A ring of stitches at 1 cm holds the layers cupped.
The appliqués will look fine in acrylic, but the mesh panel will not hold its blocked shape — acrylic relaxes and the runner gradually stretches lengthwise under the weight of the flowers. If acrylic is what you have, work the panel one hook size down to tighten the mesh, and expect the finished length to run several centimeters longer than stated.
You almost certainly worked 2 sc into each chain instead of 3, or used the 4 mm hook. The curl comes from forcing far more stitches into the chain than it can lie flat with, so the 3.5 mm hook and 3 sc per chain are both doing real work. If yours are limp, rip back and redo with the smaller hook — blocking will not put a curl in that the stitch count did not create.
Two will work, but three is what makes the foliage read as layers rather than a green outline around the flowers. If you only want two, use the dark forest green and the sage, and work the two light olive leaves in sage as well. Keep the tendrils in the lightest green you have so they stay distinct from the leaves.
Braid each end of the fringe loosely into a single plait and secure it with a scrap of yarn before washing, then unbraid and comb it out while the runner is drying flat. Washing loose fringe knots it badly, and combing out a tangled cotton fringe stretches and fuzzes the strands.
The finished Sunflower Vine Table Runner

