Sunny Layered Sunflower Coaster Crochet Pattern
Beginner Friendly
Perfect for those just starting their crochet journey, with clear instructions and simple techniques
Single-Day Project
A satisfying project you can complete in a single afternoon or evening.
Handmade Gift
A beautiful keepsake — free forever. Read online or print at home.
About This Sunny Layered Sunflower Coaster Crochet Pattern
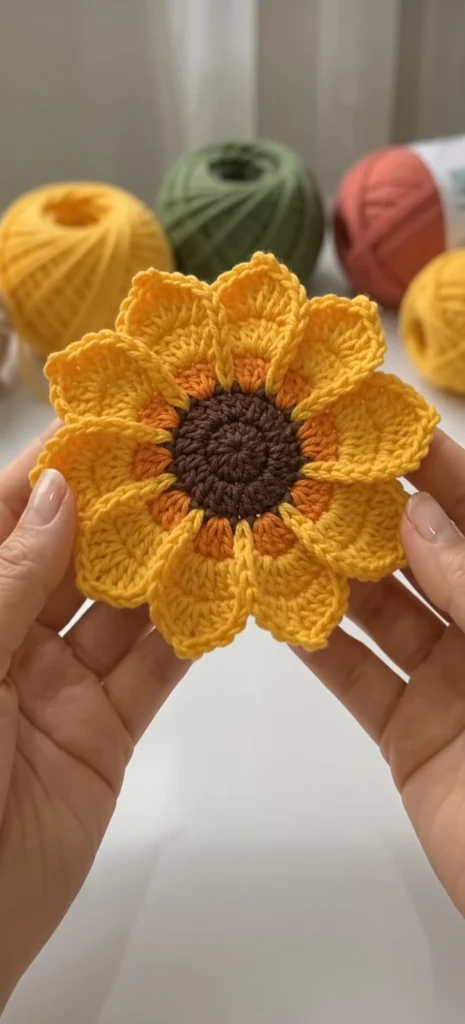
This crochet sunflower coaster pattern gives you a flat, sturdy flower with twelve separate petals that overlap one another in a gentle spiral, the way real sunflower petals fold over their neighbors. A dark brown seed center sits inside a thin ring of orange, and a hidden yellow backing disc on the underside keeps every seam out of sight and the coaster lying flat on the table.
What sets this design apart is the construction. Instead of working petals straight off the center in one go, you make each petal as its own small fan, edge it with a crisp border of single crochet, and then arrange and sew them in place. That extra step is what creates the layered look and the raised outline you can see along the edge of every petal.
Plan on four to five hours from start to finish, with most of that time spent on the petals. It is a good project for crocheters who are comfortable with basic stitches and joined rounds and want to practice neat finishing and assembly. Make one as a mug coaster, a set for a summer table, or sew one onto a bag or pillow as an appliqué.
Materials
- Worsted weight cotton yarn in sunflower yellow about 30 g (petals and backing disc)
- Worsted weight cotton yarn in dark brown about 6 g (center)
- Worsted weight cotton yarn in orange about 4 g (inner ring)
- 3.5 mm crochet hook a size smaller than usual keeps the fabric firm
- Tapestry needle for sewing petals and the backing disc
- Stitch marker to mark the first stitch of each round
- Scissors
- Blocking pins and a spray bottle for shaping the finished coaster
- Cork or felt circle, about 7 cm optional, for a heat-resistant base
Abbreviations
MRmagic ringchchainsl stslip stitchscsingle crochetincincrease: 2 sc in the same stitchhdchalf double crochetdcdouble crochettrtreble crochetspspacest(s)stitch(es)Center (Brown)
- Work in joined rounds. At the start of each round ch 1 (does not count as a st); at the end of each round sl st to the first sc to join.
- Round 1: 6 sc in MR, pull ring closed. (6)
- Round 2: inc in each st around. (12)
- Round 3: (sc in next st, inc) 6 times. (18)
- Round 4: (sc in next 2 sts, inc) 6 times. (24)
- Round 5: (sc in next 3 sts, inc) 6 times. (30)
- Round 6: (sc in next 4 sts, inc) 6 times. (36) Join and fasten off brown. Weave in the starting tail.
Center Texture (Surface Detail)
- Cut a 60 cm length of brown yarn. Holding the yarn under the center, insert the hook from front to back in the gap between Rounds 4 and 5, pull up a loop.
- Insert the hook into the next gap along the same line, pull up a loop and draw it through the loop on the hook. Repeat around to make a ring of surface slip stitches.
- Keep the tension loose enough that the center stays flat. Pull the end to the back, fasten off, and weave in both ends.
Inner Ring (Orange)
- Round 7: Join orange with a sl st in any st of Round 6. Ch 3 (counts as dc), dc in same st, dc in next 2 sts; *2 dc in next st, dc in next 2 sts* repeat from * to * 11 more times. (48)
- Sl st to the top of the beginning ch-3 to join. Fasten off orange and weave in ends on the back.
Petals (Yellow, Make 12)
- Row 1: MR, ch 3 (counts as dc), 4 dc in ring, pull ring closed. Turn. (5 dc)
- Row 2: Ch 3 (counts as dc), dc in the same st, 2 dc in each of the next 4 sts, working the last 2 dc into the top of the turning ch. Turn. (10 dc)
- Row 3: Ch 1, sc in first st, hdc in next st, dc in next st, 2 dc in next st, tr in next st, ch 2, tr in next st, 2 dc in next st, dc in next st, hdc in next st, sc in last st. Do not turn. (12 sts and a ch-2 sp at the tip)
- Round 4 (edging): Ch 1. Working down the side of the petal toward the MR: 1 sc in the end of Row 3, 2 sc in the end of Row 2, 2 sc in the end of Row 1. Sc in the MR. Working up the other side: 2 sc in the end of Row 1, 2 sc in the end of Row 2, 1 sc in the end of Row 3.
- Continue across the top of Row 3: sc in each of the next 6 sts, (sc, ch 2, sc) in the ch-2 sp, sc in each of the last 6 sts. Sl st to the first sc of the edging. (25 sc and a ch-2 tip)
- Fasten off, leaving a 30 cm tail for sewing. Repeat to make 12 petals in total.
Backing Disc (Yellow)
- Work in joined rounds as for the Center, with ch 1 at the start and a sl st join at the end of each round.
- Rounds 1-6: Work as Center Rounds 1-6 in yellow. (36)
- Round 7: (sc in next 5 sts, inc) 6 times. (42)
- Round 8: (sc in next 6 sts, inc) 6 times. (48)
- Fasten off, leaving a 60 cm tail for sewing.
Finishing
Lightly block each petal before assembly: spray it damp, pin it flat with the tip pointed, and let it dry. Flat petals are much easier to arrange evenly than curled ones.
Lay the center face up. Place the first petal so its MR point sits right at the line where the brown meets the orange, with the petal pointing straight out. Using the petal tail, sew the lower third of the petal to the orange ring with small running stitches worked through the back of the petal, so the stitches do not show on the front. Place the next petal to the right, overlapping the first petal’s edge by about a third, and sew it the same way. Continue around, spacing the petals so the MR points sit roughly every four orange stitches. Tuck the edge of the twelfth petal under the first petal to close the spiral. Small orange triangles should show between the petal bases, as in the photo.
Turn the flower over and tack each overlap with one or two stitches at the middle of the petal so the layers stay put. If you are using a cork or felt circle, center it on the back now. Place the backing disc over the back, wrong side facing the flower, and whipstitch its outer edge to the undersides of the petals with the long tail. Weave in all remaining ends between the two layers. Give the whole coaster a final light spray, pin it flat, and let it dry completely.
Tips for Success
- Make all twelve petals in one sitting if you can. Your tension shifts from day to day, and petals made at different times often come out slightly different in size.
- Lay out all twelve petals around the center before sewing any of them. Adjust the spacing until the gaps look even, then pin each one in place.
- Pull the treble stitches at the petal tip up to their full height. Short trebles give you a rounded tip instead of the pointed shape in the photo.
- Use a cotton yarn with a slight sheen. It shows the raised single crochet edging clearly and holds up to hot mugs and washing.
- Sew petals with yarn separated to two plies if your yellow is thick. The thinner strand hides better in the orange dc.
Common Mistakes to Avoid
- Skipping the turning chain count in Row 2 of the petal. If you do not work into the top of the ch-3, you end with 8 dc instead of 10 and the petal comes out narrow. Count to 10 before starting Row 3.
- Working too many stitches into the row ends during the edging. That makes the sides ruffle. Stick to 1, 2, 2 on each side; if your rows are tall, you can drop to 1 sc in the end of Row 1.
- Sewing petals too far out on the orange ring. The coaster then looks like a daisy with a wide orange band. Keep the MR point right against the brown.
- Pulling the backing seam tight. A tight whipstitch cups the coaster into a bowl shape. Keep the stitches snug but relaxed and block flat afterward.
- Forgetting to tuck the last petal under the first. If it sits on top, one petal breaks the spiral and the flower looks unfinished.
Ways to Customize This Pattern
- Make a set of four or six coasters and crochet a simple yellow cotton pouch or a brown ring holder to store them.
- Use two shades of yellow and alternate them around the flower for a sun-dappled look.
- Skip the backing disc and add a pin back or sew the flower onto a tote bag, cushion, or hat as an appliqué.
- Change the colors to make a red and burgundy autumn sunflower, or a cream and gold version for a neutral table.
- Work the center in a variegated brown and add a few French knots in orange across the brown for extra seed texture.
Frequently asked questions
Separate petals let each one overlap the next, which creates the layered spiral look. Petals worked directly into the ring sit side by side and cannot fold over each other.
You can, but acrylic can melt or scorch under a very hot mug and does not block as crisply. Cotton is the better choice for a coaster; acrylic is fine if you are making it as a decoration or appliqué.
For a coaster, yes. It hides the sewing, keeps the petals from lifting when you set a cup down, and gives the piece enough body to lie flat. For an appliqué you can leave it off.
Hand wash in cool water with mild soap, press out the water in a towel, then pin it flat to dry so the petals keep their shape.
The finished Sunny Layered Sunflower Coaster Crochet Pattern

