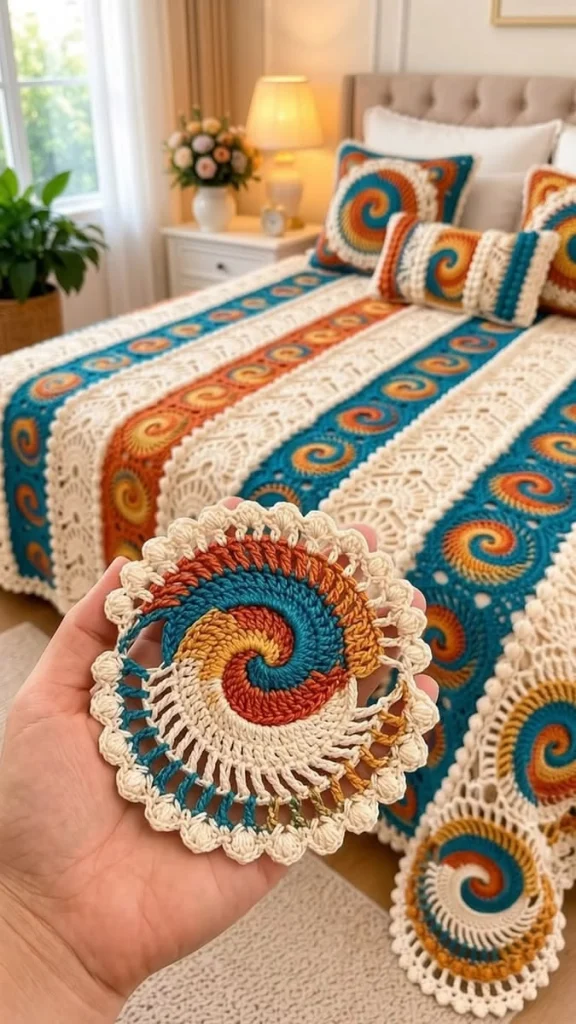
Teal and Amber Spiral Medallion Crochet Blanket
Advanced
For experienced crocheters who enjoy complex shaping, fine detail, and ambitious construction
Weekend Project
A satisfying weekend make — start Friday, finish Sunday, enjoy forever.
Handmade Gift
A beautiful keepsake — free forever. Read online or print at home.
About This Teal and Amber Spiral Medallion Crochet Blanket
This spiral medallion crochet blanket pattern brings together deep teal, burnt rust, warm gold, and ivory in long decorative bands. Inspired by the blanket in the reference photograph, it combines circular motifs, raised curling details, open ivory lace, and a soft scalloped border.
The blanket is assembled from 28 individually worked squares and three separate lace panels. Applied crochet cords form the colored spirals, while embroidered accents soften their edges. Allow approximately 65–90 hours for crocheting, decorating, joining, and blocking. This is an advanced project for crocheters comfortable with shaping circles into squares, matching different fabric gauges, and sewing long seams accurately.
Materials
- DK yarn in deep teal Approximately 900 m
- DK yarn in burnt rust Approximately 650 m
- DK yarn in warm gold Approximately 350 m
- DK yarn in ivory Approximately 1,100 m
- Matching yarn construction Use the same smooth, washable wool blend or acrylic blend for all four colors; quantities include a working allowance
- Crochet hook 4 mm as a starting point; additional sizes for matching the two gauges
- Tapestry needle, scissors, and removable markers Include four corner markers per square while blocking
- Blocking mats, rustproof pins, and measuring tape Essential for matching the squares and lace panels
Abbreviations
chchainsl stslip stitchscsingle crochethdchalf double crochetdcdouble crochetinc2 single crochet in one stitchMRmagic ringRSright sideWSwrong sideGauge, Dimensions, and Construction
- Use US crochet terminology throughout. Starting chains do not count as stitches unless a row explicitly says otherwise. Work medallion rounds in a continuous spiral through Round 12, marking the first stitch of each round.
- Target plain-fabric gauge: approximately 18 sc and 20 rows = 10 cm. The controlling motif gauge is one completed square through Round 14, blocked to 16 × 16 cm. Adjust the motif hook to obtain this measurement.
- Target lace gauge: 19 stitch positions across = approximately 10.5 cm, and 15 rows = 10 cm after blocking. A stitch position is either a stitch or a chain space. Use a separate hook size for the lace if needed.
- Each motif column contains seven 16 cm squares and measures 16 × 112 cm. Each lace panel has 168 rows and measures approximately 10.5 × 112 cm.
- Arrange four motif columns with three lace panels between them. Before edging, the blanket measures approximately 95.5 × 112 cm. The border brings it to approximately 100 × 116 cm, depending on blocking.
- All measurements are blocked targets. Wash and block the samples as you intend to wash the finished blanket before committing to the full project.
Medallion Squares — Make 28
- Color allocation: make 21 teal-centered squares and seven rust-centered squares. Keep the center color through Round 12. Work Rounds 13–14 in the same color for a continuous colored column.
- Round 1: Work 6 sc in MR. Tighten the ring. (6 stitches)
- Round 2: Inc in every stitch. (12 stitches)
- Round 3: Repeat (sc in next stitch, inc in next stitch) 6 times. (18 stitches)
- Round 4: Repeat (sc in next 2 stitches, inc in next stitch) 6 times. (24 stitches)
- Round 5: Repeat (sc in next 3 stitches, inc in next stitch) 6 times. (30 stitches)
- Round 6: Repeat (sc in next 4 stitches, inc in next stitch) 6 times. (36 stitches)
- Round 7: Repeat (sc in next 5 stitches, inc in next stitch) 6 times. (42 stitches)
- Round 8: Repeat (sc in next 6 stitches, inc in next stitch) 6 times. (48 stitches)
- Round 9: Repeat (sc in next 7 stitches, inc in next stitch) 6 times. (54 stitches)
- Round 10: Repeat (sc in next 8 stitches, inc in next stitch) 6 times. (60 stitches)
- Round 11: Repeat (sc in next 9 stitches, inc in next stitch) 6 times. (66 stitches)
- Round 12: Repeat (sc in next 10 stitches, inc in next stitch) 6 times. (72 stitches)
- Round 13: Repeat the following 4 times: in next stitch work (2 dc, ch 2, 2 dc), hdc in next 2 stitches, sc in next 13 stitches, hdc in next 2 stitches. Join with sl st to first dc. Each repeat consumes 18 stitches and produces 21 stitches plus one corner space. (84 stitches and four ch-2 spaces)
- Round 14: Ch 1. Sc in every stitch and work 3 sc in each corner ch-2 space. Join with sl st to first sc; fasten off. Mark the middle sc of each corner group. (96 stitches)
- Block to 16 × 16 cm without stretching the center into a dome. Between consecutive marked corner stitches there are 23 unmarked stitches, giving 24 stitch-to-stitch intervals along each side.
Raised Spiral Cords — Make Three for Each Square
- For each teal square, make one rust cord, one gold cord, and one ivory cord. For each rust square, make one teal cord, one gold cord, and one ivory cord.
- For each cord, leave a 25 cm starting tail and ch 49 loosely.
- Row 1: Starting in the second chain from the hook, sl st in each chain across. Keep the slip stitches loose and even. (48 sl st)
- Fasten off, leaving a 100 cm sewing tail. A finished cord should measure approximately 26–28 cm without stretching. Make 84 cords in total.
- On the RS of a square, place three markers on Round 1, spaced two stitches apart. Place three endpoint markers on Round 11, spaced 22 stitches apart around that round.
- Pin each cord from one center marker to its corresponding outer marker. Shape all three cords into matching clockwise curves, with each cord traveling approximately three-quarters of a turn around the center as it moves outward. Keep the cords parallel and evenly spaced; they must not cross.
- Use the available cord length to smooth each curve, moving its endpoint slightly around Round 11 if necessary. Pin all three cords before sewing. Keep the square flat throughout.
- Using the long tail, couch each cord in place with a small stitch over the cord at every second slip stitch. Catch only the upper part of the underlying fabric where practical. Secure both ends firmly and weave tails into the WS.
Embroidered Spiral Highlights
- Thread a tapestry needle with approximately 80 cm of gold yarn. Secure it on the WS beneath the outer half of the rust cord on a teal square, or beneath the teal cord on a rust square.
- Working beside that cord, embroider 12 short radial straight stitches. Space them evenly along its outer half. Each stitch runs approximately 5 mm outward from the cord into the background fabric.
- Repeat with ivory beside the outer half of the gold cord, making another 12 short radial stitches. Keep the stitches relaxed so they do not pull the motif inward.
- Repeat on all 28 squares. The two sets of highlights add the small contrasting rays visible around the reference spirals without covering the colored background.
Ivory Lace Panels — Make Three
- With ivory and the hook that achieves the lace gauge, ch 20 loosely.
- Row 1: Sc in second chain from hook and in each remaining chain. Turn. (19 sc)
- Row 2: Ch 2, dc in first stitch; repeat (ch 1, skip next stitch, dc in next stitch) 9 times. Turn. The turning chain does not count. (10 dc and nine ch-1 spaces; 19 positions)
- Row 3: Ch 1, sc in every dc and work 1 sc in every ch-1 space. Turn. (19 sc)
- Rows 4–167: Repeat Rows 2–3 a further 82 times. Even-numbered rows contain 10 dc and nine ch-1 spaces; odd-numbered rows contain 19 sc.
- Row 168: Repeat Row 2. Fasten off. (10 dc and nine ch-1 spaces)
- Block each panel to approximately 10.5 × 112 cm. Place markers after every 24 rows along both long edges, producing seven equal joining sections. There are 168 rows in total: 84 solid rows and 84 mesh rows.
Join the Motif Columns
- Lay out four columns, each seven squares long. From left to right, use teal, rust, teal, and teal backgrounds. Rotate individual squares before joining so the spiral openings vary gently while all spirals retain the same clockwise direction.
- With RS facing up and edges touching, whipstitch the lower edge of one square to the upper edge of the next in matching background yarn. Pass through the outer loops of corresponding edge stitches, including both marked corner stitches. Match all 25 edge stitches from corner to corner.
- Work six horizontal seams per column, making 24 seams in total. Keep the seams flat and avoid drawing the sewing yarn tight.
- At a shared square junction, the two touching corner stitches form one joining station along the outside of the column. Treat that pair together when attaching the lace.
Attach the Lace Panels
- Arrange the blanket from left to right: teal column, ivory panel, rust column, ivory panel, teal column, ivory panel, teal column. Keep all RS facing up.
- Pin each 24-row lace section beside one square. Match the top and bottom of the section to the marked square corners. Each square side has 24 intervals, matching the 24 lace rows.
- Using ivory, whipstitch one lace row end to each successive interval along the motif edge. Work around the row-end bars rather than splitting the yarn. In the motif fabric, catch the edge loop immediately below the corresponding interval.
- At each horizontal square seam, pass through the paired corner loops together before continuing. Do not add an extra lace row or an extra stitch at these junctions.
- Complete all six long seams. Spread the blanket on a flat surface and check that every lace panel lies level with its neighboring columns before securing the sewing tails.
Ivory Foundation Border
- Round 1: With RS facing, join ivory at the upper-left outer corner. Ch 1. Work 154 sc evenly across the top edge, ch 2 for the corner, 166 sc down the right edge, ch 2, 154 sc across the bottom edge, ch 2, and 166 sc up the left edge, ch 2. Join with sl st to first sc. (640 sc and four ch-2 corner spaces)
- For each top and bottom edge, distribute the 154 sc as follows: 24 across each of the four motif ends, 19 across each of the three lace ends, and 1 extra sc at the central lace-to-motif junction. This gives 96 + 57 + 1 = 154 sc.
- For each long edge, use its 168 edge intervals as your guide. Work 1 sc per interval except at two widely separated intervals, which you leave unworked, to obtain 166 sc. Spread these small adjustments across the length.
- Round 2: Ch 1. Sc in every sc and work (sc, ch 2, sc) in each corner space. Join with sl st to first sc. (648 sc and four ch-2 spaces)
- After Round 2, each short side has 156 sc between corner spaces and each long side has 168 sc between corner spaces. Mark the first stitch after every corner space to make the scallop repeats easy to count.
Scalloped Outer Edge
- Slip stitch to the upper-left corner space. In that space work (sl st, ch 3, sl st) to make a small corner loop.
- Across the next short side, repeat (skip next sc, 5 dc in next sc, skip next sc, sl st in next sc) 39 times. Each repeat consumes 4 sc. (39 shells)
- In the next corner space work (sl st, ch 3, sl st). Across the long side, repeat the same 4-stitch shell sequence 42 times. (42 shells)
- Work the next corner loop, 39 shells across the second short side, the final corner loop, and 42 shells across the remaining long side. Join to the first corner sl st and fasten off. (162 five-dc shells and four corner loops)
Finishing
Weave in all remaining tails on the wrong side, following the matching yarn color where possible. Check every cord end and column junction with a gentle tug. The blanket should drape freely, with the raised spirals resting on the surface and the ivory panels opening evenly between the colored bands.
Wash according to the yarn label and block flat to approximately 100 × 116 cm. Set the corners square first, then smooth the columns and open the scallops with your fingers. Let the blanket dry completely before removing the pins. Store it folded loosely so the applied cords keep their texture.
Tips for Success
- Finish one decorated square before measuring gauge. Tight couching can shrink an otherwise correctly sized motif.
- Pin all three spiral cords together before sewing. Adjusting their shared spacing is easier while every curve is still movable.
- Mark every 24th lace row as you work. Those markers align directly with the seven square sections in each column.
- Check the foundation border while the blanket lies flat. Distribute the specified stitches evenly rather than crowding them near a join.
- Use short sewing lengths for the long lace seams to reduce abrasion and tangling in the ivory yarn.
Common Mistakes to Avoid
- A cupped square usually means the spiral cords were stretched during sewing. Release the couching stitches and reattach the cords with the square lying flat.
- Counting the lace turning chain as a dc adds an unwanted stitch. Every mesh row must contain exactly 10 dc and nine spaces.
- Adding a joining stitch at every horizontal square seam makes the lace edge longer than the column. Treat the touching corner stitches as one joining station.
- Skipping the final sc beside a marked square corner shifts the seam. Each square edge contains 25 stitches including both corner centers.
- Working border shells before checking the side counts can leave a partial repeat. Confirm 156 sc on each short side and 168 on each long side after Border Round 2.
Ways to Customize This Pattern
- Use teal backgrounds for all 28 squares, keeping the rust, gold, and ivory cords for a more uniform blanket.
- Replace gold with muted ochre and rust with terracotta while keeping the ivory panels for a softer version of the reference palette.
- Make a matching cushion front from four decorated squares arranged in a 2 × 2 grid. Sew it to a fabric-backed cushion cover.
- Omit the embroidered rays on selected squares to alternate richly detailed medallions with quieter spiral motifs.
Frequently asked questions
No. This original interpretation uses three separately crocheted cords attached to each circular center. That construction gives clear raised curves in the reference colors and lets you adjust their placement before sewing.
The panels combine sc rows with taller mesh rows. Their row gauge must produce the same 112 cm length as seven squares. A hook that gives the correct square size may produce lace that is too long or too short.
The written dimensions produce a throw approximately 100 × 116 cm. The photograph does not provide reliable measurements for its bedspread. Enlarging this design requires additional motif columns or squares, longer lace panels, and recalculated border pickup counts.
Yes, provided your blocked samples meet both gauges. Cotton will make a heavier blanket with less elastic seams, so check the decorated square’s drape and support the full blanket when lifting it wet.
The finished Teal and Amber Spiral Medallion Crochet Blanket

