Teal and Coral Chevron Crochet Blanket Pattern
Beginner Friendly
Perfect for those just starting their crochet journey, with clear instructions and simple techniques
Single-Day Project
A satisfying project you can complete in a single afternoon or evening.
Handmade Gift
A beautiful keepsake — free forever. Read online or print at home.
About This Teal and Coral Chevron Crochet Blanket Pattern
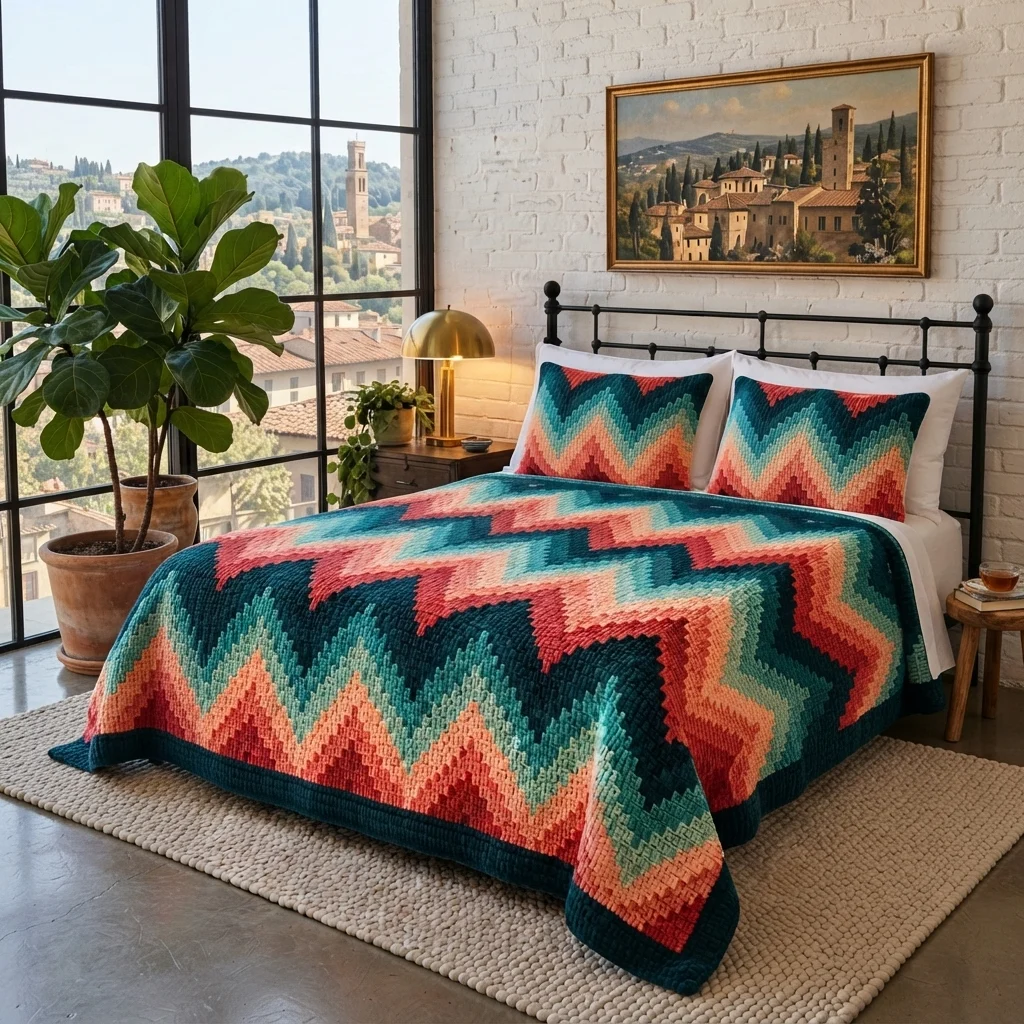
This chevron crochet blanket pattern builds a heavy, colorful throw out of one long zigzag, with bands of dark teal, teal, mint, peach, orange and red that rise and fall across the bed like the blanket in the photo. Dark teal frames the whole piece, and the dense single crochet fabric is thick enough to hold the folds of a bed cover.
It is an advanced pattern because of its size and its color work. The blanket is worked flat in one piece, 182 rows of 154 stitches, with two increases at every peak and two decreases at every valley, and you change color every 4 to 6 rows. The shaping stays the same in every row, but any miscounted row shows across the whole blanket. A five-round dark teal border finishes it. Plan on 45 to 55 hours in total.
It suits crocheters who are comfortable with ripple shaping, stripes and long projects, and who want a bright, modern throw that works with white linen, brick walls and natural wood. The finished blanket is about 150 x 175 cm, and the width changes in steps of one 14-stitch repeat, about 13 cm.
Materials
- Chunky cotton-blend yarn, dark teal (D) about 1.0 kg, estimated, includes the border
- Chunky cotton-blend yarn, teal (T) about 500 g, estimated
- Chunky cotton-blend yarn, mint (M) about 500 g, estimated
- Chunky cotton-blend yarn, peach (P) about 500 g, estimated
- Chunky cotton-blend yarn, orange (O) about 500 g, estimated
- Chunky cotton-blend yarn, red (R) about 400 g, estimated
- Crochet hook 6.5 mm
- Yarn needle
- Stitch markers one every 44 rows, and for the border corners
- Flat surface and pins for blocking
Abbreviations
chchainscsingle crochetinc2 sc in the same stitchdecsingle crochet 2 stitches together (invisible decrease)sl stslip stitchst(s)stitch(es)RSright sideFOfasten offDdark teal yarnTteal yarnMmint yarnPpeach yarnOorange yarnRred yarn( )xrepeat the stitches in brackets the number of times givenThe Chevron Row
- Every row has 154 stitches and uses the same shaping, so the peaks and valleys stack in straight lines from the bottom to the top. Ch 1 and turn at the end of every row (the ch 1 does not count as a stitch).
- Chevron row: inc, 4 sc, (dec, dec, 4 sc, inc, inc, 4 sc)x10, dec, dec, 4 sc, inc (154).
- The two decs make the valley and the two incs make the peak. Each full repeat is 14 stitches in and 14 stitches out. The first stitch of the row is a half peak and the last stitch is a half peak, so the sides stay straight.
- Count the pieces once: the row has 11 peaks (a half peak at each end and 9 full ones) and 10 valleys, and the stitch count after every row is always 154.
- Work every dec over the 4 stitches that sit around the valley of the row below, and every inc over the 2 stitches that make the middle of a peak.
Stripe Sequence
- The stripes repeat every 44 rows. Rows 1-6: D. Rows 7-10: T. Rows 11-14: M. Rows 15-18: P. Rows 19-22: O. Rows 23-28: R. Rows 29-32: O. Rows 33-36: P. Rows 37-40: M. Rows 41-44: T.
- Work the 44-row sequence 4 times (rows 1-176). Then work rows 177-182 in D.
- Check the totals: D has 30 rows, T 32, M 32, P 32, O 32 and R 24, which adds up to 182.
- Change color on the last pull-through of the last stitch of the row before, and cut the old color, leaving 10 cm tails. Crochet over the tails along the sides for the next few stitches, or weave them in later.
Blanket Body
- Foundation: with D, ch 155.
- Row 1 (RS): sc in the 2nd ch from the hook, then work the chevron row across the chain (154). Ch 1 and turn.
- Rows 2-182: work the chevron row in the colors of the stripe sequence (154 in every row). Ch 1 and turn at the end of every row except the last.
- Place a stitch marker in the turning chain of rows 44, 88, 132 and 176 so you can check your length. After 44 rows the blanket should be about 40 cm tall.
- After row 182, do not FO. Go straight into the border in D.
- Check your body: every row must have exactly 154 stitches, the body should measure about 140 cm wide and 165 cm tall, and the peaks should stack in straight vertical lines.
Dark Teal Border
- Round 1: with the RS facing you and row 182 at the top, you are in the top right corner. Ch 1 and work 3 sc in the corner stitch. Sc in each of the next 152 sts across the top. Work 3 sc in the top left corner stitch.
- Work 180 sc evenly down the left side, one in each row end between the corners. Work 3 sc in the first stitch of the foundation edge (the bottom left corner), 152 sc across the foundation edge and 3 sc in the last stitch (the bottom right corner). Work 180 sc evenly up the right side. Join with a sl st to the first sc (676).
- Rounds 2-5: ch 1, sc in each st around, working 3 sc in the middle st of each 3-sc corner group. Join with a sl st at the end of each round. Each round adds 8 stitches: round 2 has 684, round 3 has 692, round 4 has 700 and round 5 has 708.
- FO and weave in the end.
- Check your border: after round 5 there are 160 stitches between the corner groups along the top and foot and 188 down each side. The border should be about 5 cm wide, and the corners should lie flat without cupping or ruffling.
Finishing
Weave in all ends along the back, following the stitches for at least 8 cm. Block the blanket by laying it flat on towels, pinning the corners and the tip of every peak along the top and foot, and misting it with water. Let it dry fully before moving it. Blocking opens the zigzag and makes the stripes lie smooth.
Drape the blanket with the dark teal band hanging over the foot of the bed and the zigzag running across the width, and it will look like the photo.
Tips for Success
- Count your stitches at the end of every row for the first 10 rows, and then every 10 rows. There should always be 154, and a wrong count is easiest to fix straight away.
- Place a stitch marker in the first valley of the row. If the valleys drift sideways, you have lost count of the stitches between the decs.
- Use invisible decreases at the valleys, so the stripes meet in clean points.
- Keep your tension even in every color. Dark teal and red often work up a little tighter, so check your width at each stripe.
- Wind each color into a center-pull ball before you start, and put the finished stripe colors back in a bag in order.
Common Mistakes to Avoid
- Working only one inc at the peak or one dec at the valley makes the stitch count grow or shrink. Always work 2 incs and 2 decs.
- Counting the ch 1 turning chain as a stitch makes the rows 155 wide and moves the valleys. The ch 1 never counts.
- Working the decs over the wrong stitches makes the zigzag lean to one side. Check that each valley sits above the one in the row below.
- Changing color in the middle of a row leaves a visible step. Always change on the last pull-through of the row before.
- Working different corner counts in the border makes it ripple. Use exactly 3 sc in each corner stitch on every round.
Ways to Customize This Pattern
- Swap the colors for a single ombre, such as five shades of blue or five shades of gray, and keep the same stripe sequence.
- Make the stripes bolder by working 8 rows of each color instead of 4, and double the yarn estimate for each color change.
- Make a baby blanket with 6 repeats: ch 85 (84 stitches), work 88 rows (2 stripe cycles) and 4 border rounds, about 85 x 90 cm. The row is inc, 4 sc, (dec, dec, 4 sc, inc, inc, 4 sc)x5, dec, dec, 4 sc, inc.
- Make a matching pillow cover: ch 43 (42 stitches, 3 repeats) and work 44 rows of one stripe cycle. The row is inc, 4 sc, (dec, dec, 4 sc, inc, inc, 4 sc)x2, dec, dec, 4 sc, inc. Add 2 border rounds and sew it to a plain back.
- Use a worsted yarn and a 5 mm hook for a lighter blanket, and recalculate how many repeats and rows you need from your swatch.
Frequently asked questions
The amounts above are estimates of about 3.4 kg in all. Dark teal is the biggest amount because it has 30 rows plus the border. Weigh your swatch, scale it up by the number of rows in each color, and add about 10 percent.
Add or remove whole 14-stitch repeats, about 13 cm each. For R repeats, the foundation is 14R + 1 chains and the row is inc, 4 sc, (dec, dec, 4 sc, inc, inc, 4 sc)x(R – 1), dec, dec, 4 sc, inc. Then recalculate the border so the top and foot count is the stitch count minus 2.
The height of the peaks depends on your tension and your yarn. For steeper peaks, add one more sc on each slope, which makes each repeat 16 stitches, or work the stripes 2 rows tall. The photo shows a stepped design, which is steeper than a simple ripple.
With a washable cotton blend, wash it on a gentle cycle in cool water, press out the water without wringing, and lay it flat to dry. Red and dark teal can bleed onto the lighter colors, so wash it with a color catcher the first time, and never hang a wet blanket this heavy.
The finished Teal and Coral Chevron Crochet Blanket Pattern

