Teal and Cream Quilt-Style Triangle Crochet Blanket
Beginner Friendly
Perfect for those just starting their crochet journey, with clear instructions and simple techniques
Single-Day Project
A satisfying project you can complete in a single afternoon or evening.
Handmade Gift
A beautiful keepsake — free forever. Read online or print at home.
About This Teal and Cream Quilt-Style Triangle Crochet Blanket
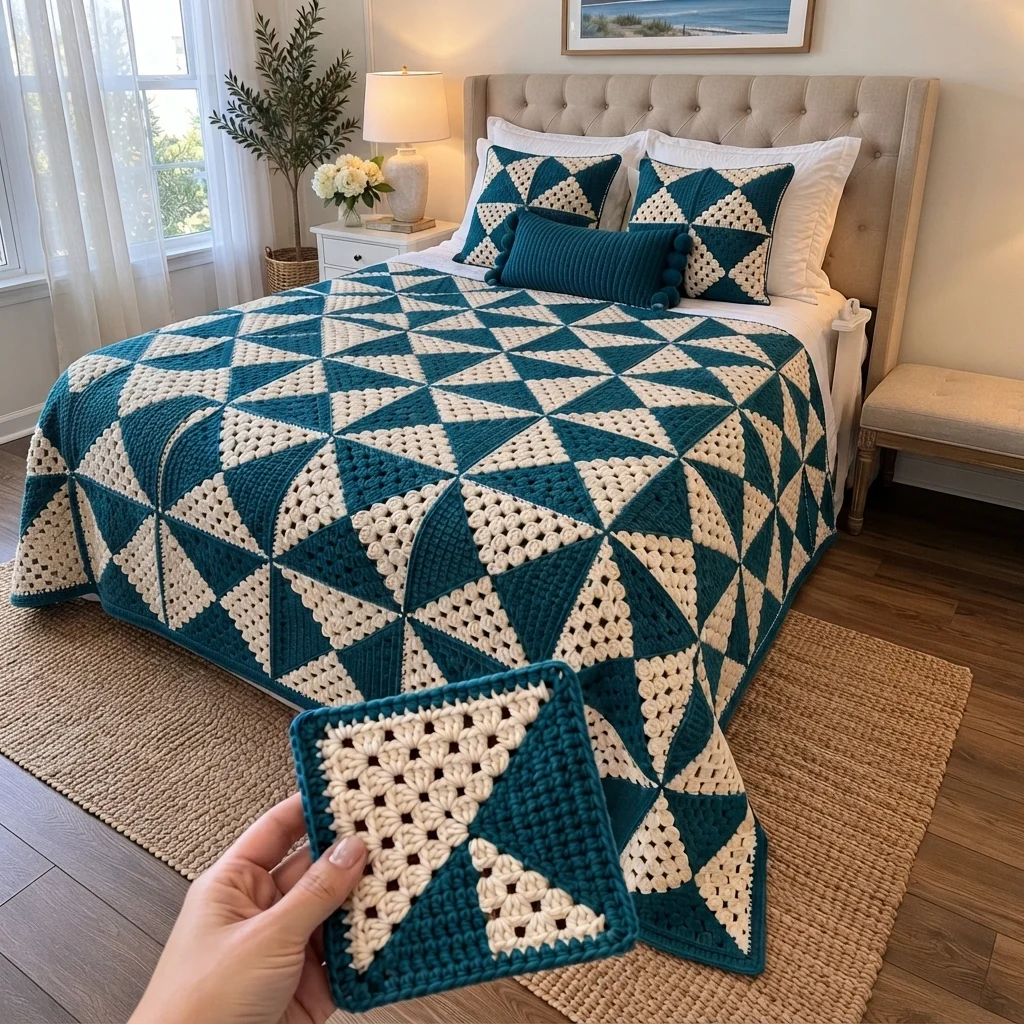
This triangle crochet blanket pattern builds a bed-sized blanket from 80 square blocks, each made of one teal triangle and one cream triangle joined on the diagonal. Turn the blocks a quarter turn at a time and the triangles meet at the corners to form large teal and cream diamonds across the whole bed, like a patchwork quilt. The result is thick, crisp and graphic, with a bold two-color look that suits almost any bedroom.
The triangles are made from simple single crochet rows with a one-stitch increase at the end of every row, so the stitch work is easy to learn and quick to repeat. The skill is in the geometry: every triangle must come out exactly the same size, and every block has to be turned the right way during assembly. A little care at those two points is what makes the diamonds line up.
Plan on about 50 minutes per block, so roughly 70 to 90 hours for the full bed size, or about 28 hours for a throw. It suits crocheters who are comfortable with single crochet rows, increasing at the edge and seaming along a stair-stepped edge. The pattern also includes matching pillow covers and a ribbed bolster with pom-poms.
Materials
- Bulky (weight 5-6) yarn in deep teal about 1,230 m (1,345 yd) for the bed-size blanket with border
- Bulky (weight 5-6) yarn in cream about 1,110 m (1,215 yd) for the bed-size blanket
- Extra yarn for two pillow covers about 360 m (395 yd) of teal and 110 m (120 yd) of cream
- Extra yarn for one bolster cover about 110 m (120 yd) of teal
- 6 mm (US J-10) crochet hook
- Large-eye tapestry needle for seaming
- Blocking mats and rustproof pins
- Two 40 cm (16 in) pillow inserts optional, for the pillow covers
- One 25 x 50 cm (10 x 20 in) bolster insert optional
Abbreviations
chchainscsingle crochetsl stslip stitchst(s)stitch(es)incincrease: 2 sc in the same stBLOback loop onlyRSright sideWSwrong sideO1, O2, O3, O4the four block positions (cream triangle in the upper left, upper right, lower right, lower left)Teal Triangle (make 80 for the bed size)
The triangle is worked in rows from the point, with one stitch added at the same edge on every row. The other edge stays straight. Row 27 has 27 sts, and the stitch count after each row equals the row number. Turn at the end of every row and work in both loops unless the pattern says otherwise.
- Row 1: With teal, ch 2. Sc in the 2nd ch from hook. (1)
- Row 2 (WS): Ch 1, turn. Inc in the st. (2)
- Row 3 (RS): Ch 1, turn. Sc in the first st, inc in the last st. (3)
- Rows 4-27: Ch 1, turn. On even rows, inc in the first st and sc in each st across. On odd rows, sc in each st to the last st, then inc in the last st. Each row has one more st than the row before. (27 sts after Row 27)
- Fasten off, leaving a 30 cm tail for sewing. The sloped edge is the hypotenuse, and the other two edges (the straight side and the top row) are the outer edges of the block.
Cream Triangle (make 80 for the bed size)
The cream triangle has the same shape and the same stitch counts as the teal one. Every row from Row 2 on is worked in the back loop only, which gives the cream triangles a ridged texture that sets them apart from the smooth teal triangles.
- Row 1: With cream, ch 2. Sc in the 2nd ch from hook. (1)
- Row 2 (WS, BLO): Ch 1, turn. Inc in the back loop of the st. (2)
- Row 3 (RS, BLO): Ch 1, turn. Sc in the first st, inc in the last st, working both in the back loops. (3)
- Rows 4-27 (BLO): Ch 1, turn. On even rows, inc in the first st and sc in each st across. On odd rows, sc in each st to the last st, then inc in the last st. Work every st in the back loop only. Each row has one more st than the row before. (27 sts after Row 27)
- Fasten off, leaving a 30 cm tail for sewing.
Assembling a Block
- Block every triangle before you sew anything. Pin it flat to 20 cm along both straight edges and let it dry.
- Place the cream triangle with its right angle in the upper left corner. This is the position O1. The right angle is the corner where the straight edge meets the last row.
- Turn the teal triangle a half turn and place it opposite, so the sloped edges lie together and the right angle is in the lower right corner. The two triangles now form a square.
- With teal yarn, whip stitch the two sloped edges together along the stair-step, passing through the back loops of the stitches and the row ends. Each of the 27 steps on one triangle matches one step on the other. Fasten off and weave in the ends.
- Check that the finished block is 20 cm square. If it is out by more than 1 cm, re-block it before you join it to other blocks.
Layout and Sizing
- Name the four positions of the finished block by where the cream triangle sits. O1 is the block as assembled, with cream in the upper left. O2 is O1 turned a quarter turn clockwise (cream upper right). O3 is O1 turned a half turn (cream lower right). O4 is O1 turned a quarter turn counterclockwise (cream lower left).
- Odd rows (1, 3, 5 and so on): alternate O1, O2, O1, O2, starting with O1 at the left.
- Even rows (2, 4, 6 and so on): alternate O4, O3, O4, O3, starting with O4 at the left. Every seam in this layout joins cream to cream or teal to teal, and the triangles meet in groups of four to form teal diamonds at the center of each 2 x 2 group and cream diamonds at the corners where the groups meet.
- Sizes: throw, 5 blocks across by 6 down (30 blocks), about 100 x 120 cm. Twin, 6 across by 9 down (54 blocks), about 120 x 180 cm. Full or double, 8 across by 10 down (80 blocks), about 160 x 200 cm. The border adds about 6 cm in each direction. The yarn amounts in this pattern are for the full size.
- Lay out all the blocks on the floor and take a photo before you join anything.
Joining the Blocks
- Block every finished block to 20 cm and let it dry completely.
- Join the blocks into rows first, then join the rows to each other.
- Place two blocks with right sides up and edges touching. Using a tapestry needle, whip stitch through the back loops of both edges, matching each stitch to a stitch. Use teal yarn on teal edges and cream yarn on cream edges. Every seam in this layout joins matching colors.
- Where four blocks meet, stitch across the join in a plus shape so there is no gap at the center.
Border
- Rd 1: Join teal at any outer corner of the blanket. Work 3 sc in the corner, then 1 sc in each st along the edge and 1 sc in each seam, with 3 sc in every remaining outer corner. Join with a sl st to the first sc.
- Rd 2: Ch 1, sc in each st around with 3 sc in each outer corner. Join with a sl st, fasten off, and weave in the end.
Matching Pillow Cover (make 2)
- Make 4 blocks for each cover. Join them into a 2 x 2 front panel, with O1 and O2 on top and O4 and O3 below, using the same color-matched seams. The panel measures 40 cm (16 in) square and shows one teal diamond in the middle.
- Back panel: With teal, ch 55. Row 1: Sc in the 2nd ch from hook and in each ch across. Ch 1, turn. (54) Rows 2-56: Sc in each st across. Ch 1, turn. (54) Fasten off. The panel measures about 40 x 40 cm.
- With wrong sides together, seam the front and back along three sides using teal and whip stitch.
- Insert the 40 cm pillow and close the fourth side with whip stitch, or sew on snaps if you want to remove the insert for washing.
Ribbed Bolster Cover (optional, make 1)
- With teal, ch 36. Row 1: Sc in the 2nd ch from hook and in each ch across. Ch 1, turn. (35)
- Rows 2-71: Sc in the back loop of each st across. Ch 1, turn. (35) Fasten off. The panel measures about 26 x 51 cm and has horizontal ribs.
- Fold the panel into a tube around the 25 x 50 cm bolster, with the ribs running around the bolster. Whip stitch the long edges together with teal.
- Gather each end with a length of teal yarn and pull tight. Tie off firmly and sew in the ends.
- Make 2 pom-poms about 7 cm across in teal and sew one over each gathered end.
Finishing
Weave in every end before blocking the finished blanket. Block it flat according to your yarn’s care label: wet-block wool, and steam acrylic by holding the iron above the fabric without pressing. Give the diamond points a gentle tug into shape as they dry. The blanket is thick and heavy, so wash it gently and dry it flat to keep the diagonals crisp.
Tips for Success
- Count your stitches at the end of every row for the first few triangles. Each row should have the same number of stitches as its row number, and the count tells you at once if you missed an increase.
- Keep your tension the same on the cream and teal triangles. BLO rows can run slightly tighter, so go up a few millimeters in hook size for the cream triangles if they come out smaller.
- Make all the triangles in batches of ten and block each batch together so they all end up the same size.
- Pin each pair of triangles along the whole hypotenuse before you sew, matching stair-step to stair-step, and whip stitch in short even stitches.
- Weigh your first finished block, then multiply by your block count to check you have enough yarn before you begin the rest.
Common Mistakes to Avoid
- Increasing at the wrong edge makes a lopsided triangle instead of a right triangle. Always increase at the same edge on every row: the end of right side rows and the start of wrong side rows.
- Forgetting to turn the second triangle a half turn means the sloped edges do not match. Check that the right angles sit in opposite corners before you sew.
- Joining the blocks in the wrong orientation breaks the diamonds. Follow the layout key and photograph it before seaming.
- Working some cream rows in both loops disrupts the ridged texture. Mark the BLO rows on the first triangle and keep a row counter.
- Using a hook that is too large leaves gaps and a floppy fabric. Drop down half a size so the triangles stay dense.
Ways to Customize This Pattern
- Change the colors. Navy and cream, forest green and oatmeal, or charcoal and white all give a strong quilt look, as long as the two colors contrast well.
- Swap the ridged cream triangle for an open granny-style triangle if you want the lacy texture from the photo. Work it so it measures the same 20 cm along both straight edges, and keep everything else the same.
- Use all blocks in the same position (all O1) for diagonal stripes instead of diamonds.
- Use worsted yarn and a 4 mm hook for a lighter blanket. Make the triangles 36 rows and 36 sts and use 18 more rows per side of the triangle to keep the block the same size.
- Make a throw or baby blanket using the smaller sizes in the Layout and Sizing section.
Frequently asked questions
Using the same counts for both triangles guarantees they join into a perfect square. The only difference between them is color and the back-loop-only rows on the cream triangle, which add texture without changing size.
You can slip stitch the triangles together on the wrong side instead of whip stitching, but a slip stitch seam makes a ridge on one side of the blanket. Whip stitch keeps the seams flat and nearly invisible, so it is the method written here.
Yes. Worsted yarn and a 4 mm hook make a much lighter blanket, but you will need about 36 rows and 36 sts per triangle. Make a test triangle and measure it before you start the rest.
About 50 minutes once you find your rhythm, a little longer for the first few. Each triangle takes about 20 minutes, and joining the two takes about 10 minutes.
The finished Teal and Cream Quilt-Style Triangle Crochet Blanket

