Teal Arch Lace Crochet Bedspread Pattern
Beginner Friendly
Perfect for those just starting their crochet journey, with clear instructions and simple techniques
Single-Day Project
A satisfying project you can complete in a single afternoon or evening.
Handmade Gift
A beautiful keepsake — free forever. Read online or print at home.
About This Teal Arch Lace Crochet Bedspread Pattern
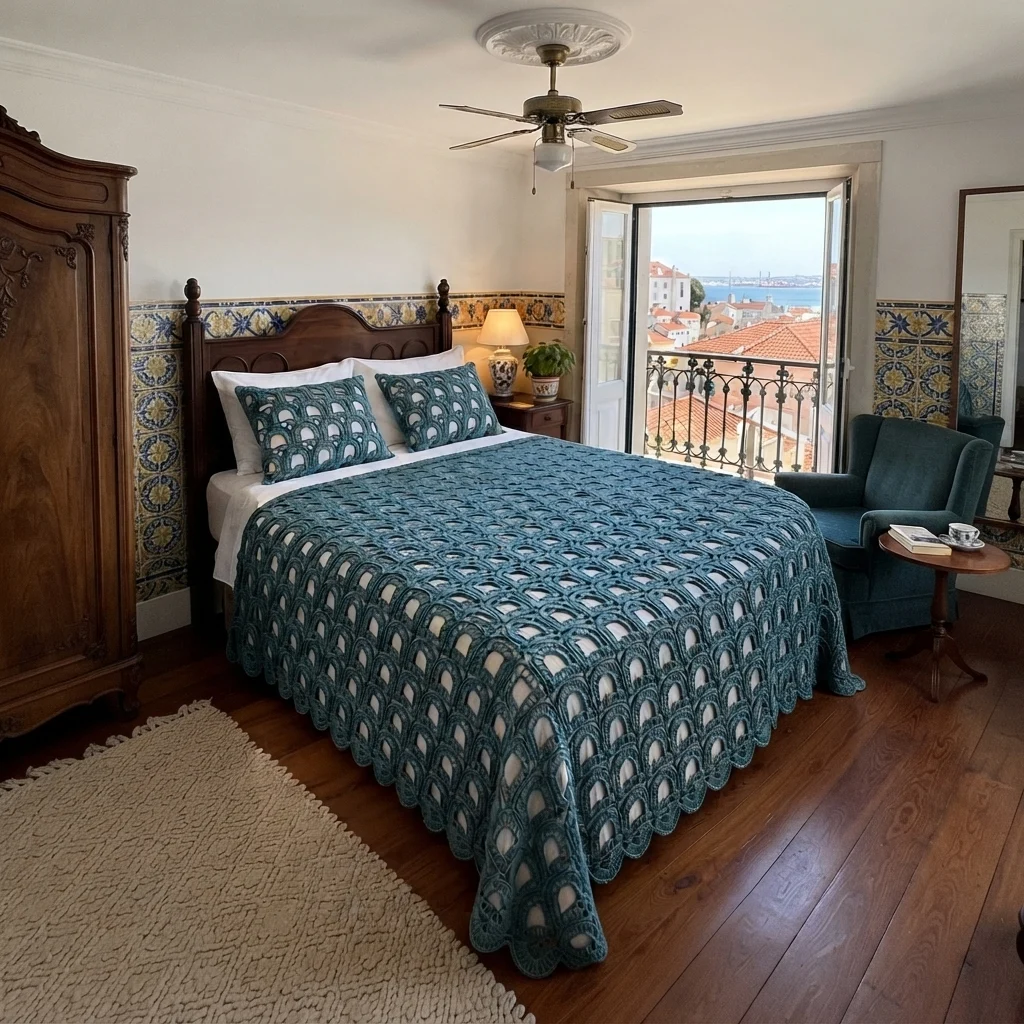
This lace crochet bedspread pattern builds an open, airy cover in deep teal, made of rounded fans and chain loops that line up into rows of little arched windows. A scalloped edge runs around all four sides, and the whole piece is worked flat in one piece, with no motifs to join.
It is an advanced pattern because of its size and its rhythm. The lace is a four-row repeat that you work 30 times, each row has 201 stitches, and every row has to land exactly on the loops of the row below, so one miscounted fan shows all the way up the bedspread. The border adds two rounds of almost 900 stitches and 150 scallops. Plan on 30 to 40 hours in total.
It suits crocheters who are comfortable with double crochet fans, chain loops and long projects, and who want a light, elegant bedspread that looks lovely over white linen, where the windows show the bed underneath. The finished cover is about 156 x 190 cm, and the width changes in steps of one fan, which is about 6 cm.
Materials
- Worsted cotton yarn, deep teal about 1.2 kg, estimated
- Crochet hook 4.0 mm
- Yarn needle
- Stitch markers one every 20 rows
- Flat surface and pins for blocking
Abbreviations
chchainscsingle crochetdcdouble crochetsl stslip stitchst(s)stitch(es)loopa ch-7 (or ch-3) arch between two scfan7 dc worked into the same ch-7 loopRSright sideWSwrong sideFOfasten off( )xrepeat the stitches in brackets the number of times givenHow the Rows Work
- The bedspread is 25 fans wide, and every fan row has 201 stitches: 26 sc and 25 fans of 7 dc (26 + 175 = 201).
- Odd rows are loop rows, worked on the WS. Even rows are fan rows, worked on the RS. The fans always face you.
- Ch 1 and turn at the start of every row. The ch 1 does not count as a stitch.
- The 4th dc of a fan is its center. Loop rows are anchored in the center dc of each fan, so the next row of fans sits halfway between the fans below.
- Every loop row is made of sc stitches joined by loops. Skip stitches only where the instructions say, so the row below always holds the right number of fans.
Foundation and Row 1
- Foundation: ch 202.
- Row 1 (WS, loop row): sc in the 2nd ch from the hook, *ch 7, skip 7 ch, sc in the next ch*, repeat 25 times in total (26 sc, 25 ch-7 loops). Ch 1 and turn.
- Check row 1: you should have 26 sc and 25 loops. The last sc is in the last chain of the foundation.
Four-Row Repeat (rows 2-5)
- Row 2 (RS, fan row A): sc in the first sc, *7 dc in the next ch-7 loop, sc in the next sc*, repeat 25 times in total (25 fans, 201 sts). Ch 1 and turn.
- Row 3 (WS, loop row with short ends): sc in the first sc, ch 3, skip 3 dc, sc in the next dc (the center of the first fan), *ch 7, skip 7 sts, sc in the next dc (the center of the next fan)*, repeat 24 times in total, ch 3, skip 3 dc, sc in the last sc (27 sc, 2 ch-3 loops and 24 ch-7 loops). Ch 1 and turn.
- Row 4 (RS, fan row B): sc in the first sc, 3 dc in the ch-3 loop, sc in the next sc, *7 dc in the next ch-7 loop, sc in the next sc*, repeat 24 times in total, 3 dc in the last ch-3 loop, sc in the last sc (24 full fans and 2 half fans of 3 dc, 201 sts). Ch 1 and turn.
- Row 5 (WS, loop row): sc in the first sc, ch 7, skip 7 sts, sc in the 4th dc of the first full fan, *ch 7, skip 7 sts, sc in the 4th dc of the next full fan*, repeat 23 times in total, ch 7, skip 7 sts, sc in the last sc (26 sc, 25 ch-7 loops). Ch 1 and turn.
- Check rows 2-5: row 2 and row 4 each have 201 stitches. Row 5 has the same count as row 1, so rows 2-5 can repeat.
Body (rows 6-122)
- Repeat rows 2-5 a total of 30 times (rows 2-121).
- Row 122 (RS, final fan row): work row 2 once more (201). Do not FO.
- Place a stitch marker in the turning chain of rows 21, 41, 61, 81, 101 and 121 so you can check your length. After 40 rows the bedspread should be about 60 cm tall.
- Check your body: every fan row has 201 stitches, every loop row has the right number of loops (25, 26 and 25), and the fans stack in straight diagonal lines. The body should measure about 150 x 183 cm.
Border: Single Crochet Rounds
- Round 1: with the RS facing you and row 122 at the top, ch 1 and work 3 sc in the first st of row 122 (the right corner). Sc in each of the next 199 sts, 3 sc in the last st (the left corner).
- Work 241 sc evenly down the left side, about 2 sc in each row end. Work 3 sc in the first chain of the foundation edge (the bottom corner), 199 sc along the foundation chain (skipping the 1 extra chain at the end) and 3 sc in the last chain. Work 241 sc evenly up the right side. Join with a sl st to the first sc (892).
- Round 2: ch 1, sc in each st around, working 3 sc in the middle st of each 3-sc corner group. Join with a sl st (900).
- Check your count: after round 2, the distance from one corner middle stitch to the next is 204 stitches along the top and foot and 246 stitches along each side. Both numbers divide by 6, which is what makes the scallops land evenly on every corner.
Border: Scalloped Edge
- Round 3: join the yarn in the middle stitch of any corner group. Ch 3 (counts as a dc) and work 4 dc in the same st (5 dc, the first scallop).
- *Skip 2 sts, sl st in the next st, skip 2 sts, 5 dc in the next st*, repeat 149 times in total (150 scallops). Then skip 2 sts, sl st in the next st, skip 2 sts and join with a sl st to the top of the ch 3.
- FO and weave in the end.
- Check your scallops: there should be 34 along the top and foot and 41 down each side (counting each corner scallop once), and a scallop should sit on every corner.
Finishing
Weave in all ends along the back, following the stitches for at least 8 cm. Join new balls of yarn at the end of a row, so the ends stay at the edge and not in the middle of a fan.
Block the bedspread by laying it flat on towels, pinning the corners and the tip of every second scallop, and misting it with water. Let it dry fully before moving it. Blocking opens the arches and sets the scallops. Drape the bedspread over a white or light sheet so the windows show it through, with the scalloped edge hanging over the foot and sides, and it will look like the photo.
Tips for Success
- Count your loops at the end of every loop row: 25, 26 or 25. A missing loop is easy to fix right away and very hard to fix 20 rows later.
- Pull each dc of a fan up to the same height, so every fan is round and the windows keep the same shape.
- Work the chain loops loosely. Tight loops pull the fans together and close the windows.
- Write the four rows on a card and tick them off, since the end stitches change on every row.
- Wind your yarn into center-pull balls before you start, and keep a spare ball close by for the end of a row.
Common Mistakes to Avoid
- Counting the ch 1 turning chain as a stitch makes the rows 202 stitches wide and shifts the fans. The ch 1 never counts.
- Skipping 6 or 8 stitches between loops instead of 7 shifts every later fan by one stitch. Count 7 on the first loop of every row.
- Working a loop row into the wrong dc makes the arches lopsided. Always sc in the 4th dc of the fan.
- Forgetting the half fans at the ends of row 4 leaves the sides ragged. Work 3 dc into each end ch-3 loop.
- Starting the scallops away from the corner middle puts the corners between scallops. Join in the middle of a corner group.
Ways to Customize This Pattern
- Swap teal for navy, burgundy, cream or sage and keep the same pattern.
- Make a baby blanket: ch 90 (11 fans wide) and work row 1, then rows 2-5 a total of 11 times, then row 2 once more. This gives about 66 x 70 cm before the border, with 2 sc rounds and a scallop round.
- Make a pillow cover panel: ch 42 (5 fans wide) and work row 1, then rows 2-5 six times, then row 2 once more. This gives about 30 x 40 cm. Make two panels and sew them together with a button closure.
- Make the bedspread wider or narrower by changing the fan count. Each fan adds 8 stitches and about 6 cm, and the foundation is 8 x fans + 2 chains.
- Skip the scallops and finish with 3 more sc rounds and a round of crab stitch (reverse sc) for a simpler edge.
Frequently asked questions
The amount above is an estimate of about 1.2 kg. Lace uses much less yarn than solid crochet, so weigh your swatch of 3 fans and 5 rows, scale it up by the number of fans and rows, and add about 10 percent for the border.
For width, add or remove whole fans. Each fan adds 8 stitches and about 6 cm, and the foundation chain is 8 x fans + 2. For length, add or remove 4 rows at a time, which adds about 6 cm. Recalculate the border so that the corner-to-corner counts divide by 6.
The loops of row 3 are anchored in the center of each fan, so the fans of row 4 sit half a fan to the side. This offset is what draws the arched windows between the fans.
With a washable cotton, wash it by hand or on a gentle cycle in cool water, press out the water without wringing, and lay it flat to dry. Never hang a wet lace bedspread this large, because the loops will stretch out of shape.
The finished Teal Arch Lace Crochet Bedspread Pattern

