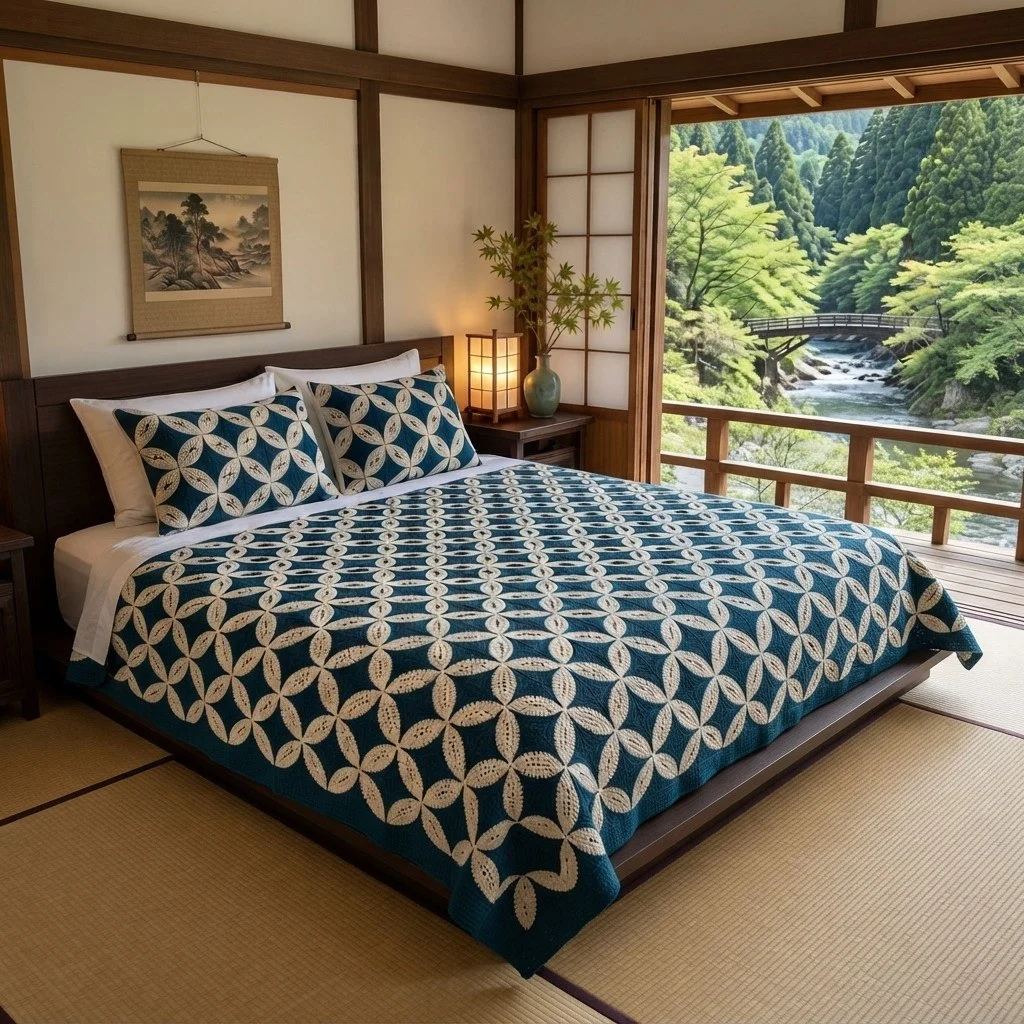
Teal Interlocking Circles Crochet Blanket
Advanced
For experienced crocheters who enjoy complex shaping, fine detail, and ambitious construction
Weekend Project
A satisfying weekend make — start Friday, finish Sunday, enjoy forever.
Handmade Gift
A beautiful keepsake — free forever. Read online or print at home.
About This Teal Interlocking Circles Crochet Blanket
This interlocking circles crochet blanket turns a classic quilt layout into yarn: deep teal tiles, cream petals that overlap into four-point flowers, and thin cream circles that travel across the whole surface and tie every flower to its neighbours. The grid is built from 48 solid teal squares worked in the round, joined into a 6 x 8 field, and then dressed with 332 separate cream petals and 83 surface-crochet circles. Nothing about it is printed or faked — the pattern you see is physically built, layer by layer, which is exactly why it reads as crisp from across a room.
It is an honest commitment. Expect 45 to 60 hours spread over a few weeks: the squares are fast and repetitive, the petals are small and portable, and the surface crochet at the end is the part where the whole thing suddenly clicks into place. The techniques themselves are not difficult individually, but the project asks for accurate counting, consistent tension across dozens of identical pieces, and patience with placement. That makes it a good fit for someone who has already made a few motif blankets and wants a result that looks far more complex than the stitches involved.
The finished blanket measures about 120 x 160 cm, which covers a double bed as a top throw or works as a generous sofa blanket. Worked in cotton or a cotton-blend worsted it holds its geometry beautifully and only gets softer with washing. If you want it bigger, the layout scales in whole squares, and the petal and circle math scales with it without any recalculation.
Materials
- Worsted / aran cotton or cotton-blend yarn in deep teal approx. 1300 g / 2700 m
- Worsted / aran cotton or cotton-blend yarn in warm cream approx. 800 g / 1700 m
- 5 mm crochet hook for squares, joining and border
- 4.5 mm crochet hook for the petals, so they sit dense and flat
- Tapestry needle blunt, large eye
- Stitch markers at least 8, for corners and placement
- Rust-proof pins 30+, for pinning petals before sewing
- Tape measure
- Cream sewing thread or split cream yarn for invisible appliqué stitching
- Blocking mats and a spray bottle or a steam iron with a pressing cloth
Abbreviations
MRmagic ringchchainscsingle crochetdecsingle crochet 2 togethersl stslip stitchrscreverse single crochet (crab stitch)st(s)stitch(es)rndroundreprepeatBLOback loops onlyRS / WSright side / wrong sideFOfasten off( ) x4work the bracketed sequence 4 timesGauge and Layout
- Gauge with the 5 mm hook: 16 sc x 18 rnds = 10 cm. One finished square should measure 20 x 20 cm unblocked.
- Grid: 6 squares across x 8 squares down = 48 squares, giving 120 x 160 cm before the border.
- Flower positions: one four-petal flower centred on every square (48 flowers) and one centred on every interior four-square junction (5 x 7 = 35 flowers). Total 83 flowers = 332 petals.
- Circle positions: one surface-crochet circle, 20 cm across, centred on every flower centre (83 circles). Neighbouring circles touch, which is what creates the overlapping-ring look.
- Work all squares in the same direction, with the same starting corner, so the fabric grain matches across the whole blanket.
- Every square round is worked with the RS facing; do not turn.
Teal Background Square (make 48)
- With teal and the 5 mm hook, Rnd 1: 8 sc in MR. (8) Pull the ring tight and mark the first st.
- Rnd 2: (3 sc in next st, sc in next st) x4. (16) The four 3-sc groups are your corners.
- Rnd 3: Begin in the centre st of a corner group. (3 sc in next st, sc in next 3 sts) x4. (24)
- Rnd 4: (3 sc in next st, sc in next 5 sts) x4. (32)
- Rnd 5: (3 sc in next st, sc in next 7 sts) x4. (40)
- Rnd 6: (3 sc in next st, sc in next 9 sts) x4. (48)
- Rnd 7: (3 sc in next st, sc in next 11 sts) x4. (56)
- Rnd 8: (3 sc in next st, sc in next 13 sts) x4. (64)
- Rnd 9: (3 sc in next st, sc in next 15 sts) x4. (72)
- Rnd 10: (3 sc in next st, sc in next 17 sts) x4. (80)
- Rnd 11: (3 sc in next st, sc in next 19 sts) x4. (88)
- Rnd 12: (3 sc in next st, sc in next 21 sts) x4. (96)
- Rnd 13: (3 sc in next st, sc in next 23 sts) x4. (104)
- Rnd 14: (3 sc in next st, sc in next 25 sts) x4. (112)
- Rnd 15: (3 sc in next st, sc in next 27 sts) x4. (120)
- Rnd 16: (3 sc in next st, sc in next 29 sts) x4. (128) Each side now has 32 sts, counting one corner st at each end.
- Sl st into the next st, FO and weave in the tail along the back of the last round. Do not cut the starting tail short — close the magic ring with it, knot it twice, then weave in.
- Spray-block every square to exactly 20 x 20 cm and let it dry flat before joining. This step is not optional on this blanket.
Joining the Squares
- Lay the 48 blocked squares out 6 across and 8 down, all with the same corner at top left.
- Join in rows first. Hold two squares with WS together, RS facing out, and line up the 32 sts of one side with the 32 sts of the next.
- With teal and the 5 mm hook, insert the hook through the BLO of the front square and the BLO of the back square together and sl st across all 32 st pairs. (32 sl sts per seam)
- Keep the sl sts loose; a tight joining row will pucker the blanket and distort the square edges.
- Repeat until each horizontal row of 6 squares is joined (5 seams per row, 8 rows).
- Now join the rows to each other the same way, working across 192 st pairs per long seam (6 squares x 32 sts). At each point where four squares meet, work the sl st through all available loops so no hole forms. (7 long seams)
- Weave in every seam tail along the back of the seam itself, not across the teal field, or it will show through.
- Place a marker at the centre of every square and at every interior four-square junction. You should have 83 markers — these are your flower centres.
Cream Petal (make 332)
- With cream and the 4.5 mm hook, Row 1: ch 2, 2 sc in 2nd ch from hook. (2)
- Row 2: ch 1, turn, 2 sc in each st. (4)
- Row 3: ch 1, turn, sc in next st, 2 sc in next 2 sts, sc in last st. (6)
- Row 4: ch 1, turn, sc in next 2 sts, 2 sc in next 2 sts, sc in last 2 sts. (8)
- Row 5: ch 1, turn, sc in next 3 sts, 2 sc in next 2 sts, sc in last 3 sts. (10)
- Rows 6-11: ch 1, turn, sc in each st across. (10) Six rows worked even — this straight middle is what gives the petal its pointed-oval shape.
- Row 12: ch 1, turn, sc in next 3 sts, dec twice, sc in last 3 sts. (8)
- Row 13: ch 1, turn, sc in next 2 sts, dec twice, sc in last 2 sts. (6)
- Row 14: ch 1, turn, sc in next st, dec twice, sc in last st. (4)
- Row 15: ch 1, turn, dec twice. (2)
- Row 16: ch 1, turn, dec once. (1)
- Edging round: ch 1, do not turn. Work 16 sc evenly down the first long edge, 1 sc in the bottom tip, 16 sc evenly up the second long edge, 1 sc in the top tip, sl st to the first sc. (34)
- FO leaving a 40 cm tail for sewing. The finished petal measures about 9 cm long x 6 cm wide.
- Steam-block the petals in batches of twenty, pulling each tip gently to a point while the yarn is damp. Blunt petals are the single biggest thing that softens this design.
Placing and Sewing the Flowers
- Work on a flat floor or large table, never on your lap — the grid must stay square while you pin.
- At one marked centre, pin four petals in a cross: one pointing to 12 o’clock, one to 3, one to 6 and one to 9. The inner tips should meet at the marker, almost touching but not overlapping.
- On the 48 square-centre flowers, the petals point straight up, down, left and right, parallel to the seams.
- On the 35 junction flowers, the petals point along the seam lines too, so every flower on the blanket has the same orientation. Keeping them aligned is what makes the overall pattern read as one continuous tile.
- Measure from the seam before you sew the first flower in each new row: petal tips should sit 9-10 cm from the centre, so neighbouring flowers come within about 1 cm of each other.
- Sew each petal down with its own tail and a tapestry needle, using small whip stitches through the outer loop of the petal edging only, catching one teal stitch each time. Space the stitches about 5 mm apart.
- Sew all the way around each petal, including the tips. Any unsewn tip will curl after the first wash.
- Weave the tail ends under the petal itself so nothing shows on the teal field, then move on. Sew one full row of flowers at a time and re-measure before pinning the next.
Surface-Crochet Circles
- These thin cream rings pass through all four petal tips of each flower and connect flower to flower. Work them after every petal is sewn down.
- Cut a length of cream yarn about 1.5 m per circle and hold it under the blanket. Work with the RS facing and the 5 mm hook.
- Start at a petal tip: insert the hook from the front through the teal fabric right at the tip, catch the yarn below and pull up a loop to the front.
- Insert the hook about 1 cm along the circle line, catch the yarn below and pull a loop through both the fabric and the loop on the hook — that is one surface sl st.
- Continue in surface sl st in a smooth curve of 10 cm radius around the flower centre, passing exactly through each of the four petal tips, about 62-64 sl sts for the full circle.
- Keep the tension loose and even. If the circle pulls the fabric into a dish, your sl sts are too tight; rip back and work them looser rather than trying to block it out.
- Join the last sl st to the first, pull the tail through to the back, knot it against the fabric and weave it in under the circle line.
- Work all 83 circles. Where two circles touch, let them kiss rather than overlap; the eye reads the near-touch as an intersection.
Border
- Rnd 1: With teal and the 5 mm hook, join in any outer corner st of the blanket. Work 3 sc in each of the 4 corner sts, 190 sc along each short edge between corners and 254 sc along each long edge between corners. Sl st to the first sc. (900)
- Rnd 2: Change to cream. Ch 1, sc in each st around, working 3 sc in the centre st of each corner group. Sl st to the first sc. (908)
- Rnd 3: Change to teal. Ch 1, sc in each st around, working 3 sc in the centre st of each corner group. Sl st to the first sc. (916)
- Rnd 4: Change to cream. Ch 1, rsc in each st around, working 1 rsc in each st with no corner increases. Sl st to the first rsc. (916)
- FO and weave all four colour-change tails into the border rounds of their own colour.
Finishing
Give the whole blanket a final wet block. Soak it in cool water with a little wool wash, press the water out between towels without wringing, then lay it out on blocking mats and pin the corners and every square seam until the grid is true. Check with a tape measure that opposite sides match and that the diagonals are equal before you leave it to dry. Cotton takes a day or two to dry fully at this size, so turn it once halfway through.
Once it is dry, go over the surface one last time. Press any curled petal tips with a steam iron held just above the fabric, and run a finger along each surface-crochet circle to settle it flat. Check the back for stray tails and trim or re-weave anything that has worked loose. Wash it on a cool gentle cycle in a mesh bag and dry it flat; the appliqué and surface crochet hold up well as long as the piece is never tumbled dry at heat.
Tips for Success
- Block every square before joining, not after. Eight rows of 20 cm squares means a 1 cm error per square becomes 8 cm of crooked blanket, and no amount of final blocking fixes that.
- Make the petals in batches between squares rather than all at once. Tension drifts when you do 332 of anything in a row, and petals from a tired evening are noticeably rounder.
- Sew petals with split yarn or matching sewing thread rather than full-weight yarn. A whole strand makes visible lumps along the petal edge, especially at the tips.
- Chalk or pin your circle line before you start surface crocheting. A 10 cm length of yarn pinned at the flower centre and swung around works as a compass.
- Count the squares into labelled piles of six as you finish them, one pile per row. It saves a frustrating recount when you lay the grid out.
Common Mistakes to Avoid
- Working the square corners into the wrong stitch. Each new round must put its 3-sc group into the centre stitch of the previous corner group; one stitch off and the square skews into a pinwheel. Mark the centre corner stitch on every round until the rhythm is automatic.
- Joining with tight slip stitches. The seam becomes shorter than the squares and the blanket ripples. Go up a hook size for joining if your slip stitches are naturally firm.
- Letting flower orientation drift. If some flowers have petals at 12-3-6-9 and others sit at the diagonals, the grid stops reading as a single pattern. Pin one full row at a time and step back to check before sewing.
- Pulling the surface crochet tight. Surface slip stitch shortens the fabric under it and dimples the blanket. The loops should sit on top of the teal, barely tensioned.
- Leaving petal tips unsewn to save time. They always curl, catch on fingers and eventually unsew themselves. Stitch right around every tip.
Ways to Customize This Pattern
- Make matching pillow covers: join four squares into a 40 x 40 cm front, work a plain teal back, add one centre flower plus four junction flowers, and finish with the same three-round border.
- Resize in whole squares. A 5 x 6 grid gives a 100 x 120 cm lap blanket with 30 squares and 50 flowers; a 7 x 9 grid gives 140 x 180 cm with 63 squares and 111 flowers.
- Reverse the colours for a light room: cream squares with deep teal petals and teal surface circles. Use the darker yarn for the border so the edge still frames the grid.
- Add half-flowers along the outer edges by sewing two petals pointing inward at each edge junction (48 extra petals), so the tile pattern runs right to the border instead of stopping.
- Shade the field: work the squares in three closely related teals, from deepest at the outer rows to lightest at the centre, keeping all petals and circles in the same cream.
Frequently asked questions
You can, but the overlapping-circle effect depends on neighbouring circles touching. If you place flowers only on the square centres and skip the junction flowers, you drop to 48 flowers and 192 petals, and the result is a polka-dot blanket rather than an interlocking grid. If you want fewer petals, make the squares bigger instead and keep both flower positions.
Not cleanly, because 35 of the 83 flowers sit across a four-square junction and would have to span two or four separate motifs. Sewing is the only way to place those. If you want to reduce sewing, you can work the four square-centre petals directly into the square by surface-crocheting their outlines and filling them, but the appliqué version gives the raised, quilted look you see in the photo.
Mercerised cotton or a cotton-acrylic blend in worsted weight. Cotton holds the square edges straight, keeps the petal tips pointed and makes the cream read as crisp against the teal. Pure acrylic works but the petals go soft and the circles sink into the fabric; pure wool at this weight makes the blanket very heavy at 120 x 160 cm.
Make a simple compass: pin a 10 cm length of yarn at the flower centre with a loop at the far end, hold a chalk marker or pin in the loop, and swing it around to mark eight points on the circle. Surface crochet from point to point. Checking against the petal tips as you go is the second control — the line should pass exactly through all four of them.
Yes, if they are sewn all the way around with small stitches about 5 mm apart and the tails are knotted before weaving. Wash cool on a gentle cycle in a mesh laundry bag, and dry flat rather than in a tumble dryer. Heat and tumbling are what loosen appliqué, not the water.
The finished Teal Interlocking Circles Crochet Blanket

