Teal Spiral Toilet Roll Holder Crochet Pattern
Advanced
For experienced crocheters who enjoy complex shaping, fine detail, and ambitious construction
Multi-Day Project
A rewarding 12+ hour journey — perfect for dedicated crafters who love detailed work.
Handmade Gift
A beautiful keepsake — free forever. Read online or print at home.
About This Teal Spiral Toilet Roll Holder Crochet Pattern
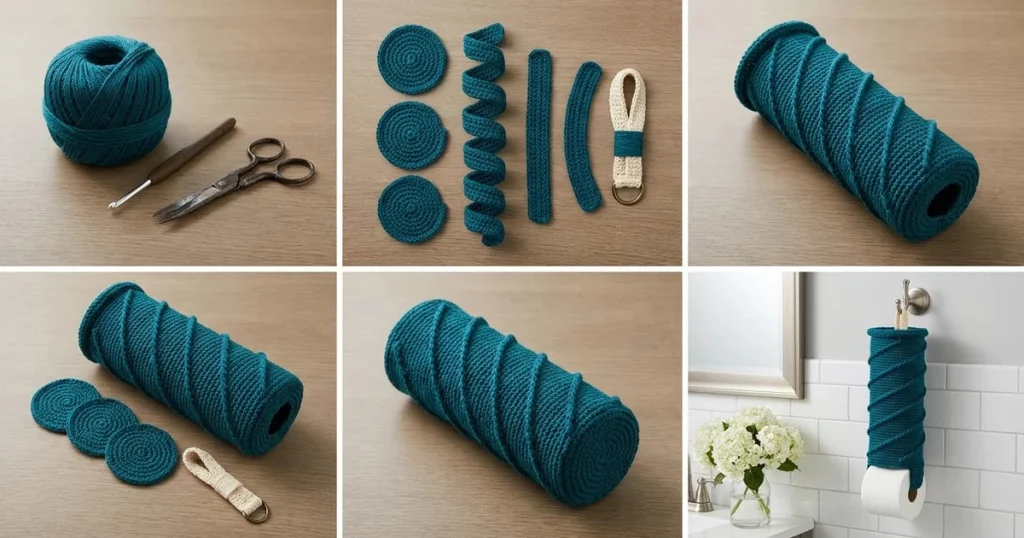
This toilet roll holder crochet pattern creates a hanging teal cylinder with raised diagonal ridges and a cream suspension loop, inspired by the reference photo. A fitted circular lid covers the top, while a removable cream sling supports three compact rolls and lets the lowest roll peek below the sleeve.
The advanced construction combines a firm tubular shell, a separately crocheted spiral ribbon, a fitted lid, reinforced attachment tabs, and a buttoned support sling. Allow about 12–16 hours, including careful fitting and assembly. This is a practical project for crocheters comfortable with accurate gauge, surface stitching, and sewing several structural pieces together.
Materials
- Teal DK cotton yarn Approximately 220 g / 550 m, including two optional matching discs
- Cream DK cotton yarn Approximately 30 g / 75 m
- Crochet hook 3.0 mm, or size needed for gauge
- Two smooth washable buttons 18 mm diameter, for sling and lid closures
- Welded metal D-ring 25 mm internal width, for the hanging loop
- Strong sewing thread and needle For securing buttons
- Tapestry needle, locking markers, tape measure, scissors For assembly and fitting
- Three toilet rolls Each no larger than 10.5 cm diameter and approximately 10 cm tall; measure before starting
- Secure wall hook Suitable for the completed holder and its contents
Abbreviations
chchainscsingle crochet, US terminologysl stslip stitchinc2 single crochet in one stitchMRmagic ringBLOback loop onlyst / stsstitch / stitchesGauge, Fit, and Construction
- Using teal and your chosen hook, make a swatch at least 14 cm square in sc. Wash and dry as you will wash the holder. Target gauge: 20 sc and 24 rows or rounds = 10 cm. Turning chains never count as stitches.
- The shell has 72 sts around: approximately 36 cm circumference and 11.5 cm external diameter. Allow for fabric thickness; rolls up to 10.5 cm diameter are the intended fit.
- The shell has 65 rounds, approximately 27 cm tall. Three 10 cm rolls form a 30 cm stack, leaving approximately 3 cm of the lowest roll below the shell. The sling is fitted around this actual stack.
- Work the shell and circular pieces in continuous rounds unless instructed otherwise. Mark the first stitch and move the marker after every round. No stuffing, facial embroidery, or safety eyes are used.
- The long ribbon forms one continuous five-turn helix. Its chain length is fitted to the blocked shell before the ribbon is crocheted; this is essential because chain tension differs from sc gauge.
Teal Tubular Shell
- Foundation: with teal, ch 72. Check that the chain is untwisted, then sl st into the first ch to form a ring. The joining sl st does not count.
- Round 1: ch 1, sc into each foundation ch around. Do not join; continue in a spiral. Count 72 sts.
- Rounds 2–64: sc in each st around. Maintain 72 sts in every round. After Round 12, slide the tube over a roll to confirm clearance.
- Round 65: sc in each st around. Count 72 sts. Sl st into the next st to level the edge; fasten off and weave in the end. This is the top edge.
- Bottom edging: with the bottom opening facing you, join teal in any unused foundation-chain loop. Ch 1, work 1 sc in each of the 72 loops. Sl st to the first sc and fasten off. This edging adds a narrow firm rim.
- Mark the back column at the round-start position and the front column 36 sts away. Mark both side columns, 18 sts to either side of the back. Keep these markers for assembly.
Raised Spiral Ribbon
- On the shell, mark a helix beginning at the back on Round 3. For each complete turn, rise 12 rounds: the ribbon crosses the back at Rounds 3, 15, 27, 39, 51, and 63. Each quarter-turn travels 18 sts around and rises 3 rounds. Connect these points with a loose contrasting basting thread.
- Foundation: ch 365 in teal. Starting at the second ch from the hook, there are 364 available working chains. Lay the chain loosely along the entire marked helix without stretching either fabric.
- Fit the foundation: add or remove chains until it follows the helix comfortably. Record the final chain count as C; the working stitch count will be C minus 1. At the specified gauge the route is approximately 182 cm long, but use the fitted chain rather than forcing the nominal count.
- Row 1: sc in the second ch from the hook and each remaining ch. With the nominal foundation, count 364 sts; with an adjusted foundation, count C minus 1 sts.
- Row 2: ch 1, turn, sc BLO in every st. Maintain 364 sts, or your recorded adjusted count. Fasten off with a sewing tail.
- Pin the Row 1 edge along the marked helix. Sew that edge to the shell with small stitches, catching shell fabric without pulling it inward. Leave the Row 2 edge free to stand up as a raised ridge. Secure each end flat over approximately 2 cm and remove the basting thread.
Fitted Teal Lid
- Round 1: with teal, work 6 sc in MR. Count 6 sts.
- Round 2: inc in each st around. Count 12 sts.
- Round 3: repeat (sc in next st, inc) 6 times. Count 18 sts.
- Round 4: repeat (sc in next 2 sts, inc) 6 times. Count 24 sts.
- Round 5: repeat (sc in next 3 sts, inc) 6 times. Count 30 sts.
- Round 6: repeat (sc in next 4 sts, inc) 6 times. Count 36 sts.
- Round 7: repeat (sc in next 5 sts, inc) 6 times. Count 42 sts.
- Round 8: repeat (sc in next 6 sts, inc) 6 times. Count 48 sts.
- Round 9: repeat (sc in next 7 sts, inc) 6 times. Count 54 sts.
- Round 10: repeat (sc in next 8 sts, inc) 6 times. Count 60 sts.
- Round 11: repeat (sc in next 9 sts, inc) 6 times. Count 66 sts.
- Round 12: repeat (sc in next 10 sts, inc) 6 times. Count 72 sts.
- Round 13: sc BLO in every st. Count 72 sts. This creates the turn from the lid top to its shallow skirt.
- Rounds 14–15: sc in every st. Count 72 sts in each round. Sl st into the next st and fasten off with a 40 cm tail.
- Fit the lid over the top opening. Align its back with the shell back marker. Sew 12 consecutive skirt stitches to the upper shell edge, centered at the back, to form a flexible hinge. Leave the rest free to open.
Lid Button Loop
- With the lid fitted, join teal to its lower skirt edge at the front center. Ch 8 and sl st into the same attachment stitch to form a loop.
- Try the loop over one 18 mm button before fastening off. If your chain tension requires it, remake with 7 or 9 chains so the loop passes over the button with slight resistance.
- Sew the button to the shell front approximately 1.5 cm below its top edge, positioned so the closed lid sits level without stretching the loop.
Cream Hanging Loop and Teal Reinforcement
- Cream loop, Row 1: ch 7; sc in the second ch from the hook and each remaining ch. Count 6 sts.
- Rows 2–48: ch 1, turn, sc in each st. Count 6 sts in every row. The strip measures approximately 3 × 20 cm. Fasten off with a long tail.
- Thread the strip through the D-ring. Fold the strip so its two short ends meet below the ring, making a doubled hanging loop with the ring at its upper bend.
- Teal reinforcement patch, Row 1: ch 9; sc in the second ch from the hook and each remaining ch. Count 8 sts.
- Rows 2–10: ch 1, turn, sc in every st. Count 8 sts per row. Fasten off with a long sewing tail.
- Place the lowest 4 cm of both cream ends against the outside back of the shell. Keep them below the top opening so the lid can move. Sew through both layers and the shell around their perimeter, then add two horizontal reinforcing seams.
- Cover the attachment area with the teal patch. Sew all four patch edges securely to the shell. The ring should rise approximately 6 cm above the shell, depending on the folded strip and ring size.
Removable Cream Support Sling
- Row 1: with cream, ch 7; sc in the second ch from the hook and each remaining ch. Count 6 sts.
- Rows 2–52: ch 1, turn, sc in every st. Count 6 sts per row. The strip measures approximately 3 × 21.7 cm before its buttonhole.
- Fit now: place three rolls inside the shell. Position the first 2 cm of the strip against the outside left side, immediately above the bottom rim. Run the strip down around the exposed bottom roll, across its flat lower face, and up to the opposite rim. The buttonhole end should reach the right side just above the rim without lifting the rolls.
- If necessary, add or remove plain 6-sc rows before proceeding. For the intended 3 cm projection and 10.5 cm roll diameter, the nominal strip provides approximately 2 cm at each attachment plus the exposed supporting path.
- Buttonhole row, nominal Row 53: ch 1, turn, sc in first st, ch 4, skip next 4 sts, sc in last st. Count 2 sc and one 4-chain opening, spanning 6 positions.
- Final row, nominal Row 54: ch 1, turn, sc in first sc, work 4 sc into the chain opening, sc in last sc. Count 6 sts. Fasten off and weave in the end.
- Sew the first 2 cm of the sling to the left side above the bottom rim with perimeter stitching and a crossed reinforcing seam. Sew the second button at the opposite side, approximately 1 cm above the rim. Button the sling in place.
Two Optional Matching Teal Discs
- Make two flat discs to echo the separate circular pieces shown in the reference. They are optional matching coasters, not loose internal supports.
- For each disc, work Rounds 1–10 of the fitted lid exactly as written, ending with 60 sts. Each round increases by 6 sts: 6, 12, 18, 24, 30, 36, 42, 48, 54, 60.
- Sl st into the next st, fasten off, and weave in both ends. Block flat to approximately 9.5–10 cm diameter. Do not add the lid skirt.
Finishing
Weave in all ends securely and wash or damp-block the empty pieces according to the yarn label. Dry the shell around a removable cylindrical form approximately 11 cm wide, keeping the raised ribbon upright. Remove the form when the fabric is dry.
Load the holder through the open lid, close the lid loop, and check that the bottom sling lies flat beneath the lowest roll. Lift the filled holder over a soft surface and inspect the hanging-loop seams, sling seams, and buttons for movement. Reinforce any shifting attachment before hanging it from a firmly installed hook.
To remove a roll, support the stack with one hand and undo the sling with the other. Slide out the lowest roll, refasten the sling, and settle the remaining rolls. Keep the cotton sleeve dry and wash it regularly.
Tips for Success
- Fit the shell over a wrapped roll before sewing on the spiral. A ribbon attached under tension can reduce the usable diameter.
- Mark every quarter-turn of the helix. Rising 3 rounds for each 18 stitches keeps all five turns evenly spaced.
- Sew the spiral while the shell surrounds a removable form. Keep a hand inside to avoid catching the opposite wall.
- Fit the sling with all three actual rolls in place; roll height controls how far the lowest roll projects.
- Use several small reinforcing stitches across the hanging-loop attachment so the load spreads across the shell.
Common Mistakes to Avoid
- A twisted foundation creates a distorted tube. Lay the chain flat and inspect the entire ring before Round 1.
- A puckered spiral means its attached edge is too short or the sewing is too tight. Release the affected seam and refit the ribbon loosely.
- A rigid lid hinge prevents loading. Join only the specified 12 stitches at the back, leaving the rest of the skirt free.
- A short sling pulls the bottom roll upward and strains the button. Add plain rows before making the buttonhole.
- Attaching the hanging loop only to the top rim concentrates the load. Anchor its doubled ends over the full 4 cm attachment area and cover them with the reinforcement patch.
Ways to Customize This Pattern
- Use deep navy or forest green for the shell while retaining the cream loop and sling.
- Work the spiral ribbon in cream for a stronger contrast against the teal cylinder.
- For a shorter two-roll holder using 10 cm-tall rolls, stop the shell after Round 41, approximately 17 cm. Mark three spiral turns crossing the back at Rounds 3, 15, 27, and 39; fit a new ribbon chain to that route.
- Omit the optional discs for a coordinated holder-only project, or crochet additional discs using the same 60-stitch circle.
Frequently asked questions
The stated size is intended for rolls up to 10.5 cm in diameter. Measure yours first. For larger rolls, redesign the circumference in multiples of six and increase the lid to the same stitch count; the spiral and sling must then be fitted again.
This version is a storage holder with a supporting sling. The bottom roll does not rotate on a spindle. Undo the sling while supporting the stack, remove a roll, and place it on your usual dispenser.
This original interpretation uses one fitted circular lid and two optional matching flat coasters. The photo does not establish an internal function for every separate circle, so no loose discs are required inside the holder.
Cotton fabric can lengthen under sustained weight. Use firm gauge, block before fitting the sling, and check the loaded holder again after hanging. If the bottom roll becomes covered, shorten the shell before final assembly or refit the sling to the settled fabric.
The finished Teal Spiral Toilet Roll Holder Crochet Pattern

