Terracotta and Blue Fan Lace Crochet Curtains
Advanced
For experienced crocheters who enjoy complex shaping, fine detail, and ambitious construction
Single-Day Project
A satisfying project you can complete in a single afternoon or evening.
Handmade Gift
A beautiful keepsake — free forever. Read online or print at home.
About This Terracotta and Blue Fan Lace Crochet Curtains
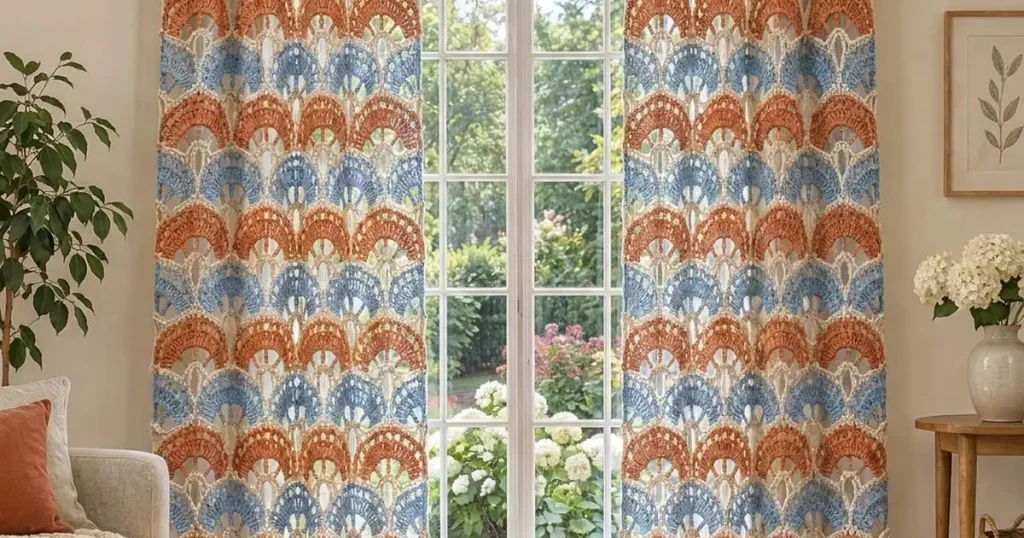
This fan lace crochet curtain pattern pairs broad terracotta and dusty blue shells with warm cream outlines, inspired by the airy curtains in the reference photograph. The curved motifs sit in alternating horizontal bands, letting daylight show through their open spokes and the fine mesh behind them.
The advanced construction combines 108 separately worked fans, two measured mesh foundations, shaped cream outlines and reinforced hanging bands. Allow approximately 100–140 hours for the pair, including joining and blocking. This project suits crocheters who enjoy careful lace finishing and working to blocked measurements; the instructions describe an original interpretation of the photograph.
Materials
- Sport-weight cotton, approximately 250 m per 100 g Cream: 1,200 g / 3,000 m; terracotta: 500 g / 1,250 m; dusty blue: 500 g / 1,250 m. These are planning allowances, including swatching.
- Crochet hook 3.0 mm, or size needed for blocked gauge
- Tapestry needle and fine sewing needle For joining motifs and reinforcing the header
- Matching cream sewing thread and cotton twill tape Two lengths of 52.5 cm tape, approximately 2 cm wide
- Curtain rings with clips Eight per panel; select hardware rated for the finished weight
- Blocking mats, rustproof pins, measuring tape and removable markers Allow room to block each complete panel
Abbreviations
chchainscsingle crochetdcdouble crochetsl stslip stitchMRmagic ringststitchspspaceRSright sideWSwrong sideUS terminology. Work flat and turn after each row unless instructed otherwise. Beginning ch 1 never counts as a stitch. Beginning ch 3 counts as one dc. A mesh cell consists of a ch-1 space between two dc posts; adjacent cells share a post.
Gauge, Dimensions and Layout
- Mesh swatch: ch 36. Work the mesh foundation row described below to obtain 17 cells, then work 20 further mesh rows. Measure the central 8 cells and 10 rows after washing, blocking and hanging; the target is 10 × 10 cm.
- Fan gauge: one completed and outlined fan measures 17.5 cm across its straight lower edge and 8 cm from the middle of that edge to the crown. A fan is a shallow semicircle; its straight edge remains open rather than joining into a circle.
- Each mesh foundation contains 42 cells across and 144 rows vertically, measuring approximately 52.5 × 144 cm. A 6 cm reinforced header gives a finished panel approximately 52.5 × 150 cm. Narrow side and bottom edging are included within the blocked width and height.
- Each panel carries 18 tiers of three fans: 54 fans per panel and 108 fans for the pair. Number tiers from the bottom. Odd tiers are dusty blue and even tiers are terracotta, giving a terracotta band at the top.
- For the pair, make 54 blue fans and 54 terracotta fans. All fans receive cream outlines. No stuffing, eyes or other toy components are used.
Mesh Foundations — Make Two in Cream
- Foundation: ch 86 loosely. Mark every tenth chain to help prevent counting errors.
- Row 1: dc in sixth ch from hook; the five skipped chains represent the first dc and first ch-1 space. Repeat (ch 1, skip next ch, dc in next ch) 41 times. Turn. Count: 43 dc and 42 ch-1 spaces, forming 42 cells.
- Row 2: ch 4, counting as first dc and ch 1; skip first space, dc in next dc. Repeat (ch 1, skip next space, dc in next dc) 41 times, placing the final dc in the third chain of the previous turning chain. Turn. Count: 43 dc and 42 ch-1 spaces.
- Rows 3–144: repeat Row 2. Every row contains 43 dc and 42 ch-1 spaces. Place a marker at each eighth row along both sides. Fasten off after Row 144.
- Wash and block each foundation to 52.5 × 144 cm. Keep the bottom and top parallel. Retain the row markers until all fans have been attached.
Colored Fan Centers — Make 54 Blue and 54 Terracotta
- Row 1: make an MR, ch 3, then work 11 dc into the ring. Tighten the ring until the stitches form a semicircle. Do not join. Turn. Count: 12 dc including the beginning ch 3.
- Row 2: ch 3, dc in the same first st, then work 2 dc in each of the remaining 11 sts, including the top of the previous beginning ch 3. Turn. Count: 24 dc.
- Row 3: ch 3, then repeat (ch 1, dc in next st) 23 times. Turn. Count: 24 dc and 23 ch-1 spaces.
- Row 4: ch 1, sc in first dc, then repeat (sc in next ch-1 space, sc in next dc) 23 times. Count: 47 sc. Fasten off the colored yarn. Do not join the two ends of the curved row.
- Secure the ring tail through several stitch bases on the WS before trimming. Keep the lower edge straight and spread the spokes evenly; do not pull the ring so tightly that the center puckers.
Cream Fan Outlines — Work on Every Fan
- Curve row: with RS facing, join cream to the first sc of colored Row 4. Ch 1, sc in all 47 sts. Fasten off. Count: 47 sc.
- Lower edge: with RS facing, join cream at the left end of the straight lower edge. Ch 1, work 2 sc around each of the four row-end posts leading toward the MR center, 1 sc into the central ring opening, then 2 sc around each of the four row-end posts leading to the opposite corner. Fasten off. Count: 17 sc.
- At both corners, work around the row-end post below the cream curve; do not add extra stitches into the cream curve stitches. The curve and lower border meet at their ends without sharing a counted stitch.
- Block every outlined fan to 17.5 × 8 cm. Pin the center of the lower edge, both corners and the crown first, then distribute the remaining pins around the curve. Let dry completely.
Panel Edges — Work on Each Foundation
- With RS facing, join cream at the upper left corner. Ch 1 and work 2 sc around the outer dc post or turning-chain post of each of the 144 row ends down the left side. Count: 288 sc along this side.
- Ch 1 for the lower left corner. Across the bottom, work 1 sc at each of the 43 foundation dc positions and 1 sc into each of the 42 spaces between them. Count: 85 sc across the bottom.
- Ch 1 for the lower right corner. Work 2 sc around each of the 144 row ends up the right side. Count: 288 sc along this side. Fasten off, leaving the top edge unworked for the header.
- The complete three-sided edging contains 661 sc and two corner ch-1 spaces. Block the edging flat within the panel’s target dimensions; it should not draw the mesh inward.
Attach the Fan Tiers
- Lay one foundation RS up, with Row 1 at the bottom. Mark vertical lines at 0, 17.5, 35 and 52.5 cm across the panel. These divide the 42 mesh cells into three groups of 14 cells.
- Tier 1: place three blue fans with their straight lower edges on the bottom boundary of mesh Row 1. Set each fan between adjacent vertical markers, with its crown pointing toward the header. Pin corners and crowns.
- Tier 2: place three terracotta fans with their straight lower edges on the boundary between mesh Rows 8 and 9. Their crowns point upward. Their lower corners meet the upper curved edges of the tier below at the panel divisions.
- Tiers 3–18: continue in alternating blue and terracotta. Place lower edges on the boundaries immediately below Rows 17, 25, 33, 41, 49, 57, 65, 73, 81, 89, 97, 105, 113, 121, 129 and 137 respectively. Each fan spans approximately eight mesh rows in height.
- Using cream yarn and a tapestry needle, attach every cream curve stitch to the nearest mesh post or chain with a small whipstitch. Where no post lies directly beneath a stitch, catch the nearest mesh chain without pulling it sideways. Keep the sewing yarn relaxed.
- Attach all 17 stitches of each lower border to the mesh along its marked horizontal boundary. Secure the middle and both corners first, then distribute the remaining stitches evenly across the 14 mesh cells. Do not try to match 17 border stitches one-for-one to 14 cells.
- At adjacent fan corners, add two small joining stitches through the cream borders and the backing. At each tier junction, secure any touching cream outlines together. Repeat the entire layout and attachment process for the second panel.
Reinforced Headers — Make on Both Panels
- Header Row 1: with RS facing and top edge uppermost, join cream in the first dc of mesh Row 144. Ch 1, sc in that dc, then repeat (sc in next ch-1 space, sc in next dc) 42 times. Turn. Count: 85 sc.
- Header Row 2: ch 1, sc in each st across. Turn. Count: 85 sc.
- Header Rows 3–16: repeat Header Row 2. Count: 85 sc in every row. Fasten off. The target washed header gauge is approximately 16 sc and 26.5 rows per 10 cm; the header measures approximately 52.5 × 6 cm.
- If your dense sc gauge differs from this target, change hook size for the header before proceeding. Keep all 85 sts and 16 rows so both panels match.
- Center a 52.5 cm length of cotton twill tape horizontally on the WS of each header, with its upper edge 5 mm below the top. Turn under 5 mm at each tape end and sew around the tape perimeter with matching sewing thread, catching stitch backs so the seam is discreet from the front.
- Mark eight clip positions across each header at approximately 1.25, 8.4, 15.5, 22.7, 29.8, 37.0, 44.1 and 51.25 cm from the left edge. Each clip must grip both crochet fabric and the reinforcement tape.
Finishing
Weave all yarn ends through several stitches on the wrong side, changing direction once before trimming. Check that each fan lies flat and that its cream border is securely attached without tight sewing lines. Remove the layout markers.
Wash gently according to the yarn label and block each complete panel to approximately 52.5 × 150 cm. Support the wet fabric while lifting it. Once fully dry, attach the rings and hang both panels for 24 hours before judging the final drop. Cotton can lengthen under its own weight; reblock if needed and record the settled measurements for your window.
Tips for Success
- Block the first blue and terracotta fans together. Different dyes can affect how the same cotton relaxes, so confirm both colors fit the same template.
- Pin a full tier before sewing any fan permanently. The three lower edges must fill the panel width without stretching the mesh sideways.
- Use short joining lengths of cream yarn, approximately 60 cm at a time. Long lengths fray as they pass repeatedly through cotton lace.
- Check the back after every attached tier. A taut strand across several cells will shorten the panel even when the front looks tidy.
- Weigh your first six completed fans and mesh swatch to refine the yarn estimate before purchasing the full dye lot.
Common Mistakes to Avoid
- Closing the fan into a circle: leave every fan row unjoined and turn. Joining the first row produces a different shape that will not fit the layout.
- Losing the final mesh cell: place the last dc into the third chain of the previous turning chain. Count 43 posts and 42 spaces before continuing.
- Adding extra curve stitches: Row 4 has 24 stitches over dc posts and 23 over spaces, totaling 47. An extra stitch at either turning edge can make the cream outline ripple.
- Pulling 17 lower-border stitches into 14 tight attachment points: distribute them by measurement, allowing more than one border stitch to share a nearby mesh support.
- Hanging from unreinforced lace: sew in the twill tape and make sure every clip grips it. Otherwise the top can stretch into points between rings.
Ways to Customize This Pattern
- Make a 70 cm wide panel with four fans per tier. Use 56 mesh cells: ch 114, work the first foundation dc in the sixth chain, then repeat the foundation cell instruction 55 times. This gives 57 dc and 56 spaces; the header starts with 113 sc.
- Shorten each panel by one blue-and-terracotta pair of tiers. Omit 16 mesh rows and six fans per panel, reducing the finished drop by approximately 16 cm.
- Reverse the blue and terracotta tier order to place dusty blue next to the header while retaining the cream outlines.
- Use cream for every fan for a quieter lace curtain. Keep the separate outlines and backing to preserve the raised fan shapes.
Frequently asked questions
The backing supports the many separate motifs, keeps the panels rectangular and gives reliable attachment points between the fan curves. It also creates the delicate cream openings visible between the colored bands.
The pair has a combined flat width of approximately 105 cm. For soft folds, use them on a narrower opening; at 1.5 times fullness, they suit an opening around 70 cm wide. Measure your window and desired coverage before choosing the panel width.
These instructions rely on the mesh for their dimensions and support. Removing it would require a different joining structure, additional filler motifs and a new gauge calculation.
Wash a terracotta swatch with a cream scrap before assembling the curtains. If color transfers, follow the yarn manufacturer’s care advice and choose a more colorfast yarn before joining the panels.
The finished Terracotta and Blue Fan Lace Crochet Curtains

