Terracotta Bloom Flower Square Bedspread
Advanced
For experienced crocheters who enjoy complex shaping, fine detail, and ambitious construction
Weekend Project
A satisfying weekend make — start Friday, finish Sunday, enjoy forever.
Handmade Gift
A beautiful keepsake — free forever. Read online or print at home.
About This Terracotta Bloom Flower Square Bedspread
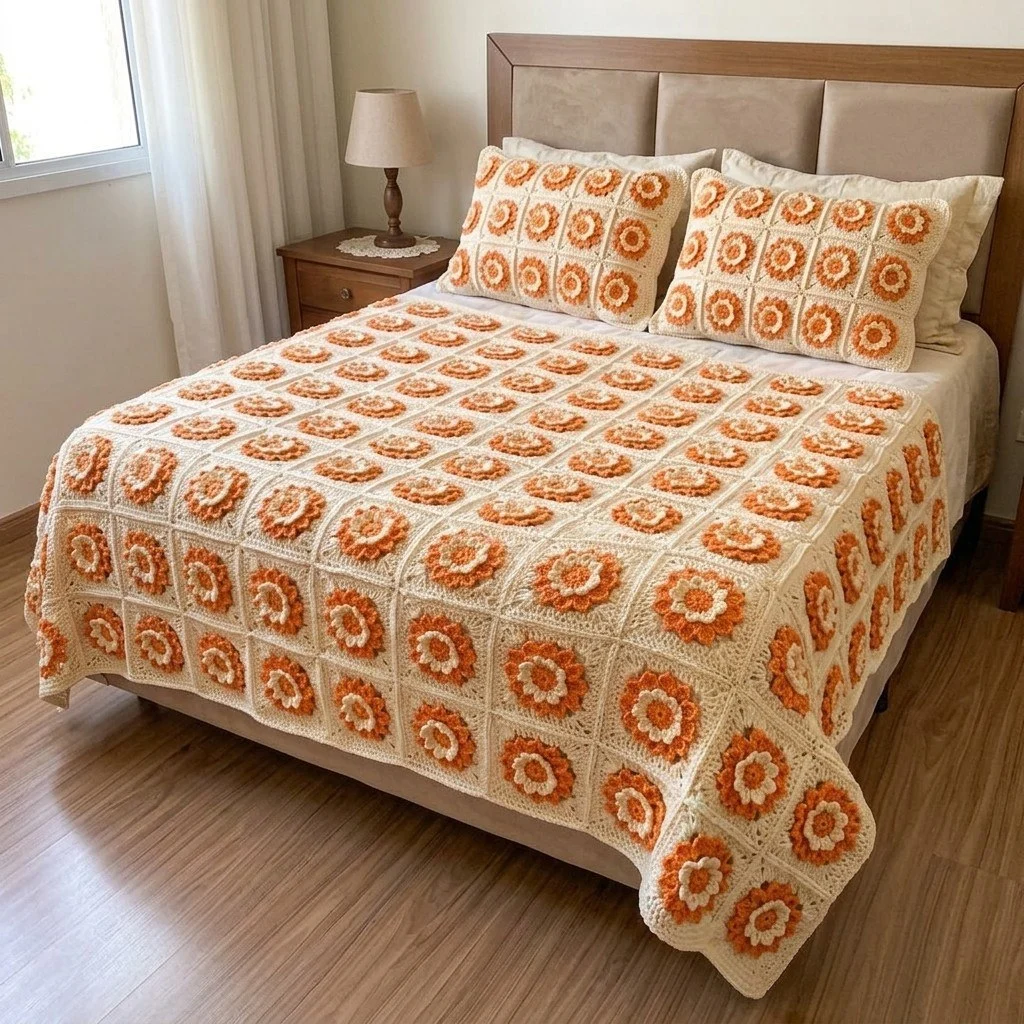
This crochet flower square bedspread pattern turns eighty layered flower motifs into a full queen-size cover in terracotta, apricot and cream. Every square is built from the middle out: a flat apricot or cream disc, a ring of twelve small petals worked into front loops only, a second ring of eighteen larger terracotta petals worked the same way, and then a cream granny-style frame that grows out of the back loops left behind. Because each petal round sits on its own free loops, the flowers stand up off the surface instead of lying flat, and the cream background stays clean and uncrowded behind them.
The work is slow but very portable. A single square takes most people around 45 minutes once the rhythm clicks, so the full set of eighty runs roughly 60 to 80 hours including joining and the border. Nothing in it is difficult round by round — the demands are the front-loop/back-loop discipline, keeping tension even across dozens of motifs, and joining 80 squares straight. That makes it a good project for someone who has finished a few granny-square blankets and wants a heirloom-scale piece to work on over several months.
Worked in worsted-weight cotton, the finished bedspread is heavy, washable and holds its shape without lining. Two colourways of flower centre alternate across the grid so the surface reads as a field of blooms rather than a repeating stamp, and the slip-stitch joining method leaves a raised cream ridge between squares that frames each flower like a tile. The pattern below gives exact stitch counts for every round, the layout chart, the joining order and a three-round shell border.
Materials
- Worsted / aran weight cotton in cream approx. 2000 g (squares, frames and border)
- Worsted / aran weight cotton in terracotta orange approx. 600 g (outer petal rounds)
- Worsted / aran weight cotton in apricot approx. 250 g (flower centres and inner petals)
- 4.5 mm crochet hook or size needed for gauge
- Tapestry needle blunt, large eye
- Stitch markers at least 8, for marking square corners while joining
- Scissors
- Blocking mats and rust-proof pins or a flat towel-covered surface
- Measuring tape
- Spray bottle with water for wet-blocking squares
Abbreviations
MRmagic ringchchainsl stslip stitchscsingle crochetdcdouble crochetFLOfront loop onlyBLOback loop onlyst(s)stitch(es)rndroundspspacereprepeatFOfasten offGauge and Layout
- Gauge: one finished, blocked square measures 18 cm (7 in) along each side. Rnds 1-4 of the flower base (before petals) measure 7 cm across.
- Layout: 8 squares across × 10 squares down = 80 squares total, giving a joined centre panel of 144 × 180 cm.
- The three-round border adds about 4 cm all around, for a finished bedspread of roughly 152 × 188 cm.
- Colourway A — 40 squares: apricot centre, cream inner petals, terracotta outer petals, cream frame.
- Colourway B — 40 squares: cream centre, apricot inner petals, terracotta outer petals, cream frame.
- Arrange the two colourways in a checkerboard across the 8 × 10 grid so no two identical centres touch side by side.
Flower Centre and Inner Petals
- Rnd 1: with apricot (colourway A) or cream (colourway B), make a MR. Ch 3 (counts as first dc), work 11 dc into the ring, sl st to top of ch-3 to join. Pull the ring tight. (12 dc)
- FO and weave in the tail now — it is almost impossible to reach once the petals are on.
- Rnd 2 (inner petals): join cream (colourway A) or apricot (colourway B) with a sl st in the FLO of any dc of Rnd 1. Working into front loops only all the way around, work (sl st, ch 2, dc, ch 2, sl st) into the front loop of each dc. (12 petals)
- Sl st to the base of the first petal to close, FO and weave in the ends behind the petals. The back loops of Rnd 1 stay free — that is where the next round goes.
- Rnd 3: join terracotta with a sl st in the BLO of any Rnd 1 dc, working behind the petals so they fold forward. Ch 1, sc in the BLO of each of the 12 dc, sl st to first sc to join. (12 sc)
- Rnd 4: ch 1, *2 sc in next st, sc in next st; rep from * 5 more times, sl st to first sc to join. (18 sc)
Outer Petal Round
- Rnd 5 (outer petals): still in terracotta and working into front loops only, work (sl st, ch 3, 2 dc, ch 3, sl st) into the front loop of each of the 18 sc of Rnd 4. (18 petals)
- Sl st to the base of the first petal, FO, and weave the end in behind the petals. Leave all 18 back loops of Rnd 4 free.
- Press the petal ring gently with your fingers so every petal tips outward and the ring of free back loops sits clearly visible behind them.
- The flower should now measure about 11 cm across at the petal tips and feel springy, not flat.
Cream Frame — Turning the Flower into a Square
- Rnd 6: join cream with a sl st in the BLO of any Rnd 4 st, working behind the outer petals. Ch 1, sc in the BLO of each st around, sl st to first sc to join. (18 sc)
- Rnd 7: ch 3 (counts as dc), dc in same st, dc in next 2 sts, *2 dc in next st, dc in next 2 sts; rep from * 5 more times, sl st to top of ch-3. (24 dc)
- Rnd 8 (corners are formed here): ch 3 (counts as dc), dc in same st… do not work the corner yet — instead: ch 3, dc in next 4 sts (5 dc made including ch-3), *(2 dc, ch 2, 2 dc) in next st [corner made], dc in next 5 sts; rep from * twice more, (2 dc, ch 2, 2 dc) in next st, sl st to top of ch-3. (36 dc and 4 ch-2 corner sps; 5 dc along each side between corners)
- Rnd 9: sl st into the next dc and into the first ch-2 corner sp. Ch 3, (dc, ch 2, 2 dc) in same corner sp, *dc in each of the next 9 sts, (2 dc, ch 2, 2 dc) in next corner sp; rep from * twice more, dc in each of the last 9 sts, sl st to top of ch-3. (52 dc; 9 dc along each side between corners)
- Rnd 10: sl st into the next dc and into the corner sp. Ch 3, (dc, ch 2, 2 dc) in same corner sp, *dc in each of the next 13 sts, (2 dc, ch 2, 2 dc) in next corner sp; rep from * twice more, dc in each of the last 13 sts, sl st to top of ch-3. (68 dc; 13 dc along each side between corners)
- Rnd 11 (joining round — work this on every square): ch 1, sc in each dc around, working 3 sc in each ch-2 corner sp, sl st to first sc to join. (80 sc: 17 sc along each side, 3 sc at each corner)
- FO, leaving a 15 cm tail. Weave in all ends on the back of the square.
- Repeat the whole sequence until you have 40 squares in colourway A and 40 in colourway B.
Blocking the Squares
- Spray each finished square until evenly damp, then pin it to 18 × 18 cm with a pin at each corner and one at the midpoint of each side.
- Pin the squares face up and do not press the petals flat — let them stand while the cream frame dries under tension.
- Block in batches of 8 to 12 and leave to dry fully, at least 12 hours, before stacking.
- Re-measure a sample from each batch. Squares that dry at 17.5 cm or less will pucker the join; re-block those wetter and pinned harder.
Joining the Squares
- Lay all 80 blocked squares out in the 8 × 10 checkerboard, then stack them row by row so you join in a fixed order and never lose the arrangement.
- Join with cream, right sides facing each other, working a sl st join through the back loops only of both squares so a raised ridge forms on the front.
- Each edge joins across 21 stitches: the centre sc of the first corner, the 1 sc beside it, the 17 side sc, the 1 sc beside the next corner, and the centre sc of that corner.
- Join Row 1: hold square 1 and square 2 together, insert the hook through the back loops of the centre corner stitches of both, draw up a loop of cream, then sl st through the back loops of all 21 paired stitches. FO.
- Continue along Row 1 until all 8 squares are joined into a strip. Repeat for all 10 rows.
- Join the strips: hold Row 1 and Row 2 together, and sl st through back loops across the full length, working 1 extra sl st through the four stitches that meet at each seam crossing so no gap opens at the intersections.
- Work the long seams in alternating directions (row 1-2 left to right, row 2-3 right to left) to stop the panel pulling diagonally.
- Weave in all joining ends along the back of the ridges before starting the border.
Border
- Rnd 1: join cream in the centre corner stitch of any corner square. Ch 1, work sc evenly around the whole panel: 21 sc along each square edge (168 sc across each short end, 210 sc along each long side), and 3 sc in each of the four outer corner stitches. Sl st to first sc. (760 sc)
- Rnd 2: ch 3 (counts as dc), dc in each sc around, working 3 dc in the centre stitch of each of the four corners, sl st to top of ch-3. (768 dc)
- Rnd 3 (shell edge): ch 1, sc in first st, *skip 2 sts, 5 dc in next st, skip 2 sts, sl st in next st; rep from * around, ending with a sl st in the base of the first sc. (128 shells)
- Place a shell centred on each of the four corner stitches as you come to them, shifting a single skipped stitch either side of the corner if your count runs tight — the shell must sit on the corner point or it will curl.
- FO and weave in the end along the back of Rnd 2.
Finishing
Give the joined bedspread a final light block. Spread it flat on a clean sheet, mist it all over, square the corners by hand and tug the edges straight, then let it dry undisturbed for a full day. Cotton this heavy will not dry in a few hours and it will keep whatever shape it dries in, so take your time squaring the grid.
Check the back once it is dry and trim any ends you missed; with 80 motifs and four colour joins per square, a few always slip past. Run a finger around each petal ring from the front to lift petals that were squashed during joining — they spring back easily and the surface texture is the whole point of the piece. For washing, use a cool gentle cycle and dry flat; the bedspread is too heavy to hang and will stretch out of square on a line.
Tips for Success
- Work the back-loop rounds (Rnd 3 and Rnd 6) with the petals folded firmly toward you and the square tilted away. If you can see the free loop you are about to enter, you will not split the petal base by accident.
- Make all 80 flower bases through Rnd 4 first, then all the petal rounds, then all the cream frames. Batching by round keeps your tension consistent far better than finishing squares one at a time over several months.
- Weave in the Rnd 1 and Rnd 2 ends immediately, before the next round covers them. Once two petal rings are on, those tails are unreachable without turning the flower inside out.
- Keep one finished, blocked square as a master reference and compare every tenth square against it. Tension creep over 80 motifs is the single most common reason these bedspreads end up out of square.
- Count the frame rounds out loud at Rnd 10: 13 dc between corners on every side, every time. One miscounted side on one square shows up as a pucker in the finished grid.
Common Mistakes to Avoid
- Working petal rounds into whole stitches instead of front loops only. You lose the free back loops entirely and the next round has nowhere to go. If it has happened, unpick the petal round — it comes out cleanly since it is only slip stitches and dc.
- Pulling the Rnd 3 terracotta round too tight behind the petals. It cups the flower into a dome. Work it at the same tension as the rest of the square and the base stays flat.
- Skipping the corner shift at Rnd 9 and Rnd 10. If you do not sl st across into the ch-2 corner space before starting the round, the corners drift round the square and the frame comes out as a skewed diamond.
- Joining squares through both loops instead of back loops only. It gives a flat, floppy seam with no ridge and the grid loses its tiled look. Check the first seam from the front before you join another 150 of them.
- Blocking the squares face down. The petals crush permanently under pins and weight. Always block face up with the pins only in the cream frame.
Ways to Customize This Pattern
- Resize the bedspread by changing the grid: 7 × 9 squares makes a 134 × 170 cm single-bed cover, 9 × 11 makes a 166 × 206 cm king cover. Border counts change to 21 sc per square edge along each new side.
- Work all 80 flower centres in the same colour for a stricter, more formal field of blooms, or give each row a slightly different centre shade — deep rust, apricot, pale gold — for a graded sunset effect down the bed.
- Swap the outer petal round to cream and the inner petals to terracotta on half the squares for a reversed checkerboard that reads as two different flowers.
- Add a third petal ring: after Rnd 4, work an extra round of *2 sc in next st, sc in next 2 sts* (24 sc), then petal into those front loops before continuing the frame from the back loops of the 24-st round. The square grows to about 20 cm, so recalculate your grid.
- Make matching pillow covers by joining 9 squares (3 × 3) for the front, backing them with a plain cream granny square panel of the same size, and joining the two around three sides with the same back-loop slip-stitch seam.
Frequently asked questions
Almost always because the petal rounds were worked into both loops rather than front loops only. The raised effect comes from the petals being anchored on the front loop while the fabric continues from the back loop, which forces them to tip forward. Check that you can still see a clear ring of free loops behind each petal ring after Rnd 2 and Rnd 5.
Yes, but expect a different result. Worsted acrylic makes a lighter, warmer, drapier cover and the petals will be softer and less sculptural. It also blocks much less willingly, so your squares need to come off the hook at 18 cm rather than being pinned into shape. If you go acrylic, work a test square first and drop to a 4 mm hook if it blocks larger than 18 cm.
Roughly 22 g cream, 7 g terracotta and 3 g apricot per square at the stated gauge, which is where the 2000 g / 600 g / 250 g totals come from, with the border included in the cream figure. Weigh your first finished square and multiply by 80 before buying — dye lots matter enormously on a project this size, so buy the cream all at once.
Yes. Replace Rnd 11 with a join-as-you-go version: work sc as written, but at each point where the new square meets a finished one, sl st into the corresponding sc of the neighbour instead of chaining past. It saves the separate seaming stage, though the ridge is flatter than the back-loop slip-stitch seam and the squares cannot be rearranged once attached.
Partly. Small differences of 2-3 cm pull out during the final wet block if you pin the corners to true right angles. Larger drift usually comes from uneven seam tension, so check the seams before bordering: a seam worked tighter than its neighbours shows as a visible gather along that row and is worth unpicking and redoing at an even tension.
The finished Terracotta Bloom Flower Square Bedspread

