Terracotta Flower Diamond Crochet Curtain Pattern
Advanced
For experienced crocheters who enjoy complex shaping, fine detail, and ambitious construction
Single-Day Project
A satisfying project you can complete in a single afternoon or evening.
Handmade Gift
A beautiful keepsake — free forever. Read online or print at home.
About This Terracotta Flower Diamond Crochet Curtain Pattern
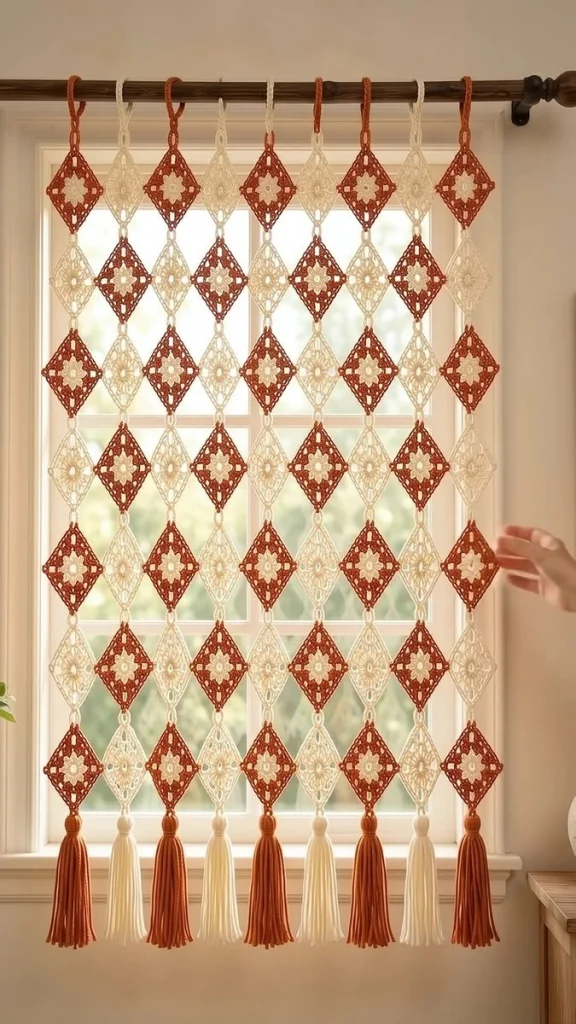
This crochet diamond curtain pattern frames a window with alternating terracotta and ivory diamonds, cream flower centers, and nine long tassels. The motifs meet at their points, leaving open spaces that let daylight through. Individual hanging loops repeat the colors across the curtain rod.
This advanced project combines raised flower petals, work behind the petals, lace framing, directional blocking, and carefully aligned point joins. Allow approximately 35–45 hours, including assembly and tassel making, plus drying time. It suits an experienced crocheter who enjoys building a larger piece from small, repeated components.
Materials
- Smooth sport-weight mercerized cotton, approximately 125 m per 50 g Terracotta: 600 g / 1,500 m; ivory: 650 g / 1,625 m. These are planning allowances, including tassels and cords; confirm consumption with your swatch.
- 3.0 mm crochet hook Adjust if necessary to obtain the blocked motif gauge.
- Tapestry needle and sharp scissors For secure point joins and trimming.
- Blocking mats, rustproof pins, and measuring tape Enough space to block several motifs together.
- 20 cm tall piece of firm cardboard Tassel winding template.
- Curtain rod with removable end Approximately 90–100 cm usable length; the specified hanging loops fit rods up to about 3 cm in diameter.
- Removable markers Mark motif tops and track the assembly grid.
Abbreviations
chchainscsingle crochethdchalf double crochetdcdouble crochetsl stslip stitchst / stsstitch / stitchesspspaceMRmagic ringRS / WSright side / wrong sideGauge, Dimensions, and Construction
- Use US crochet terminology. Work motifs in joined rounds with the RS facing throughout. Starting chains do not count as stitches unless explicitly stated. Joining slip stitches never count.
- Blocked motif gauge: one completed motif measures approximately 9 cm from left point to right point and 14 cm from top point to bottom point. Measure after drying and removing the pins. The open frame is deliberately blocked into an elongated diamond.
- Make one swatch using the full five-round motif below. Wet it, gently squeeze out water, and pin the four points to the target dimensions with the flower centered. Do not force tight fabric to stretch. If necessary, change hook size and repeat the swatch.
- The curtain contains 63 motifs arranged in nine columns and seven rows. Make 32 terracotta-framed motifs with ivory flowers and 31 entirely ivory motifs. Make nine hanging loops and nine tassels separately.
- At the target gauge, the joined motif panel measures approximately 81 × 98 cm. Hanging loops add about 10 cm above the panel, and tassels add about 20 cm below it, giving approximately 81 × 128 cm overall.
- If your relaxed motif measures differently, calculate panel width as nine times motif width and panel height as seven times motif height. Loop height and tassel length are added separately.
Ivory Flower Centers — Make 63
- Round 1: With ivory, work 8 sc in an MR. Tighten the ring and sl st into the first sc. Count: 8 sc.
- Round 2: Ch 1. Work (sc, hdc, dc, hdc, sc) into each of the 8 sc. Sl st into the first sc. Count: 8 petals, 40 sts. Each petal has one central dc.
- For 32 terracotta-framed motifs, fasten off ivory and continue with terracotta in the next section. For 31 ivory motifs, retain ivory, draw the working loop behind the petals, and continue in the same color.
Lace Diamond Frames — Complete All 63 Motifs
- Round 3: Work behind the petals. For a terracotta frame, join terracotta with a standing sc around the post of any petal’s central dc, inserting the hook from the back so the sc and working yarn remain behind the flower. For an ivory frame, sl st loosely along the backs of the stitches to the nearest central dc, then ch 1 and sc around that post from behind. This is the first anchor sc.
- Continue Round 3: Ch 5, sc around the central dc post of the next petal from behind; repeat this sequence until all 8 petals have an anchor sc. Ch 5 and sl st into the first anchor sc. Count: 8 anchor sc and 8 ch-5 arches. Keep every arch behind the petals.
- Round 4: Sl st into the first ch-5 arch. Ch 2, then work (3 dc, ch 3, 3 dc) into that arch for the first corner. Work (3 dc, ch 1, 3 dc) into the next arch for a side group. Repeat the following sequence three times: (3 dc, ch 3, 3 dc) into the next arch, then (3 dc, ch 1, 3 dc) into the following arch. Sl st into the first dc. Count: 48 dc, four corner ch-3 spaces, and four side ch-1 spaces. Leave the Round 3 anchor sc unworked.
- Round 5: Ch 1. Sc in each dc around; work 1 sc into each side ch-1 sp and (sc, ch 3, sc) into each corner ch-3 sp. Sl st into the first sc. Count: 60 sc and four corner ch-3 spaces. There are exactly 15 sc between consecutive corner spaces.
- Fasten off with a 25 cm tail. Secure the center-ring tail through the bases of several stitches, then reverse direction before trimming. Weave other color-change tails along the backs of matching-color stitches.
- Mark one corner as the top. The opposite corner is the bottom; the remaining two corners are the side points. Block to the motif gauge and allow to dry completely before joining.
Arrange the Checkerboard Panel
- Lay out seven horizontal rows, each containing nine upright diamonds. Keep every flower’s RS facing up and every marked top point facing upward.
- Rows 1, 3, 5, and 7: Alternate terracotta-framed and ivory motifs, beginning and ending with terracotta. Each of these rows contains 5 terracotta and 4 ivory motifs.
- Rows 2, 4, and 6: Alternate ivory and terracotta-framed motifs, beginning and ending with ivory. Each of these rows contains 5 ivory and 4 terracotta motifs.
- Check the totals before joining: 32 terracotta-framed motifs and 31 ivory motifs. Adjacent motifs must differ in frame color both horizontally and vertically.
Join the Motif Points
- Use ivory joining yarn and a tapestry needle. A point join connects only two corner ch-3 spaces; do not sew along the motif edges. Hold the two corner spaces together without overlapping the surrounding sc.
- For each join, pass the needle through both corner spaces four times, keeping the wraps snug enough to bring the points into contact without puckering them. Secure the yarn on the WS and weave each end through at least 3 cm of nearby edging, reversing direction once.
- Join the right point of each motif to the left point of its neighbor. Make 8 joins per row for 7 rows: 56 horizontal joins.
- Join the bottom point of each motif to the top point of the motif directly below it. Make 9 joins between each adjacent pair of rows: 54 vertical joins.
- Check all 110 point joins. The nine top points and nine bottom points remain free for loops and tassels. The seven left outer points and seven right outer points remain free.
- Lay the assembled panel flat and lightly dampen it. Align columns and rows to the target 81 × 98 cm panel dimensions, supporting the motifs at their points. Let dry completely.
Hanging Cords and Loops — Make 9
- Make five terracotta cords and four ivory cords, matching the nine motifs across the top row. Use two strands of the same yarn held together and the 3.0 mm hook.
- Row 1: Leave a 30 cm starting tail and ch 65 loosely. Sl st into the back bump of the second ch from the hook and into each remaining chain. Count: 64 sl sts. Fasten off with a 30 cm tail.
- Make the first cord as a gauge sample. Its relaxed working length should be approximately 24 cm, excluding tails. Adjust chain tension or hook size if necessary, retaining the stated 65-chain and 64-slip-stitch counts.
- Bring the two ends together to form a loop. Pass both ends through the top corner space of the matching top-row motif from front to back. Fold the ends upward and sew each securely to the cord about 2 cm above the motif point. This leaves a loop with approximately 20 cm usable circumference and a hanging drop of about 10 cm when laid flat.
- Bind the two joined cord legs immediately above the motif with six close wraps of matching yarn. Secure and bury the ends inside the wrapped section. Complete all nine loops at identical lengths.
- Slide the loops over the curtain rod before replacing its end. For rods wider than approximately 3 cm, make a longer sample cord and check the required loop circumference before completing the set; additional cord length increases the curtain’s overall drop.
Long Tassels — Make 9
- Make five terracotta tassels and four ivory tassels to match the bottom row. For each tassel, wind yarn 60 complete times around a 20 cm tall cardboard template without pulling tightly.
- Slide a separate 45 cm matching yarn strand under all the wraps at the top. Tie a firm double knot. Cut all wraps at the bottom edge and remove the cardboard. Count: 120 fringe ends, excluding the attachment strand.
- Fold the bundle neatly around the top tie. Using a separate 60 cm strand, wrap the bundle 12 times approximately 2 cm below the fold to form a rounded head. Secure the wrap with a hidden knot and draw its tails down into the fringe.
- Thread both top-tie ends through the corresponding bottom corner space. Tie securely on the WS so the tassel head sits directly beneath the motif point. Pass each end back through the head twice before burying it in the fringe.
- Hang the curtain for 24 hours before the final trim. Smooth each tassel by hand and trim the nine bundles to an even length of approximately 20 cm from the motif attachment point. Keep scissors clear of the attachment strands.
Finishing
Check the back of every motif and bury any remaining ends. Lift the panel by its top loops and examine the point joins under its own weight. Reinforce any join that opens or allows its securing knot to show.
Space the nine loops evenly along the rod, approximately 9 cm between neighboring motif centers at the stated gauge. Let the diamonds settle, then straighten the tassels and make the final trim. The finished curtain should hang freely with open gaps between motifs and a level line of tassel ends.
Tips for Success
- Make the first terracotta and ivory motifs together. A color change can affect tension, and both versions must block to the same dimensions.
- Keep Round 3 arches behind the petals. Pull each flower forward before working Round 4 so the frame does not trap its edges.
- Use a paper diamond measuring 9 × 14 cm as a blocking guide beneath a waterproof covering. Center the flower before pinning all four points.
- Measure the hanging loops under gentle, equal tension before attaching them. Small differences become visible across the curtain’s top edge.
- Weigh one completed motif of each color and one tassel. Use those measurements to refine yarn purchasing before making the full set.
Common Mistakes to Avoid
- Working every Round 4 arch as a corner creates an eight-sided motif. Alternate corner groups and side groups to obtain exactly four corners.
- Missing a side ch-1 space in Round 5 reduces the edging count. Place one sc in each of the four side spaces and verify 60 sc before fastening off.
- Joining several edging stitches together closes the airy gaps. Connect only the corner spaces, using four passes through each pair.
- Blocking only the first few motifs produces uneven columns. Block every motif to the same relaxed dimensions before assembly.
- Trimming tassels immediately can leave an uneven hem after the cotton settles. Hang the finished curtain for 24 hours before the final cut.
Ways to Customize This Pattern
- Make a narrower panel with seven columns and seven rows. The checkerboard requires 25 terracotta-framed motifs and 24 ivory motifs, plus seven loops and seven tassels.
- Make a shorter window valance with nine columns and three rows. Use 14 terracotta-framed motifs and 13 ivory motifs, retaining nine loops and nine tassels.
- Replace terracotta with muted olive or warm ochre while keeping ivory flowers and alternate motifs for the same clear checkerboard effect.
- Use a 12 cm tassel template for a shorter fringe. Retain the 60 wraps and trim after hanging; the overall curtain becomes approximately 8 cm shorter.
Frequently asked questions
The four-corner frame is blocked into an elongated diamond to echo the reference curtain. Measure between opposite points after the motif has dried and relaxed. If your cotton will not comfortably hold 9 × 14 cm, use its stable dimensions and recalculate the panel size.
No. Each flower is made first, then its frame is crocheted into arches anchored behind the petal centers. This keeps the ivory flower raised above the terracotta or ivory lace without a separate sewn attachment.
The specified loops are closed and slide over a rod with a removable end. For a fixed rod, attach each finished closed loop to an opening curtain ring instead. Measure the ring’s extra hanging drop when calculating the finished length.
Follow the cotton yarn’s care label. If hand washing is permitted, support the entire wet panel, gently squeeze out water, and dry it flat with the diamonds aligned. Smooth tassels separately and avoid lifting the wet curtain by its loops, which can stretch the upper joins.
The finished Terracotta Flower Diamond Crochet Curtain Pattern

