Terracotta Medallion Crochet Bedspread
Beginner Friendly
Perfect for those just starting their crochet journey, with clear instructions and simple techniques
Single-Day Project
A satisfying project you can complete in a single afternoon or evening.
Handmade Gift
A beautiful keepsake — free forever. Read online or print at home.
About This Terracotta Medallion Crochet Bedspread
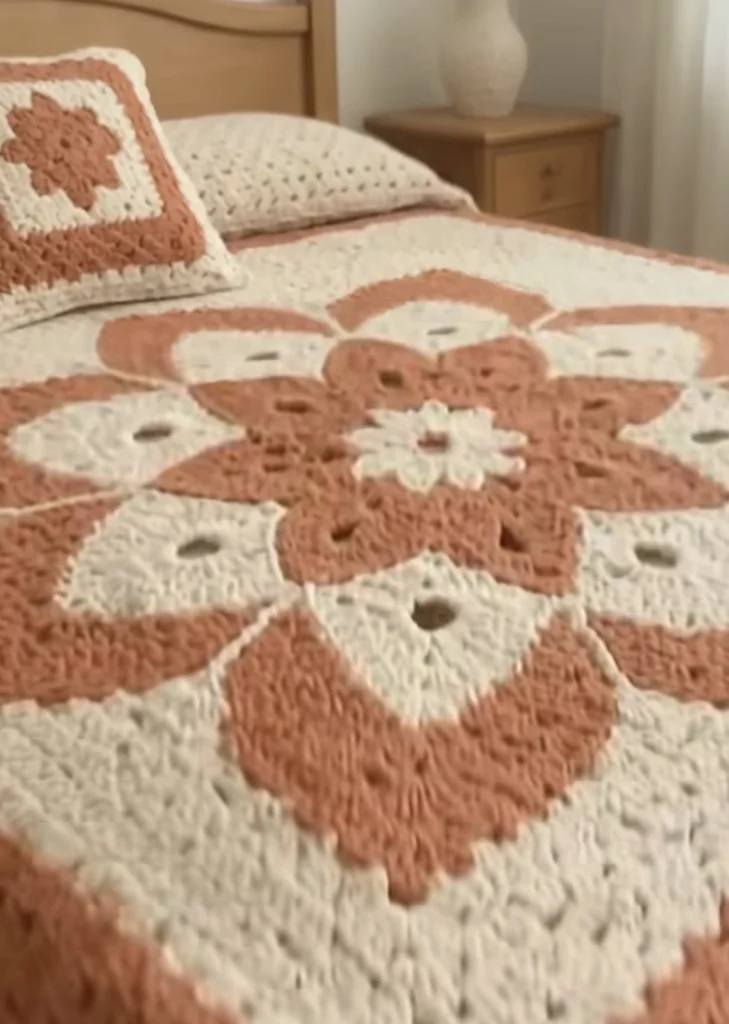
This crochet medallion bedspread pattern turns 80 simple-looking squares into one large design: a cream center under a layered 3D flower, a thick terracotta diamond, a ring of cream with small eyelets, and a final terracotta diamond that fades into a cream field and a wide terracotta border. Every curve and point comes from just three square types, laid out from a chart the way a quilter pieces half-square triangles.
The key square is a two-tone square split corner to corner, worked in turned rounds so each color only ever works its own half. That gives clean intarsia lines with no carried yarn and no cutting mid-square. Each square takes about 40 minutes once you know the rhythm. The full bedspread, with joining, border and flower, takes roughly 70 to 80 hours.
It suits crocheters who already make granny squares with confidence and want a heirloom piece with a real plan behind it. The individual rounds are plain double crochet. The skill lies in the color handoff, keeping every square right side up, and placing all 80 exactly where the chart says.
Materials
- Worsted weight (#4) cotton-blend yarn, terracotta (T) approx. 2,950 m / 3,230 yd, about 17 skeins of 100 g / 183 m
- Worsted weight (#4) cotton-blend yarn, cream (C) approx. 3,650 m / 4,000 yd, about 20 skeins of 100 g / 183 m
- 5 mm (H-8) crochet hook for squares, flower and border
- 5.5 mm (I-9) crochet hook for the slip stitch seams
- Locking stitch markers at least 10
- Zip bags or labels for sorting the three square types
- Yarn needle
- Scissors
- Blocking mats, rust-proof pins and a spray bottle
Abbreviations
TterracottaCcreamMRmagic ringchchainsl stslip stitchscsingle crochethdchalf double crochetdcdouble crochettrtreble crochetdc2togdouble crochet two togetherrev screverse single crochet (crab stitch)yoyarn oversp(s)space(s)st(s)stitch(es)begbeginningrndroundRS / WSright side / wrong sideGauge and Square Anatomy
- Gauge: Rounds 1 to 4 measure about 10.5 cm (4 in) side to side. A finished, blocked square after Round 8 measures 21 cm (8.25 in). Change hook size if needed to match.
- Corners are named A, B, C and D. Every round starts and ends at corner A. On the two-tone square, corner B is the all-terracotta corner, corner D is the all-cream corner, and the color split runs in a straight diagonal from A to C.
- All squares are worked in turned rounds. The RS is the side facing you during Round 1. Clip a marker to the RS of every square as soon as Round 1 is done, because the chart only works with every square RS up.
- Color changes: change color by working the final yo of the last dc in the new color. Drop the old color to the WS of the fabric, and bring the new color up from under it so the two strands twist. The twist closes the gap at corner C.
- Each square starts on a ch-5 ring, which leaves the small eyelet at its center that you see across the finished medallion.
Two-Tone Square (make 44)
- Rnd 1 (RS, T first): With T, ch 5 and sl st in first ch to form a ring. Ch 3 (counts as dc throughout), 2 dc in ring, ch 2, 3 dc in ring, changing to C on the last yo. With C: ch 2, 3 dc in ring, ch 2, 3 dc in ring, ch 2, sl st in top of beg ch-3. Turn. (12 dc, 3 on each side. The first ch-2 is corner B, the C ch-2s are corners C and D, and the last ch-2 is corner A.)
- Rnd 2 (WS, C first): With C, sl st in corner A sp, ch 3, dc in same sp; dc in each of next 3 dc; (2 dc, ch 2, 2 dc) in corner D; dc in each of next 3 dc; 2 dc in corner C, changing to T on the last yo. With T: ch 2, 2 dc in same corner C; dc in each of next 3 dc; (2 dc, ch 2, 2 dc) in corner B; dc in each of next 3 dc; 2 dc in corner A, ch 2, sl st in top of beg ch-3. Turn. (28 dc, 7 on each side.)
- Rnd 3 (RS, T first): With T, sl st in corner A sp, ch 3, dc in same sp; dc in each of next 7 dc; (2 dc, ch 2, 2 dc) in corner B; dc in each of next 7 dc; 2 dc in corner C, changing to C on the last yo. With C: ch 2, 2 dc in same corner C; dc in each of next 7 dc; (2 dc, ch 2, 2 dc) in corner D; dc in each of next 7 dc; 2 dc in corner A, ch 2, sl st in top of beg ch-3. Turn. (44 dc, 11 on each side.)
- Rnd 4 (WS, C first): Work as Rnd 2, but dc in each of next 11 dc on every side. Turn. (60 dc, 15 on each side.)
- Rnd 5 (RS, T first): Work as Rnd 3, but dc in each of next 15 dc on every side. Turn. (76 dc, 19 on each side.)
- Rnd 6 (WS, C first): Work as Rnd 2, but dc in each of next 19 dc on every side. Turn. (92 dc, 23 on each side.)
- Rnd 7 (RS, T first): Work as Rnd 3, but dc in each of next 23 dc on every side. Turn. (108 dc, 27 on each side.)
- Rnd 8 (WS, C first): Work as Rnd 2, but dc in each of next 27 dc on every side. Fasten off both colors, leaving 15 cm tails. (124 dc, 31 on each side between corner ch-2 sps.)
Solid Squares (make 28 in C and 8 in T)
- Rnd 1 (RS): Ch 5, sl st in first ch to form a ring. Ch 3, 2 dc in ring, [ch 2, 3 dc in ring] 3 times, ch 2, sl st in top of beg ch-3. Turn. (12 dc.)
- Rnd 2: Sl st in corner sp, ch 3, dc in same sp; *dc in each dc to next corner, (2 dc, ch 2, 2 dc) in corner sp*; rep from * twice more; dc in each dc to first corner, 2 dc in first corner, ch 2, sl st in top of beg ch-3. Turn. (28 dc, 7 on each side.)
- Rnds 3 to 8: Rep Rnd 2, adding 4 dc on each side every round. The counts match the two-tone square: 44, 60, 76, 92, 108 and 124 dc, ending with 31 dc on each side. Fasten off after Rnd 8.
Center Flower (make 1)
- Rnd 1 (T): Make a MR, 6 sc in ring. Pull tight and sl st in first sc. (6 sc.)
- Rnd 2 (T): Ch 1, 2 sc in each st around, sl st in first sc. Fasten off T. (12 sc.)
- Rnd 3 (C): Join C in any st. Ch 1, sc in same st, ch 3, skip next st, [sc in next st, ch 3, skip next st] 5 times, sl st in first sc. (6 sc, 6 ch-3 sps.)
- Rnd 4 (front petals): In each ch-3 sp work (sc, hdc, 3 dc, hdc, sc). Sl st in first sc. (6 petals.)
- Rnd 5: Working behind the petals, sl st around the post of the center dc of the first Rnd 4 petal from the back. *Ch 5, sl st around the post of the center dc of the next petal from the back*; rep from * around. (6 ch-5 loops.)
- Rnd 6 (middle petals): In each ch-5 loop work (sc, hdc, 2 dc, tr, 2 dc, hdc, sc). Sl st in first sc. (6 petals, offset from the front layer.)
- Rnd 7: Working behind, sl st around the post of the tr of the first Rnd 6 petal from the back. *Ch 7, sl st around the post of the tr of the next petal from the back*; rep from * around. (6 ch-7 loops.)
- Rnd 8 (back petals): In each ch-7 loop work (sc, hdc, 2 dc, 3 tr, 2 dc, hdc, sc). Sl st in first sc. Fasten off, leaving a 60 cm tail for sewing. (The flower is about 16 cm across.)
Medallion Chart
- How to read the chart: the blanket is 8 squares wide and 10 squares long, and every square lies RS up. C is a solid cream square and T is a solid terracotta square. NW, NE, SW and SE are two-tone squares, turned so the terracotta half (corner B) covers that corner: NW is top left, NE top right, SW bottom left, SE bottom right. Read each row from left to right.
- Row 1: C, C, C, C, C, C, C, C
- Row 2: C, C, SE, NW, NE, SW, C, C
- Row 3: C, SE, NW, SE, SW, NE, SW, C
- Row 4: SE, NW, SE, T, T, SW, NE, SW
- Row 5: NW, SE, T, NW, NE, T, SW, NE
- Row 6: SW, NE, T, SW, SE, T, NW, SE
- Row 7: NE, SW, NE, T, T, NW, SE, NW
- Row 8: C, NE, SW, NE, NW, SE, NW, C
- Row 9: C, C, NE, SW, SE, NW, C, C
- Row 10: C, C, C, C, C, C, C, C
- Check before joining: the four center squares should form a cream diamond, ringed by a thick terracotta diamond, then a cream diamond, then a terracotta diamond whose points touch rows 2 and 9 and both long edges. Photograph the layout and clip a row-number marker to the first square of each row.
Joining
- Block all 80 squares to 21 cm (8.25 in) before joining. Pin each one square with sharp corners, spray it until damp, and let it dry completely.
- All seams are worked in C, including across terracotta areas. The fine cream seam lines are part of the design.
- Horizontal seams: with the 5.5 mm hook and C, hold rows 1 and 2 WS together so the ridge forms on the RS. Join C in the corner ch-2 sps of the first pair. *Sl st through both loops of both squares in the corner sps, sl st in each of next 31 dc, sl st in the corner sps*; move to the next pair and rep from * across the row (33 sl st per pair). Fasten off. Rep for all 9 horizontal seam lines.
- Vertical seams: work the 7 vertical seam lines the same way, 10 squares each. Sl st loosely over every intersection so the crossing stays flat.
Border
- Border Rnd 1 (T, 5 mm hook): With RS facing, join T with a standing dc in any outer corner ch-2 sp, dc in same sp. *Dc in each dc along each square edge; at each seam, dc2tog over the corner sp of this square and the corner sp of the next; at the next outer corner work (2 dc, ch 2, 2 dc)*. Rep from * around, ending with 2 dc in the first corner, then hdc in the standing dc (this counts as the corner ch-2 sp). (259 dc on each short side and 323 dc on each long side, counted between corner sps.)
- Border Rnd 2 (T): Ch 3 (counts as dc), dc around the post of the joining hdc. *Dc in each dc to the next corner, (2 dc, ch 2, 2 dc) in corner sp*; rep from * around, ending with 2 dc in the first corner and hdc in top of beg ch-3. (263 dc per short side, 327 dc per long side.)
- Border Rnds 3 to 6 (T): Rep Border Rnd 2, adding 4 dc on each side every round. (Rnd 6: 279 dc per short side, 343 dc per long side.)
- Border Rnd 7 (T): Ch 1. Working from left to right, rev sc in each dc around and 3 rev sc in each corner sp. Sl st in first rev sc. Fasten off.
Finishing
Lay the bedspread flat RS up and center the flower over the point where the four center squares meet, in the middle of the cream diamond. Use the long tail to stitch around the base of each back petal and then through the flower center, so the flower stays flat and the front petals stand free. Pull the eyelet of no square closed while you sew.
Weave in all remaining ends along the seam ridges, where they disappear. Give the finished piece a final light block: lay it on a clean floor or a bed covered with towels, mist it evenly, smooth the border straight, and let it dry fully before moving it. Finished, it measures about 182 x 224 cm (72 x 88 in), large enough to cover a queen bed with a drop on each side.
Tips for Success
- Turn clockwise after RS rounds and counterclockwise after WS rounds. The two balls then untwist as you go instead of braiding into a tangle by Round 8.
- Work over the starting tails in Rounds 1 and 2. Each two-tone square then has only two ends left to weave in when it is done.
- Make the two-tone squares in batches and store them in labelled bags with the solid squares kept separate. With 80 squares, sorting saves an hour at layout time.
- Hold the twist firmly at corner C on every round. A loose twist leaves a small hole along the diagonal, and across 44 squares those holes become noticeable.
- Block one finished square before making the rest. If it comes out larger than 21 cm, go down a hook size now, since the chart depends on all three square types matching exactly.
Common Mistakes to Avoid
- Laying a two-tone square WS up. Flipping a square mirrors it, so an NW becomes an NE and the diamond breaks. Keep the RS markers in place until every seam is done.
- Starting a round with the wrong color. Odd rounds start with terracotta and even rounds with cream. If the color you need is at the opposite corner, rip back to the end of the last correct round rather than cutting and rejoining.
- Skipping the sl st into corner A after turning. Without it, the beg ch-3 sits one stitch off the corner and the split line drifts. Always sl st into the corner sp before the ch 3.
- Working the dc2tog in the wrong place on Border Rnd 1. It belongs over the two corner sps at each seam only. Anywhere else, the border pulls in and ripples.
- Joining too tightly. Slip stitch seams shrink easily, and a tight seam gathers the bedspread along the grid. Use the 5.5 mm hook and check that each seam lies flat before moving on.
Ways to Customize This Pattern
- Square coverlet: leave out rows 1 and 10 to make an 8 x 8 medallion of 64 squares, about 182 cm (72 in) square with the border.
- Matching cushion: join four two-tone squares in the center arrangement (NW, NE over SW, SE), add 3 rounds of the border, and sew a second flower on top. Back it with a solid square panel for a cushion of about 48 cm (19 in).
- New colorways: the medallion works in any two high-contrast colors. Try sage and cream, navy and white, or mustard and charcoal.
- Closed centers: start each square with a magic ring pulled tight instead of the ch-5 ring for a solid surface with no eyelets.
- Wider border: add more T rounds before the rev sc round, about 1.2 cm per round, for a longer drop on a deep mattress.
Frequently asked questions
Each color works only its own half of the square. If you didn’t turn, each yarn would end its half at the opposite corner from where the next round needs it, and you would have to cut and rejoin every round. Turning reverses the direction, so both yarns are always in the right place. It also stops the squares from leaning.
Yes. The fine cream ridges outline every square, which is what gives the medallion its pieced, quilt-like look. If you prefer the terracotta shapes to read as solid blocks, join with T in terracotta areas and C everywhere else, but expect more ends.
In a cotton blend it weighs about 3.5 kg, which gives a substantial, smooth drape on a bed. To make it lighter, use worsted acrylic at the same gauge. It will weigh roughly a third less, and you can block it with steam instead of water.
Yes. The four center squares already form a cream diamond with an eyelet in each square, so the medallion is complete without it. The flower simply adds a raised focal point in the middle of the bed.
The finished Terracotta Medallion Crochet Bedspread

