Terracotta Shell Pocket Wall Organizer Crochet Pattern
Advanced
For experienced crocheters who enjoy complex shaping, fine detail, and ambitious construction
Weekend Project
A satisfying weekend make — start Friday, finish Sunday, enjoy forever.
Handmade Gift
A beautiful keepsake — free forever. Read online or print at home.
About This Terracotta Shell Pocket Wall Organizer Crochet Pattern
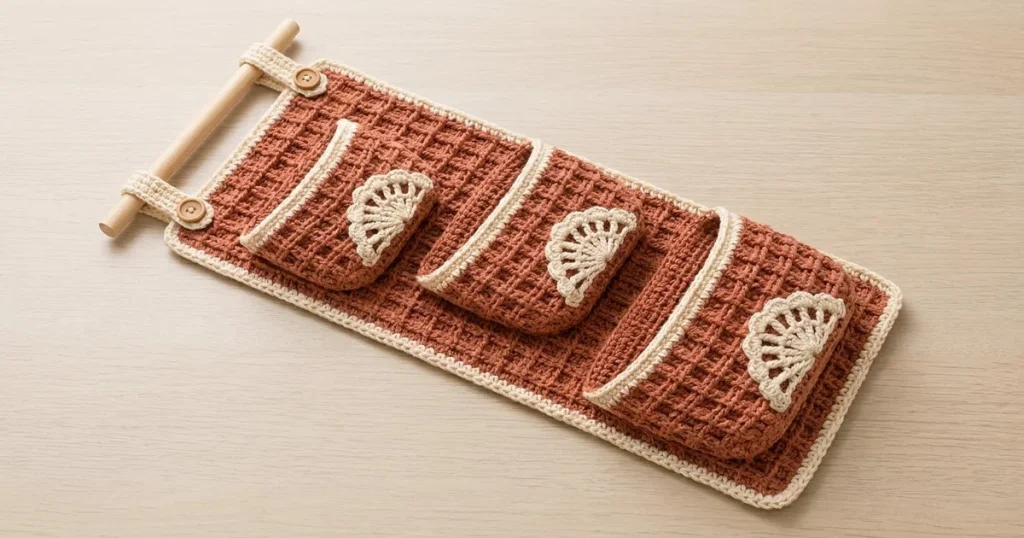
This crochet wall organizer pattern pairs warm terracotta waffle texture with cream edging and three fan-shaped shell appliqués. The long rectangular backing hangs from a wooden dowel, with three open pockets stacked down its length. Rounded pocket corners and narrow cream rims give it the soft, handmade look of the reference.
Allow approximately 18–24 hours for the textured panels, shaped pockets, separate shell motifs, and careful assembly. This advanced project suits crocheters comfortable with post stitches, shaping in rows, surface embroidery, and sewing pieces together without flattening their texture. Firm cotton keeps the pockets useful for lightweight craft supplies and everyday odds and ends.
Materials
- DK cotton yarn in terracotta Approximately 400 g / 880 m
- DK cotton yarn in natural cream Approximately 100 g / 220 m
- Crochet hooks 3.5 mm for panels and tabs; 3.0 mm for shells
- Wooden dowel Approximately 32 cm long and 12–15 mm in diameter
- Two wooden buttons Approximately 20 mm diameter
- Tapestry needle, stitch markers, ruler, and blocking supplies For assembly and shaping
- Strong cotton sewing thread For reinforcing the buttons
- Suitable wall supports Two hooks positioned beneath the dowel ends
Abbreviations
chchainsl stslip stitchscsingle crochethdchalf double crochetdcdouble crochetFPdcfront post double crochetinc2 sc in the same stitchMRmagic ringRSright sideWSwrong sidest / stsstitch / stitchesGauge, Dimensions, and Working Notes
- Use US crochet terminology. With the 3.5 mm hook, blocked waffle gauge is 18 sts and 10 rows per 10 cm. Measure across the relaxed fabric, including the recessed areas.
- For the swatch, ch 29. Work dc in the fourth ch from the hook and each remaining ch; the skipped 3 ch count as the first dc for this swatch foundation only: 27 sts. Instead, to use the exact panel construction below, ch 31, work dc in the fourth ch and onward without counting the skipped chains: 28 sts. Use this 28-st version and repeat the panel’s two texture rows with eight interior repeats.
- Work at least 14 texture rows on the 28-st swatch, wash, and dry flat. Adjust the main hook if necessary. All actual pattern rows use turning chains that do not count as stitches.
- Blocked sc gauge with the main hook is approximately 22 sts and 24 rows per 10 cm. A shell made with the smaller hook should measure approximately 7–8 cm across.
- The unbordered backing measures approximately 24.5 × 64 cm. Each pocket front measures approximately 21 × 19 cm. Cream edging brings the backing to approximately 26 × 66 cm.
- Ch 2 before dc rows and ch 1 before sc rows; these chains never count as stitches. Turn after every row unless instructed otherwise. Work the first and last stitch into the actual edge stitches.
- A FPdc replaces the stitch directly behind its post. Do not work into that stitch’s top loops as well. Row counts always include the plain stitch at each edge.
Terracotta Waffle Backing
- Foundation: With terracotta and the main hook, ch 46.
- Row 1, WS: Dc in the third ch from the hook and each remaining ch. The skipped chains do not count. Turn. (44 sts)
- Row 2, RS: Ch 2, dc in first st, repeat [FPdc around next st, dc in next 2 sts] 14 times, dc in last st. Turn. (44 sts)
- Row 3, WS: Ch 2, dc in first st, repeat [dc in next st, FPdc around next 2 sts] 14 times, dc in last st. Turn. (44 sts)
- Rows 4–63: Repeat Rows 2–3 thirty times. Maintain 44 sts in every row.
- Row 64, RS: Repeat Row 2. Fasten off. (44 sts)
- Block gently to approximately 24.5 × 64 cm, keeping the waffle texture raised. Mark the foundation edge as the bottom and Row 64 as the top.
Cream Backing Border
- With RS facing, join cream at the top-left corner. Work clockwise. The corner groups described below are additional to the straight-edge stitches.
- Round 1, top edge: Ch 1. Work one sc in each of the 44 top stitches, adding one extra sc in top stitches 4, 8, 12, 16, 20, 24, 28, 32, 36, and 40. Work 3 sc in the corner junction. (54 edge sts plus 3 corner sts)
- Round 1, first long side: Work 2 sc around each of the 64 row ends, with one additional sc at row ends 5, 10, 15, 20, 25, 30, 35, 40, 45, 50, 55, and 60. Work 3 sc in the bottom corner junction. (140 edge sts plus 3 corner sts)
- Round 1, bottom edge: Work into the unused foundation-chain loops. Work 54 sc using the same ten increase positions as the top edge, counted from the current corner. Work 3 sc in the next corner junction. (54 edge sts plus 3 corner sts)
- Round 1, remaining side: Work 140 sc as on the first long side, then 3 sc in the starting corner junction. Sl st to first sc. Fasten off. (400 sts around the complete border)
- Lay the backing flat. The border should frame the fabric without stretching it. If your sc gauge differs, change the edging hook size and rework the border to these same counts.
Shaped Pocket Fronts — Make Three
- Foundation: With terracotta and the main hook, ch 33.
- Row 1, RS: Sc in second ch from hook and each remaining ch. Turn. (32 sts)
- Row 2, WS: Ch 1, inc, sc in next 30 sts, inc. Turn. (34 sts)
- Row 3, RS: Ch 1, inc, sc in next 32 sts, inc. Turn. (36 sts)
- Row 4, WS: Ch 1, inc, sc in next 34 sts, inc. Turn. (38 sts)
- Row 5, RS: Ch 2, dc in each st. Turn. (38 sts)
- Row 6, WS: Ch 2, dc in first st, repeat [dc in next st, FPdc around next 2 sts] 12 times, dc in last st. Turn. (38 sts)
- Row 7, RS: Ch 2, dc in first st, repeat [FPdc around next st, dc in next 2 sts] 12 times, dc in last st. Turn. (38 sts)
- Rows 8–21: Repeat Rows 6–7 seven times. (38 sts per row)
- Fasten off, leaving a 100 cm terracotta sewing tail. Block each front to approximately 21 cm wide at the mouth and 19 cm high. Preserve the narrower foundation and rounded lower corners.
Cream Pocket Rims — Work on All Three Pockets
- With pocket RS facing, join cream at the right end of Row 21. Work across the mouth only; do not continue down the sides.
- Rim Row 1: Ch 1, work one sc in each of the 38 top stitches, adding an extra sc in stitches 5, 11, 17, 23, 29, and 35. Turn. (44 sts)
- Rim Row 2: Ch 1, sc in each st. Fasten off and weave in the ends along the WS. (44 sts)
- Block the rim to match the width of the terracotta pocket. The additional sc accommodate the narrower stitch gauge of sc; they should not create a ruffle.
Cream Shell Appliqués — Make Three
- Use cream and the 3.0 mm hook. Work in turned rows to create a semicircular fan. The starting ch 3 in Row 1 counts as a dc; all later turning chains do not count.
- Row 1: Make a MR, ch 3, work 8 dc into the ring. Pull the ring closed and turn. (9 dc)
- Row 2: Ch 2, work 2 dc in each of the 9 sts, including the top of the starting ch 3. Turn. (18 dc)
- Row 3: Ch 1, sc in first st; repeat [ch 3, skip next st, sc in next st] 8 times; ch 3, sc in the last st. Turn. (10 sc and 9 ch-3 spaces)
- Row 4: Ch 1, skip the first sc. In each of the 9 ch-3 spaces work [sc, hdc, 3 dc, hdc, sc], leaving the intervening sc unworked. Sl st in the final sc. Fasten off with a 70 cm sewing tail. (9 scallops containing 63 sts, plus the final sl st)
- Secure the ring tail on the WS. Block the fan with its straight lower edge relaxed and its scalloped edge rounded. Do not pull it into a full circle.
- Using a separate cream strand, embroider five radiating straight stitches from just above the ring center toward evenly spaced points along the outer edge of Row 2. Keep these stitches loose enough that the fan remains flat. Secure both ends on the WS.
Buttoned Hanging Tabs — Make Two
- With cream and the main hook, ch 8.
- Row 1: Sc in second ch from hook and each remaining ch. Turn. (7 sts)
- Rows 2–23: Ch 1, sc in each st. Turn. (7 sts per row)
- Row 24, buttonhole: Ch 1, sc in first 2 sts, ch 3, skip next 3 sts, sc in last 2 sts. Turn. (4 sc and one ch-3 space)
- Row 25: Ch 1, sc in first 2 sts, work 3 sc in the ch-3 space, sc in last 2 sts. Turn. (7 sts)
- Row 26: Ch 1, sc in each st. Fasten off, leaving a 50 cm sewing tail. (7 sts)
- Each tab measures approximately 3.2 × 10.8 cm. Check that the button passes through the opening with gentle pressure before attaching the tab.
Pocket Placement and Joining
- Lay the backing RS up, with Row 64 at the top. All placement measurements refer to the terracotta panel, excluding its cream border.
- Mark three centered pocket rectangles, each 20 cm wide and 19 cm high. Their lower edges sit 3 cm, 23 cm, and 43 cm above the backing’s lower terracotta edge. Their mouths therefore sit approximately 22 cm, 42 cm, and 62 cm above that edge.
- Before joining the pockets, sew one shell to each front. Center it horizontally, with the fan’s straight edge approximately 4.5 cm above the pocket bottom and the scallops pointing toward the mouth. Use small cream stitches around the motif and several hidden stitches through its center.
- Pin the lower pocket inside its marked rectangle. Its mouth is approximately 1 cm wider than the attachment span; ease this excess toward the center to create shallow storage space. Keep its narrower foundation centered between the lower corners.
- With the terracotta tail, sew the pocket’s lower edge and both sides to the backing using small backstitches. Catch the pocket edge and the body of backing stitches, avoiding the raised front posts where possible. Follow the shaped lower corners smoothly.
- Distribute the pocket’s side edge evenly along the 19 cm attachment line. Leave the entire cream mouth open. Reinforce each upper corner with three small stitches through both the terracotta fabric and the end of the cream rim.
- Repeat for the middle and upper pockets. Check that all three mouths are horizontal before securing the final tails.
Finishing
Place the tabs behind the upper corners, with their outer edges approximately 1 cm inside the terracotta side edges. Overlap the plain end of each tab onto the backing by 2 cm and sew securely around that overlap. Bring each free end up and over the dowel, then down onto the front of the backing. Mark the button position through the buttonhole while the dowel is in place.
Sew each wooden button at its marked position using strong cotton thread, catching several backing stitches and the attached tab layer beneath. Button the tabs around the dowel and check that the organizer hangs level. Weave in all remaining ends, lightly steam or damp-block the seams without pressing the waffle ridges, and let the piece dry completely. Hang the dowel on two suitable supports and fill the pockets with lightweight items.
Tips for Success
- Mark the backing RS after Row 2. Match the raised waffle face on all three pockets before adding their cream rims.
- Block every pocket against the same paper rectangle so its mouth and side seams line up with the others.
- Attach the shells before sewing the pockets down; this keeps embroidery and sewing stitches out of the storage spaces.
- Pin the pocket mouths first, then ease the lower edges into place. The slight extra front width gives useful depth without separate gussets.
- Support the dowel near both ends. A single central support can let this long organizer tilt when one pocket holds more than another.
Common Mistakes to Avoid
- Working into the top of a stitch already used for a FPdc adds unwanted stitches. Count 44 on the backing and 38 on the pocket texture rows.
- Using the backing’s texture-row order unchanged on the pockets reverses their visible texture. Follow the pocket instructions, which account for the four shaping rows.
- Pulling cream edging tight makes the panels cup. Keep the specified additional sc and use a larger edging hook if the blocked border still draws inward.
- Sewing the pocket front completely flat removes its storage allowance. Keep the 20 cm attachment span and ease the approximately 21 cm front across it.
- Drawing the shell’s embroidered rays tight makes its center buckle. Remove any tight ray and replace it with a relaxed stitch while the motif lies flat.
Ways to Customize This Pattern
- Keep the cream shells and borders, but replace terracotta with muted clay pink, olive, or deep sea blue.
- For two pockets, make the backing through Row 44 and use the lower two pocket placements. Recalculate each long border edge as 96 sc: 2 per row end plus one extra at every fifth row through Row 40.
- Divide the lowest pocket into two compartments by sewing one vertical line through its center after attachment. Keep the upper pockets undivided for wider supplies.
- Add a washable cotton lining to each pocket, cut to the blocked pocket outline with a 1 cm seam allowance. Hem the top and sew the lining inside before attaching the pocket to the backing.
Frequently asked questions
At the specified gauges, sc stitches are narrower than waffle stitches. The extra cream stitches let the edging cover the same width without cinching the pocket mouth or backing.
This shallow, unlined crochet construction is intended for lightweight supplies. Heavy bottles can stretch the mouths and distort the backing. For heavier storage, add a firm fabric backing and reinforced fabric pockets, and choose wall fittings for the full loaded weight.
Unbutton both tabs and remove the dowel. Follow the yarn label, wash gently, reshape the backing and pocket mouths, and dry flat completely before rehanging.
Check that you used the 3.0 mm hook and did not count later turning chains as stitches. Aim for a 7–8 cm fan; if needed, use a smaller hook or a thinner cream cotton for all three motifs.
The finished Terracotta Shell Pocket Wall Organizer Crochet Pattern

