Textured Maple Leaf and Sunflower Table Runner Pattern
Beginner Friendly
Perfect for those just starting their crochet journey, with clear instructions and simple techniques
Single-Day Project
A satisfying project you can complete in a single afternoon or evening.
Handmade Gift
A beautiful keepsake — free forever. Read online or print at home.
About This Textured Maple Leaf and Sunflower Table Runner Pattern
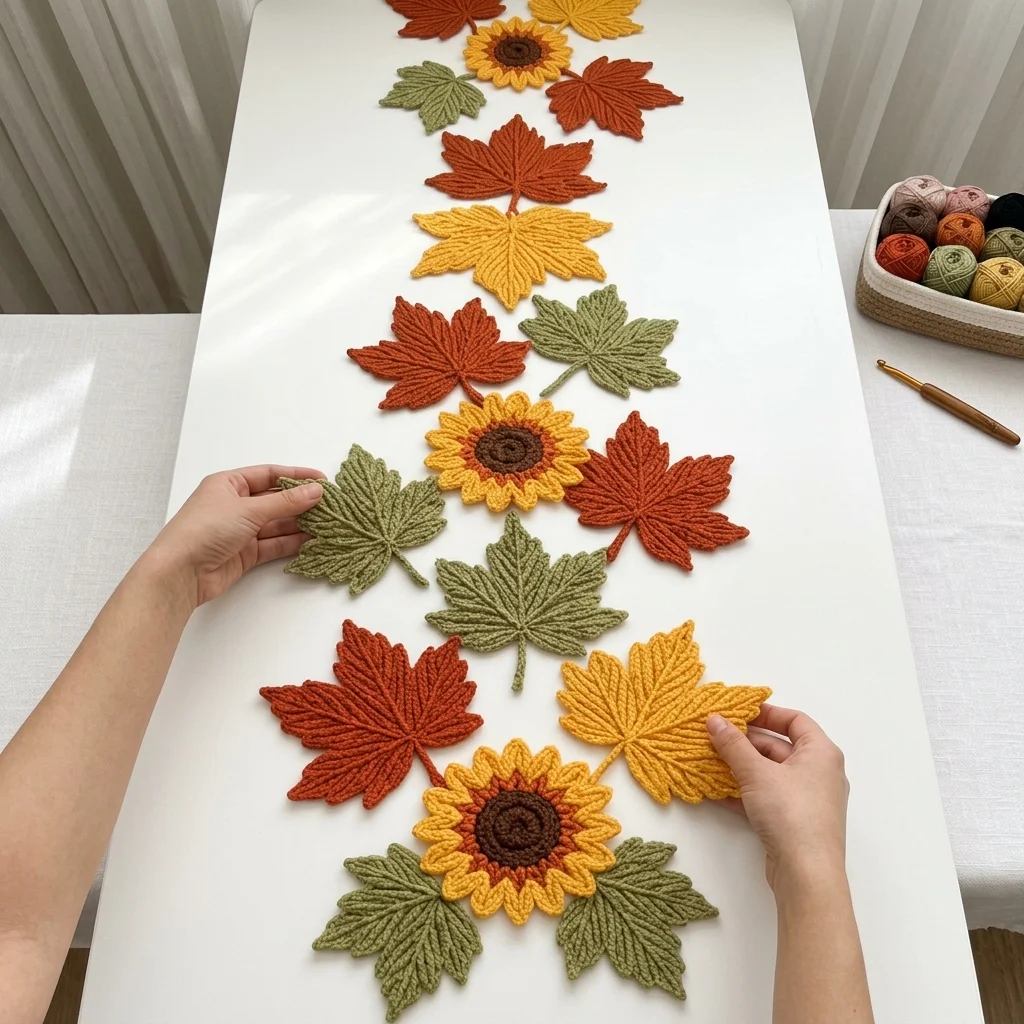
This crochet maple leaf sunflower table runner pattern overlaps 12 large, heavily textured maple leaves in rust, gold, and olive around 2 golden sunflowers with deep brown centers, joined directly edge to edge with no gaps. Rather than a uniform strip, the leaves are arranged in a loosely tapered shape, narrower at both ends and fuller in the middle where the sunflowers sit, so the finished piece looks like a gathered armful of fall foliage rather than a flat panel.
What makes this design distinctive is the leaf texture itself: each lobe carries deep, raised front-post ridging worked in vertical lines from base to tip, giving every leaf real dimension you can feel as well as see. Placing the two sunflowers at intervals within the overlapping leaf field, rather than centering a single one, is what gives the arrangement its asymmetrical, naturally gathered look. Expect to spend 16-20 hours total, split between 12 textured leaves and 2 sunflowers.
This is an advanced pattern, best suited to someone comfortable with front-post relief stitches on large leaf motifs and confident building an asymmetrical, tapered layout by eye, rather than someone wanting a straight, uniform strip.
Materials
- Worsted weight yarn, rust orange ~90g, leaves
- Worsted weight yarn, mustard gold ~70g, leaves and sunflower petals
- Worsted weight yarn, olive green ~60g, leaves
- Worsted weight yarn, dark brown ~20g, sunflower centers
- Worsted weight yarn, rust orange (thin accent) ~10g, sunflower center ring
- Crochet hook 4.5 mm (US 7)
- Tapestry/yarn needle
- Steam iron and pressing cloth, or blocking mat and pins
- Sharp scissors
Abbreviations
chchainsl stslip stitchscsingle crochethdchalf double crochetdcdouble crochettrtreble/triple crochetFPdcfront post double crochetMRmagic ringincincrease (2 sc in one st)st(s)stitch(es)reprepeatFOfasten offTextured Maple Leaf Motif (make 12: mix of rust, gold, and olive)
- Ch 4, sl st in first ch to form a small foundation ring.
- Lobe 1, top center: ch 13. Starting in 2nd ch from hook: sl st, sc 2, hdc 2, dc 4, tr 3 (11 sts). Sl st into ring.
- Lobe 2, upper right: ch 10. Starting in 2nd ch from hook: sl st, sc 2, hdc 2, dc 4 (8 sts). Sl st into ring.
- Lobe 3, lower right: ch 7. Starting in 2nd ch from hook: sl st, sc 2, hdc 3 (5 sts). Sl st into ring.
- Lobe 4, lower left: repeat Lobe 3 exactly. Sl st into ring.
- Lobe 5, upper left: repeat Lobe 2 exactly. Sl st into ring.
- Sl st into base of Lobe 1 to close. Do not FO; continue to the ridging round.
- Ridging round: work back around the outer edge of all 5 lobes, working FPdc stitches down the center of each lobe from base to tip to raise a ropey vein, sl st between veins to travel along the edge.
- Ch 2 more at the base to form a short stem, sl st back down those 2 ch. FO leaving a 15-20 cm tail. Repeat for 12 leaves total, mixing colors.
Sunflower Motif (make 2)
- With dark brown, 8 sc in MR, inc around (16 sts), sl st to join, FO leaving a short tail.
- With rust orange (thin accent), join and work a slim textured ring round: sc around even, working in BLO for a raised ridge separating center from petals. FO leaving a short tail.
- With mustard gold, join in any st behind the ring round. Round 1 (inner petals): *ch 2, dc 3 in next st, ch 2, sl st in same st; rep from * around all 16 sts. 16 petals.
- Round 2 (outer petals): join gold in a base st between two inner petals. *ch 3, dc 4 in next base st, ch 3, sl st in same st; rep from * around. 16 larger petals layered behind the first set.
- FO leaving a long tail for attaching. Fold outer petals slightly back so the two rounds separate visually. Repeat for 2 sunflowers total.
Blocking All Pieces
- Lightly steam or mist each leaf, right-side up, pinning all 5 lobes spread evenly without pressing directly on the ridged veins.
- Steam and pin each sunflower, spreading its outer petals evenly. Let all pieces dry completely before assembly.
Layout and Direct Joining
- Lay out the 12 leaves and 2 sunflowers on a large flat surface in a tapered shape: 2 leaves at the very top narrowing to a point, widening through the middle where both sunflowers sit roughly a third and two-thirds down the length, then narrowing again toward the bottom point.
- Overlap leaf lobes generously against neighboring leaves and against the sunflowers’ outer petals, rotating leaves at varying angles so no visible gaps or background show through anywhere in the arrangement.
- Once you’re happy with the layout, whipstitch each pair of touching pieces at 2-3 overlap points, using matching yarn tails, working outward from the two sunflower positions toward both tapered ends.
Finishing
Turn the finished piece over and check for any leaf or sunflower joined at only one point; add a second join wherever something feels loose. Weave in all remaining tails. Give the whole arrangement a final light steam from a slight distance rather than pressing directly, so the raised leaf veining and sunflower petal layers stay intact rather than flattening under the iron.
Tips for Success
- Lay out the full tapered arrangement on the floor or a large table before joining a single stitch, adjusting leaf placement until the widening-then-narrowing shape looks balanced.
- Work the FPdc ridging round at even tension across all 5 lobes on every leaf; inconsistent ridging is very noticeable once pieces sit close together.
- Position the 2 sunflowers at genuinely different points along the length, not symmetrically, to match the naturally gathered look in the photo.
- Join each piece at 2-3 points minimum, not just one, so the whole arrangement holds flat without pieces flipping up.
- Steam from a slight distance rather than pressing the iron directly onto leaves or sunflowers, to protect the raised texture.
Common Mistakes to Avoid
- Spacing leaves evenly along a straight line instead of tapering the arrangement loses the gathered, armful look. Fix: lay out the full shape first and adjust density before joining anything.
- Skipping the FPdc ridging round or substituting a simple embroidered line loses the raised, tactile texture that defines this design. Fix: work genuine front-post stitches as instructed.
- Placing both sunflowers at the exact same point relative to each end makes the layout feel too symmetrical. Fix: offset their positions slightly for a more natural, asymmetrical arrangement.
- Leaving visible gaps between leaves where the table shows through breaks the dense, gathered effect. Fix: overlap lobe tips generously before joining.
- Pressing an iron directly onto textured leaves during blocking flattens the ridged veins. Fix: steam from above without full contact pressure.
Ways to Customize This Pattern
- Reduce to 8 leaves and 1 sunflower for a shorter, smaller centerpiece arrangement.
- Swap the three-color leaf palette for greens and yellows for a spring or everyday version.
- Skip the FPdc ridging round for a faster, flatter version of the same leaf shape if time is limited.
- Add small crocheted acorns tucked among the leaves for extra seasonal texture.
- Arrange the pieces into a round wreath shape instead of an elongated runner for a different centerpiece style.
Frequently asked questions
Pin all pieces to a foam blocking board or thick towel in your final layout before joining anything. This holds the arrangement still so you can join point by point without pieces shifting out of place.
Add extra leaves at the midpoint near one or both sunflowers to extend the length while keeping the tapered ends intact, rather than stretching the existing pieces further apart.
One sunflower works fine for a smaller arrangement; center it around the midpoint of your tapered leaf layout and adjust leaf count on each side to balance the shape.
This usually means the ridging round was skipped or worked as regular dc instead of true FPdc. Recheck that the ridging round works around the post of the stitch below, not into its top, to create the raised vein.
The finished Textured Maple Leaf and Sunflower Table Runner Pattern

