Trailing Rose Curtain Crochet Wall Hanging
Beginner Friendly
Perfect for those just starting their crochet journey, with clear instructions and simple techniques
Single-Day Project
A satisfying project you can complete in a single afternoon or evening.
Handmade Gift
A beautiful keepsake — free forever. Read online or print at home.
About This Trailing Rose Curtain Crochet Wall Hanging
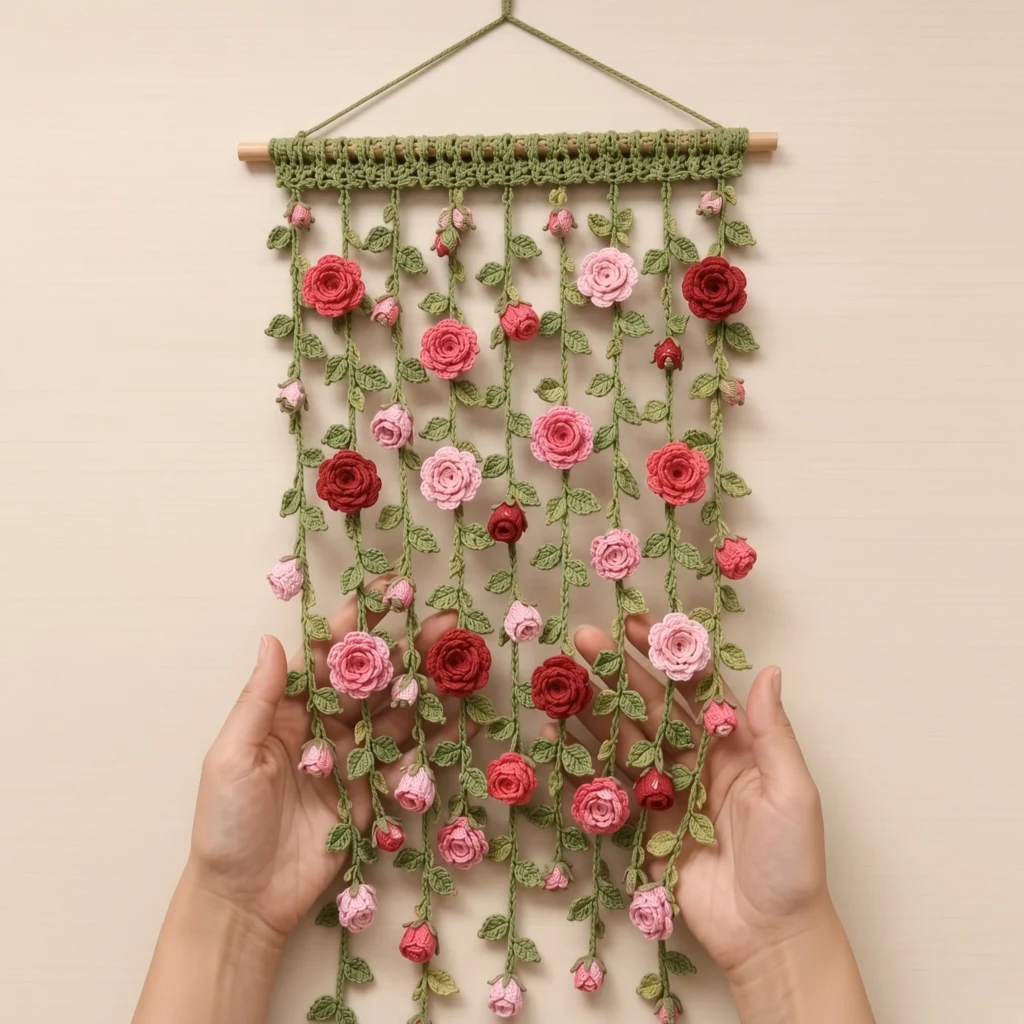
This crochet rose wall hanging pattern turns roughly 175 small pieces into a curtain of trailing roses: nine leafy vine cords of staggered lengths, twenty rolled open roses in four shades, twenty-four closed buds with green calyxes, and around 130 leaves worked directly into the vines as you slip stitch back up each chain. The header is a scalloped green band with an open row that the dowel threads straight through, so there is no casing to sew and no rod pocket to line up.
Expect 14 to 18 hours. The roses and buds are the fast part, about four minutes each once the rolling technique clicks, and they are ideal small-batch work. The vines take longer than they look, because every cord is chained to full length and then slip stitched all the way back with a leaf worked in every seventh stitch. The real skill is in the last stage: placing forty-four blooms across nine cords so the piece reads as a growing plant rather than as evenly spaced decorations, which has to be judged with the hanging already on the wall.
Four shades of red and pink give the depth, from a deep crimson through coral to two pinks, with a single sage green throughout. DK cotton keeps the roses small and defined and the vines slim enough to look like real stems. Any hairy or fuzzy yarn will blur the rolled petals into a blob, so stay with a smooth mercerised cotton if you can. Written in US terms throughout.
Materials
- DK / light worsted cotton in sage green approx. 140 g
- DK / light worsted cotton in deep crimson approx. 25 g
- DK / light worsted cotton in coral red approx. 25 g
- DK / light worsted cotton in medium pink approx. 25 g
- DK / light worsted cotton in pale pink approx. 25 g
- 3.0 mm crochet hook one size down from the ball band for firm petals
- Wooden dowel 30 cm long, 10 mm diameter
- Tapestry needle blunt, large eye
- Stitch markers 9, one per cord attachment point
- Rust-proof pins and a foam board or thick towel
- Sharp scissors and a tape measure
- Optional: a picture hook or small nail, since the piece hangs from a crocheted loop rather than a cord
Abbreviations
chchainscsingle crochethdchalf double crochetdcdouble crochettrtreble crochetsl stslip stitchsp / spsspace / spacesst / stsstitch / stitchesreprepeatRSright sideFOfasten offGauge and Working Notes
- Gauge: a finished open rose measures about 4 cm across, a bud about 2 cm, and a vine leaf about 1.5 cm. The header should measure about 26 cm wide.
- Chain gauge varies more between people than stitch gauge does. Make one 50-chain test cord, slip stitch back along it, and measure. Use your own centimetres per chain to recalculate the cord lengths rather than trusting my numbers.
- Work every slip stitch on the vines into the back bump of the chain, not the top loops. This is the one thing that keeps a cord flat instead of corkscrewing, and it cannot be fixed afterwards.
- Keep the return slip stitches loose. A tight return pass shortens a cord by several centimetres and twists it into a spring.
- Roses and buds are rolled strips, not worked in the round. Do not press them flat at any stage.
- Leave a 25 cm tail on every rose and bud. You will use it to stitch the roll closed and again to attach the bloom to a vine, so one tail does both jobs.
- Make all the roses, buds and vines before you attach anything. Placement is a judgement call across the whole piece and cannot be made one cord at a time.
Header Band
- With green, ch 67.
- Row 1: dc in the 4th ch from hook and in each ch across, turn (65 dc, counting the ch-3 as the first dc).
- Row 2 (dowel row): ch 4 (counts as first tr), *ch 3, skip the next 3 sts, tr in the next st*; rep from * across, turn (17 tr and 16 ch-3 sps, using all 65 sts).
- Row 3: ch 3 (counts as first dc), *3 dc into the next ch-3 sp, dc in the next tr*; rep from * across, turn (65 dc).
- Row 4 (scalloped edge): ch 1, sc in each st across, working (ch 3, sl st into the 3rd ch from hook) after every 4th sc, so a picot falls after sts 4, 8, 12 and so on through st 64 (65 sc with 16 picots). FO and weave in the ends.
- Mark stitches 1, 9, 17, 25, 33, 41, 49, 57 and 65 of Row 4. These nine evenly spaced points are where the vine cords attach, 8 stitches apart.
- Slide the dowel through the 16 ch-3 spaces of Row 2, letting it pass in front of some bars and behind others. It should sit snugly with about 2 cm of bare wood showing at each end.
Leafy Vine Cords (make 9)
- Cord lengths, worked left to right across the header: cord 1 ch 100, cord 2 ch 125, cord 3 ch 110, cord 4 ch 140, cord 5 ch 125, cord 6 ch 145, cord 7 ch 115, cord 8 ch 130, cord 9 ch 105.
- Chain the full length for the cord you are making, then work back along it as follows.
- Return pass: sl st into the back bump of the 2nd ch from hook and into the back bump of each of the next 6 ch (7 sl sts).
- Leaf: ch 6, then working back along those 6 ch, sc in the 2nd ch from hook, hdc in the next ch, dc in the next ch, hdc in the next ch, sc in the last ch (5 sts). Sl st into the same back bump of the vine chain where the leaf began.
- Continue: *sl st into the back bump of each of the next 7 ch, then work one leaf as above*; rep from * all the way along the cord, ending with plain sl sts if fewer than 7 chains remain.
- This gives 13 to 19 leaves per cord depending on its length, and roughly 130 leaves across the whole hanging. FO at the top end, leaving a 25 cm tail for attaching to the header.
- Every leaf comes off the same side of the cord as you work. Give the cord a half twist between leaves as you lay it out and they will sit alternately left and right, which is what makes the vine read as a real stem.
- Do not block the cords. A slight natural curve is what gives the finished piece its drape.
Open Rose (make 20)
- With your chosen shade, ch 28.
- Row 1, petals 1 to 3 (the centre): work (2 dc, ch 1, 2 dc) into the 4th ch from hook, *skip the next 2 ch, work (2 dc, ch 1, 2 dc) into the next ch*; rep from * once more (3 small petals).
- Row 1, petals 4 to 6 (the middle): *skip the next 2 ch, work (3 dc, ch 1, 3 dc) into the next ch*; rep from * twice more (3 medium petals).
- Row 1, petals 7 to 9 (the outer): *skip the next 2 ch, work (4 dc, ch 2, 4 dc) into the next ch*; rep from * twice more (3 large petals). All 28 chains are now used and you have a graduated strip of 9 petals.
- FO leaving a 25 cm tail. Do not cut the tail short, since it does two jobs.
- Roll the strip from the small-petal end, keeping the straight foundation edge level at the bottom as you go. The small petals form the tight centre and the large ones open out around it.
- Thread the tail onto the needle and stitch straight through the rolled base three or four times in different directions to lock it. Check the rose from above before the final stitch, since it cannot be adjusted afterwards.
- Make 20: 5 in each of the four shades.
Rosebud with Calyx (make 24)
- With your chosen shade, ch 16.
- Row 1: work (2 dc, ch 1, 2 dc) into the 4th ch from hook, *skip the next 2 ch, work (2 dc, ch 1, 2 dc) into the next ch*; rep from * 3 more times, using all 16 chains (5 petals).
- FO leaving a 20 cm tail. Roll the strip tightly from one end so the bud stays closed, and stitch through the base to lock it.
- Calyx: join green at the base of the rolled bud. Ch 6, sl st into the 2nd ch from hook and into each remaining ch (5 sl sts for the short stem), then work 6 sc around the base of the bud and sl st into the first sc.
- Sepals: *ch 3, sl st into the 2nd ch from hook, sl st into the next ch, sl st into the next sc of the calyx*; rep from * 2 more times, working the sepals into sc 1, 3 and 5 so they sit evenly around the bud (3 sepals).
- FO leaving a 20 cm tail for attaching. Make 24: 6 in each of the four shades.
Hanging Loop
- With green, ch 130. Sl st into the back bump of the 2nd ch from hook and into each remaining ch, working loosely (129 sl sts, about 50 cm).
- FO leaving 15 cm tails at both ends.
- Tie one end tightly to each exposed end of the dowel with a double knot, then whip the tail around the dowel three or four times and weave it back into the cord so no knot shows from the front.
- Check the loop hangs symmetrically before you trim the tails. A loop that is even 2 cm longer on one side tilts the whole hanging, and it is far harder to see once forty-four blooms are attached.
Placement Plan
- Attach all nine vine cords to the header first, sewing the top end of each cord to its marked stitch on Row 4 with three or four stitches through the last few sl sts of the cord.
- Hang the piece on the wall before placing a single bloom. The cords settle differently hanging than they do lying flat, and any layout judged on a table has to be redone.
- Distribute the 20 open roses at roughly 2 per cord, staggering their heights so that no two neighbouring cords carry a rose at the same level. Even heights across the piece read as a grid rather than as a plant.
- Concentrate the larger open roses in the middle third of the piece and let the buds dominate the top and the very bottom, which is how a real climbing rose flowers.
- Distribute the 24 buds at roughly 2 to 3 per cord, hanging most of them from the tip of a short section of vine so they nod downward rather than sitting flat against the cord.
- Keep the four shades scattered so no two of the same colour touch, and check the balance by standing back three metres. Colour clumping is invisible up close and obvious from across a room.
- Photograph the arrangement before you sew anything. You will move blooms during attaching and this is the only way back to a layout you liked.
Finishing
Attach each bloom with the tail already left on it, stitching through the rolled base and into the vine cord at three or four points around the base rather than at a single spot. A rose tacked with one stitch spins the first time anyone brushes past, and a spun rose shows its flat underside to the room. For the buds, stitch through the calyx and the short green stem rather than through the petals themselves, so the bud keeps its shape and hangs at a natural angle.
Work from the top of the piece downward and from the centre cords outward. Sewing the outer cords first is tempting because they are easiest to reach, but the centre is where the composition lives and it needs the freedom to be adjusted last. Every few blooms, step back and look at the whole hanging rather than the cord in your hand.
Weave in every end on the back of a leaf or into the rolled base of a bloom, never along a bare stretch of vine cord where the tail will show through as a thickening. Give the leaves a light steam from 15 cm away with the iron never touching the work, and finger press each one so it lifts slightly off the cord instead of lying flat. Do not steam the roses at all. Trim any cord that hangs noticeably longer than its neighbours only if it looks wrong, since a slightly uneven lower edge is part of the effect.
Tips for Success
- Make one complete vine cord before starting the other eight, and hang it up. It tells you whether your leaf spacing of every seventh stitch looks right at your gauge, and whether your return pass tension is producing a flat cord or a spring.
- Roll a rose loosely first and look at it from directly above before locking the base. The tightness of the roll is the whole character of the bloom, and once the tail is stitched through it cannot be loosened.
- Make the roses in colour batches of five rather than one at a time. Petal tension settles after the first two or three, and roses made across different sittings vary noticeably in size.
- Count leaves on your first cord and write the number down. Matching that number roughly on the other eight keeps the vines looking like they came from the same plant.
- Assemble with the hanging on the wall at its final height. Blooms placed at desk height end up looking wrong once the piece is at eye level, because the angle you view a nodding bud from changes everything.
Common Mistakes to Avoid
- Vine cords that spiral into springs. Almost always slip stitches worked into the top loops rather than the back bump, or worked too tight. Undo the return pass and redo it. No amount of steaming will straighten a corkscrewed cord.
- A dowel that will not fit the header. The ch-3 spaces in Row 2 are sized for a 10 mm dowel. Test yours after Row 2 rather than after the whole piece is built, and widen the spaces to ch 4 if you need to.
- Rolling the rose from the wrong end. Starting from the large-petal end gives a bloom with a gaping centre and a bunched outer edge. Always roll from the small petals so the graduation works with you.
- Blooms attached with one stitch. They rotate and hang face down within a week. Anchor each one at three or four points around the base.
- Even spacing of the roses. Placing one rose at the same height on every cord turns a climbing plant into a polka dot pattern. Stagger every neighbouring cord deliberately.
- Weaving ends along the bare vine. The doubled yarn shows as a visible bulge on a cord this slim. Bury tails in a leaf or in a rolled base instead.
Ways to Customize This Pattern
- Change the season with the palette: all white roses with pale green leaves for a wedding piece, or peach through cream for a softer nursery version.
- Make it wider by adding cords in pairs. Every 16 stitches added to the header foundation gives two more attachment points, so a 97-stitch header carries 13 cords across about 39 cm.
- Turn it into a window curtain by working the header to the full width of your frame and lengthening every cord to reach the sill, which suits a kitchen window where the light comes through the vines.
- Add small stuffed rosehips between the blooms using the berry method: 6 sc in a magic ring, increase to 12, work two even rounds, then decrease and stuff with a scrap of the red yarn.
- Work a single cord as a bookmark, a gift wrap tie or a curtain tieback, using one long vine with three roses and a few buds.
- Skip the dowel and sew the header to a length of driftwood, a copper pipe or a bent branch for a more rustic hanging point.
Frequently asked questions
About forty-five minutes for a mid-length cord, which surprises most people since it looks like simple chaining. The chain itself takes five minutes and the return pass with a leaf every seventh stitch takes the rest. Nine cords is therefore around seven hours, roughly half the total project time, so plan for the vines to be the long stretch rather than the roses.
You can, but it is slower and the result is less stable. A leaf worked into the vine as you slip stitch back is anchored inside the cord and cannot rotate, while a sewn leaf sits on the surface and will spin to show its back. If you do sew them on, stitch each leaf at its base through the cord twice, once from each side.
Usually the rolling rather than the crochet. The foundation edge has to stay level at the bottom while you roll, and if the strip drifts upward as it goes round, the finished rose splays. Unroll it, lay the strip on the table, and roll again keeping the bottom edge flat against the surface. A second cause is skipping the graduation, since all-equal petals give a rose with no centre.
They can if the piece is somewhere with a draught or where people walk past closely. Two things prevent it: the natural weight of a bloom near the lower end of each cord, and keeping the cords at slightly different lengths so they do not swing in unison. If two cords do twist together, untwist them from the top down rather than pulling them apart, since pulling stresses the header attachment points.
Take it off the wall and shake it gently, then go over the roses with a hairdryer on the cool setting from about 30 cm away. Do not wash the whole piece. Wet cords stretch under the weight of the blooms and the drape never fully returns. For a stain, spot clean that single bloom with a damp cloth and let it dry hanging.
The finished Trailing Rose Curtain Crochet Wall Hanging

