Trailing Wisteria Vine Lace Scarf Crochet Pattern
Beginner Friendly
Perfect for those just starting their crochet journey, with clear instructions and simple techniques
Single-Day Project
A satisfying project you can complete in a single afternoon or evening.
Handmade Gift
A beautiful keepsake — free forever. Read online or print at home.
About This Trailing Wisteria Vine Lace Scarf Crochet Pattern
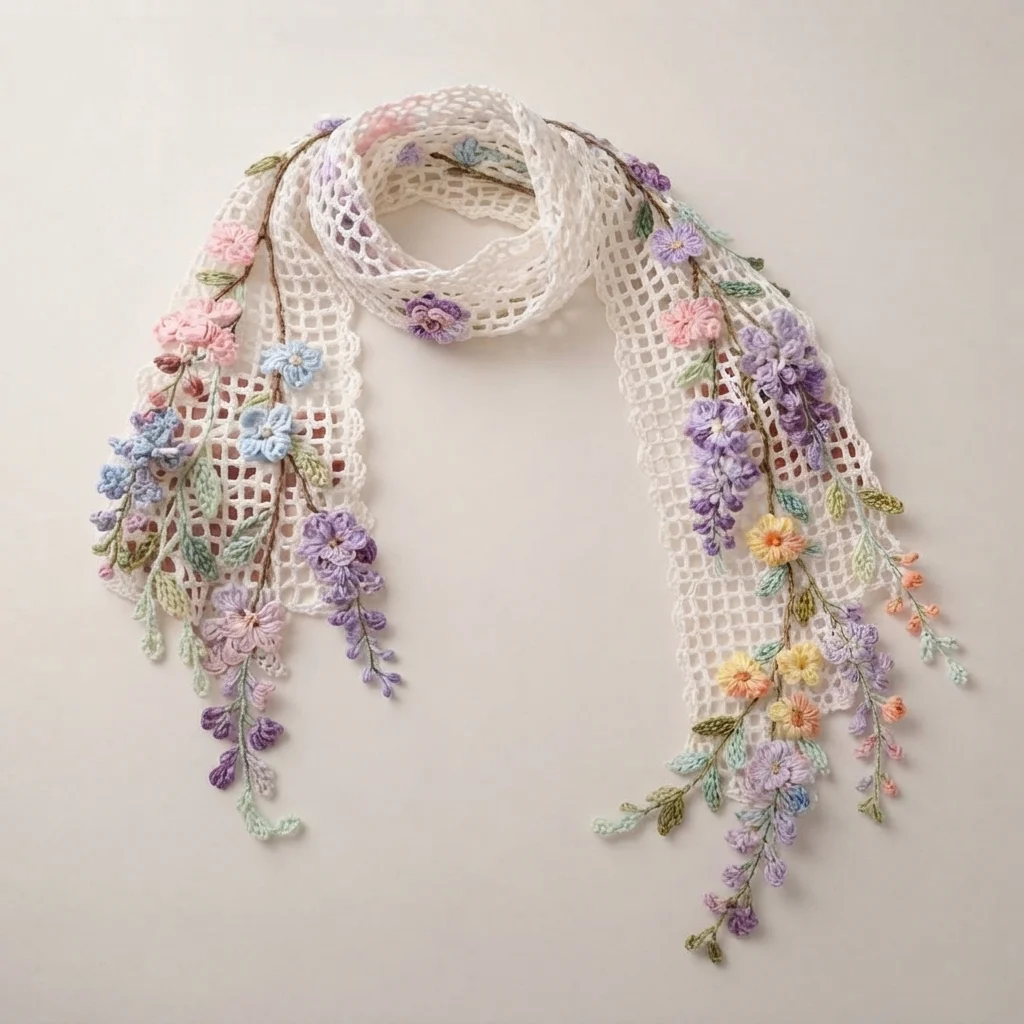
This crochet wisteria vine scarf pattern builds a long, open honeycomb mesh panel in white, then trails multiple vines of tiny clustered blooms, larger single flowers, and small berry drops down both ends and across the shoulders, in a soft mix of lavender, purple, pink, blue, and peach. Each vine is worked and attached separately, so the flowers cascade at slightly different lengths and angles rather than lining up in a predictable repeat.
What makes this design distinctive is the clustered wisteria bloom itself: rather than one large flower, tiny 3-4 petal blossoms are grouped in tapering chains that mimic real wisteria racemes, layered alongside larger single flowers and thin sprigs of tiny leaves. That mix of scales, miniature clustered blooms next to bigger single flowers next to fine leaf sprigs, is what gives the piece its detailed, naturalistic look rather than reading as a repeated appliqué pattern. Expect to spend 18-22 hours total, with the majority of that time in the many small flower and leaf pieces.
This is an advanced pattern, best suited to someone comfortable working very fine motifs at a small scale and confident hand-arranging several cascading vines for a natural, asymmetrical look, rather than someone wanting a symmetrical, evenly spaced trim.
Materials
- Fingering/lace weight cotton-blend yarn, white ~180g, mesh panel
- Fingering weight yarn, lavender ~15g
- Fingering weight yarn, light purple ~15g
- Fingering weight yarn, dusty pink ~15g
- Fingering weight yarn, soft blue ~10g
- Fingering weight yarn, pale peach ~10g
- Fingering weight yarn, pale yellow small amount, flower centers
- Fingering weight yarn, sage green ~20g, leaf sprigs
- Fingering weight yarn, olive/brown ~15g, vine stems
- Crochet hook, small 2.5 mm, for mesh
- Crochet hook, slightly larger 2.75 mm, for motifs
- Tapestry/yarn needle
- Fabric-safe pins, for laying out vines before sewing
- Blocking mat and pins
- Sharp scissors
Abbreviations
chchainsl stslip stitchscsingle crochethdchalf double crochetdcdouble crochetMRmagic ringch-spchain spacest(s)stitch(es)reprepeatFOfasten offHoneycomb Mesh Panel
- With white and the smaller hook, ch a multiple of 4 plus 2, approximately ch 42 for scarf width.
- Row 1: dc in 6th ch from hook, *ch 2, skip 3 ch, dc in next ch; rep from * across, ending with dc in last ch.
- Row 2: ch 5, turn, dc in first ch-2 sp, *ch 2, dc in next ch-2 sp; rep from * across, ending dc in top of turning ch.
- Rep Row 2 until the panel measures approximately 150 cm long, keeping the honeycomb mesh consistent throughout.
- Work a simple scalloped edge along both short ends and both long sides: join white and *sc in next st, ch 2, sl st in same st; rep from * evenly around the whole panel. FO.
Mini Wisteria Blossom (make approximately 100, mixed colors: lavender, purple, pink, blue, peach)
- Ch 2. Round 1: 4 sc in 2nd ch from hook, do not join, work in a continuous spiral. (4 sts)
- Round 2 (petals): *ch 2, sl st in same st, sl st in next st; rep from * around all 4 sts to form 4 tiny petals.
- FO leaving a short tail. Repeat for approximately 100 tiny blossoms total, spread across all 5 colors.
Larger Single Flower (make approximately 15, mixed colors: purple, pink, blue, yellow, peach)
- With pale yellow (or a contrast center color), 6 sc in MR. Sl st to join, FO leaving a short tail.
- With petal color, join in any st of the center. Round 1 (petals): *ch 2, dc 2 in next st, ch 2, sl st in same st; rep from * around all 6 sts. 6 petals.
- FO leaving a short tail for attaching. Repeat for approximately 15 flowers total, distributed across the vines.
Leaf Sprig (make approximately 40, in sage green)
- Ch 6. Starting in 2nd ch from hook: sl st, sc 1, hdc 1, 3 dc in last ch.
- Continue down the other side: hdc 1, sc 1, sl st in last ch.
- FO leaving a short tail for attaching. Repeat for approximately 40 leaf sprigs total.
Vine Stems (make 6-8, in olive/brown)
- With olive/brown, chain lengths varying from 25-50 cm, one per vine, for a total of 6-8 vines that will trail down both ends of the scarf and across the shoulder area.
- Sl st back down each chain for body and a slightly twisted cord look.
- FO leaving tails at both ends of each vine.
Assembling the Wisteria Racemes
- Along each vine stem, tack mini wisteria blossoms in a tapering cluster near the tip, denser and wider at the base of the cluster and narrowing to just a few blossoms at the very tip, mimicking a real wisteria raceme.
- Mix 2-3 colors within each raceme cluster rather than using a single color per vine, so the blooms shade gently from one shade to another along the cluster.
- Repeat this tapering cluster technique at 1-2 points along each vine, plus at the very tip.
Assembly and Placement
- Pin the scarf panel flat and decide where each vine will attach, mainly along both short ends and trailing down, with 1-2 shorter vines crossing diagonally near where the scarf would sit at the shoulders.
- Whip-stitch each vine to the mesh along its length using the vine’s own tail, catching it at mesh intersections every 2-3 cm so it stays flexible.
- Tuck 1-2 larger single flowers along each vine at varied points, not evenly spaced, and tack down through their centers.
- Scatter leaf sprigs along each vine between blossom clusters, angling them outward from the stem.
- Pin the full layout of all vines before sewing anything down permanently, checking that the overall arrangement looks balanced but not identical from side to side.
Finishing
Weave in all remaining ends through the backs of stitches so nothing shows on the front. Wet-block the mesh panel to open the honeycomb grid fully and square off the edges, pinning it out to your target dimensions and letting it dry completely before handling. Once dry, gently steam the flowers from the back only, never the mesh itself, to help petals sit open rather than curled.
Tips for Success
- Make all your motifs before starting to assemble any single vine, so you can distribute colors evenly across all the racemes rather than running out of one shade partway through.
- Taper each wisteria cluster genuinely, wide at the base narrowing to a few blossoms at the tip, rather than keeping the cluster the same width throughout.
- Vary vine length and attachment point rather than making every vine identical, for the natural, cascading look shown in the photo.
- Block the mesh panel before attaching any vines; motifs sewn onto an unblocked, uneven mesh will bunch once it’s finally blocked out.
- Sew with a fine needle and go slowly around small petal curves, since whip-stitching too tightly flattens these tiny motifs more easily than larger ones.
Common Mistakes to Avoid
- Making every wisteria raceme the same length and density loses the organic, cascading look. Fix: vary cluster length and density between vines deliberately.
- Working the mesh at too tight a gauge produces a stiff fabric instead of the airy drape this design needs. Fix: size up your hook slightly and re-swatch if the mesh feels dense.
- Sewing tiny mini blossoms on with a single stitch through the center lets them spin loose. Fix: tack through the base of each tiny blossom at 1-2 points for a more secure hold.
- Skipping the pin-and-preview step before sewing results in vines that look too symmetrical instead of naturally cascading. Fix: always lay out and step back to check the full arrangement before committing any stitches.
- Running out of one flower color partway through. Fix: count your total motifs per color before starting and divide roughly evenly across all planned vines.
Ways to Customize This Pattern
- Reduce vine count to 3-4 for a lighter, more minimal trailing effect.
- Use a single color family throughout instead of 5 for a more monochrome, subtle look.
- Shorten the mesh panel and vines for a neck scarf rather than a full-length wrap.
- Add tiny crocheted seed beads or French knots at some blossom centers for extra sparkle.
- Work the mesh in a pale pastel instead of white to shift the whole piece toward a softer palette.
Frequently asked questions
Around 100 tiny blossoms spread across 6-8 tapering vine clusters covers a scarf of this length. Make extras and add them to whichever cluster looks thin once you begin arranging the full layout.
Yes. Reduce the mesh panel length and use 3-4 vines instead of 6-8, concentrating them at the ends and skipping the shoulder-crossing vines for a simpler, quicker version.
No. The small dc-cluster petals hold their shape from the stitch construction alone; gently steaming them from the back to open the petals is enough. Starching would stiffen the mesh unevenly around them.
Pin all vines in place before sewing any of them down, and deliberately vary the spacing, length, and angle between vines rather than measuring even intervals. Step back and compare the whole layout before committing to any stitches.
The finished Trailing Wisteria Vine Lace Scarf Crochet Pattern

