Tree of Life Crochet Blanket Pattern
Beginner Friendly
Perfect for those just starting their crochet journey, with clear instructions and simple techniques
Single-Day Project
A satisfying project you can complete in a single afternoon or evening.
Handmade Gift
A beautiful keepsake — free forever. Read online or print at home.
About This Tree of Life Crochet Blanket Pattern
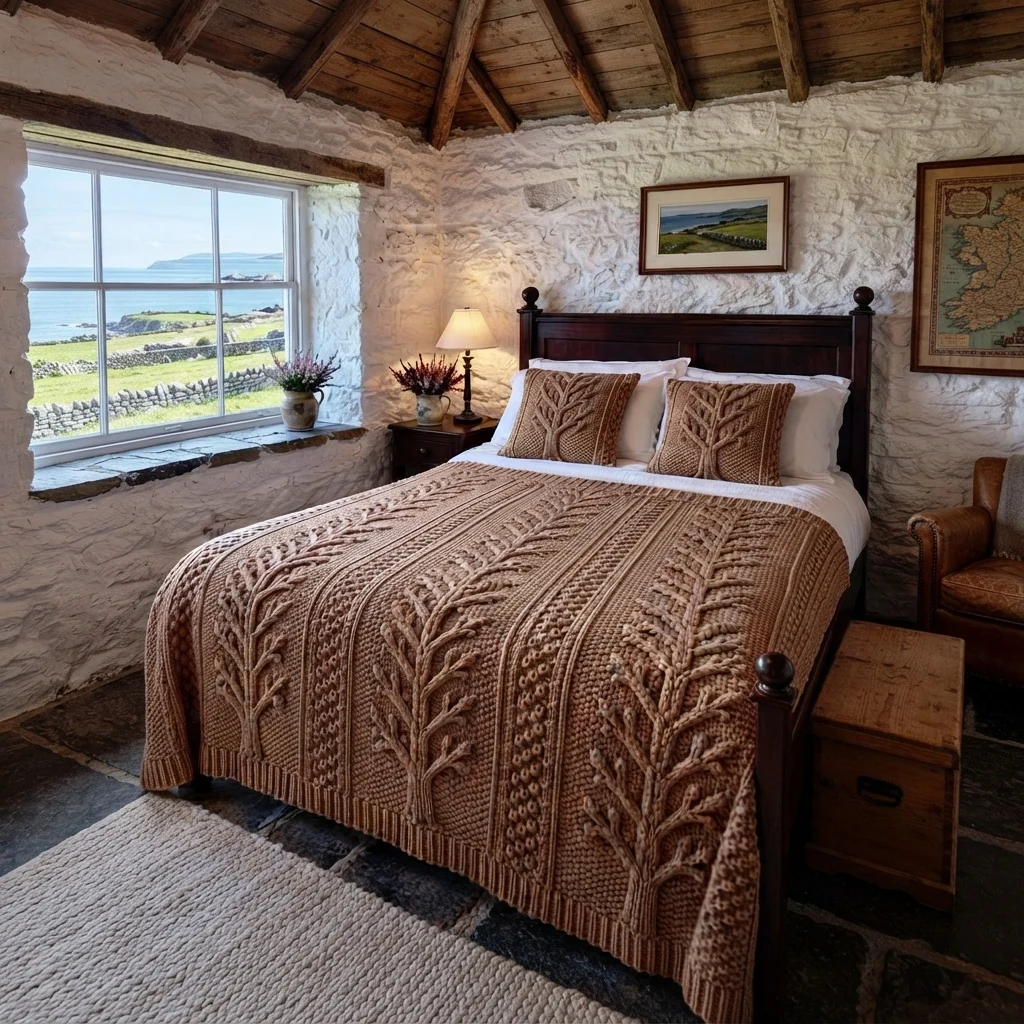
This tree of life crochet blanket pattern makes a heavy, textured throw in warm tan, with three wide panels of ground fabric, each carrying three branching trees, and two narrow columns of bobbles between them. A ribbed band at each end finishes the blanket like the one in the photo.
It is an advanced project because of the size and the finishing. The body is worked in one piece from the bottom up, with 157 stitches in every row and a popcorn-style puff column in the dividers. You then make nine trees from slip stitch cords, one trunk and ten branches each, and sew every piece on by hand. Plan on 50 to 60 hours in total.
It suits crocheters who are comfortable with post stitches and puff stitches, and who enjoy careful sewing and placement. The finished blanket is about 145 x 205 cm, and it is easy to make narrower by working only two panels.
Materials
- Chunky cotton-blend yarn, tan about 4 kg in all, estimated (body 3.4 kg, trees 0.6 kg)
- Crochet hook 6.5 mm
- Yarn needle
- Stitch markers one every 20 rows
- Pins for placing the trees
- Flat surface for blocking
Abbreviations
chchainscsingle crochetdcdouble crochetFPdcfront post double crochetBPdcback post double crochetpuff(yarn over, insert hook in the stitch, pull up a loop to the height of a dc) 3 times, yarn over and pull through all 7 loops on the hook, then ch 1 to close. The puff counts as one stitch and the ch 1 is not a stitch.sl stslip stitchst(s)stitch(es)BLOback loop onlyRSright sideWSwrong sideFOfasten off( )xrepeat the stitches in brackets the number of times givenLayout Across the Row
- Every body row has 157 stitches: 3 edge, 43 tree panel, 11 divider, 43 tree panel, 11 divider, 43 tree panel, 3 edge (3 + 43 + 11 + 43 + 11 + 43 + 3 = 157).
- Count from the right edge of the RS: edge sts 1-3, panel 1 sts 4-46, divider 1 sts 47-57, panel 2 sts 58-100, divider 2 sts 101-111, panel 3 sts 112-154, edge sts 155-157.
- The center of each tree panel is stitch 25, 79 and 133. Mark these three stitches with stitch markers on the first body row.
Bottom Ribbed Band
- Foundation: ch 159.
- Row 1 (RS): dc in the 4th ch from the hook (the skipped chains count as the first dc) and in each ch across (157). Ch 2 and turn.
- Row 2 (WS): FPdc around the first st, (BPdc around the next st, FPdc around the next st)x78 (157). Ch 2 and turn. The ch 2 does not count as a stitch.
- Rows 3-7: work a FPdc around each post that sits proud toward you and a BPdc around each post that sinks back, so the ribs stack in straight columns (157). Ch 2 and turn at the end of each row except the last.
- Row 8 (WS): ch 1, sc in each st across (157). Turn.
- Check your band: every row must have exactly 157 stitches, and the band should be about 12 cm tall.
Body (4-row repeat)
- Ch 1 at the start of each row does not count as a stitch. Turn at the end of every row.
- Row 1 (RS): ch 1, sc in each of the next 46 sts, (sc, puff)x5 and sc in the next 11 sts (divider 1), sc in each of the next 43 sts, (sc, puff)x5 and sc in the next 11 sts (divider 2), sc in each of the last 46 sts (157)
- Row 2 (WS): ch 1, sc in the back loop only of each st across (157)
- Row 3 (RS): ch 1, sc in each of the next 46 sts, (puff, sc)x5 and puff in the next 11 sts (divider 1), sc in each of the next 43 sts, (puff, sc)x5 and puff in the next 11 sts (divider 2), sc in each of the last 46 sts (157)
- Row 4 (WS): ch 1, sc in the back loop only of each st across (157)
- Repeat rows 1-4 a total of 52 times (208 rows). In rows 1 and 3 the puffs sit on opposite stitches, which gives the staggered bobble column.
- Place a stitch marker every 20 rows. Measure after 100 rows. The body should be about 91 cm tall.
- After row 208, do not FO. Ch 3 and turn to start the top band.
- Check your body: every row must have 157 stitches. Rows 1 and 3 have 5 and 6 puffs in each divider.
Top Ribbed Band
- Row 1 (RS): dc in each of the next 156 sts (the ch 3 counts as the first dc, 157). Ch 2 and turn.
- Row 2 (WS): FPdc around the first st, (BPdc around the next st, FPdc around the next st)x78 (157). Ch 2 and turn.
- Rows 3-7: work a FPdc around each post that sits proud and a BPdc around each post that sinks back, as in the bottom band (157). Ch 2 and turn at the end of each row except the last.
- FO and weave in the end.
Tree Trunk (make 9)
- Ch 61. Starting in the 2nd ch from the hook, sl st in each ch across (60). FO leaving a tail of about 30 cm for sewing.
- Measure the finished trunk. It should be about 50 to 55 cm long. If yours is much shorter or longer, add or remove chains in steps of 10.
Tree Branches (make 90: 9 trees x 10 branches)
- Make each branch as a cord: ch one more than the length given, then sl st in the 2nd ch from the hook and in each ch across. FO leaving a tail of about 15 cm for sewing.
- For each tree, make 2 branches of each length: ch 15 (14 sl sts), ch 13 (12 sl sts), ch 11 (10 sl sts), ch 9 (8 sl sts) and ch 7 (6 sl sts).
- Sort the branches into nine bags of ten, two of each length, so assembly goes quickly.
Tree Placement
- Lay the blanket flat with the RS facing you. Each tree panel carries 3 trees, with the base of each trunk on body rows 6, 76 and 146 and the top on rows 66, 136 and 206. Count the rows from the first body row, above the bottom rib and transition row.
- Pin each trunk straight up the center stitch of the panel (stitch 25, 79 or 133), with its base on the base row and its top 60 stitches up.
- Number the trunk stitches 1 to 60 from the base. Pin the branch pairs at trunk stitches 26, 32, 38, 44 and 50 with the lengths 14, 12, 10, 8 and 6, so the longest branches are lowest. Pin one branch of each pair to each side, with its base at the trunk, angled up at about 45 degrees.
- Step back from the blanket and check that all nine trees look the same before you sew anything.
Sewing the Trees
- Sew each trunk first, working small stitches along both edges of the cord and through the back loops of the body so it stays upright.
- Sew the branches on from the bottom pair up. Tuck the base end of each branch under the trunk and sew it down firmly, then sew along the branch with small stitches, leaving the last 2 cm of each tip free so it lifts slightly.
- Weave all tails along the back of the blanket for at least 8 cm.
Finishing
Block the blanket by laying it flat on towels, pinning the corners and edges to the size you want, and misting it with water. Keep the pins away from the trees and the bobbles so you do not flatten them. Let it dry fully before moving it.
Optional: work one round of sc around the whole blanket, working 3 sc in each corner and one sc in each stitch or row end, to firm up the sides. Drape the blanket with a ribbed band hanging over the foot of the bed, and it will look like the photo.
Tips for Success
- Count your stitches after every 20 rows. There should always be 157, or the tree panels will drift.
- Make the trees before you finish the blanket, and lay them out on the body to check the sizes.
- Pull each puff loop up to the height of a dc so all the bobbles match.
- Use a thinner tan thread for sewing, so the stitches sink into the cord and stay hidden.
- Block the blanket before you sew the trees, so you place them against the final shape.
Common Mistakes to Avoid
- Pulling the puff closed without a ch 1 leaves the bobble loose. Always lock it with a ch 1.
- Working the divider puffs on the same stitches in rows 1 and 3 stacks them in a line. Check that row 3 starts with a puff.
- Sewing the branches too straight makes the trees look like ladders. Angle them up and leave the tips free.
- Pinning the trees off-center makes the three panels look uneven. Use the marked stitches 25, 79 and 133.
- Working the post stitches in the ribbing the wrong way round flattens the ribs. Follow the columns that bump toward you.
Ways to Customize This Pattern
- Swap tan for cream, sage or charcoal for a different look, and keep the trees in the same color for a tonal finish.
- Make the trees in a lighter or darker shade of the same color, so they stand out from the panels.
- Make a lap throw with two tree panels and one divider by chaining 100 and working 3 + 43 + 11 + 43 + 3 = 103 stitches, with 2 trees per panel.
- Make matching pillow covers by working 46 stitches (3 edge, 40 panel, 3 edge) for 50 rows, with one tree in the middle, sewn to a plain back.
- Add small tan bobbles at the tips of the branches by working a 3-dc popcorn in the last stitch of each cord.
Frequently asked questions
The amounts above are estimates of about 4 kg in all. Weigh your swatch and scale it up by area for the body, then weigh one finished tree and multiply by nine, and add about 10 percent.
Yes. Each extra tree panel with a divider adds 54 stitches, which is 43 + 11, and about 49 cm. For a narrower blanket, leave out one panel and one divider. Keep the edges at 3 stitches each and recalculate the foundation chain as the stitch count plus 2.
The carved cable trees in the photo are hard to reproduce in crochet. Slip stitch cords sewn on top give a similar raised look, and they let you place each tree exactly where you want it.
With a washable cotton blend, wash it on a gentle cycle in cool water, press out the water without wringing, and lay it flat to dry. Check that the tree stitching is secure before every wash.
The finished Tree of Life Crochet Blanket Pattern

