Tulip Crochet Blanket Pattern
Beginner Friendly
Perfect for those just starting their crochet journey, with clear instructions and simple techniques
Single-Day Project
A satisfying project you can complete in a single afternoon or evening.
Handmade Gift
A beautiful keepsake — free forever. Read online or print at home.
About This Tulip Crochet Blanket Pattern
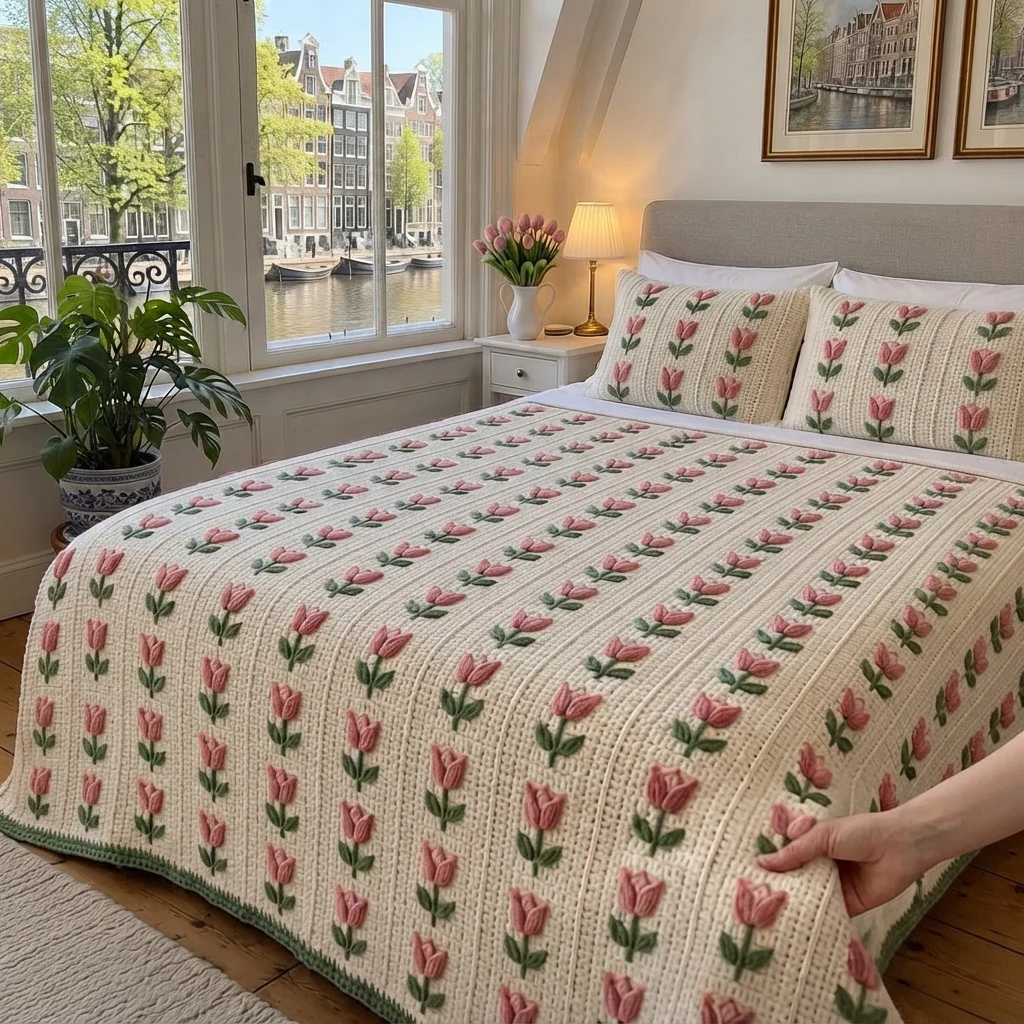
This tulip crochet blanket pattern builds a soft cream throw and decorates it with nine columns of pink tulips, each on a green stem with two leaves. The tulips are small stuffed blooms, so they stand up from the fabric, and a green scalloped edge finishes the blanket like the one in the photo.
It is an advanced project because of the volume and the finishing. The body is simple half double crochet, but you will make 108 blooms, 108 stems and 216 leaves, then sew every piece on in a precise grid. Plan on 60 to 70 hours in total, about 30 of them for the body and the rest for the tulips and the edging.
It suits crocheters who are comfortable with small shaped pieces, care about tidy placement, and want a spring blanket that looks like a garden bed. The finished throw is about 128 x 168 cm, and it is easy to resize by changing the number of columns and rows.
Materials
- Worsted or aran cotton-blend yarn, cream (C) about 2 kg, estimated
- Worsted or aran cotton-blend yarn, pink (P) about 250 g, estimated
- Worsted or aran cotton-blend yarn, green (G) about 250 g, estimated
- Crochet hook 5.0 mm
- Polyester fiberfill a small amount for the blooms
- Yarn needle
- Stitch markers and pins for the placement grid
- Flat surface for blocking
Abbreviations
MRmagic ringchchainscsingle crochethdchalf double crochetdcdouble crochetinc2 sc in the same stitchdecsingle crochet 2 stitches togethersl stslip stitchst(s)stitch(es)FOfasten offCcream yarnPpink yarnGgreen yarn( )xrepeat the stitches in brackets the number of times givenBlanket Body (flat, C)
- Foundation: with C, ch 182.
- Row 1: hdc in the 3rd ch from the hook (the skipped chains do not count as a stitch) and in each ch across (180). Ch 2 and turn.
- Rows 2-168: hdc in each st across (180). Ch 2 and turn at the end of every row except the last. The ch 2 does not count as a stitch.
- Place a stitch marker in the turning chain of every 14th row. These markers will show you where each row of tulips goes.
- After row 168, do not FO. Go straight into the edging below.
- Check your body: every row should have exactly 180 stitches, and the blanket should measure about 128 cm wide and 168 cm long after blocking.
Green Scalloped Edging (G)
- Round 1: with C still on the hook, FO and join G in any corner. Ch 1, work 3 sc in the corner st. Sc in each st along the top or bottom (180 sts between the corners, counting the corner sts) and in each row end along the sides (168 sts). Work 3 sc in each of the other corners. Join with a sl st (about 704 sc).
- Round 2: ch 1, sc in the same st, *skip 1 st, 5 dc in the next st, skip 1 st, sc in the next st*. Repeat from * to * around (176 shells if your Round 1 count is 704). Near each corner, adjust by skipping 2 sts instead of 1 so the shell sits in the corner st. Join with a sl st, FO and weave in the end.
- Count a few shells on each side. They should look even and lie flat. If a side bunches up or ripples, redo the spacing on that side.
Tulip Bloom (make 108, P)
- Round 1: 6 sc in MR (6)
- Round 2: inc x6 (12)
- Round 3: (1 sc, inc)x6 (18)
- Rounds 4-6: sc in each st around (18) for 3 rounds
- Round 7: (1 sc, dec)x6 (12). Stuff lightly with a small ball of fiberfill.
- Round 8: dec x6 (6). FO leaving a long tail and close the hole.
- The closed end is the top of the tulip. With P, embroider two curved lines of surface chain from the top down to the base, dividing the bloom into three petals. Pull the stitches just snug enough to show the petals.
Tulip Stem (make 108, G)
- Ch 12. Starting in the 2nd ch from the hook, sl st in each ch across (11). FO leaving a tail of about 20 cm for sewing.
Tulip Leaves (make 216, G)
- Ch 8. Starting in the 2nd ch from the hook: sl st, sc, hdc, dc, hdc, sc, sl st (7).
- FO leaving a tail of about 15 cm for sewing. You need 2 leaves per tulip.
Placement Grid
- Columns: there are 9 columns, centered on stitches 10, 30, 50, 70, 90, 110, 130, 150 and 170 of the body, counted from the right edge. Pin a vertical line of markers on each column.
- Rows: there are 12 tulips in every column. The base of each bloom sits on rows 8, 22, 36, 50, 64, 78, 92, 106, 120, 134, 148 and 162 (every 14th row, starting at row 8).
- Lay the blanket flat and pin all 108 blooms before you sew any of them. Step back and check that the rows look straight, then sew.
Assembly
- Sew each bloom on first, working small stitches around its base and through the back loops of the body so the bloom stands up.
- Sew a stem straight down from the base of each bloom over about 6 rows, tacking it every 2 rows so it does not curl.
- Sew a pair of leaves to the stem about 2 rows below the bloom, one on each side, angled outward at about 45 degrees. Sew the leaf base to the stem and leave the tips free.
- Weave in all ends along the back of the blanket.
Finishing
Block the finished blanket by laying it flat on towels, pinning the corners and the edges to the size you want, and misting it lightly with water. Keep the pins away from the tulips so they do not flatten. Let it dry fully before moving it. This opens the scallops and evens out the fabric.
Check every tulip for loose stitches and secure any that move. Drape the blanket over the foot of the bed with the columns running down the length, and it will look like the photo.
Tips for Success
- Make one complete tulip with its stem and leaves first. It should be about 3 cm wide and 9 cm tall, and you can adjust the stuffing or hook size from there.
- Make the tulips in batches of twelve and keep them in a bag by column, so the sewing goes quickly.
- Count your stitches after every twenty rows. If any row has more or fewer than 180, fix it before you go on, since the grid depends on it.
- Pin every piece before you sew. Straight lines are the whole look of this blanket.
- Use the same amount of fiberfill in every bloom so they all stand at the same height.
Common Mistakes to Avoid
- Counting the turning chain as a stitch makes the width drift. Work 180 hdc in every row and count again if the edge looks wavy.
- Stuffing the blooms too firmly makes them look like balls. Use a small amount so they keep a soft, tulip-like shape.
- Sewing the tulips on without a grid makes the columns wander. Pin everything first and check from a few steps back.
- Pulling the surface-chain petal lines too tight squashes the bloom. Keep the stitches just snug.
- Working the shells too tightly makes the edge cup and the blanket ripple. Keep each shell loose and flat.
Ways to Customize This Pattern
- Swap the pink for yellow, coral or lavender, or mix three colors across the columns for a tulip-field look.
- Make a baby blanket with 5 columns (chain 102 for 100 stitches) and 7 tulips per column (98 rows), about 70 x 98 cm.
- Make matching pillow covers by working 60 stitches for 60 rows, sewing on 3 tulips in a column, and adding a button closure.
- Work the edging in pink or leave the shells in cream for a softer, more traditional look.
- Add a second, shorter row of tulips between the columns for a denser flower-bed effect.
Frequently asked questions
The amounts above are estimates based on the finished size. For a closer figure, weigh your swatch and one finished tulip, scale the swatch up by area, multiply the tulip weight by 108, and add about 10 percent for the edging and sewing.
Yes. For width, add or remove 20 stitches at a time, which gives you one more or one fewer column of tulips. For length, add or remove 14 rows at a time, which gives you one more or one fewer tulip in each column.
With a cotton or cotton-blend yarn, wash it on a gentle cycle in cool water and lay it flat to dry. If you are worried about the blooms, hand wash it and press the water out without wringing.
You can, but sewing them on gives you more control over the placement and the stuffing. If you prefer to crochet them in place, work them with a surface slip stitch base and plan the grid with markers first.
The finished Tulip Crochet Blanket Pattern

