Tulip Garden Crochet Placemats Pattern
Advanced
For experienced crocheters who enjoy complex shaping, fine detail, and ambitious construction
Weekend Project
A satisfying weekend make — start Friday, finish Sunday, enjoy forever.
Handmade Gift
A beautiful keepsake — free forever. Read online or print at home.
About This Tulip Garden Crochet Placemats Pattern
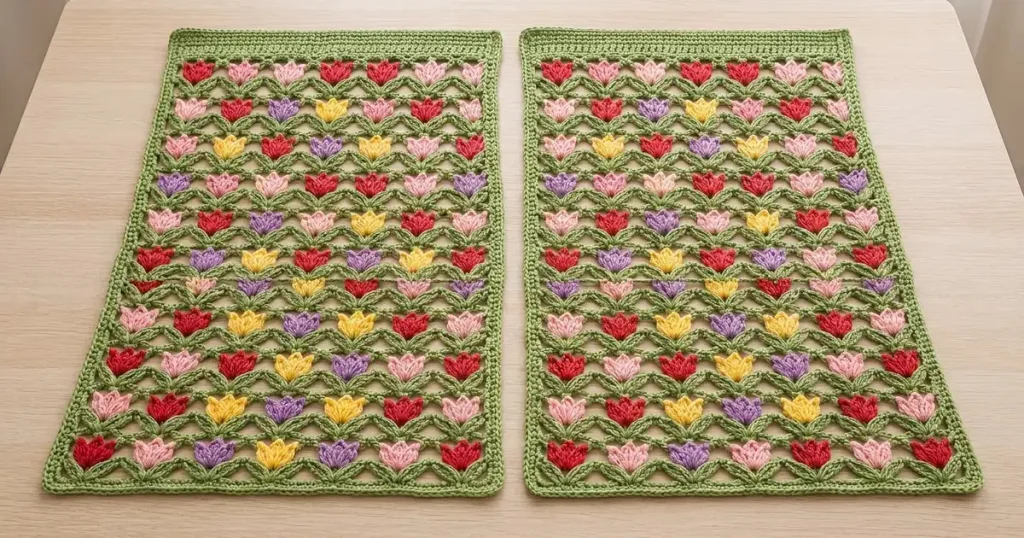
This tulip crochet placemat pattern creates a matching pair of rectangular mats with sage-green openwork, rows of raised flowers, and firm green borders. Red, blush pink, pale pink, lavender, and yellow tulips echo the garden colors in the reference photograph. Each flower sits above a shaped pair of green leaves, leaving small windows of lace between the rows.
Allow approximately 28–36 hours for the pair, including the individual flowers, careful attachment, and blocking. This advanced project suits crocheters who enjoy detailed finishing: the green backgrounds are worked first, then 154 separately crocheted tulips are shaped and sewn into place. The construction keeps the backs relatively tidy and lets you arrange every flower before committing to the final layout.
Materials
- DK cotton in sage green Approximately 250 g / 625 m for two backgrounds and borders
- DK cotton in red Approximately 45 g / 112 m
- DK cotton in blush pink Approximately 35 g / 87 m
- DK cotton in pale pink Approximately 35 g / 87 m
- DK cotton in lavender Approximately 30 g / 75 m
- DK cotton in yellow Approximately 25 g / 62 m; quantities include a working allowance
- 3.5 mm crochet hook Adjust to achieve blocked gauge
- Tapestry needle, scissors, and locking stitch markers Mark eight structural anchor columns
- Blocking board, rustproof pins, and measuring tape For matching the two rectangles
Abbreviations
chchainscsingle crochethdchalf double crochetdcdouble crochettrtreble crochetsl stslip stitchMRmagic ringst / stsstitch / stitchesRS / WSright side / wrong sideGauge, Construction, and Counting
- Use US crochet terminology. Work the green backgrounds in turned rows. A beginning ch 1 never counts as a stitch. All seven flowers in a band point toward the same short end of the mat.
- Target blocked solid-fabric gauge: 20 sc and 22 rows measure 10 × 10 cm. Target lace gauge: one eight-position repeat measures 4 cm wide; one three-row lace band measures approximately 3.3 cm high.
- For a two-repeat swatch, ch 18. Row 1: sc in second ch from hook and each remaining ch, turn—17 sc. Rows 2–4: ch 1, sc in each st, turn—17 sc each row.
- Swatch Row 5: ch 1, sc in first st, repeat [ch 7, skip 7 sts, sc in next st] twice, turn—3 sc and 2 ch-7 spaces.
- Swatch Row 6: ch 1, sc in first sc; repeat [work (sc, hdc, dc, ch 2, dc, hdc, sc) in next ch-7 space, sc in next sc] twice, turn—15 actual stitches and 2 ch-2 spaces.
- Swatch Row 7: ch 1, sc in first anchor sc; repeat [ch 7, skip the entire six-stitch leaf cluster and its ch-2 space, sc in next anchor sc] twice, turn—3 sc and 2 ch-7 spaces. Anchor sc are the stitches worked into the previous row’s sc, rather than into its chain spaces.
- Swatch Row 8: repeat Row 6. Swatch Row 9: repeat Row 7. Swatch Row 10: repeat Row 7, working into its three anchor sc and skipping each ch-7 space. Rows 8–10 demonstrate the next complete band.
- Block without stretching the chains taut. Measure across the two complete spaces for an 8 cm width and across Rows 8–10 for a 3.3 cm band height. Adjust hook size or chain tension before proceeding. Finished measurements are approximately 30 × 42 cm including the border.
Sage Backgrounds — Make Two
- Foundation: with sage, ch 58.
- Row 1: sc in second ch from hook and each remaining ch, turn—57 sc.
- Row 2: ch 1, sc in each st, turn—57 sc.
- Row 3: repeat Row 2—57 sc.
- Row 4: repeat Row 2—57 sc. Mark this face as the RS; the following leaf rows will also have their RS facing you.
- Row 5, opening arches: ch 1, sc in first st; repeat [ch 7, skip 7 sts, sc in next st] seven times, turn—8 anchor sc and 7 ch-7 spaces. This occupies all 57 input stitches: 1 + (7 × 8).
- Row 6, shaped leaves: ch 1, sc in first anchor sc; repeat [work (sc, hdc, dc, ch 2, dc, hdc, sc) in next ch-7 space, sc in next anchor sc] seven times, turn—50 actual stitches and 7 ch-2 spaces. Each six-stitch cluster forms a pair of sloping leaves beneath a flower.
- Row 7, bridge: ch 1, sc in first anchor sc; repeat [ch 7, skip the entire leaf cluster and its ch-2 space, sc in next anchor sc] seven times, turn—8 sc and 7 ch-7 spaces.
- Row 8, separating arches: ch 1, sc in first anchor sc; repeat [ch 7, skip next ch-7 space, sc in next anchor sc] seven times, turn—8 sc and 7 ch-7 spaces.
- Rows 9–11: repeat Rows 6–8 respectively. Row 9 has 50 actual stitches and 7 ch-2 spaces; Rows 10 and 11 each have 8 sc and 7 ch-7 spaces.
- Rows 12–14: repeat Rows 6–8 with the same respective counts.
- Rows 15–17: repeat Rows 6–8 with the same respective counts.
- Rows 18–20: repeat Rows 6–8 with the same respective counts.
- Rows 21–23: repeat Rows 6–8 with the same respective counts.
- Rows 24–26: repeat Rows 6–8 with the same respective counts.
- Rows 27–29: repeat Rows 6–8 with the same respective counts.
- Rows 30–32: repeat Rows 6–8 with the same respective counts.
- Rows 33–35: repeat Rows 6–8 with the same respective counts.
- Rows 36–38: repeat Rows 6–8 with the same respective counts. There are now 11 leaf rows, at Rows 6, 9, 12, 15, 18, 21, 24, 27, 30, 33, and 36.
- Row 39, close the lace: ch 1, sc in first sc; repeat [7 sc in next ch-7 space, sc in next sc] seven times, turn—57 sc.
- Row 40: ch 1, sc in each st, turn—57 sc.
- Row 41: repeat Row 40—57 sc.
- Row 42: repeat Row 40—57 sc. Fasten off. The completed background has four solid rows at each short end.
Rectangular Borders — Work on Each Background
- With RS facing, join sage in the first stitch of Row 42. Round 1: ch 1, work 3 sc in that corner stitch, sc in the next 55 sts, and 3 sc in the last stitch. Work 78 sc evenly down the long edge, excluding the corner stitches. Across the foundation edge, work 3 sc in the first corner, sc in the next 55 foundation stitches, and 3 sc in the last corner. Work 78 sc evenly up the remaining long edge. Join with sl st to first sc—278 sc.
- For each 78-stitch long edge, place 1 sc in each of the eight solid-row ends and distribute the remaining 70 sc across the 34 lace-row ends. Start with 2 sc per lace-row end, then add one extra sc in each of two well-separated lace-row ends. Mark the middle sc of each three-stitch corner.
- Round 2: ch 1, sc in each st around, working 3 sc in each marked corner stitch. Move the corner markers to the new middle stitches. Join with sl st—286 sc.
- Round 3: repeat Round 2—294 sc. Fasten off and weave in the green ends. Each round adds eight stitches, two at each corner.
Three-Petal Tulips — Make 154
- Each mat uses 77 flowers: 21 red, 17 blush pink, 15 pale pink, 13 lavender, and 11 yellow. For the pair, make 42 red, 34 blush pink, 30 pale pink, 26 lavender, and 22 yellow.
- Set-up: make an MR, leaving a 12 cm starting tail. Work the next three petals into this same ring. Chains form petal edges and do not count as tall stitches.
- Left petal: ch 2, work 1 dc and 1 tr in MR, ch 2, sl st in MR—2 tall stitches and 1 anchoring sl st.
- Center petal: ch 3, work 2 tr in MR, ch 3, sl st in MR—2 tall stitches and 1 anchoring sl st.
- Right petal: ch 2, work 1 tr and 1 dc in MR, ch 2, sl st in MR—2 tall stitches and 1 anchoring sl st. Total: 3 petals, 6 tall stitches, and 3 anchoring sl sts.
- Fasten off with a 25 cm sewing tail. Pull the ring firmly closed. Arrange the petals in a fan with the center petal upright and the side petals angled outward. Overlap their lower edges slightly and secure the overlap with two small stitches using the starting tail; secure and weave in that tail.
- Gently flatten each flower to approximately 2.5–3 cm wide. Leave the long sewing tail available. Do not stuff the flowers.
Flower Color Layout — Repeat for Both Mats
- Lay the mat RS up with its foundation edge nearest you. Read every sequence from left to right as viewed from this fixed position. Band 1 is nearest the foundation edge; Band 11 is nearest the final solid rows.
- Band 1, leaf Row 6: red, blush pink, lavender, yellow, lavender, blush pink, red.
- Band 2, leaf Row 9: pale pink, red, yellow, lavender, yellow, red, pale pink.
- Band 3, leaf Row 12: red, blush pink, red, yellow, lavender, blush pink, red.
- Band 4, leaf Row 15: blush pink, red, yellow, lavender, yellow, red, blush pink.
- Band 5, leaf Row 18: lavender, pale pink, lavender, yellow, red, pale pink, lavender.
- Band 6, leaf Row 21: red, lavender, yellow, red, lavender, yellow, red.
- Band 7, leaf Row 24: pale pink, red, lavender, pale pink, yellow, red, pale pink.
- Band 8, leaf Row 27: lavender, blush pink, pale pink, red, red, blush pink, lavender.
- Band 9, leaf Row 30: blush pink, yellow, red, lavender, yellow, blush pink, red.
- Band 10, leaf Row 33: pale pink, red, lavender, yellow, pale pink, red, pale pink.
- Band 11, leaf Row 36: red, blush pink, pale pink, red, red, pale pink, blush pink.
Attach Flowers and Embroider Stems
- Block both green backgrounds before attaching flowers. Pin each to approximately 30 cm wide and 42 cm long, keeping the anchor columns straight. If your swatch gives a different natural size, preserve a flat fabric rather than forcing these measurements.
- Place one flower above every leaf cluster, with its closed ring centered over the cluster’s ch-2 space. The flower should extend toward Row 42. Pin all 77 flowers on one mat using the color layout before sewing.
- Using each flower’s sewing tail, attach its base through both strands of the green ch-2 space with three small stitches. Catch the lower edge of each outer petal to the corresponding green dc beneath it. Keep these stitches within the lower third of the flower so the tips remain raised.
- For stability, tack the back of the center petal to the bridge chain immediately above it with one loose stitch. Do not draw the bridge chain downward. Secure the tail and weave it through the flower base and nearby green stitches on the WS.
- With sage and a tapestry needle, add a short straight embroidered stem below each flower: bring the needle up through the center of its green leaf cluster, take it down at the flower base, and repeat once. Keep the two stitches parallel and relaxed. Secure each length on the WS, weaving through stitches rather than carrying yarn across open spaces.
- Repeat the placement, attachment, and stem embroidery on the second mat. Check that all flowers point toward the same short edge.
Finishing
Check each tulip with a gentle tug, especially the petal tacks near the outer edges. Trim ends only after they have been woven securely through several stitches. Lightly dampen the finished mats and pin the borders straight again, shaping the petals with your fingers so their three points remain visible.
Let both mats dry completely before using them. Wash gently in cool water according to the yarn label, reshape flat, and avoid pressing the raised flowers with an iron. These mats work best beneath plates and place settings; use a separate heat-rated trivet beneath hot cookware.
Tips for Success
- Keep removable markers in all eight anchor columns during the first two bands. They make it much easier to distinguish an anchor sc from the sc at either end of a leaf cluster.
- Crochet all flowers of one color together, then count them into two identical sets before arranging the mats.
- Pin a complete flower band before sewing. The seven closed flower bases should align with the seven ch-2 leaf centers.
- Check the border on a flat surface after every round. Adjust the distribution of the prescribed side stitches before continuing if one section starts to buckle.
- Use small stitches beneath the flower bases so the bright sewing yarn does not show through the green lace.
Common Mistakes to Avoid
- Working bridge stitches into the leaf-cluster sc creates extra repeats. Work only into the eight structural anchor sc; count seven arches after every bridge row.
- Replacing the separating-arch row with another leaf row crowds the flowers. Each band has one leaf row, one bridge row, and one separating-arch row.
- Pulling flower tacks tight draws the lace into puckers. Release the tack and resew while the mat lies flat.
- Putting border stitches only in obvious holes leaves long edges uneven. Mark the solid and lace portions first, then distribute all 78 stitches along each long edge.
- Leaving the magic rings unsecured can loosen the petals during washing. Close each ring firmly and weave its tail through the base in more than one direction.
Ways to Customize This Pattern
- Use only red and pale pink flowers in alternating columns while keeping the sage background and the same 77 placements.
- Make a matching coaster-sized sample with the 17-stitch swatch width, two complete lace bands, four solid rows at each end, and a proportionately spaced border.
- Create a longer centerpiece by retaining the 57-stitch width and adding complete three-row bands before the four closing solid rows. Add seven flowers for each extra band and recalculate long-edge border spacing to keep it flat.
- Choose deeper olive for the leaves and cream, apricot, and dusty rose for the flowers, using cotton of the same weight throughout.
Frequently asked questions
No. The green background includes shaped leaf clusters, and each three-petal tulip is made separately. Sewing the flowers on afterward lets you control the color arrangement and keep every bloom facing the same direction.
The leaf row contains eight anchor sc plus seven six-stitch clusters: 8 + 42 = 50 actual stitches. The bridge row skips those clusters and connects the eight anchors with seven chain arches. Chain spaces are listed separately from actual stitches.
Yes. Make one background, one border, and 77 tulips. Use the per-mat flower quantities in the tulip section and allow approximately half the listed yarn, with a little extra green for the gauge swatch.
Check the blocked three-row band height before attaching any flowers. Short bands usually come from tight chains or short dc stitches in the leaves. Adjust your stitch formation and reswatch; stretching the finished mat lengthwise can narrow the arches and distort the border.
The finished Tulip Garden Crochet Placemats Pattern

