Vintage Filet Rose Bedspread and Cushions Crochet Pattern
Beginner Friendly
Perfect for those just starting their crochet journey, with clear instructions and simple techniques
Single-Day Project
A satisfying project you can complete in a single afternoon or evening.
Handmade Gift
A beautiful keepsake — free forever. Read online or print at home.
About This Vintage Filet Rose Bedspread and Cushions Crochet Pattern
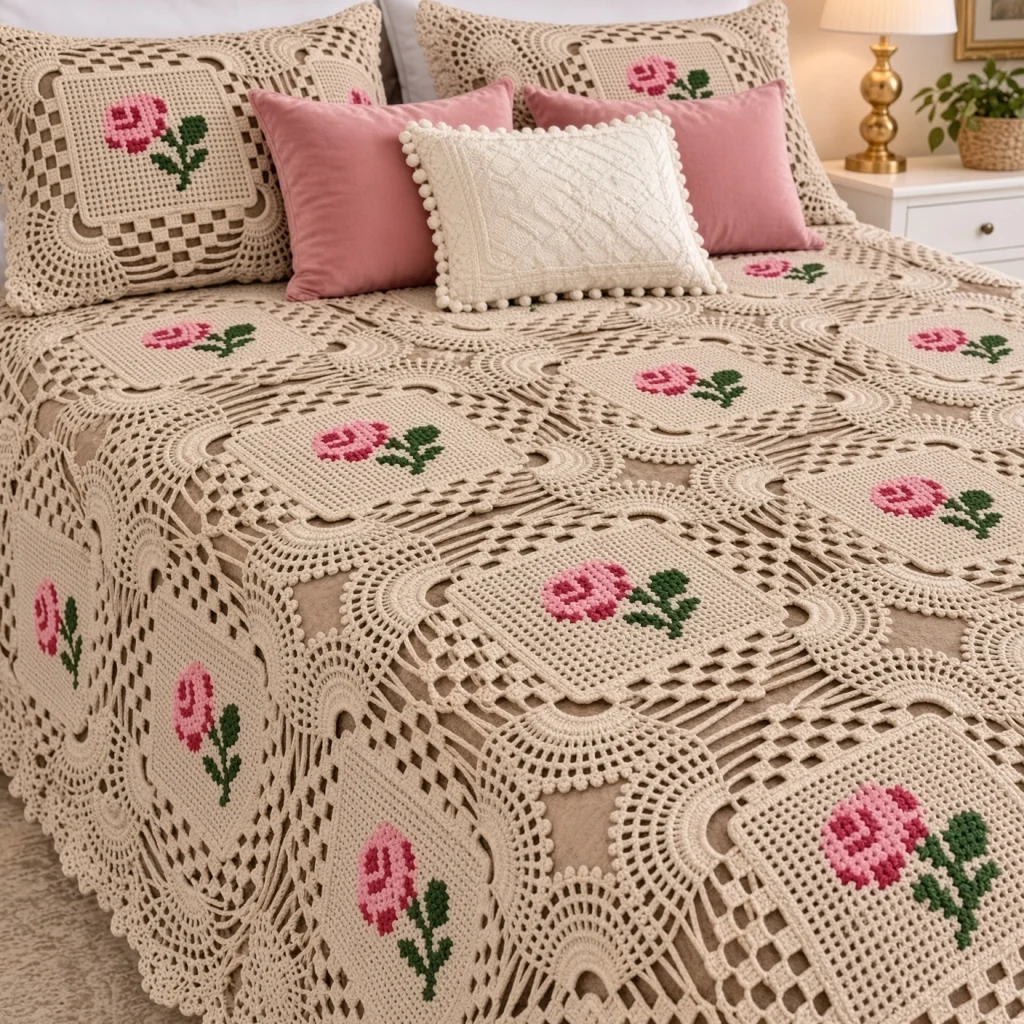
This filet crochet rose bedspread has the charm of a treasured heirloom: 42 ecru lace squares, each with a pink rose and green leaves on a fine filet mesh. Around the rose, a checkerboard frame of filled and open blocks and a row of tall fans make each square look like a small framed picture. The squares are joined at their picot edges, leaving open diamonds between them, and two cushions use the same squares.
The center of each square is a filet mesh panel worked in rows. The rose is then cross-stitched into the open mesh squares in two shades of pink and green, which gives it the slightly raised, dotted look of vintage needlework. Rounds of double crochet, two checkerboard filet rounds, a fan round and a picot edge are worked around the panel to finish the square.
The bedspread takes about 140 to 160 hours, with each square taking around three hours including the embroidery. It suits a crocheter who knows basic filet crochet and enjoys detailed, traditional work.
Materials
- DK weight mercerized cotton, ecru about 5,000 m (20 skeins of 100 g / 250 m)
- DK weight cotton, rose pink about 250 m (1 skein)
- DK weight cotton, deep rose about 250 m (1 skein)
- DK weight cotton, leaf green about 250 m (1 skein)
- 3.5 mm crochet hook
- Blunt tapestry needle
- Stitch markers about 4, for the corners
- Two 35 cm square cushion forms, in a pale pink or taupe cover
Abbreviations
chchainscsingle crochetdcdouble crochettrtreble crochetsl stslip stitchpicotch 3, sl st in 3rd ch from hookblocka filled filet square: 3 dc (over a space, work 2 dc in the ch-2 sp and 1 dc in the next dc)spacean open filet square: ch 2, sk 2 sts, dc in next stXone cross stitch worked over one open mesh squareskskipspspacest(s)stitch(es)rndroundreprepeatRS / WSright side / wrong sideFilet Center Panel
- With ecru, ch 68.
- Row 1 (RS): dc in 8th ch from hook, *ch 2, sk next 2 ch, dc in next ch; rep from * 19 more times. (21 open spaces)
- Rows 2-21: ch 5 (counts as dc and ch 2), turn, dc in next dc, [ch 2, dc in next dc] 19 times, ch 2, dc in 3rd ch of turning ch. (21 open spaces)
- Don’t fasten off. The panel is a grid of 21 x 21 open squares.
Rose Chart (21 x 21)
- Key:
Prose pink,Rdeep rose,Gleaf green,.leave open. Each letter is one mesh square. Chart Row 1 is the top of the panel (crochet Row 21). - Rows 1-3:
..................... - Row 4:
......PPPP........... - Row 5:
....PPRRRPP.......... - Row 6:
...PRRPPPRRP......... - Row 7:
...PRPRRRPRP......... - Row 8:
...PRPRPRPRP......... - Row 9:
...PRPPRRPRP......... - Row 10:
...PRRPPPRRP......... - Row 11:
....PRRRRRP.......... - Row 12:
.....PPPPP.G......... - Row 13:
...........G..GG..... - Row 14:
..........GG.GGG..... - Row 15:
........GG.GGGG...... - Row 16:
.......GGGGG......... - Row 17:
........GG.G......... - Rows 18-19:
...........G......... - Rows 20-21:
..................... - Each rose has 39 rose pink, 29 deep rose and 25 green squares. The swirl of deep rose inside the pink outline shows the petals curling around the center.
Embroidering the Rose
- You can stitch the rose now or after the square is finished; doing it now keeps the panel small and easy to handle.
- Thread the tapestry needle with an arm’s length of yarn, folded double. Start on the WS, leaving a tail to weave in.
- For each charted square, work one X from corner to corner of the open mesh square, wrapping around the dc and ch at the edges. The doubled yarn fills the hole and gives a raised dot.
- Work all the half stitches of one color along a chart row, then cross them on the way back. All top stitches should slant the same way.
- Stitch the deep rose first, then the rose pink, then the green.
Frame (Rnd 1)
- Rnd 1: continuing from the panel, ch 3 (counts as dc here and throughout) and work along all four sides: 64 dc evenly along each side (3 dc in each open sp or row end, plus 1 extra dc in the middle sp of the side), and (3 dc, ch 3, 3 dc) in each corner. Join to top of ch 3. (70 dc per side between corner sps)
- Place a marker in each corner ch-3 sp.
Checkerboard Rounds (Rnds 2-3)
- Rnd 2: sl st to the next corner sp, ch 3, (2 dc, ch 3, 3 dc) in same sp, *dc in next st, [block over next 3 sts, space over next 3 sts] 11 times, block over next 3 sts, (3 dc, ch 3, 3 dc) in corner sp; rep from * 3 times, omitting the last corner, join. (23 squares per side: 12 blocks and 11 spaces; 76 sts per side between corner sps)
- Rnd 3: sl st to the next corner sp, ch 3, (2 dc, ch 3, 3 dc) in same sp, *dc in next st, [block, space] 12 times, block, (3 dc, ch 3, 3 dc) in corner sp; rep from * 3 times, omitting the last corner, join. Work each block or space so it sits over the opposite kind in Rnd 2: a space over a block and a block over a space. (25 squares per side: 13 blocks and 12 spaces; 82 sts per side)
- The two rounds form a checkerboard band around the rose.
Solid Round (Rnd 4)
- Rnd 4: sl st to the next corner sp, ch 3, (2 dc, ch 3, 3 dc) in same sp, *dc in each dc and 2 dc in each ch-2 sp to next corner, (3 dc, ch 3, 3 dc) in corner sp; rep from * 3 times, omitting the last corner, join. (88 sts per side between corner sps)
Fan Edge (Rnd 5)
- Rnd 5: sl st to the next corner sp, ch 4 (counts as tr), (3 tr, ch 3, 4 tr) in same sp, *[sc in next st, sk next 3 sts, 9 tr in next st, sk next 3 sts] 11 times, (4 tr, ch 3, 4 tr) in corner sp; rep from * 3 times, omitting the last corner, join to top of ch 4. (11 fans per side plus a corner fan at each corner)
Picot Edge (Rnd 6, first square only)
- Rnd 6: sl st to the corner sp, ch 1, (sc, picot, sc) in corner sp, *sc in next 4 tr, [sl st in next sc, sc in next 4 tr, (sc, picot, sc) in next tr, sc in next 4 tr] 11 times, sl st in next sc? no: work the last fan of the side, then sc in next 4 tr of the corner fan, (sc, picot, sc) in corner sp; rep from * around, join. Fasten off.
- Each side has 11 fan picots plus a picot at each corner. The square measures about 35 cm.
Joining As You Go (Rnd 6 for all other squares)
- Work Rnds 1-5 as usual and embroider the rose.
- Join stitch: on a side that touches a square already in place, replace each picot with: ch 1, sl st in the matching picot of the neighbor, ch 1. Join all 11 fan picots and the corner picots at both ends of the side.
- Where four corners meet, sl st the last corner picot into the point where the other three are joined.
- Turn every square so the rose faces the head of the bed before joining.
Bedspread Layout
- The bedspread is 6 squares across and 7 squares long. (42 squares)
- Row 1: the first square is worked plain. Squares 2-6 join one side to the square on the left.
- Rows 2-7: the first square in each row joins only its lower side to the square below. Squares 2-6 join their left side and their lower side.
- The joined bedspread measures about 210 x 245 cm. Small open diamonds appear between the fans where four squares meet.
Cushions (make 2)
- For each cushion, make one square with the rose and one square without embroidery, working Rnd 6 plain on both.
- Hold the two squares WS together. With ecru, sew them together through the sc at the base of the fans in Rnd 6, leaving the fans and picots free all around.
- Insert the cushion form before closing the last side. A colored cover underneath shows through the open mesh and the checkerboard.
Finishing
Weave in all ends along solid areas, such as the dc rounds and the blocks of the checkerboard, so nothing shows in the open mesh. Weave the embroidery tails under the backs of their own cross stitches.
Wet block the bedspread on a large flat surface. Pin each square straight, open the filet mesh and the checkerboard spaces, and pin out each fan so the picots stand out. Let it dry completely. Lay it over a pink or taupe sheet so the lace shows clearly.
Tips for Success
- Count the open spaces at the end of every filet row. A missing space shifts the chart, and the rose won’t sit where it should.
- Stitch the rose before working the frame rounds. The small panel is much easier to handle and turn while embroidering.
- Use mercerized cotton. It gives crisp, even mesh and shows off the checkerboard frame.
- Mark the corners on every round. With 80 or more sts per side, it’s easy to lose your place.
- Block each square before joining. Filet lace changes shape a lot when it’s blocked.
Common Mistakes to Avoid
- Working the turning chain wrong. In filet, the ch 5 at the start of each row counts as the first dc and the first ch-2 sp. If you add an extra dc, every row gains a space.
- A wavy frame in Rnd 1. If the sides ruffle, you worked more than 3 dc in some sps. Stick to 3 per sp and only one extra dc in the middle of each side.
- A checkerboard that doesn’t alternate. In Rnd 3, check each square against the one below it: always the opposite kind.
- Fans that cup. If the fans bowl up, the tr are too tight. Work them loosely, or use a half-size larger hook for Rnd 5 only.
- Loose cross stitches. Thin or single-strand stitches disappear in the mesh. Use the yarn doubled so each X fills its square.
Ways to Customize This Pattern
- Change the rose colors to red and burgundy, yellow and gold, or lilac and purple.
- Leave out the embroidery for an all-ecru filet bedspread with a classic heirloom look.
- Change the size: each square adds about 35 cm. A throw of 4 by 4 squares is about 140 cm square.
- Make a tablecloth of 3 by 3 squares, or a table runner of 2 by 4 squares.
- Turn alternate squares so the roses face different directions for a more scattered look.
Frequently asked questions
Yes. In classic filet, you can work the rose as blocks of ecru. To work it in color, you would carry the pink and green through the rows, which is much harder in mesh. Cross-stitching afterward is easier and gives the rose its puffy, dotted look.
The stitches are just dc and chains. The challenge is keeping the count right. Counting the spaces at the end of each row makes it very manageable.
Yes. Work Rnd 6 plain on every square, lay them out and sew the matching picots together with a few stitches each. Joining as you go is faster and gives neater diamonds between the squares.
Hand wash in cool water with mild soap, or use a gentle cold cycle inside a large laundry bag, and dry it flat. Re-block it while damp to open the mesh and fans. Wash a test square first so the pinks don’t bleed onto the ecru.
The finished Vintage Filet Rose Bedspread and Cushions Crochet Pattern

