Vintage Rose Bouquet Crochet Table Runner
Beginner Friendly
Perfect for those just starting their crochet journey, with clear instructions and simple techniques
Single-Day Project
A satisfying project you can complete in a single afternoon or evening.
Handmade Gift
A beautiful keepsake — free forever. Read online or print at home.
About This Vintage Rose Bouquet Crochet Table Runner
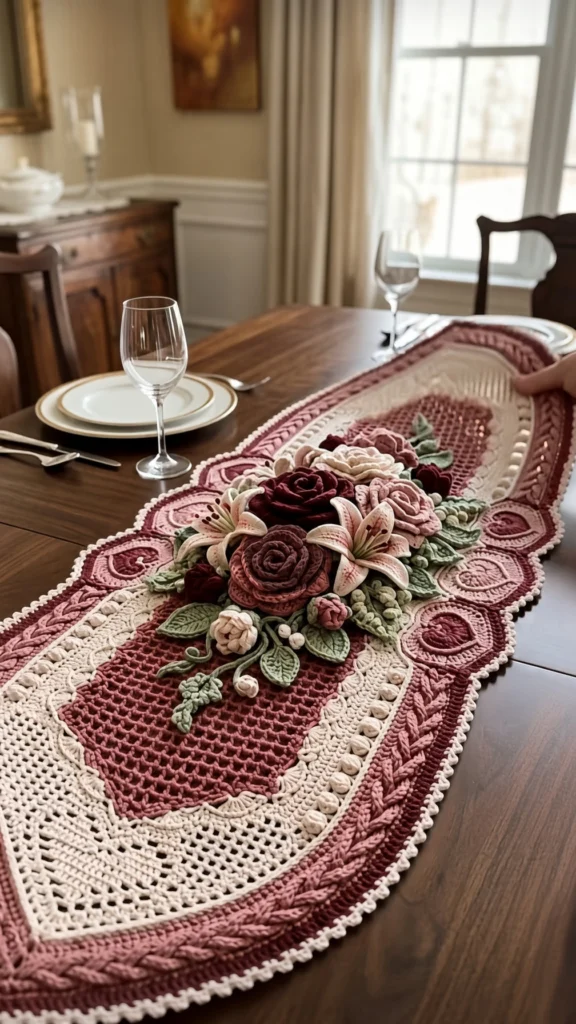
This crochet rose table runner pattern is worked as a single continuous oval, from a long foundation chain outward through twenty rounds that change colour and texture as they go: a burgundy filet mesh centre, a cream shell and mesh band, a dusty rose band carrying bobbles, a burgundy border set with raised teardrop clusters, and a deep cream picot scallop all the way round. Nothing is joined and nothing is seamed. The whole base grows from one chain.
The bouquet is separate, made from twenty-five pieces and sewn on top after the base is blocked: five rolled roses in three sizes, three six-petal lilies with crocheted stamens, four buds with green calyxes, ten leaves and two sprays of small stuffed berries. This is what turns a handsome banded oval into a piece that people stop and look at, and it is also where most of the character lives, so it is worth arranging carefully rather than sewing the first thing you make into the middle.
Expect 35 to 45 hours. The base is around two thirds of that and it is calm, rhythmic work once the increase pattern makes sense: six increases at each end of every double crochet round, three at each end of every single crochet round, and nothing anywhere else. The bouquet is fiddlier and more interesting. Worsted cotton in a firm gauge is what holds the oval flat under a place setting. Written in US terms throughout.
Materials
- Worsted / Aran cotton in burgundy approx. 300 g, base and roses
- Worsted / Aran cotton in cream approx. 250 g, base and edging
- Worsted / Aran cotton in dusty rose approx. 200 g, base and roses
- Worsted / Aran cotton in blush pink approx. 60 g, lilies and buds
- Worsted / Aran cotton in sage green approx. 80 g, leaves, calyxes and stems
- Small amount of soft yellow or pale gold lily stamens
- 4.0 mm crochet hook one size down from the ball band, for a dense flat fabric
- Tapestry needle blunt, large eye
- Stitch markers at least 6, four of them a different colour to mark the increase zones
- Rust-proof pins and blocking mats you will be pinning a 118 cm oval, so a spare bed works too
- Spray bottle and a steam iron with a pressing cloth
- Scraps of matching yarn for stuffing the berries do not use polyfill, see the notes
- Tape measure and sharp scissors
Abbreviations
MRmagic ringchchainscsingle crochethdchalf double crochetdcdouble crochettrtreble crochetsl stslip stitchsc2togsingle crochet 2 stitches togethertr3togtreble crochet 3 stitches together, worked in one stbobble5 dc in the same st, closed togethersp / spsspace / spacesst / stsstitch / stitchesreprepeatRSright sideFOfasten offGauge and Working Notes
- Gauge: 14 dc and 8 rows to 10 cm, blocked. The fabric should be firm with no daylight through the solid rounds.
- Every round is worked with the RS facing and joined with a sl st. Do not turn at any point, or the texture rounds will alternate front and back.
- The increase rule is the whole geometry of the piece: 6 increases at each end on every dc round (12 in total), 3 at each end on every sc round (6 in total), and no increases anywhere along the straight sides.
- Mark the two end zones with a different colour of marker on Round 1 and move them up every round. The end zone is the curved section, roughly 25 stitches at each end on the early rounds and growing as you go.
- Spread the increases evenly across each end zone rather than stacking them. Stacked increases produce two visible spokes radiating from each end.
- Change colour on the final yarn over of the last stitch of the preceding round so the join is clean, then cut the old colour rather than carrying it. Carried yarn shadows through the mesh rounds badly.
- Leave a 25 cm tail on every appliqué piece. You will use it to lock the piece and again to sew it down, so one tail does both jobs.
- Work the entire base and block it before you make a single flower. Placement is decided on the blocked base, and a bouquet arranged on unblocked fabric will sit wrong once the oval opens up.
Runner Base, Foundation and Rounds 1 to 2
- With burgundy, ch 155.
- Round 1: sc in the 2nd ch from hook and in each of the next 152 ch (153 sc), 6 sc in the last ch; working now along the opposite side of the foundation chain, sc in each of the next 153 ch, then 6 sc in the remaining chain at the base; sl st into the first sc (318 sc, with 6 sc at each end).
- Place a marker at each end of the oval, at the centre of the 6-sc group.
- Round 2: ch 1, sc in each st around, working 2 sc in each of 3 evenly spaced sts within each end zone; sl st into the first sc (324 sc, 6 increases in total).
- Count at the end of Round 2 before continuing. Every round after this adds either 6 or 12 stitches to a known number, so an error here is the one error that cannot be traced later.
Burgundy Mesh Centre, Rounds 3 to 8
- Round 3: ch 4 (counts as dc plus ch 1), skip the next st, *dc in the next st, ch 1, skip the next st*; rep from * around. Within each end zone, work (dc, ch 1, dc) into a single st 3 times instead of the plain repeat, which adds 2 sts each time. Sl st into the 3rd ch of the beginning ch-4 (336 sts: 168 dc and 168 ch-1 sps).
- Round 4: work as Round 3, treating each ch-1 sp as a stitch and working into the space itself, not around it, with the same 6 increases at each end (348 sts).
- Round 5: as Round 4 (360 sts).
- Round 6: as Round 4 (372 sts).
- Round 7: as Round 4 (384 sts).
- Round 8: as Round 4 (396 sts). FO burgundy.
- The mesh centre now measures roughly 84 cm by 8 cm. Hold it up to the light and check the grid runs straight along the sides. If it wanders, an increase has been worked outside an end zone.
Cream Shell and Mesh Band, Rounds 9 to 12
- Round 9 (shell round): join cream in any st. Ch 1, sc in the same st, *skip 2 sts, 5 dc in the next st, skip 2 sts, sc in the next st*; rep from * around, working 66 shells in total. Within each end zone, work 7 dc instead of 5 in 3 of the shells, which adds 2 sts each time. Sl st into the first sc (408 sts).
- Round 10: ch 3 (counts as first dc), dc in each st around, working 2 dc in the same st 6 times within each end zone; sl st into the top of the ch-3 (420 dc).
- Round 11: work the mesh as Round 3, with the same 6 increases at each end (432 sts).
- Round 12: as Round 11 (444 sts). FO cream.
- Working the shells over the top of the burgundy mesh is what creates the scalloped line between the two colours. Keep the sc stitches of Round 9 firm, because a loose sc lets the shell tip forward and blurs that line.
Dusty Rose Bobble Band, Rounds 13 to 15
- Round 13: join dusty rose in any st. Ch 3 (counts as first dc), dc in each st around, working 2 dc in the same st 6 times within each end zone; sl st into the top of the ch-3 (456 dc).
- Round 14 (bobble round): ch 3, *dc in the next 3 sts, bobble in the next st*; rep from * around, which uses 4 sts per repeat and gives 114 repeats. Within each end zone, work 2 dc in the same st 6 times, spreading the increases so they fall on plain dc rather than on a bobble; sl st to join (468 sts).
- Round 15: ch 3, dc in each st and in the top of each bobble around, with the same 6 increases at each end; sl st to join (480 dc). FO dusty rose.
- Push every bobble through to the front with your thumb as you close it. A bobble left sitting on the back is invisible from above and there is no fixing it later.
Burgundy Teardrop Band, Rounds 16 to 18
- Round 16: join burgundy in any st. Ch 3 (counts as first dc), dc in each st around, working 2 dc in the same st 6 times within each end zone; sl st to join (492 dc).
- Round 17 (teardrop round): ch 3, *dc in the next 8 sts, tr3tog in the next st, dc in the next 3 sts*; rep from * around, which uses 12 sts per repeat and gives 41 repeats. Within each end zone, work 2 dc in the same st 6 times, always on plain dc; sl st to join (504 sts).
- To work tr3tog in one stitch: work three incomplete trebles into the same st, keeping the last loop of each on the hook, then yarn over and pull through all four loops. This makes the raised teardrop that sits proud of the border.
- Round 18: ch 3, dc in each st and in the top of each teardrop around, with the same 6 increases at each end; sl st to join (516 dc). FO burgundy.
Cream Picot Edging, Rounds 19 to 20
- Round 19: join cream in any st. Ch 1, sc in each st around, working 2 sc in the same st 3 times within each end zone; sl st into the first sc (522 sc).
- Round 20 (scallop round): ch 1, *skip 2 sts, work 5 dc in the next st, ch 3, sl st into the 3rd ch from hook for a picot, work 5 dc in the same st, skip 2 sts, sl st in the next st*; rep from * around, using 6 sts per repeat and giving 87 scallops. Sl st to join and FO.
- Keep the sl st between scallops loose. A tight one pulls two neighbouring scallops together and the edge starts to wave.
- The base is now complete at roughly 118 cm by 40 cm. Block it before making the bouquet.
Large Rose (make 3)
- With burgundy, dusty rose or blush, ch 40.
- Petals 1 to 4 (the centre): work (2 dc, ch 1, 2 dc) into the 4th ch from hook, *skip the next 2 ch, work (2 dc, ch 1, 2 dc) into the next ch*; rep from * twice more (4 small petals).
- Petals 5 to 9 (the middle): *skip the next 2 ch, work (3 dc, ch 1, 3 dc) into the next ch*; rep from * 4 more times (5 medium petals).
- Petals 10 to 13 (the outer): *skip the next 2 ch, work (4 dc, ch 2, 4 dc) into the next ch*; rep from * 3 more times (4 large petals). All 40 chains are used and the strip has 13 graduated petals.
- FO leaving a 25 cm tail. Roll the strip from the small-petal end, keeping the straight foundation edge level at the bottom as you go.
- Thread the tail onto the needle and stitch straight through the rolled base four or five times in different directions. Look at the rose from directly above before the final stitch, since it cannot be adjusted afterwards. Finished rose about 7 cm across.
- Make 3: one deep burgundy, one dusty rose, one blush.
Medium Rose (make 2)
- Ch 28.
- Petals 1 to 3: work (2 dc, ch 1, 2 dc) into the 4th ch from hook, *skip the next 2 ch, work (2 dc, ch 1, 2 dc) into the next ch*; rep from * once more (3 small petals).
- Petals 4 to 6: *skip the next 2 ch, work (3 dc, ch 1, 3 dc) into the next ch*; rep from * twice more (3 medium petals).
- Petals 7 to 9: *skip the next 2 ch, work (4 dc, ch 2, 4 dc) into the next ch*; rep from * twice more (3 large petals), using all 28 chains.
- Roll and lock exactly as for the large rose. FO leaving a 25 cm tail. Finished rose about 5 cm across.
- Make 2: one cream and one dusty rose.
Lily (make 3)
- Petal, make 6 per lily: with cream, ch 11.
- Petal Round 1, first side: sc in the 2nd ch from hook, hdc in the next ch, dc in the next 5 ch, hdc in the next ch, sc in the next ch (9 sts, one chain left free at the far end).
- Petal Round 1, tip: 3 sc into that last free chain (12).
- Petal Round 1, second side: working along the free loops on the underside of the foundation chain, sc in the next ch, hdc in the next, dc in the next 5, hdc in the next, sc in the next (21).
- Petal Round 1, base: 2 sc into the remaining chain at the base, sl st into the first sc (23 sts). FO leaving a 15 cm tail. Finished petal about 5 cm.
- Stamens, make 6 per lily: with soft yellow, ch 8, work dc3tog into the 2nd ch from hook to form the anther, then sl st into each of the remaining 6 ch. FO leaving a 15 cm tail.
- Assembly: gather the 6 petals in a ring with their bases overlapping slightly and stitch through all six bases together. Bundle the 6 stamens, tie them at the base, and stitch the bundle into the centre so the anthers sit just above the petals.
- Optional detail: with a length of dusty rose, work a line of 5 or 6 running stitches from the base to the tip along the centre of each petal to suggest the streak on a real lily.
- Make 3 lilies in total. Finished lily about 10 cm across.
Rosebud with Calyx (make 4)
- With blush or dusty rose, ch 16.
- Row 1: work (2 dc, ch 1, 2 dc) into the 4th ch from hook, *skip the next 2 ch, work (2 dc, ch 1, 2 dc) into the next ch*; rep from * 3 more times, using all 16 chains (5 petals).
- FO leaving a 20 cm tail. Roll the strip tightly so the bud stays closed and stitch through the base to lock it.
- Calyx: join sage green at the base. Ch 6, sl st into the 2nd ch from hook and into each remaining ch (5 sl sts for the stem), then work 6 sc around the base of the bud and sl st into the first sc.
- Sepals: *ch 3, sl st into the 2nd ch from hook, sl st into the next ch, sl st into the next sc of the calyx*; rep from * twice more, working into sc 1, 3 and 5 (3 sepals). FO leaving a 20 cm tail.
- Make 4: two blush and two dusty rose. Finished bud about 3 cm.
Leaves (make 10)
- Large leaf, make 6: with sage green, ch 13.
- Round 1: sc in the 2nd ch from hook, sc in the next ch, hdc in the next 2 ch, dc in the next 3 ch, hdc in the next 2 ch, sc in the next 2 ch (11 sts, one chain free at the far end); 3 sc into that last chain (14); working along the underside of the foundation chain, sc in the next 2, hdc in the next 2, dc in the next 3, hdc in the next 2, sc in the next 2 (25); 2 sc into the remaining chain at the base, sl st into the first sc (27).
- Round 2: ch 1, sc in the next 11 sts; at the tip work sc in the next st, 3 sc in the centre st, sc in the next st; sc in the next 11 sts; at the base work 2 sc in each of the last 2 sts; sl st into the first sc (31). FO leaving a 20 cm tail. Finished leaf about 8 cm.
- Small leaf, make 4: ch 9.
- Round 1: sc in the 2nd ch from hook, hdc in the next ch, dc in the next 3 ch, hdc in the next ch, sc in the next ch (7 sts, one chain free); 3 sc into the last chain (10); along the underside, sc in the next, hdc in the next, dc in the next 3, hdc in the next, sc in the next (17); 2 sc into the remaining chain, sl st into the first sc (19). FO leaving a 20 cm tail. Finished leaf about 5 cm.
- Keep the foundation chain visible on the front of every leaf. It reads as the central spine and it is the only thing distinguishing a leaf from a plain oval.
Berry Spray (make 2)
- Berry, make 6 per spray: with cream, 6 sc in MR (6).
- Berry Round 2: 2 sc in each st around (12).
- Berry Round 3: sc in each st around (12).
- Berry Round 4: sc2tog 6 times (6). Stuff with a small scrap of the cream yarn wound into a tight ball, then thread the tail through the remaining 6 sts and pull closed. FO leaving a 15 cm tail. Finished berry about 1.5 cm.
- Stem: with sage green, ch 22, sl st into the back bump of the 2nd ch from hook and into each remaining ch (21 sl sts). FO leaving a 20 cm tail.
- Sew 6 berries along the stem at staggered intervals, alternating sides, with the last one at the tip. Make 2 sprays.
- Use yarn scraps rather than polyfill inside the berries. White fibre shadows through cotton and a berry that looks slightly grubby cannot be fixed once it is closed.
Finishing
Block the base before touching the bouquet. Soak the oval in cool water, roll it in a towel to take out the excess, then lay it out and pin it. Pin the two end points first to set the 118 cm length, then pin the sides to set the 40 cm width, then work all the way round pinning every scallop of the picot edge individually. Every scallop needs a pin. Leave it a full day to dry, and do not lift it while damp.
Lay the bouquet out on the dry, blocked base before sewing anything. Work from the largest pieces down: place the three large roses first in a loose triangle just off the centre line, then the three lilies filling the spaces between them, then the two medium roses, then the buds at the outer tips of the arrangement, then the leaves fanning out underneath, and finally the two berry sprays trailing down toward the mesh. The bouquet should sit at a slight angle rather than square to the runner, and it should spill past the burgundy centre panel onto the cream band on one side only. Symmetry is what makes an arrangement look stiff. Photograph it before you move anything.
Sew each piece down with the tail already left on it. Roses and buds are stitched through their rolled bases at four or five points around the edge so they cannot spin. Lilies are stitched through the join at the centre of the petal ring and then tacked once at the base of two opposite petals, leaving the petal tips free to lift. Leaves are stitched at the base only, never along the edge, so the tips rise off the fabric and cast a shadow. Weave every remaining end into the back of a solid round rather than through the mesh, where a tail will show. Give the finished runner a light steam from 15 cm away without letting the iron touch the flowers.
Tips for Success
- Write the stitch count for each round on a piece of paper and tick it off as you go: 318, 324, 336, 348, 360, 372, 384, 396, 408, 420, 432, 444, 456, 468, 480, 492, 504, 516, 522. Recounting 400 stitches to find a mistake three rounds later costs an evening.
- Spread the six end increases across the whole curve, not across five stitches. Bunched increases produce visible spokes at both ends of the oval that no amount of blocking will hide.
- Lay the work flat on a table every few rounds and look at it from above. A base that is starting to ruffle at the ends has too many increases, and one that is starting to cup has too few. Both are three-round fixes and neither is a twenty-round fix.
- Roll a rose loosely first, look at it from directly above, and only then lock the base. The tightness of the roll is the entire character of the bloom.
- Arrange the whole bouquet and photograph it before a single stitch goes in. You will move pieces while sewing and the photograph is the only way back to an arrangement you liked.
Common Mistakes to Avoid
- Increasing along the straight sides. The sides must stay at a fixed stitch count for the full length of the runner, and even two stray increases per round will make the oval bulge into a lozenge. All growth happens at the two ends.
- Working the mesh rounds around the ch-1 space rather than into it. Working around the chain twists the square and the grid starts to look wobbly, which is very visible over six rounds of burgundy mesh.
- Bobbles left on the wrong side. Push each one through to the front with your thumb as you close it. Half a round of backward bobbles means undoing the round.
- Carrying colours between bands. Five colour changes across twenty rounds is tempting to shortcut, but a carried strand under the cream mesh reads as a dirty line. Cut and rejoin every time.
- Sewing the bouquet on before blocking. The base grows by several centimetres when blocked and the flowers end up sitting in the wrong place with puckered fabric underneath them.
- Blooms tacked down with one central stitch. They rotate the first time a plate is slid past and a spun rose shows its flat underside. Anchor each one at four or five points.
Ways to Customize This Pattern
- Change the length by changing only the foundation chain. Every extra chain adds about 0.5 cm to the finished runner and every round count rises by twice that number, with the increase rule unchanged.
- Make a matching oval centrepiece mat by working the same twenty rounds on a foundation of just 30 chains, which gives a 55 cm by 40 cm oval for under a vase.
- Swap the palette for the season: sage, cream and soft gold for spring, or deep green, cream and gold for Christmas with the roses replaced by poinsettias.
- Leave the bouquet off entirely. The banded oval stands alone as a formal runner and takes about 25 hours instead of 45, and you can add the flowers later without undoing anything.
- Move the bouquet to one end instead of the centre, which suits a long table where a centrepiece would sit on top of the flowers anyway.
- Make the bouquet as a separate brooch or hat trim by sewing the same pieces onto a small circle of felt rather than onto the runner.
Frequently asked questions
Change the foundation chain and nothing else. The finished runner is roughly the chain length plus 40 cm, so a 200 chain foundation gives about 140 cm and a 110 chain foundation gives about 95 cm. Every round count in the pattern then shifts by twice the difference in chains, since the chain is worked along both sides. The increase rule and the round structure stay exactly as written.
The increases are bunched into too few stitches at each end. Six increases spread across a curve of forty stitches gives a smooth arc, while six worked over ten stitches gives a corner. Undo back two or three rounds and redo them with the increases spaced across the full width of the end zone. Blocking will soften a mild point but it will not rescue a real one.
You can, and the counts are unaffected, but the runner will not block. Acrylic has no memory for wet blocking, so the picot scallops stay soft and the oval never fully flattens on the table. On a piece where the whole appeal is a crisp banded edge, that matters. If acrylic is what you have, work a size tighter and expect to re-flatten it by hand each time it is laid out.
Yes, and the arrangement survives it. The three lilies are the most time-consuming element at six petals and six stamens each, so replacing them with three more medium roses cuts several hours and still reads as a full bouquet. What you should not cut is the leaves, since they are what makes the flowers look like an arrangement rather than a scatter of blooms.
Hand wash in cool water with a mild detergent, supporting the whole oval rather than lifting it by one end. Press the water out against the side of the basin, never wring, and lay it flat to re-pin the ends, the sides and the scallops as you did the first time. Do not machine wash: the appliqué stitching takes a beating in a drum and the rolled roses will loosen. Reshape the flowers with your fingers while damp and let them dry standing proud.
The finished Vintage Rose Bouquet Crochet Table Runner