Vintage Rose Granny Square Bedspread
Advanced
For experienced crocheters who enjoy complex shaping, fine detail, and ambitious construction
Single-Day Project
A satisfying project you can complete in a single afternoon or evening.
Handmade Gift
A beautiful keepsake — free forever. Read online or print at home.
About This Vintage Rose Granny Square Bedspread
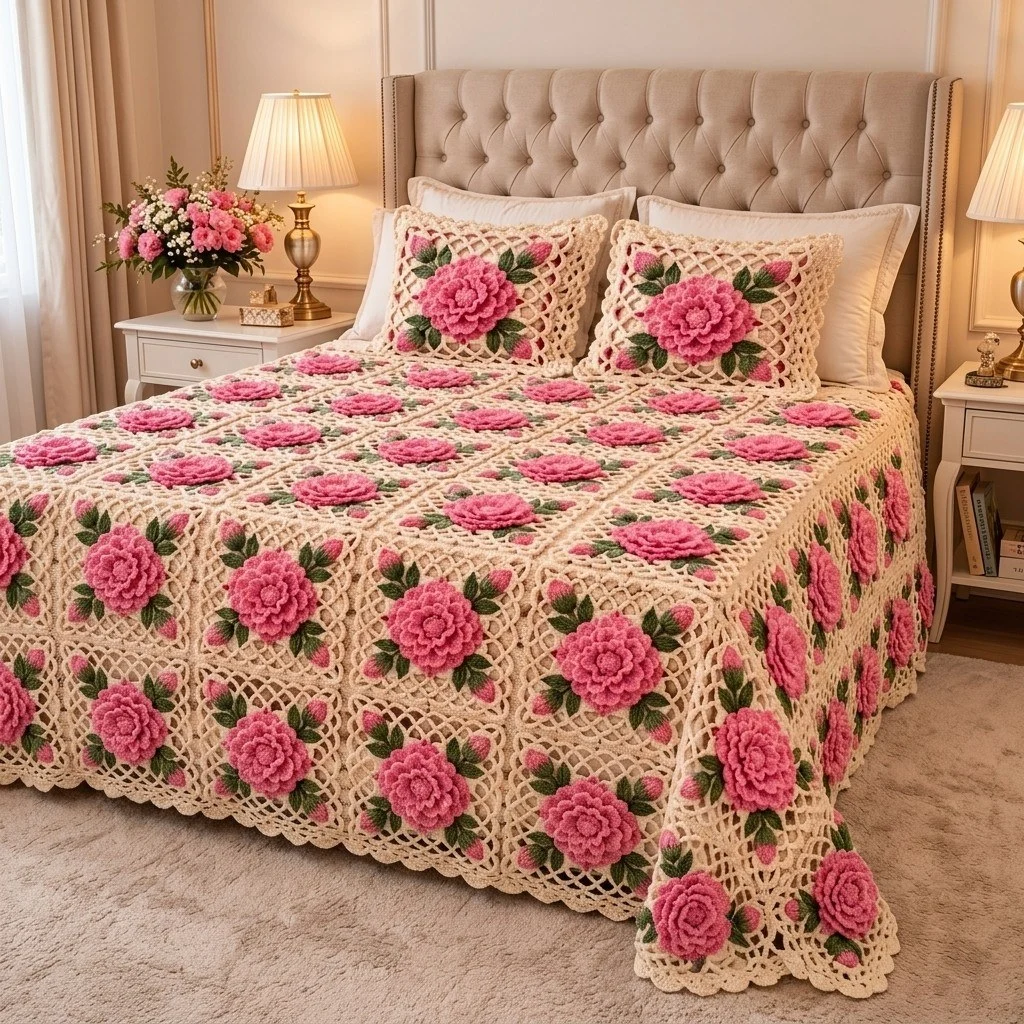
This rose granny square bedspread crochet pattern turns forty-eight cream lattice squares into one heirloom coverlet, each square carrying a four-layer rose that stands up off the fabric. The roses are not appliqué flowers flattened against the background — they are built in concentric petal rounds worked behind one another, shading from deep rose at the heart to soft light pink at the outer petals, so the blossom opens the way a real one does. Around each rose sit three pointed leaves with embroidered veins and two stuffed rosebuds in their own green calyxes.
The background is deliberately open. Each square is a ch-2 filet net that grows one mesh per side per round, which keeps the bedspread light enough to use in spring and autumn and lets the roses read clearly against the cream. The squares are joined into a six-by-eight grid and finished with a three-round border that steps from a chain-5 net into picot scallops, matching the scalloped drop you see along the sides and foot of the bed.
Plan on 70 to 90 hours of work spread over several weeks — this is a long project, not a weekend one. It suits a confident crocheter who has made granny squares before and wants to move into layered flowers, working-behind-petals technique and large-scale assembly. The repeat is short enough to memorise by the third square, so most of the hours are comfortable television crochet rather than constant chart-reading.
Materials
- Worsted / aran cotton-acrylic blend in cream approx. 1600 g for the squares, joining and border
- Worsted / aran yarn in deep rose pink approx. 350 g for rose centres and buds
- Worsted / aran yarn in mid rose pink approx. 300 g for the third petal layer
- Worsted / aran yarn in soft light pink approx. 200 g for the outer petal layer
- Worsted / aran yarn in leaf green approx. 420 g for leaves and calyxes
- Worsted / aran yarn in dark forest green approx. 40 g for embroidered veins
- 4.0 mm crochet hook for the lattice squares, joining and border
- 3.5 mm crochet hook for roses, leaves and buds, so petals stay dense
- Tapestry needle blunt, large eye
- Polyester fiberfill small amount, about 60 g total for the buds
- Stitch markers at least 8
- Blocking mats and rustproof pins essential for square accuracy
- Sharp scissors
- Gauge note one blocked lattice square should measure 24 cm across
Abbreviations
MRmagic ringchchainsl stslip stitchscsingle crochethdchalf double crochetdcdouble crochetinc2 sc in the same stitchdecinvisible decrease over 2 stitchesst / stsstitch / stitchesspspaceskskipreprepeatBLOback loops onlypicotch 3, sl st in 3rd ch from hookFOfasten off( ) x nrepeat what is in brackets n timesLattice Square (make 48)
- With cream and the 4.0 mm hook: MR, ch 6 (counts as dc + ch 3), [dc in ring, ch 2, dc in ring, ch 3] x 3, dc in ring, ch 2, join with sl st to 3rd ch of beg ch-6. (8 dc, 4 corner ch-3 sps, 4 side ch-2 sps — one mesh per side)
- Sl st into the nearest corner ch-3 sp. Ch 6 (counts as dc + ch 3), dc in same sp, [ch 2, dc in next ch-2 sp, ch 2, (dc, ch 3, dc) in next corner sp] x 3, ch 2, dc in next ch-2 sp, ch 2, join to 3rd ch of beg ch-6. (12 dc; 2 ch-2 sps per side)
- Sl st into corner sp. Ch 6, dc in same sp, {[ch 2, dc in next ch-2 sp] x 2, ch 2, (dc, ch 3, dc) in next corner sp} x 3, [ch 2, dc in next ch-2 sp] x 2, ch 2, join. (16 dc; 3 ch-2 sps per side)
- Rnds 4-10: rep Rnd 3, working one extra [ch 2, dc in next ch-2 sp] on every side each round. After Rnd 4 each side has 4 meshes, after Rnd 5 it has 5, and so on. (After Rnd 10: 44 dc total — 8 corner dc plus 9 side dc per side — and 10 ch-2 sps per side)
- Rnd 11 (edging): sl st into a corner ch-3 sp, ch 1, (2 sc, ch 2, 2 sc) in that corner sp, then along the side work [3 sc in next ch-2 sp, sc in next dc] x 9, 3 sc in last ch-2 sp; *(2 sc, ch 2, 2 sc) in next corner sp, [3 sc in next ch-2 sp, sc in next dc] x 9, 3 sc in last ch-2 sp*, rep from * to * twice more, join to first sc. (39 sc per side, 4 corner ch-2 sps, 172 sc total)
- FO, leaving a 20 cm tail for joining later. Weave in the starting tail only and pull the magic ring tight.
Layered Rose (make 48)
- With deep rose and the 3.5 mm hook: 6 sc in MR. (6)
- Rnd 2: inc x 6. (12)
- Rnd 3: (sc, inc) x 6. (18)
- Rnd 4: (2 sc, inc) x 6. (24)
- Rnd 5 (petal bases): *ch 3, sk 2 sts, sl st in next st*, rep from * 7 times more. (8 ch-3 loops, all 24 sts used)
- Rnd 6 (layer 1): in each ch-3 loop work (sc, 3 dc, sc). (8 small petals)
- Rnd 7: fold the petals forward. Working behind them, *ch 4, sl st around the post of the next Rnd 5 sl st*, rep from * around. (8 ch-4 loops)
- Rnd 8 (layer 2): in each ch-4 loop work (sc, 5 dc, sc). (8 medium petals) Change to mid rose pink at the end of this round.
- Rnd 9: working behind layer 2, *ch 5, sl st around the post of the next Rnd 7 sl st*, rep from * around. (8 ch-5 loops)
- Rnd 10 (layer 3): in each ch-5 loop work (sc, 7 dc, sc). (8 large petals) Change to soft light pink at the end of this round.
- Rnd 11: working behind layer 3, *ch 6, sl st around the post of the next Rnd 9 sl st*, rep from * around. (8 ch-6 loops)
- Rnd 12 (layer 4): in each ch-6 loop work (sc, 9 dc, sc). (8 outer petals)
- FO leaving a 40 cm tail for sewing. Finished rose measures about 9 cm across. Do not stuff — the layered petals hold their own dome.
Leaf (make 144 — three per square)
- With leaf green and the 3.5 mm hook: ch 9.
- Sl st in 2nd ch from hook, sc in next ch, hdc in next 2 ch, dc in next 2 ch, hdc in next ch, then 3 sc in the last ch (leaf tip).
- Working back along the free loops of the foundation chain: hdc in next ch, dc in next 2 ch, hdc in next 2 ch, sc in next ch, sl st in next ch. (7 sts along each side plus a 3-sc tip)
- Ch 4 for a short stem, sl st in 2nd ch from hook and in each of the next 2 ch, sl st into the base of the leaf.
- FO leaving a 25 cm tail. With dark forest green and a tapestry needle, backstitch a single centre vein from base to tip, then two short angled side veins. Pull the embroidery snug but not tight, so the leaf stays flat.
Rosebud (make 96 — two per square)
- Bud, with deep rose and the 3.5 mm hook: 6 sc in MR. (6)
- Rnd 2: (sc, inc) x 3. (9)
- Rnd 3: sc in each st around. (9)
- Rnd 4: (sc, dec) x 3. (6) Stuff lightly with a pinch of fiberfill.
- Rnd 5: dec x 3. (3) FO, draw the remaining loops closed, leave a 20 cm tail.
- Calyx, with leaf green: 6 sc in MR, join with sl st to first sc. (6)
- Calyx Rnd 2: *ch 4, sl st in 2nd ch from hook, sc in next ch, hdc in next ch, sl st in next sc of Rnd 1, sl st in following sc*, rep from * twice more. (3 sepals worked over all 6 sts)
- FO leaving a 20 cm tail. Seat the bud inside the green cup and sew the base of the bud to the calyx ring, letting the three sepals point up along the bud.
- With mid rose pink, work three short straight stitches across the closed tip of the bud to suggest overlapping petals.
Assembling a Flowered Square
- Block the lattice square first, flat and square, to 24 cm. Roses, leaves and buds are always sewn to a blocked square, never a fresh one.
- Find the centre of the square by counting 5 meshes in from two adjacent sides; mark that mesh with a stitch marker.
- Pin the rose over the centre so the magic ring sits directly on the marked mesh. Sew it down from the back with the deep rose tail, catching only the Rnd 4 stitches of the rose and the dc posts of the lattice — about 8 anchor points. Leave every petal layer free.
- Pin the three leaves around the rose at roughly 10, 2 and 6 o’clock, tips pointing outward, with each stem tucked under the rose edge. Sew each leaf down along its centre vein only, so the edges lift.
- Pin the two buds between the leaves, about 4 cm out from the rose, sepals facing outward. Sew through the calyx ring and the base of the bud into the lattice.
- Weave in all flower, leaf and bud tails on the wrong side, working them into the dc posts rather than across open mesh so nothing shows through.
- Repeat for all 48 squares.
Joining the Squares
- Lay the squares out 6 across and 8 down, flowers up. Rotate squares until the leaf directions alternate across the grid — it keeps the finished surface from looking like it leans one way.
- Join the squares in vertical columns first. With cream and the 4.0 mm hook, hold two squares wrong sides together and sl st through the BLO of both squares, stitch for stitch, from corner ch-2 sp to corner ch-2 sp. Work 1 sl st in each of the 39 sc, plus 1 sl st in each corner ch-2 sp. (41 sl st per seam)
- Keep the loops loose. A tight sl st seam will pull the blanket in and ripple the squares.
- When all 8 columns are built, join the columns to each other the same way, working straight through the seam intersections without adding extra stitches.
- Weave in every seam tail along the inside of the ridge it came from. The joined panel should measure about 144 x 192 cm before the border.
Picot Scallop Border
- Rnd 1: with cream and the 4.0 mm hook, join in any outer corner ch-2 sp. Ch 1, work 3 sc in each outer corner and sc in each st around the whole panel, working 1 sc into each join seam. Adjust by skipping or adding a stitch at the seams so each side ends on a multiple of 4 stitches between corners. Join to first sc.
- Rnd 2: ch 1, sc in first st, *ch 5, sk 3 sts, sc in next st*, rep from * around each side; at each corner work (sc, ch 5, sc) in the centre corner st. Join to first sc.
- Rnd 3: sl st to the centre of the first ch-5 sp, ch 1, sc in that sp, *ch 5, sc in next ch-5 sp*, rep from * around, working (sc, ch 5, sc) in each corner ch-5 sp. Join to first sc.
- Rnd 4: rep Rnd 3 once more, for a second net round.
- Rnd 5 (scallops): sl st into the first ch-5 sp, ch 1, in that sp work (3 dc, picot, 3 dc), sc in next sc; *in next ch-5 sp work (3 dc, picot, 3 dc), sc in next sc*, rep from * around. At each corner ch-5 sp work (3 dc, picot, 3 dc, picot, 3 dc).
- Join to the first dc, FO and weave in the tail along the back of a scallop. The border adds about 7 cm all round, giving a finished bedspread of roughly 158 x 206 cm.
Finishing
Block the whole bedspread once it is complete, even though you blocked every square. Lay it out damp on a clean sheet or on joined blocking mats, square up the corners with a tape measure, and pin the scallops out one by one so each picot sits proud. The net rounds of the border are what hold the drop along the sides of the bed, and they only open up properly under tension. Let it dry fully flat — with this much yarn that can take two days.
Once dry, go back over the roses with your fingers. Push each petal layer outward and slightly downward so the four layers stagger instead of stacking, and lift the leaf edges away from the lattice. A few minutes of this shaping is the difference between a flat flowered blanket and the three-dimensional surface in the photo. Check the back of each square for loose tails before the bedspread goes on a bed, since anything left untrimmed will catch on a toe. Store it folded over a rail rather than stacked under weight, so the roses keep their height.
Tips for Success
- Use the smaller 3.5 mm hook for every rose, leaf and bud. The denser fabric is what makes the petals hold a curve; worked at 4.0 mm they flop against the lattice.
- When you work the “behind” rounds (Rnds 7, 9 and 11 of the rose), fold the finished petals forward into your palm and hold them there with your yarn hand. If you can see the previous round’s sl sts clearly, you will anchor in the right place every time.
- Make all 48 lattice squares before you make a single rose. Counting mesh rounds is the part that goes wrong when you are tired, and batching it means you only have to hold one count in your head.
- Keep a finished, blocked square beside you as a reference and compare every tenth square against it. Gauge drifts over 90 hours, especially as the blanket gets heavy in your lap.
- Sew the roses down with the rose’s own tail, not a fresh length. The colour match is exact and you avoid one more end to weave in across 48 squares.
Common Mistakes to Avoid
- Sewing the rose down through its petals. If you catch the outer layers, the blossom flattens permanently. Only stitch through Rnd 4 of the rose, which sits hidden underneath.
- Skipping the wrong number of stitches in Rnd 5 of the rose. You must end with exactly 8 ch-3 loops over 24 stitches; if you finish with 7 loops and spare stitches, the petal layers will sit lopsided — undo the round and recount in groups of three.
- Joining the squares with tight slip stitches. The seam has no stretch and the lattice does, so a tight join puckers the square edges and the blanket will not lie flat no matter how hard you block it. Go up a hook size for joining if your slip stitches run tight.
- Over-stuffing the rosebuds. A bud with too much fiberfill turns into a ball and the sepals splay open. A pinch the size of a pea is enough at 9 stitches wide.
- Starting the border before the panel is a multiple of 4 stitches per side. The ch-5 net needs a 4-stitch repeat, and an off count forces a squashed scallop at one corner. Count Rnd 1 carefully and fudge the extra stitches at the seams, where they vanish.
Ways to Customize This Pattern
- Make the matching shams: work 2 lattice squares per pillow, flower only the front one, join them around three sides with the same sl st seam, insert a standard pillow form and close the fourth side, then work Rnds 1-5 of the border around the whole sham.
- Resize the bedspread by changing the grid. 5 x 7 squares gives a throw of about 134 x 182 cm; 7 x 9 squares gives roughly 182 x 230 cm for a queen bed. The border instructions work unchanged.
- Shade the roses the other way, with soft light pink at the centre and deep rose on the outer layer, for a blown-open cabbage rose look. Keep the greens the same so the blanket still reads as one set.
- Work every fourth square plain — lattice and leaves only, no rose or buds — for a quieter, more open coverlet that uses about a quarter less pink yarn and takes roughly 15 hours off the total.
- Add a second leaf tone by making one of the three leaves per square in a sage or olive green, which gives the foliage depth without changing any stitch counts.
Frequently asked questions
Not with this construction. The rose is worked in continuous rounds from a magic ring and needs a solid base of 24 stitches for its petal loops, which the ch-2 filet net cannot give you. If you want to avoid sewing, work a solid 24-stitch circle as Rnds 1-4 of the square centre, then build the lattice rounds outward from it and add the petal layers last — but you will need to recalculate the mesh counts, since the square in this pattern starts from a small ring.
Machine wash cold on a delicate cycle in a front-loader, or hand wash in a bathtub if you only have a top-loader with an agitator. Never put it in a tumble dryer — the heat relaxes the petal layers and they will not spring back. Press the water out with towels, then dry it flat, reshaping the roses with your fingers while it is still damp.
Chain-batch them. Make all the leaves in one sitting without cutting the yarn between leaves where possible, leaving long connecting strands you snip later, and do all the dark green vein embroidery in a single session with one threaded needle. The buds go quickest if you make all 96 pink puffs first, then all 96 calyxes, then assemble. Batching cuts the colour-change and needle-threading time roughly in half.
A cotton-acrylic blend in worsted weight is the sweet spot. Pure cotton gives the sharpest petal definition but makes a 2.9 kg blanket that is heavy to sleep under and slow to dry. Pure acrylic is lighter and cheaper but the roses lose crispness over time. A 50/50 blend holds the petal shape, blocks well, and keeps the finished weight manageable.
Yes, within about 1 cm either way. Blocking will even out small differences because the filet mesh stretches in both directions. Sort the squares by size, put the largest ones in the centre of the bed where the surface is flat, and keep the tightest ones along the edges where the border tension will pull them out. Anything more than 1 cm off should be redone.
The finished Vintage Rose Granny Square Bedspread

