Wave Fan and Rose Table Runner Crochet Pattern
Beginner Friendly
Perfect for those just starting their crochet journey, with clear instructions and simple techniques
Single-Day Project
A satisfying project you can complete in a single afternoon or evening.
Handmade Gift
A beautiful keepsake — free forever. Read online or print at home.
About This Wave Fan and Rose Table Runner Crochet Pattern
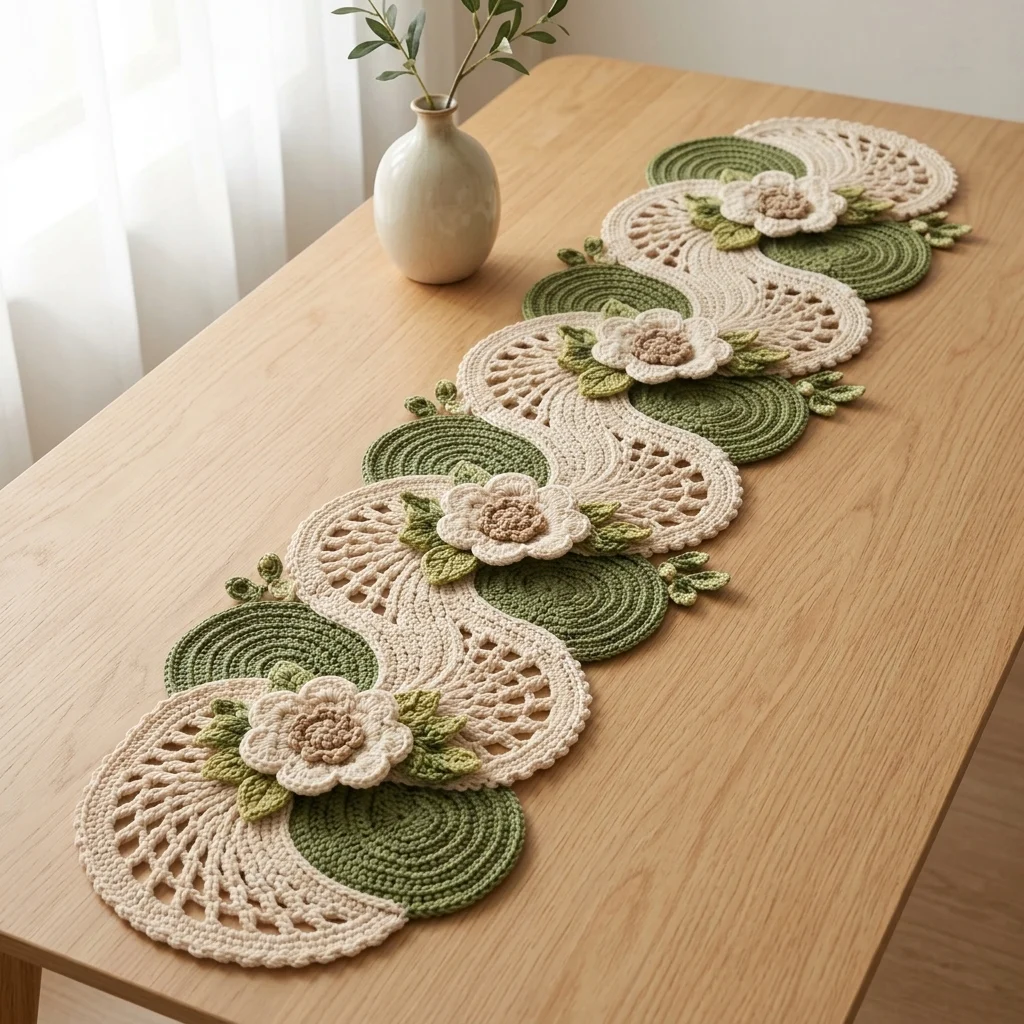
This crochet rose table runner pattern winds a continuous S-curve of open cream lace fan shapes down the table, flanked on both sides by solid green spiral discs, with 3 large, fully layered roses marking the points where the wave curves. Each rose sits on a bed of small leaves and bud sprays, tying the floral centerpieces into the greenery around them.
What makes this design distinctive is the combination of three very different textures worked side by side: the fan shapes are open, radiating lace built from long chain spokes filled with mesh; the discs are dense, solid spirals worked in concentric rounds; and the roses are fully three-dimensional, built up in tight, overlapping layers rather than flat petals. That contrast, airy lace against solid discs against dimensional flowers, is what gives the runner its rich, layered look. Expect to spend 24-28 hours total across the fan-and-disc wave and the 3 roses with their leaf sprays.
This is an advanced pattern, best suited to someone comfortable combining very different crochet techniques within one project and confident assembling asymmetrical, curving pieces by eye, rather than someone wanting a single uniform technique throughout.
Materials
- DK weight cotton yarn, cream ~150g, fan shapes
- DK weight yarn, sage green ~100g, spiral discs
- DK weight yarn, olive green ~30g, leaves and bud sprays
- DK weight yarn, light green ~20g, small leaf accents
- DK weight yarn, cream ~40g, rose petals
- DK weight yarn, brown/tan ~15g, rose centers
- Crochet hook 3.5 mm (US E/4)
- Tapestry/yarn needle
- Steam iron and pressing cloth, or blocking mat and pins
- Straight pins, for positioning pieces before joining
- Sharp scissors
Abbreviations
chchainsl stslip stitchscsingle crochethdchalf double crochetdcdouble crochettrtreble/triple crochetMRmagic ringch-spchain spaceincincrease (2 sc in one st)st(s)stitch(es)reprepeatFOfasten offSpiral Disc Motif (make 6, in sage green)
- Round 1: 6 sc in MR. Do not join; work in a continuous spiral throughout. (6 sts)
- Round 2: inc in each st around. (12 sts)
- Round 3: *sc 1, inc; rep from * around. (18 sts)
- Round 4: *sc 2, inc; rep from * around. (24 sts)
- Round 5: *sc 3, inc; rep from * around. (30 sts)
- Round 6: *sc 4, inc; rep from * around. (36 sts)
- Round 7: *sc 5, inc; rep from * around. (42 sts)
- Sl st into next st to finish, FO leaving a short tail. Repeat for 6 discs total.
Fan Motif (make 5, in cream)
- Ch 2. Round 1: 12 dc in 2nd ch from hook, do not join, forming the tight base point of the fan. (12 sts)
- Round 2: working in rows now rather than a full round, turn and work back across only the outer half of the sts to keep the piece as a half-circle fan rather than a full circle: ch 3, dc in next 5 sts, working (ch 1, dc) in the next few sts to open into a radiating mesh. (approx. 12 sts across the fan’s width)
- Row 3: ch 4, turn, dc in first dc, *ch 1, dc in next dc; rep from * across, ending dc in top of turning ch, widening the fan’s open mesh slightly with each row.
- Rows 4-6: continue in the ch-1/dc mesh pattern, increasing 1-2 sts at the outer edge every other row to flare the fan into a wide, curved half-circle shape, matching the fan width shown in the photo.
- FO after the final row, leaving a long tail for joining. Repeat for 5 fans total.
Rose Motif (make 3)
- With brown/tan, 6 sc in MR, inc around (12 sts), sl st to join, FO leaving a short tail. This is the small center bud.
- With cream, join in any st of the center. Round 1 (inner petals): *ch 2, dc 3 in next st, ch 2, sl st in same st; rep from * around all 12 sts. 12 petals.
- Round 2 (middle petals): join cream behind Round 1. *ch 3, dc 4 in next base st, ch 3, sl st in same st; rep from * around. 12 larger petals.
- Round 3 (outer petals): join cream once more behind Round 2. *ch 4, dc 5 in next base st, ch 4, sl st in same st; rep from * around for a final, largest layer of 12 petals.
- FO leaving a long tail for attaching. Fold each successive round back and down from the one before it so all 3 layers show clearly, building real rose-like depth.
Leaves and Bud Sprays (make approximately 15 leaves and 6 buds)
- Leaf, in olive or light green: ch 7. Starting in 2nd ch from hook: sl st, sc 1, hdc 1, dc 1, 3 dc in last ch, then work back down the other side: dc 1, hdc 1, sc 1, sl st in last ch. FO leaving a short tail.
- Bud, in olive green: 5 sc in MR. Pull the MR tail tight to close, then sl st into the first sc to close into a small tight bud shape. FO leaving a short tail.
- Repeat for approximately 15 leaves and 6 buds total, to be tucked around each rose.
Assembly, The Wave
- Lay the 5 fans and 6 discs on your work surface in an alternating S-curve pattern, fans on one side of the curve and discs on the other, mirroring the winding path shown in the photo, overlapping their edges generously.
- Whipstitch each fan to its neighboring disc at 2-3 overlap points, working down the length of the curve one join at a time.
- Continue until all fans and discs are joined into one continuous winding strip.
Assembly, Roses and Greenery
- Position the 3 roses at the 3 points along the wave where the curve bends most sharply, roughly matching the photo, and pin.
- Sew each rose down firmly through its center into the fan and disc pieces beneath it.
- Tuck 4-5 leaves and 2 buds around the base of each rose, angling them outward into the curve of the wave, and tack each one down at its base.
Finishing
Turn the finished runner over and check for any fan or disc joined at only one point; add a second stitch anywhere that feels loose. Weave in all remaining tails. Steam-block the entire runner, keeping the fan shapes’ open mesh spread evenly and the rose petal layers separated and slightly domed rather than pressed flat, and let it dry completely before moving it to the table.
Tips for Success
- Make and block a full test wave of 1 fan and 1 disc joined together before committing to the whole runner, so you know the actual finished width and can plan your final piece count.
- Keep the S-curve of the wave loose and organic rather than forcing it into a rigid zigzag; let each fan and disc overlap at a slightly different angle.
- Fold each rose’s petal rounds back deliberately after attaching; this step is what turns a flat flower into a true dimensional rose.
- Position leaves and buds asymmetrically around each rose rather than in a perfectly even ring, for a more natural look.
- Block the fan shapes with their mesh fully opened; an unblocked fan looks much smaller and denser than its true finished size.
Common Mistakes to Avoid
- Joining fans and discs in a straight line instead of a winding curve loses the wave silhouette entirely. Fix: lay out the full S-curve on your work surface before joining any pieces.
- Sewing rose petal layers down flat against each other loses the ruffled, dimensional look. Fix: fold and tack each outer round back and slightly down after attaching.
- Making all fans and discs the same size makes the wave look mechanical rather than organic. Fix: allow slight natural size variation between individual motifs.
- Skipping the mesh-opening block on the fan shapes leaves them looking cramped and small. Fix: steam and pin the mesh open before joining fans into the wave.
- Placing leaves in a perfectly symmetrical ring around each rose looks stiff. Fix: vary leaf angle and spacing around each flower.
Ways to Customize This Pattern
- Reduce to 3 fans, 4 discs, and 2 roses for a shorter runner suited to a smaller table.
- Swap the sage green discs for a warm rust or gold for a different seasonal palette.
- Use a single rose color throughout instead of cream for a bolder color statement.
- Widen the fan shapes for a bolder, more dramatic wave silhouette.
- Add a few small crocheted berries tucked among the leaves near each rose for extra texture.
Frequently asked questions
Lay out all the fans and discs loosely on a flat surface first and physically curve the line with your hands before pinning anything. Adjust overlap and angle by eye until the curve looks fluid, then start joining from one end.
Yes. Add fan-and-disc pairs in the middle of the wave to extend the length while keeping the curve balanced, and consider adding a fourth rose if the extra length calls for another focal point.
Firm steam blocking is usually enough. If your cotton yarn is on the softer side, a light fabric stiffener spray can help the mesh hold its shape more crisply over time.
This usually means the petal layers weren’t folded back enough after attaching. After finishing Round 3, gently curl each layer of petals outward and slightly downward from the one inside it, and steam lightly to help set the shape.
The finished Wave Fan and Rose Table Runner Crochet Pattern

