Wild Daisy Chain Crochet Table Runner
Beginner Friendly
Perfect for those just starting their crochet journey, with clear instructions and simple techniques
Single-Day Project
A satisfying project you can complete in a single afternoon or evening.
Handmade Gift
A beautiful keepsake — free forever. Read online or print at home.
About This Wild Daisy Chain Crochet Table Runner
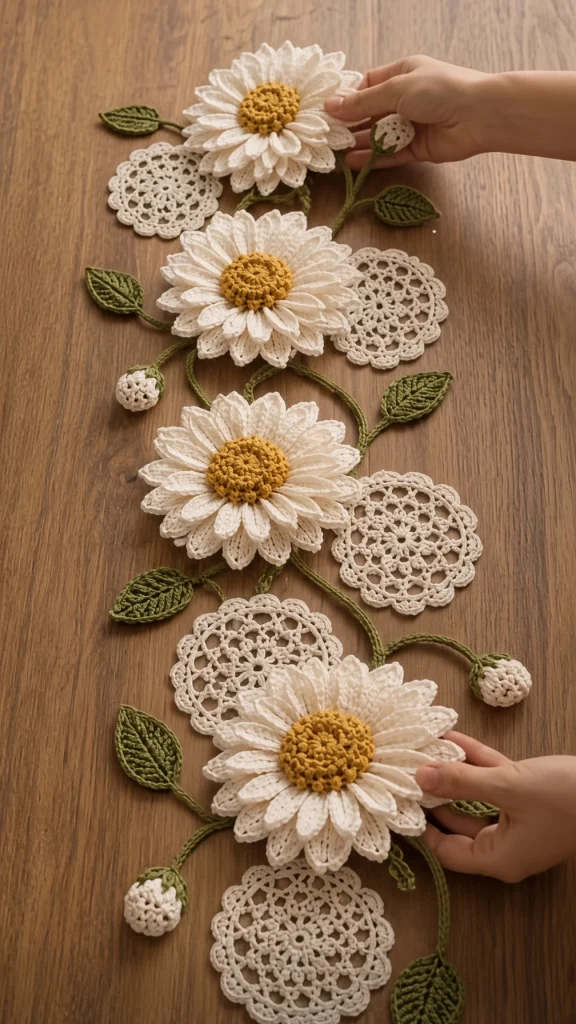
This crochet daisy table runner pattern is built as a chain of separate motifs rather than as a panel: four large layered daisies, five openwork lace medallions, a winding green vine that threads between them, twelve leaves and four small closed buds. Nothing sits on a backing. The vine is the structure, and every other piece is attached to it or to its neighbours, which is why the finished runner has table showing through it rather than a solid ground.
The daisies are the reason to make this. Each one is two stacked layers of twenty-four petals worked into the back loops of a mustard centre disc, so the lower layer peeks out between the upper petals and the flower reads as full rather than flat. The centre is worked in back loop only for three rounds to give it the raised, textured button that a real daisy has. One daisy takes about ninety minutes, and four of them is a solid two-thirds of the project.
Expect 22 to 28 hours. The lace medallions are the calm part, about forty minutes each, and the vine and leaves go quickly. The demanding stage is assembly, which has to be done with everything laid out at once because the composition is asymmetric on purpose. DK cotton keeps the petals crisp and the medallions open. Written in US terms throughout.
Materials
- DK / light worsted cotton in cream approx. 250 g, daisies and medallions
- DK / light worsted cotton in mustard gold approx. 40 g, daisy centres
- DK / light worsted cotton in olive green approx. 120 g, vine and leaves
- 3.0 mm crochet hook one size down from the ball band, for firm petals
- 3.5 mm crochet hook lace medallions only, see the notes
- Tapestry needle blunt, large eye
- Stitch markers at least 6
- Rust-proof pins and blocking mats around 120 pins, every petal and every medallion point needs one
- Spray bottle and a steam iron with a pressing cloth
- Scraps of cream yarn for stuffing the buds do not use polyfill, see the notes
- Tape measure and sharp scissors
Abbreviations
MRmagic ringchchainscsingle crochethdchalf double crochetdcdouble crochettrtreble crochetsl stslip stitchsc2togsingle crochet 2 stitches togetherBLOback loop onlyFLOfront loop onlysp / spsspace / spacesst / stsstitch / stitchesreprepeatFOfasten offGauge and Working Notes
- Gauge: a finished daisy measures about 14 cm across, a lace medallion about 12 cm, and a leaf about 6 cm long.
- Use the 3.0 mm hook for everything except the lace medallions, which are worked on the 3.5 mm so the openwork stays open. A medallion worked at petal tension closes up and looks like a solid disc.
- The daisy centre is worked in BLO for rounds 2 to 4, which creates the raised rim that the petals attach to. Do not work these rounds through both loops or there will be no free loop left for the lower petal layer.
- The lower petal layer is worked into the free front loops left by the BLO rounds, and the upper layer into the final round. Work the lower layer first, always.
- All motifs are worked with the right side facing throughout. Do not turn.
- Leave a 25 cm tail on every piece. There are around 25 motifs plus the vine, and one tail per piece does both the locking and the sewing.
- Make and block everything before you assemble. The composition is asymmetric and cannot be judged one motif at a time.
Daisy Centre (make 4)
- Round 1: with mustard gold, 6 sc in MR (6)
- Round 2: working in BLO, 2 sc in each st around (12)
- Round 3: working in BLO, (sc in the next st, 2 sc in the next st) rep 6 times (18)
- Round 4: working in BLO, (sc in the next 2 sts, 2 sc in the next st) rep 6 times (24)
- Round 5: working through both loops, sc in each st around (24)
- Round 6: working through both loops, sc in each st around (24). Sl st into the first sc and FO, leaving a 15 cm tail.
- You now have a mustard disc about 4.5 cm across with a raised textured surface and three free front loop rounds on its underside. Round 3 is the one that carries the lower petal layer.
- Push the centre gently from behind with your thumb so it domes slightly. A flat centre makes the whole daisy look like a wheel.
Daisy Petals, Lower Layer (make 4)
- Turn the centre over. Join cream in any free front loop of Round 3, which has 18 available loops.
- Petal round: *ch 1, work (hdc, dc, tr, dc, hdc) all into the next free front loop, ch 1, sl st into the following free front loop*; rep from * around.
- Each repeat uses 2 free loops, so 18 loops gives 9 petals. Then work a second pass into the free front loops of Round 4, which has 24 available loops, using the same repeat for a further 12 petals.
- Lower layer total: 21 petals. They will sit in two slightly staggered rings, which is what gives the flower its depth.
- Sl st to join and FO, leaving a 15 cm tail. Weave it in on the back now, while the flower is still easy to handle.
- Keep the tr in each petal loose. It is the longest stitch and it sets the petal length, and a tight one gives a stubby petal that never blocks out.
Daisy Petals, Upper Layer (make 4)
- Turn the flower back to the front. Join cream in any st of Round 6 of the centre, which has 24 sts.
- Petal round: *ch 2, work (hdc, dc, 2 tr, dc, hdc) all into the next st, ch 2, sl st into the following st*; rep from * around.
- Each repeat uses 2 sts, so 24 sts gives 12 petals in this pass. Work a second pass into the same round, placing each new petal in the stitch that was slip stitched in the first pass, for a further 12 petals.
- Upper layer total: 24 petals, and 45 petals on the finished daisy across both layers.
- Sl st to join and FO, leaving a 25 cm tail for attaching the daisy during assembly.
- The upper petals are one stitch longer than the lower ones on purpose, so they cover the lower layer’s bases while letting its tips show through. If the lower layer disappears entirely, your upper tr stitches are too long.
- Make 4 daisies in total. Finished size about 14 cm across.
Lace Medallion (make 5)
- With cream and the 3.5 mm hook, ch 6 and sl st into the first ch to form a ring.
- Round 1: ch 3 (counts as first dc), 17 dc into the ring, sl st into the top of the ch-3 (18 dc).
- Round 2: ch 5 (counts as dc plus ch 2), *skip the next st, dc in the next st, ch 2*; rep from * around, sl st into the 3rd ch of the beginning ch-5 (9 dc and 9 ch-2 sps).
- Round 3: ch 1, *work 3 sc into the next ch-2 sp, sc in the next dc*; rep from * around, sl st into the first sc (36 sc).
- Round 4: ch 6 (counts as dc plus ch 3), *skip the next 2 sts, dc in the next st, ch 3*; rep from * around, sl st into the 3rd ch of the beginning ch-6 (12 dc and 12 ch-3 sps).
- Round 5: ch 1, *work (2 sc, ch 3, 2 sc) into the next ch-3 sp, sl st into the next dc*; rep from * around, sl st to join (12 small picot shells).
- Round 6: sl st into the first ch-3 picot sp, *ch 7, sl st into the next ch-3 picot sp*; rep from * around (12 ch-7 loops).
- Round 7: *work 5 sc into the next ch-7 loop, ch 3, sl st into the 3rd ch from hook for a picot, work 5 sc into the same loop, sl st into the sl st between loops*; rep from * around (12 picot scallops). Sl st to join and FO, leaving a 25 cm tail.
- Make 5. Finished medallion about 12 cm across.
Vine Cord
- With olive green, ch 260 (about 95 cm at this gauge).
- Return pass: sl st into the back bump of the 2nd ch from hook and into the back bump of each remaining ch (259 sl sts).
- Work every slip stitch into the back bump, not the top loops, and keep them loose. This is the only thing that keeps the vine flat instead of corkscrewing, and it cannot be corrected afterwards.
- FO leaving 25 cm tails at both ends.
- Branch cords, make 6: ch 40, sl st back along the chain as above (39 sl sts, about 14 cm each). FO leaving a 20 cm tail.
- The branches carry the buds and some of the leaves, and they let the vine appear to fork rather than running as a single line down the middle. Making them separately means you can reposition them during layout instead of committing early.
- Do not block the cords. A slight natural curve is what makes the vine look like it is winding rather than ruled.
Leaf (make 12)
- With olive green, ch 11.
- Round 1, first side: sc in the 2nd ch from hook, sc in the next ch, hdc in the next 2 ch, dc in the next 2 ch, hdc in the next 2 ch (9 sts, one chain free at the far end).
- Round 1, tip: 3 sc into that last free chain (12).
- Round 1, second side: working along the free loops on the underside of the foundation chain, hdc in the next 2 ch, dc in the next 2 ch, hdc in the next 2 ch, sc in the next 2 ch (21).
- Round 1, base: 2 sc into the remaining chain at the base, sl st into the first sc (23).
- Round 2: ch 1, sc in the next 9 sts; at the tip work sc in the next st, 3 sc in the centre st, sc in the next st; sc in the next 9 sts; at the base work 2 sc in each of the last 2 sts; sl st into the first sc (27). FO leaving a 20 cm tail.
- Central vein: with the same green, work a line of surface sl sts up the centre of the leaf from base to tip, one into each round you cross, about 8 sl sts. Keep them loose, since a tight vein puckers the leaf.
- Make 12. Finished leaf about 6 cm long.
Bud (make 4)
- Round 1: with cream, 6 sc in MR (6)
- Round 2: 2 sc in each st around (12)
- Round 3: working in BLO, sc in each st around (12)
- Round 4: sc in each st around (12)
- Round 5: (sc in the next st, sc2tog) rep 4 times (8)
- Stuff firmly with a scrap of the cream yarn wound into a tight ball.
- Round 6: sc2tog 4 times (4). FO leaving a 20 cm tail, thread it through the front loops of the remaining 4 sts and pull closed.
- Texture: using the free front loops left by Round 3, work a round of *ch 3, sl st into the next free front loop* around, giving 12 small raised loops that suggest unopened petals.
- Use yarn scraps rather than polyfill inside the buds. White fibre is fine against cream, but a loose polyfill ball shifts and the bud goes lumpy within a few months.
- Make 4. Finished bud about 2.5 cm.
Assembly
- Block every piece before joining. Pin each daisy flat with every petal pulled out individually, each medallion pinned at all 12 picot scallops, and each leaf pinned to a point. Let everything dry completely.
- Lay the vine cord down the length of the table in a loose S curve rather than a straight line, so it drifts from one side of the runner to the other and back.
- Position the 4 daisies along the vine at roughly 22 cm intervals, alternating which side of the cord each one sits on.
- Position the 5 medallions in the spaces between and beside the daisies, tucking each one so it partly overlaps a daisy petal or another medallion rather than floating alone. The overlaps are what hold the runner together.
- Attach the 6 branch cords to the main vine at points where it curves, angling them outward, and place a bud at the end of 4 of them.
- Scatter the 12 leaves along both the main vine and the branches, mostly on the outer edges of the composition where the runner needs width.
- Photograph the layout from directly above before sewing anything. You will move pieces during assembly and this is the only reliable way back.
- Sew in this order: vine and branches to each other, medallions to medallions and to the vine, daisies on top, then buds, then leaves last so they sit over everything else.
- Join each medallion to its neighbour along the full contact zone where they overlap, usually 3 to 4 cm, with a whip stitch through the picot scallops. A join of two or three stitches will hinge and the runner will fold.
- Attach each daisy by stitching through the mustard centre from the back, at six points around the disc, so it cannot rotate and the petals stay free.
Finishing
Weave in every end on the back of a solid section, following the line of the stitches for at least 3 cm and splitting the yarn once along the way. Never weave a tail along the vine cord or across an open medallion space, where a doubled strand shows immediately. There are around 60 ends on this runner, so work through them motif by motif rather than saving them for the end.
Once assembled, block the whole runner a second time. Every join redistributes tension across both pieces, so the individual blocking you did earlier has shifted. Soak it in cool water, roll it in a towel, then lay it out and pin the two ends to set the 95 cm length, the sides to set the 30 cm width, and then every medallion picot and every daisy petal again. This is the stage that decides whether the runner reads as lace or as a soft pile of motifs, and it takes around 120 pins.
Let it dry a full day and do not lift it while damp. Once dry, check that the daisy petals sit proud rather than flattened. If the block has squashed them, lift each upper petal with your fingers and steam the flower from 15 cm away with the iron never touching the work. The lower layer should just show between the upper petals when the daisy is viewed from above.
Tips for Success
- Work the BLO rounds of the daisy centre carefully, because those free front loops are the only anchor the lower petal layer has. Missing one loop leaves a visible gap in the lower ring that cannot be filled later.
- Make all four daisies back to back rather than one per week. Petal tension drifts between sessions, and four daisies that differ in size are the most visible inconsistency in the whole piece.
- Use the larger hook for the medallions, every time. It is one hook size but it is the whole difference between open lace and a dense cream disc sitting next to your daisies.
- Lay the composition out on the actual table, not on a blocking mat. The overlaps and the S curve of the vine both look different on wood, and this design is asymmetric enough that it has to be judged where it will live.
- Join medallions to each other before adding the daisies. The medallions carry the structural load of the runner, and building that skeleton first means the daisies can be positioned purely for looks.
Common Mistakes to Avoid
- Working the centre rounds through both loops. Without the free front loops there is nowhere to attach the lower petal layer, and the daisy ends up as a single flat ring of petals. This is the one error that means starting the centre again.
- Upper petals that swallow the lower layer. If the lower tips do not show, the upper tr stitches are too long or too loose. The upper petal should be about 5 mm longer than the lower one, not 15 mm.
- Medallions worked at petal tension. A closed-up medallion reads as a cream blob beside the daisies and the contrast between solid flower and open lace is lost.
- A vine cord that corkscrews. Almost always slip stitches worked into the top loops instead of the back bump. Redo the return pass rather than trying to steam it straight.
- Motifs joined at a single point. Every overlap needs stitching along its full contact zone, or the runner hinges at each join and folds when you pick it up.
- Blocking only once. Individual blocking sets each motif, but the assembled runner needs a second block because the joins pull everything slightly out of shape.
Ways to Customize This Pattern
- Change the length by whole daisies. Each one plus its medallion adds about 22 cm, so three gives a 73 cm runner and six gives 139 cm for a long dining table.
- Swap the palette: pale pink petals with a deep rose centre for spring, or all cream including the centres for a wedding table where the texture does the work instead of the colour.
- Make a round centrepiece instead. One daisy surrounded by three medallions and six leaves gives a 40 cm mat for under a vase.
- Turn single medallions into coasters by working two extra rounds, or single daisies into brooches by sewing a pin bar to the back.
- Add more medallions and fewer daisies for a lacier, quicker runner. Nine medallions and two daisies takes about 14 hours instead of 25.
- Hang it in a window rather than laying it flat. The open medallions read beautifully against the light, and a slim dowel threaded through the top three picot scallops is enough to carry it.
Frequently asked questions
Because a single ring of petals lies flat and reads as a sunflower or a wheel, however many petals you put in it. The stacked layers give the flower depth, with the lower tips showing between the upper petals and casting a small shadow. It adds about twenty minutes per daisy and it is the single feature that makes this design look like a real daisy rather than a flower motif.
The petal rounds are worked too tightly for the number of stitches in the centre. The tr in each petal is the culprit most often, since a tight treble pulls the petal base inward and the whole flower domes. Test it by pinning a daisy flat while damp: if it lies flat under pins and cups again once dry, redo the upper layer more loosely. If it will not pin flat at all, the centre itself has too few stitches for the petal count.
You can, but it changes the piece completely. The open table showing through the medallions and between the motifs is most of the appeal, and a backing turns it into an appliquéd placemat. If you want stability for a table that gets heavy use, add three or four more medallion-to-medallion joins instead, which stiffens the structure without closing the gaps.
Around 120 for the final block, which surprises people. Each medallion needs 12, one per picot scallop, and each daisy needs a pin at roughly every third petal, plus the ends, sides and leaves. Pinning less than that leaves the medallion edges wavy and the petals flattened, and both are immediately visible on a piece where the lace is the point.
Hand wash in cool water with a mild detergent, supporting the whole runner rather than lifting it by one end. Press the water out against the side of the basin and never wring, since twisting flattens the petal layers permanently. Lay it flat, re-pin the ends, the sides and all the medallion picots, and lift each upper daisy petal with your fingers while it is still damp so it dries standing proud.
The finished Wild Daisy Chain Crochet Table Runner

