Wildflower Garden Crochet Lampshade Pattern
Advanced
For experienced crocheters who enjoy complex shaping, fine detail, and ambitious construction
Single-Day Project
A satisfying project you can complete in a single afternoon or evening.
Handmade Gift
A beautiful keepsake — free forever. Read online or print at home.
About This Wildflower Garden Crochet Lampshade Pattern
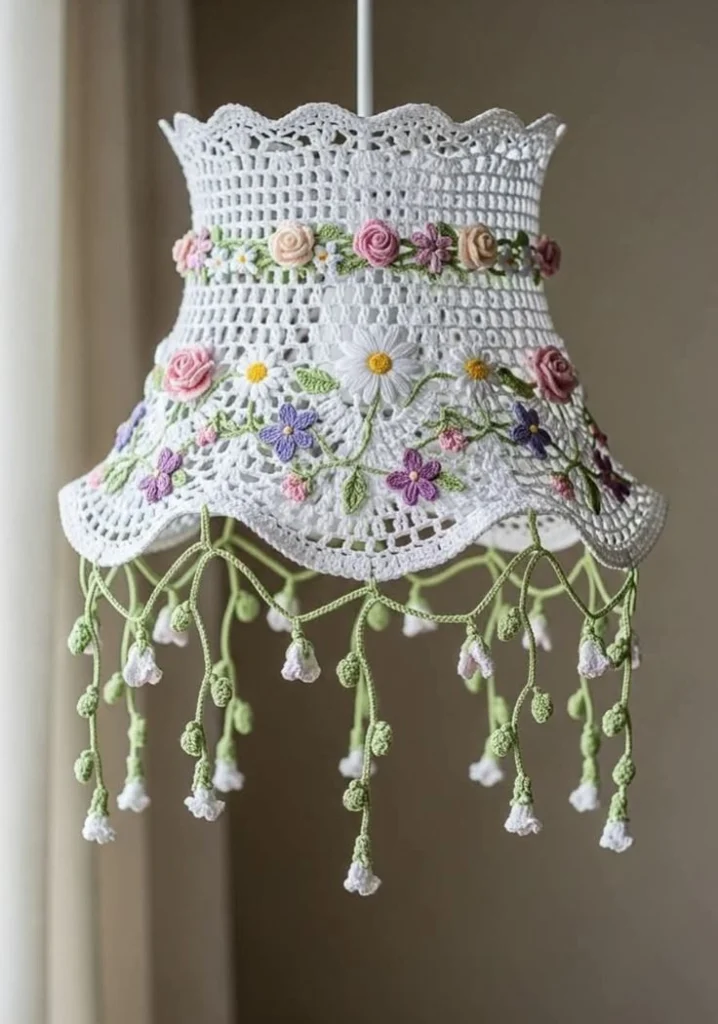
This crochet lampshade pattern creates a white openwork shade covered in pastel roses, white daisies, violet blossoms and curling green vines. Its scalloped crown and flared lower edge echo the reference, while hanging green stems carry tiny white bell flowers below the hem.
Allow approximately 25–35 hours for the lace, separate flowers, embroidery and careful assembly. This advanced project suits crocheters comfortable with fine thread, counted lace repeats and dimensional appliqué. It is a decorative lampshade cover supported by a frame; it contains no stuffing, eyes or toy components.
Materials
- Size 10 mercerized cotton thread White: approximately 700 m; sage green: 250 m; blush pink: 70 m; dusty rose: 50 m; cream: 40 m; lavender: 40 m; plum: 30 m; yellow: 20 m
- Steel crochet hook 1.5 mm, or size needed for gauge
- Purpose-made, coated metal lampshade frame Upper circumference 40 cm, lower circumference 64 cm, vertical ring separation 20 cm; eight supporting ribs preferred
- Fine tapestry needle, sewing needle and matching sewing thread For embroidery, appliqué and attachment
- Stitch markers, rustproof pins and blocking mat Mark eight shaping panels
- Compatible commercially assembled LED light fitting Use only according to its manufacturer’s shade and clearance requirements
Abbreviations
chchainsl stslip stitchscsingle crochethdchalf double crochetdcdouble crochettrtreble crochetMRmagic ringinc2 sc in the same stitchst / stsstitch / stitchesspspaceRSright sideGauge, Dimensions and Mesh Method
- Use US crochet terminology. Target blocked gauge: 10 mesh spaces and 11 mesh rounds = 10 × 10 cm. One mesh space consists of ch 2 between dc posts.
- Swatch foundation: ch 39. Dc in ninth ch from hook, then repeat [ch 2, skip 2 ch, dc in next ch] 10 times. The beginning chain forms the first post and first space: 12 posts and 11 spaces.
- Swatch subsequent rows: ch 5, turn, skip the first space, dc in next dc; repeat [ch 2, dc in next dc] across, placing the last dc in the third chain of the previous turning chain. Each row has 11 spaces. Work 12 rows total, wet-block and measure centrally.
- Finished structural mesh measures approximately 40 cm around the top and 64 cm around the bottom, with a sloping length of 20 cm. Crown scallops add approximately 1.5 cm; lower scallops add approximately 1.5 cm. The longest pendant extends approximately 20 cm below the hem.
- For joined mesh rounds, beginning ch 5 counts as one dc and ch 2. Join to the third chain of that beginning ch 5. Never count the joining sl st as a post.
- A regular mesh unit worked into an old ch-2 space is [dc in that space, ch 2]. An increase unit is [dc, ch 2, dc, ch 2] in one old space. These replace one old space with one or two new spaces respectively.
White Lace Shade Body
- Foundation: with white, ch 120 loosely and join with sl st without twisting. This edge will sit at the upper frame ring.
- Round 1: ch 5, skip the next 2 foundation chains, [dc in next ch, ch 2, skip next 2 ch] 39 times. Join. There are 40 dc posts, including the beginning post, and 40 ch-2 spaces.
- Round 2: sl st into the first space; ch 5, then [dc in next space, ch 2] 39 times. Join. 40 posts and 40 spaces.
- Rounds 3–10: repeat Round 2. Each round has 40 posts and 40 spaces. Mark the spaces in eight consecutive groups of five.
- Round 11: sl st into the first space. In that space work ch 5, dc, ch 2; work a regular mesh unit in each of the next four spaces. Repeat [increase unit in next space, regular mesh unit in each of next four spaces] seven times. Join. 48 posts and 48 spaces, arranged as eight groups of six.
- Rounds 12–14: sl st into the first space, ch 5, [dc in next space, ch 2] 47 times; join. 48 posts and 48 spaces in each round.
- Round 15: sl st into first space; in that space work ch 5, dc, ch 2, then regular mesh units in the next five spaces. Repeat [increase unit in next space, regular mesh unit in each of next five spaces] seven times. Join. 56 posts and 56 spaces, eight groups of seven.
- Rounds 16–18: sl st into first space, ch 5, [dc in next space, ch 2] 55 times; join. 56 posts and 56 spaces in each round.
- Round 19: sl st into first space; in that space work ch 5, dc, ch 2, then regular mesh units in the next six spaces. Repeat [increase unit in next space, regular mesh unit in each of next six spaces] seven times. Join. 64 posts and 64 spaces, eight groups of eight.
- Rounds 20–22: sl st into first space, ch 5, [dc in next space, ch 2] 63 times; join. 64 posts and 64 spaces in each round. Fasten off.
Scalloped Upper Crown
- Turn the shade so the foundation edge is uppermost and the RS faces you. Each group of three foundation chains corresponds to one mesh space. Join white at a foundation chain directly beneath a dc post.
- Round 1: ch 1, sc in the joining chain and each remaining foundation chain; join to first sc. 120 sc.
- Round 2: ch 1, [sc in next st, skip 2 sts, 7 dc in next st, skip 2 sts, sc in next st, ch 5, skip 3 sts, sc in next st, ch 5, skip 4 sts] eight times; join. Each repeat consumes 15 sc. There are eight 7-dc shells, 24 sc and sixteen ch-5 arches.
- Round 3: ch 1; for each repeat work sc in its first sc, sc in each of the seven shell dc with a picot after the fourth sc, sc in the next sc, 5 sc in the next arch, sc in the next sc, 5 sc in the next arch. Make each picot with ch 3, sl st in the first chain. Repeat eight times and join. 160 sc and eight picots. Fasten off.
Scalloped Lower Border
- With RS facing, join white in any Round 22 space. Round 1: ch 1, work 3 sc in each of the 64 spaces; join. 192 sc. Mark the beginning of each 24-stitch segment.
- Round 2: ch 1, [sc in next st, skip 2 sts, 7 dc in next st, skip 2 sts] 32 times; join. 32 shells and 32 sc. Every six input stitches produce one shell and one sc.
- Round 3: ch 1, [sc in next sc, sc in each of next seven dc] 32 times; join. 256 sc. Fasten off. Each marked segment now corresponds to four shells.
- Block the lower edge into eight broad waves, with each wave spanning four small shells. Let the center of each wave project slightly farther than its attachment points.
Dimensional Roses — Make 12
- Make four blush, four dusty rose and four cream roses. For each rose, ch 20.
- Row 1: sc in second ch from hook and each remaining ch. 19 sc. Turn.
- Row 2: ch 1, [sc in next st, skip next st, 5 dc in next st] six times, sc in final st. Six petals and seven sc, 37 stitches total. Fasten off with a 30 cm sewing tail.
- Roll the strip from one end, keeping the petal edges free. Stitch through the straight foundation edge on every turn, then secure the base across its diameter. Each rose should measure approximately 2–2.5 cm across.
- Set aside eight roses for the upper garland and four for the flared lower section.
White Daisies — Make 7
- Center Round 1: with yellow, 6 sc in MR; join. 6 sc.
- Center Round 2: ch 1, inc in every st; join. 12 sc. Fasten off yellow.
- Petal round: join white in any center stitch. In each of the 12 center stitches, work [sl st, ch 7, sc in second ch from hook, hdc in next ch, dc in next two ch, hdc in next ch, sc in last ch, sl st into the same center stitch]. Twelve separate petals, each with six worked chain stitches.
- Fasten off, leaving a sewing tail. Spread the petals evenly and lightly block. Reserve four daisies for the lower front and sides and three for the upper garland.
Five-Petal Violet Blossoms — Make 12
- Make six lavender and six plum blossoms. With yellow, work 5 sc in MR; join. 5 sc. Fasten off.
- Join the petal color in any center stitch. In each of the five center stitches work [sl st, ch 2, 2 dc, ch 2, sl st]. Five petals. Fasten off with a sewing tail.
- For extra definition, embroider one fine straight stitch from the base toward the middle of each petal using a slightly lighter thread. Keep the yellow center visible.
Small Pink Filler Flowers — Make 10
- With blush pink, make an MR. Into the ring work [ch 2, hdc, ch 2, sl st] five times. Tighten the ring. Five petals.
- Fasten off with a sewing tail. Add one yellow French knot in the center, wrapping the needle twice and securing the thread on the back.
Pointed Green Leaves — Make 40
- With sage green, ch 9. Starting in the second ch from hook, work sc, hdc, dc in each of next three ch, hdc, sc, then 3 sc in the final ch.
- Continue along the opposite side of the chain, working sc, hdc, dc in each of next three ch, hdc, sc across the seven remaining chain positions. Join to the first sc. 17 stitches around the leaf.
- Fasten off with a sewing tail. Embroider a loose straight vein along the foundation chain, without cinching the leaf. Reserve 16 leaves for the upper garland and 24 for the lower vines.
Hanging Bell Flowers — Make 16
- Work continuous rounds unless instructed otherwise. With sage green, Round 1: 6 sc in MR. 6 sc. Mark the first stitch.
- Round 2: sc in each st. 6 sc. Change to white in the final pull-through of the last stitch.
- Round 3: [sc in next st, inc in next st] three times. 9 sc.
- Round 4: sc in each st. 9 sc.
- Round 5: [sc in each of next two sts, inc in next st] three times. 12 sc.
- Round 6: [sl st in next st, (hdc, dc, hdc) in next st] six times. Six flared lobes, 24 worked stitches. Fasten off white and weave the end upward inside the bell. Leave the opening hollow.
- Make a separate green calyx for each bell: 5 sc in MR; join. In each sc work [sl st, ch 3, sl st in second ch from hook, sc in next ch, sl st in the same base sc]. Five points. Fasten off with a sewing tail.
- Seat the calyx over the green crown of the bell and sew around its center. Leave the five points free. Keep a green attachment tail at the top.
Green Buds — Make 24
- With green, ch 3. Work a five-leg dc cluster into the third ch from hook: yarn over, insert hook, draw up a loop and pull through two loops; repeat this partial dc four more times into the same chain. Yarn over and draw through all six loops on the hook.
- Ch 1 to secure. Fasten off with a 15 cm tail. Fold the starting chain against the cluster and stitch the base together to form a small closed oval. No stuffing is needed.
Scalloped Green Swag and Pendant Stems
- Make eight swag cords: with green, ch 38, sl st in second ch from hook and each remaining ch. Each cord has 37 sl sts. Fasten off, leaving a sewing tail at both ends.
- Make eight long stems: ch 75, sl st in second ch from hook and each remaining ch. 74 sl sts per stem.
- Make eight short stems: ch 45, sl st in second ch from hook and each remaining ch. 44 sl sts per stem.
- Make 24 bud branches: ch 10, sl st in second ch from hook and each remaining ch. Nine sl sts per branch. Sew one bud securely to one end of every branch.
- After damp blocking, long stems should measure approximately 18–20 cm and short stems approximately 10–12 cm. Their chain counts remain fixed; actual length depends on your slip-stitch tension.
- Sew one bell by its green crown to the bottom of each long and short stem. On each long stem attach one bud branch 5 cm above the bell and another 10 cm above it. On each short stem attach one bud branch 4 cm above the bell. This uses all 24 buds.
- Sew branch ends along 1 cm of the main stem, rather than relying on a single knot. Alternate the direction of the branches to create a loose botanical shape.
Frame Attachment and Flower Placement
- Wet-block all lace and appliqués separately. Shape the body to a 40 cm upper circumference, 64 cm lower circumference and approximately 20 cm sloping mesh length. Let everything dry fully before assembly.
- Slide the shade over the frame. Align the foundation edge with the upper ring and the end of mesh Round 22 with the lower ring. Position the eight shaping panels over the eight frame sectors.
- Using doubled white thread, whipstitch the foundation edge around the upper ring at every third foundation stitch: 40 attachment points. Keep the crown above the ring.
- Whipstitch each of the 64 Round 22 mesh spaces around the lower ring. The scalloped border hangs below this attachment line. Add discreet white tacking stitches around each rib at mesh Rounds 6, 12 and 18.
- Place the upper flower garland across Rounds 7–9. Center one rose in each of the eight frame sectors. Fill the gaps with three daisies and five violet blossoms. Sew 16 leaves in pairs beside the roses, and add four small pink filler flowers.
- Place the remaining four roses on the flared body, centered over alternate sectors near Rounds 14–16. Arrange the remaining four daisies and seven violet blossoms between Rounds 13–21. Distribute the remaining six pink flowers and 24 leaves among them. Pin all pieces before sewing.
- With green thread, embroider eight winding main vines from Round 11 toward Round 21, one per sector. Use short stem stitches around existing mesh posts; bridge open spaces loosely. Add branch lines to the flowers and leaves. Do not tighten the mesh.
- Sew roses through their bases, daisies through their centers and petal bases, and violet blossoms through their centers and outer petal bases. Attach leaves along their center veins, leaving their edges slightly raised.
- Attach one long pendant at each of the eight lower-ring sector boundaries. Attach one short pendant halfway between each pair of long pendants. Anchor every stem directly around the lower ring through the lace, so its weight is carried by the frame.
- Attach each swag cord between neighboring long-stem anchors, allowing its middle to dip below the border. Tack the midpoint to the neighboring short stem approximately 2 cm below that stem’s top. There are eight swags, eight long pendants and eight short pendants.
Finishing
Weave each thread end through several solid stitches, reverse direction and secure it before trimming. Turn the shade slowly and check that flowers sit comfortably, the eight swags hang evenly and no stem is caught behind a neighboring branch. Ease the bell rims open with your fingertips.
Fit the completed shade only to a compatible, commercially assembled LED fixture. Follow the fixture manufacturer’s installation and clearance instructions, and keep all cotton components outside the required clearance zone. For cleaning, remove the cover from the fixture and frame, wash gently by hand and block again before reassembly.
Tips for Success
- Move the eight panel markers after each increase round. Each panel must contain six spaces after Round 11, seven after Round 15 and eight after Round 19.
- Check the dry, blocked body on the frame before adding flowers. Appliqués make later sizing adjustments much harder.
- Keep rose foundation edges tightly stitched while leaving their petal tops loose. This produces raised blossoms without stuffing.
- Pin the largest flowers first and check the arrangement from several sides before adding filler flowers and embroidered vines.
- Block pendant cords separately with very light tension so their slip stitches remain flexible and the bells hang vertically.
Common Mistakes to Avoid
- Counting the beginning ch 5 as an extra mesh space causes the shade to grow unintentionally. It already supplies the first dc and the first ch-2 space.
- Working mesh increases into dc posts changes the intended texture and count. Work both new posts into the marked old ch-2 space.
- Pulling embroidery tightly collapses the open mesh. Lay each vine stitch against the surface with the shade supported on its frame.
- Hanging pendants from scallop tips stretches the border. Anchor them around the lower frame ring through the mesh attachment line.
- Adding every flower to the front makes the frame hang unevenly. Spread the roses and larger daisies around the full circumference before filling smaller gaps.
Ways to Customize This Pattern
- Use ivory for the lace and pale peach for the roses while keeping the white bell flowers for a softer garden palette.
- Make all 12 five-petal blossoms lavender and embroider their veins in plum for a more unified floral border.
- Shorten the eight long stems to ch 60 and the eight short stems to ch 35 for a tidier fringe. Keep the bud branches at least 3 cm apart.
- For a decorative unlit hanging piece, use the same frame and omit the light fitting entirely; retain all ring attachments and floral details.
Frequently asked questions
This pattern is counted for upper and lower circumferences of 40 cm and 64 cm. A different frame requires a new gauge calculation and possibly different mesh counts. Changing the hook works only if the resulting blocked gauge fits both rings and the frame height together.
The metal frame supports the body, so starch is unnecessary. Wet blocking shapes the crown, petals and border. Use small hidden stitches to hold a stubborn crown scallop rather than stiffening the entire cover.
Block the stems before assembly, alternate long and short pendants, and point neighboring bud branches in different directions. Secure each swag midpoint to its short stem so the fringe maintains its spacing.
No. LED bulbs and their fittings can still produce heat. Use a compatible shade frame and maintain every clearance specified by the fixture manufacturer, including clearance around the socket and electrical components.
The finished Wildflower Garden Crochet Lampshade Pattern

