Windowpane Bedspread and Pillow Shams Crochet Pattern
Beginner Friendly
Perfect for those just starting their crochet journey, with clear instructions and simple techniques
Single-Day Project
A satisfying project you can complete in a single afternoon or evening.
Handmade Gift
A beautiful keepsake — free forever. Read online or print at home.
About This Windowpane Bedspread and Pillow Shams Crochet Pattern
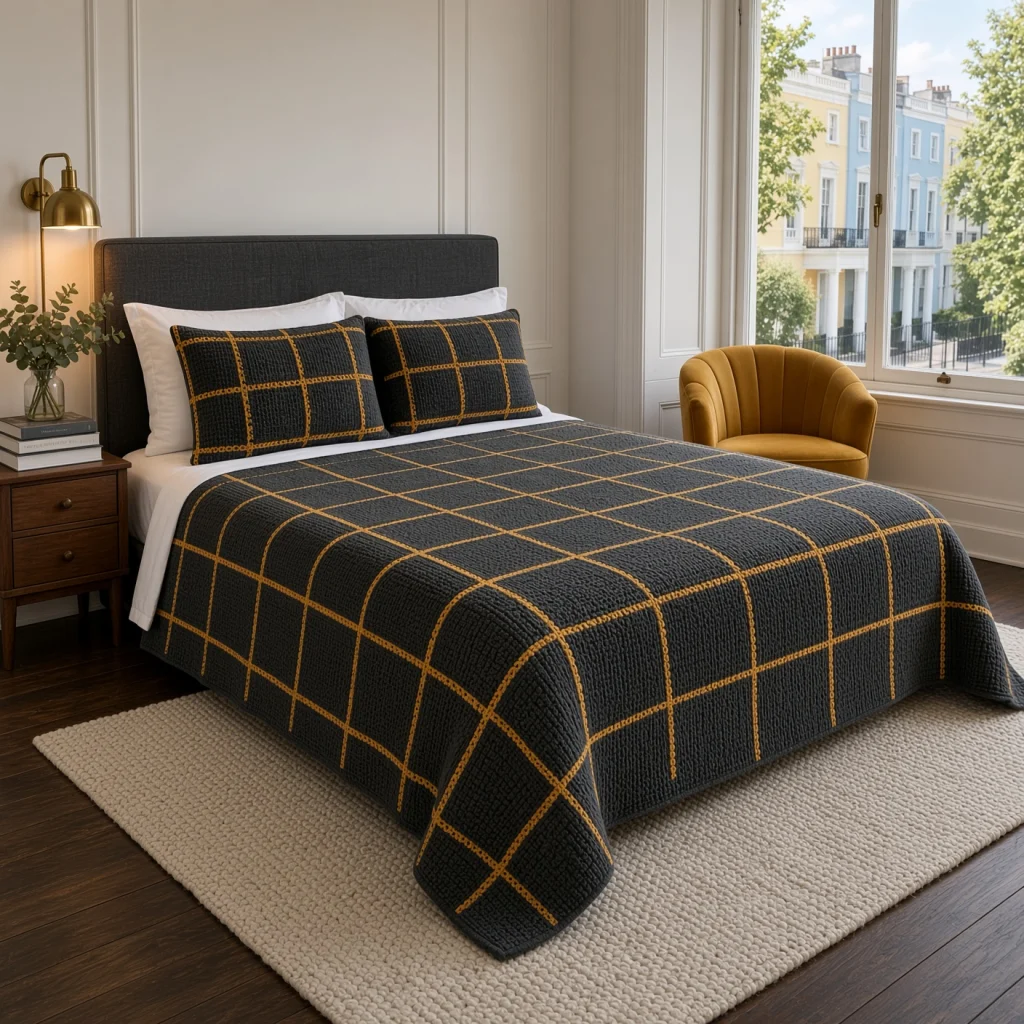
This crochet windowpane bedspread pattern gives you a dense charcoal coverlet crossed by fine mustard lines that look like stitched piping. The base is worked in linen stitch, which makes a firm, nubby fabric that lies flat and holds its shape on the bed. The grid is added afterward with surface slip stitch, so the lines stay crisp and sit slightly raised above the texture.
The bedspread is made in three long panels instead of one huge piece. Each panel is easier to carry and work on, and the two seams joining them are worked in mustard on the right side, so they become two of the vertical grid lines. A charcoal border with a mustard frame line finishes the edge, and two matching pillow shams with envelope backs complete the set.
Plan on 80 to 100 hours for the full set. This is a long project, but the stitch pattern is a simple two-row repeat once you have it in your hands. It suits a crocheter who is comfortable with gauge, counting and seaming, and who wants a finished piece that looks tailored rather than homemade.
Materials
- Worsted weight yarn, charcoal about 4,900 m for the bedspread (25 skeins of 100 g / 200 m)
- Worsted weight yarn, charcoal about 1,200 m extra for two shams (6 skeins)
- Worsted weight yarn, mustard about 600 m for lines, seams and sham edging (3 skeins)
- 5.5 mm crochet hook for the base fabric, seams and border
- 6 mm crochet hook optional, for looser surface slip stitch lines
- Stitch markers at least 30
- Tapestry needle and scissors
- Two pillows 50 x 70 cm, for the shams
- Blocking mats or a clean bedsheet and pins for blocking panels
Abbreviations
chchainscsingle crochetsl stslip stitchsurf sl stsurface slip stitch: yarn held behind the work, insert hook from front between stitches, pull up a loop and draw it through the loop on hookrev screverse single crochet (crab stitch), worked left to rightskskipspspacest(s)stitch(es)RS / WSright side / wrong siderndroundreprepeatMain Panels (make 3)
- With charcoal and 5.5 mm hook, ch 110.
- Row 1 (RS): sc in 2nd ch from hook, *ch 1, sk next ch, sc in next ch; rep from * across. (109 sts: 55 sc, 54 ch-1 sps)
- Row 2: ch 1, turn, sc in first sc, sc in next ch-1 sp, *ch 1, sk next sc, sc in next ch-1 sp; rep from * to last sc, sc in last sc. (109 sts: 56 sc, 53 ch-1 sps)
- Row 3: ch 1, turn, sc in first sc, *ch 1, sk next sc, sc in next ch-1 sp; rep from * to last 2 sc, ch 1, sk next sc, sc in last sc. (109 sts: 55 sc, 54 ch-1 sps)
- Rows 4-484: rep Rows 2 and 3 alternately, ending with a Row 2. (109 sts in every row)
- As you go, place a marker at the end of Rows 44, 88, 132, 176, 220, 264, 308, 352, 396 and 440. These mark the horizontal grid lines.
- Fasten off. Each panel measures about 68 x 242 cm. Block all three panels to the same size before adding any lines.
Vertical Grid Lines (each panel)
- Lay a panel RS up with the foundation edge at the bottom. Counting from the right edge along Row 1, place a marker between st 36 and st 37, and another between st 73 and st 74. This gives squares of 36, 37 and 36 sts.
- With mustard held behind the work and the 6 mm hook (or 5.5 mm if you work loosely), start at the bottom edge at the first marker.
- Work 1 surf sl st between each row, going straight up the same gap between stitches, to the top edge. (484 surf sl st)
- Fasten off, leaving a 15 cm tail at each end.
- Rep along the second marker. (484 surf sl st)
- Rep on the other two panels. Lay the panels side by side and check that the lines are straight and that the panels still match in length.
Joining the Panels
- Lay Panel 1 and Panel 2 WS together, matching foundation edges and the row markers along the long sides.
- With mustard and 5.5 mm hook, with Panel 1 facing you, sl st through both layers in each row end, from bottom to top. (484 sl st)
- Check every 44 rows that the markers on both panels line up. If they drift, undo back to the last matching marker and adjust.
- Fasten off. The seam makes a raised mustard ridge on the RS that matches the surface lines.
- Join Panel 3 to the other long edge of Panel 2 the same way. The bedspread is now 327 sts wide.
Horizontal Grid Lines
- With the joined bedspread RS up, find the markers at Row 44 on the right edge.
- With mustard held behind the work, work 1 surf sl st in the gap between Row 44 and Row 45 under each stitch across the full width, working straight over the two seams. (327 surf sl st)
- Fasten off, leaving 15 cm tails.
- Rep between Rows 88/89, 132/133, 176/177, 220/221, 264/265, 308/309, 352/353, 396/397 and 440/441. (10 horizontal lines in all, 11 squares top to bottom)
- Remove all markers.
Border
- Rnd 1: with charcoal and 5.5 mm hook, RS facing, join in the top right corner. Work 3 sc in the corner st, sc in next 325 sts, 3 sc in last st; work 388 sc down the side (4 sc for every 5 rows over the first 480 rows, then 4 sc over the last 4 rows); 3 sc in the corner st of the foundation edge, sc in next 325 sts, 3 sc in last st; work 388 sc up the other side. Join with sl st to first sc. (1,438 sts)
- Rnd 2: ch 1, sc in each st around, working 3 sc in the center st of each corner. Join. (1,446 sts)
- Rnd 3: rep Rnd 2. (1,454 sts)
- Rnd 4: rep Rnd 2. (1,462 sts)
- Rnd 5: rep Rnd 2. (1,470 sts)
- Rnd 6: ch 1, rev sc in each st around. Join and fasten off. (1,470 sts)
- Frame line: with mustard held behind the work, work surf sl st all the way around in the gap between the panel edge and Border Rnd 1, 1 surf sl st per stitch or row end. Join to the first surf sl st and fasten off.
Pillow Sham Fronts (make 2)
- With charcoal and 5.5 mm hook, ch 110.
- Rows 1-3: work as Main Panel Rows 1-3. (109 sts)
- Rows 4-96: rep Rows 2 and 3 alternately, ending with a Row 2. Place a marker at the end of Row 48. (109 sts)
- Fasten off. Piece measures about 68 x 48 cm.
- Work vertical lines as for the Main Panels, between st 36/37 and st 73/74. (96 surf sl st each)
- Work one horizontal line between Rows 48 and 49. (109 surf sl st)
Pillow Sham Backs (make 2 sets)
- Upper back: with charcoal, ch 110. Work Rows 1-60 as Main Panel (rep Rows 2 and 3, ending with a Row 2). (109 sts)
- Row 61: ch 1, turn, sc in each sc and each ch-1 sp across. Fasten off. (109 sc)
- Lower back: with charcoal, ch 110. Work Rows 1-52 as Main Panel, ending with a Row 2. (109 sts)
- Row 53: ch 1, turn, sc in each sc and each ch-1 sp across. Fasten off. (109 sc)
- The sc rows are the open edges of the envelope. Together the two pieces measure about 57 cm, giving a 9 cm overlap.
Sham Assembly
- Lay a sham front WS up. Place the lower back on top, RS up, with its foundation edge along the bottom of the front. Place the upper back on top, RS up, with its foundation edge along the top of the front, overlapping the lower back in the middle. Pin all edges.
- Rnd 1: turn so the front faces you. With mustard and 5.5 mm hook, join in the top right corner through all layers. 3 sc in corner st, sc in next 107 sts, 3 sc in last st; work 76 sc evenly down the side; 3 sc in corner st, sc in next 107 sts, 3 sc in last st; work 76 sc evenly up the other side. Join with sl st. (378 sts)
- Through the overlap, go through all three layers and keep the tension steady so the side doesn’t pucker.
- Rnd 2: ch 1, rev sc in each st around. Join and fasten off. (378 sts)
- Rep with the second sham.
Finishing
Weave in every tail on the wrong side. For the mustard lines, run each tail back along the back of its own line so no gold shows through the charcoal. Split the plies of the charcoal as you weave so the ends don’t work loose with washing.
Wet block the finished bedspread flat on a bedsheet or blocking mats. Pin the edges straight and nudge the grid lines into straight lines while it’s damp. Let it dry fully before moving it, which can take a day or two with this much yarn. Block the shams with a folded towel inside to set their shape, then slip in the pillows.
Tips for Success
- Wind several skeins before you start and join new charcoal yarn at the edge of a panel, never in the middle of a row. The edge ends get hidden inside the seam or border.
- Work the surface lines with a hook one size larger than the base. Linen stitch is dense, and a tight surface line will pull the fabric and make the squares pucker.
- Count the 109 stitches every 20 rows or so. The ch-1 spaces are easy to miss at the edges, and one lost stitch changes every vertical line placement above it.
- Work the vertical lines before seaming. A single panel is much easier to turn and hold than the full joined bedspread.
- Use the same dye lot for all the charcoal. Dark colors show dye lot differences clearly in a flat, solid fabric.
Common Mistakes to Avoid
- Working sc into the sc instead of the ch-1 sp. This turns linen stitch into plain sc and changes the row gauge. Each sc in Rows 2 and 3 goes into a space, except the first and last stitches.
- Panels that differ in length. If one panel has more rows, the horizontal lines won’t meet at the seams. Count rows and check your markers before fastening off each panel.
- Wavy grid lines. This usually happens when you lose track of which gap you’re following. Place a column of markers every 20 rows in the gap before you start the line.
- A ruffled border. If the border waves, you picked up too many stitches along the sides. Stick to 4 sc per 5 rows, and go down a hook size for the border if needed.
- Sham sides that gape. Working too few stitches through the overlap leaves gaps. Make sure all three layers are caught in every stitch there.
Ways to Customize This Pattern
- Change the size: each square adds or removes about 22 cm. Add or remove 44 rows per square in length, or make a fourth panel for a king bed.
- Swap the colors: cream with rust lines, navy with white, or forest green with camel all give the same tailored look.
- Make a double windowpane: work a second surf sl st line 2 sts away from each existing line for a tartan look.
- Make a matching throw: one panel with a border makes a 76 x 250 cm bed runner, and two panels make a sofa throw.
- Add tassels or pom-poms in mustard at the four corners of the bedspread or shams.
Frequently asked questions
Yes. Ch 328 and work linen stitch across 327 sts, then add the two extra vertical lines where the seams would be (between sts 109/110 and 218/219). It will be very heavy to hold by the end, which is why the panels are recommended.
Surface slip stitch gives the thin, raised, chain-like lines in this design. Working color changes into the fabric would create thicker blocks of color and many more ends to weave in.
A machine washable wool blend or a cotton-acrylic blend works well. Pure cotton makes a very heavy bedspread at this size, and pure acrylic can lose its shape over time.
Follow your yarn label. For washable yarn, use a gentle cold cycle in a large machine, then dry it flat. Don’t hang it wet, because the weight will stretch it out of shape.
The finished Windowpane Bedspread and Pillow Shams Crochet Pattern

