Winter Lace Snowflake and Leaf Crochet Curtain
Advanced
For experienced crocheters who enjoy complex shaping, fine detail, and ambitious construction
Single-Day Project
A satisfying project you can complete in a single afternoon or evening.
Handmade Gift
A beautiful keepsake — free forever. Read online or print at home.
About This Winter Lace Snowflake and Leaf Crochet Curtain
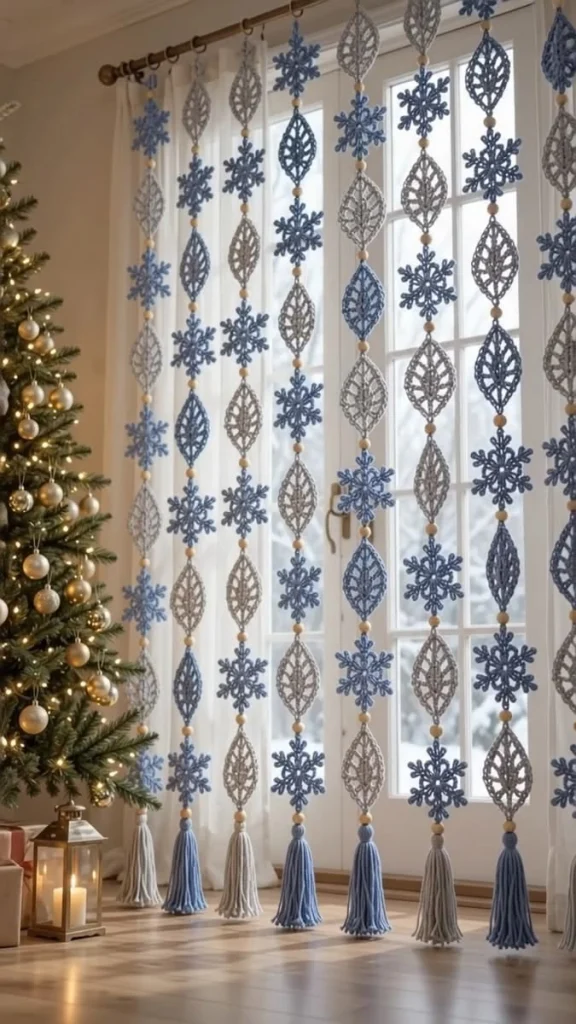
This crochet snowflake curtain pattern creates a light, open window hanging with alternating blue snowflakes and pointed lace leaves. Inspired by the reference photograph, seven separate strands combine dusty blue, deep slate blue, silver gray, natural wooden beads, and long matching tassels. Daylight shows through the motifs and the spaces between them.
The construction suits experienced crocheters who enjoy precise lace work, surface stitching, blocking, and measured assembly. Allow approximately 35–45 hours for the 56 motifs, seven tassels, and finishing, plus drying time. Each strand has its own supporting cord so the lace keeps its shape without carrying the weight of everything below it.
Materials
- Smooth sport-weight cotton, approximately 125 m per 50 g Dusty blue: 200 g; deep slate blue: 150 g; silver gray: 250 g. Includes tassels and a working allowance; quantities are estimates.
- Crochet hook 2.5 mm, or size needed for blocked gauge
- Low-stretch braided hanging cord 1 mm diameter, seven lengths of 170 cm; approximately 12 m total
- Natural wooden beads 63 beads, approximately 12 mm diameter, with holes at least 3 mm wide
- Tapestry needle and fine sewing needle For weaving ends and attaching motifs to their support cords
- Strong matching sewing thread For discreet reinforcement at motif attachment points
- Blocking board, rustproof pins, ruler, and scissors A board at least 15 cm square is sufficient for individual motifs
- Firm cardboard 20 cm long, for winding tassels
- Curtain rod with seven rings or clips Mount attachment points 14 cm apart
Abbreviations
chchaindcdouble crochet, US terminologydc2togdouble crochet two stitches togetherdc3togdouble crochet three stitches togetherMRmagic ringscsingle crochetsl stslip stitchst / stsstitch / stitchesGauge, Dimensions, and Construction
- Use US crochet terminology throughout. For a gauge swatch, ch 25. Row 1: dc in the fourth ch from the hook and each remaining ch; the skipped three chains count as the first dc. You have 23 dc. Rows 2–14: ch 2, turn, dc in each st; turning chains do not count as stitches.
- Wash and dry the swatch flat. Target gauge is 22 dc and 10 rows per 10 cm, measured away from the edges. Change hook size as needed. Motif dimensions after blocking are the final assembly check.
- Leaves are worked flat from a narrow base to a pointed tip, edged, then decorated with a surface-stitched central vein. Snowflakes have a firm center and six separately worked branched arms.
- Make seven strands, each containing eight alternating motifs: four snowflakes and four leaves. Total: 28 snowflakes and 28 leaves. Each strand also needs nine beads and one tassel.
- Finished hanging length is approximately 138 cm from the base of the hanging loop to the tassel tips. Seven strand centers spaced 14 cm apart span 84 cm; the widest motifs bring the overall width to approximately 94 cm.
Pointed Lace Leaves — Make 28
- Make 20 silver-gray leaves and eight deep slate-blue leaves. Leave a 20 cm starting tail. Row 1: ch 3, work 3 dc in the third ch from the hook; the unused chains do not count as a stitch. Turn. (3 sts)
- Row 2: ch 2, 2 dc in the first st, dc in the next st, 2 dc in the last st. Turn. (5 sts)
- Row 3: ch 2, 2 dc in the first st, dc in the next 3 sts, 2 dc in the last st. Turn. (7 sts)
- Row 4: ch 2, 2 dc in the first st, dc in the next 5 sts, 2 dc in the last st. Turn. (9 sts)
- Row 5: ch 2, 2 dc in the first st, dc in the next 7 sts, 2 dc in the last st. Turn. (11 sts)
- Row 6: ch 2, dc in the first st, repeat (ch 1, skip 1 st, dc in the next st) five times. Turn. (6 dc and 5 ch-1 spaces; 11 positions)
- Row 7: ch 2, dc2tog over the first dc and the following ch-1 space, work 1 dc in each of the next 7 positions, dc2tog over the last ch-1 space and last dc. Work into chain spaces, rather than into individual chain loops. Turn. (9 sts)
- Row 8: ch 2, dc2tog over the first 2 sts, dc in the next 5 sts, dc2tog over the last 2 sts. Turn. (7 sts)
- Row 9: ch 2, dc in the first st, repeat (ch 1, skip 1 st, dc in the next st) three times. Turn. (4 dc and 3 ch-1 spaces; 7 positions)
- Row 10: ch 2, dc2tog over the first dc and following ch-1 space, dc in each of the next 3 positions, dc2tog over the last ch-1 space and last dc. Turn. (5 sts)
- Row 11: ch 2, dc2tog over the first 2 sts, dc in the next st, dc2tog over the last 2 sts. Turn. (3 sts)
- Row 12: ch 2, dc3tog over all 3 sts. Do not turn. (1 st)
- Edging round: ch 1, work 2 sc around each of the 12 row ends down the first side (24 sc). Work 3 sc into the original foundation chain opening at the base. Work 2 sc around each of the 12 row ends up the second side (24 sc). Work 3 sc into the top of the Row 12 dc3tog. Join with a sl st to the first sc. (54 sc)
- Fasten off, leaving a 30 cm tail. The three stitches at each end form the base and tip; keep them distinct from the stitches around the adjacent row ends.
Leaf Veins and Surface Details
- Lay each leaf with its narrow foundation base downward. Thread matching yarn onto a tapestry needle. Bring the yarn up at the foundation opening, leaving a tail on the back.
- Work a line of loose chain embroidery up the center, making one embroidered chain approximately one crochet row high. Make 12 embroidered chains from the base to the pointed tip. Pass the needle through the center fabric where necessary, bridging the two openwork rows without tightening them.
- Add six diagonal straight stitches as veins: one on each side of the center at Rows 4, 6, and 8. Each stitch runs from the central line toward the inner edge of the border. Stop short of the edging so the outline remains flexible.
- Secure both ends on the back beneath solid stitches. Keep the embroidery relaxed; the leaf should lie flat before blocking.
Six-Armed Blue Snowflakes — Make 28
- Make 16 dusty-blue and 12 deep slate-blue snowflakes. Round 1: work 6 sc in MR. Close the ring and join with a sl st to the first sc. (6 sts)
- Round 2: ch 1, work 2 sc in each st around. Join with a sl st to the first sc. The chain and joining slip stitch do not count. (12 sts)
- Round 3, first arm: ch 13. Working back along this chain, sl st in the second ch from the hook and in the next 2 chains. You have worked 3 return slip stitches, leaving 9 foundation chains unworked.
- At that point make a paired branch: ch 4, sl st in the second ch from the hook and next 2 chains, then sl st into the same foundation-chain point from which the branch began. Repeat this branch once more into that same point. These two short branches will be pinned to opposite sides of the arm.
- Sl st in the next 3 unworked foundation chains. Make another paired branch exactly as above at this point. You have now worked 6 return slip stitches along the main chain, with 6 foundation chains remaining.
- Sl st in the next 3 unworked foundation chains. Make a third paired branch at this point. You have now worked 9 return slip stitches along the main chain, with 3 foundation chains remaining.
- Sl st in the last 3 foundation chains. This completes all 12 return slip stitches along the arm. Sl st in each of the next 2 stitches of Round 2, beginning with the stitch immediately after the arm’s starting stitch. The last anchor of the sixth arm will enter the stitch where Round 3 began.
- Repeat Steps 3–7 five more times to make six arms total. Each arm has three pairs of side branches, and each arm advances across 2 center stitches. All 12 center stitches are used once as anchoring stitches.
- Fasten off and weave in the ends securely. Each snowflake has six long arm tips and 36 short branch tips. Orient two long arms vertically when assembling the curtain.
Blocking the Motifs
- Soak the motifs in cool water, gently squeeze out excess water, and roll them in a towel. Do not wring them.
- Pin each leaf to approximately 12 cm high and 6 cm wide, with the widest point near Rows 5–6. Straighten the central vein and open the chain spaces without pulling the border into scallops.
- Pin each snowflake to approximately 10 cm from opposite long tips. Space the six arms evenly around the center, approximately 60 degrees apart.
- At each branch pair, pin one branch to either side of the main arm. Keep the three pairs separate so the finished snowflake has a clear branched outline.
- Let the motifs dry completely before removing the pins. Record the actual blocked dimensions. If either motif exceeds 13 cm high, adjust the gauge before making the remaining pieces or increase the center spacing and recalculate the curtain length.
Long Wrapped Tassels — Make Seven
- Make three dusty-blue, two deep slate-blue, and two silver-gray tassels. Wind yarn around the 20 cm length of the cardboard 45 times. This produces 90 hanging yarn ends after cutting.
- Slide a separate 30 cm length of matching yarn beneath the wraps at one end of the cardboard. Tie it tightly around all the wraps using a firm double knot. Keep these tie ends for attachment.
- Cut through all the wraps at the opposite end and remove the cardboard. Fold the strands downward from the tied crown.
- Use a separate 60 cm length of matching yarn to wrap a neck approximately 2 cm below the crown. Make 10 snug wraps, tie securely, and bury the ends through the neck with a needle.
- Comb the strands gently with your fingers and trim to 18 cm from crown to tips. Do not brush the cotton into a fluffy fringe; the reference has distinct hanging strands.
Strand Layout and Color Placement
- Number strands 1–7 from left to right. Number motif positions 1–8 from top to bottom. All leaves point upward.
- On strands 1, 3, 5, and 7, place snowflakes at positions 1, 3, 5, and 7, and leaves at positions 2, 4, 6, and 8. Make all 16 of these snowflakes dusty blue.
- On strands 2, 4, and 6, place leaves at positions 1, 3, 5, and 7, and snowflakes at positions 2, 4, 6, and 8. Make all 12 of these snowflakes deep slate blue.
- Use deep slate-blue leaves at positions 2 and 6 on strands 1, 3, 5, and 7. Use silver-gray leaves in all remaining leaf positions. This uses eight blue leaves and 20 gray leaves.
- Assign tassels left to right: silver gray, dusty blue, deep slate blue, dusty blue, silver gray, dusty blue, deep slate blue.
Measured Cords, Beads, and Joining
- Cut seven 170 cm support cords. At the top of each, form a loop with a 6 cm internal circumference and secure it with a bowline. Keep a tail of at least 6 cm and secure that tail alongside the standing cord with several thread stitches.
- Use the bottom of the finished hanging-loop knot as the zero point. Lay each cord straight on a measuring surface without stretching it.
- Mark motif centers at 12, 26, 40, 54, 68, 82, 96, and 110 cm below zero. Mark bead centers at 5, 19, 33, 47, 61, 75, 89, 103, and 117 cm. Mark the tassel crown at 120 cm.
- Thread nine beads onto each cord. Starting with the lowest bead, position its center at its mark. Tie an overhand stopper knot immediately below it. If the knot passes through the bead hole, add another turn before tightening. Recheck the center mark after tightening, then work upward through the remaining beads.
- Place the motifs over the cord in the planned order, with their centers aligned to the marks. The cord runs vertically behind each motif. On leaves it follows the embroidered vein; on snowflakes it follows the two vertically opposed arms.
- Using matching sewing thread doubled through the needle, attach each motif at five points: upper tip, halfway from the upper tip to the center, center, halfway from the center to the lower tip, and lower tip. At each point make three small stitches around the cord and through substantial crochet stitches, then secure the thread on the back.
- Keep the cord straight and leave the motif at its blocked size. These attachments transfer the hanging load to the cord and keep the lace from sliding or twisting.
- Attach the tassel crown at the 120 cm mark using its two tie ends, tying them around the support cord with a firm double knot. Reinforce the connection with sewing thread. Pass the remaining support cord down through the tassel neck, secure it inside with thread, and trim it below the wrap so it is concealed.
- Hang the seven top loops from rings or clips spaced 14 cm apart. Check that all tassel crowns sit at the same height before making the final fringe trim.
Finishing
Hang the curtain and let the strands settle overnight. Turn every leaf so its embroidered vein faces the room, then spread the snowflake branches with your fingers. Secure any visible yarn ends beneath stitches on the back and trim the tassels into an even lower line.
The finished curtain should fall in separate, airy strands with a wooden bead between neighboring motifs. Keep the lace clear of candles and heaters. This is a decorative hanging with long cords and small beads; install it out of reach of young children and pets.
Tips for Success
- Use a paper blocking guide with six evenly spaced rays for the snowflakes. Consistent arm angles make the whole curtain look more orderly.
- Mark the snowflake foundation chains at the three branch points before working back: branches follow the third, sixth, and ninth return slip stitches.
- Block all leaves to one outline. Their tapered rows can otherwise dry at slightly different widths, even with the same stitch count.
- Measure every strand from its own finished top knot. Small differences in loop knots will otherwise carry through to the tassel line.
- Lay out all seven strands before sewing. The staggered leaf and snowflake arrangement is easier to check across the complete curtain.
Common Mistakes to Avoid
- Counting turning chains as leaf stitches creates extra width. Only the worked stitches count in Rows 1–12; check the stated totals after each row.
- Skipping the chain spaces in leaf decrease rows makes the leaf too narrow. Treat every dc and every ch-1 space as one input position.
- Counting a branch’s return stitches as main-arm stitches shifts later branches. Only slip stitches into the original ch-13 foundation contribute to the 12 main return stitches.
- Pulling the leaf embroidery tight curls the fabric. Remove the tight section and replace it with stitches that rest on the surface.
- Joining motifs directly into a hanging chain stretches the lace. Attach every motif independently to the continuous support cord as instructed.
Ways to Customize This Pattern
- For a narrower window, make five strands using the first five color layouts. At 14 cm center spacing, the finished width is approximately 66 cm.
- For a shorter hanging, use six motifs per strand. Keep centers at 12–82 cm, use beads at 5–89 cm in 14 cm increments, and place tassel crowns at 92 cm for a finished length of approximately 110 cm.
- Replace the deep slate blue with a lighter denim shade while retaining silver-gray leaves and natural wood for a softer palette.
- Make all leaves silver gray for a quieter arrangement, keeping the two blue shades in the snowflakes and tassels.
- Shorten the tassels to 12 cm while leaving their crowns at 120 cm. This reduces the overall drop to approximately 132 cm without changing motif placement.
Frequently asked questions
The cord supports the beads and tassel independently of the crochet. Without it, the lower pieces can pull the upper snowflakes out of shape and lengthen the leaves.
Start with wet blocking alone. Cotton and the five attachment points may provide enough support. If the branches droop, test a washable fabric stiffener on the sample snowflake and apply it according to the manufacturer’s instructions before assembly.
Yes. Add strands at the same 14 cm center spacing, alternating the two motif layouts. Each additional strand needs four leaves, four snowflakes, nine beads, one tassel, and one support cord. Each strand adds approximately 14 cm to the overall width.
If the wooden beads are not explicitly washable, spot-clean the curtain or remove the motif attachment stitches and wash the crochet separately. Reblock damp motifs before reassembly. Do not tumble-dry the assembled strands.
The finished Winter Lace Snowflake and Leaf Crochet Curtain

