Wisteria Lace Crochet Curtain Pattern
Advanced
For experienced crocheters who enjoy complex shaping, fine detail, and ambitious construction
Single-Day Project
A satisfying project you can complete in a single afternoon or evening.
Handmade Gift
A beautiful keepsake — free forever. Read online or print at home.
About This Wisteria Lace Crochet Curtain Pattern
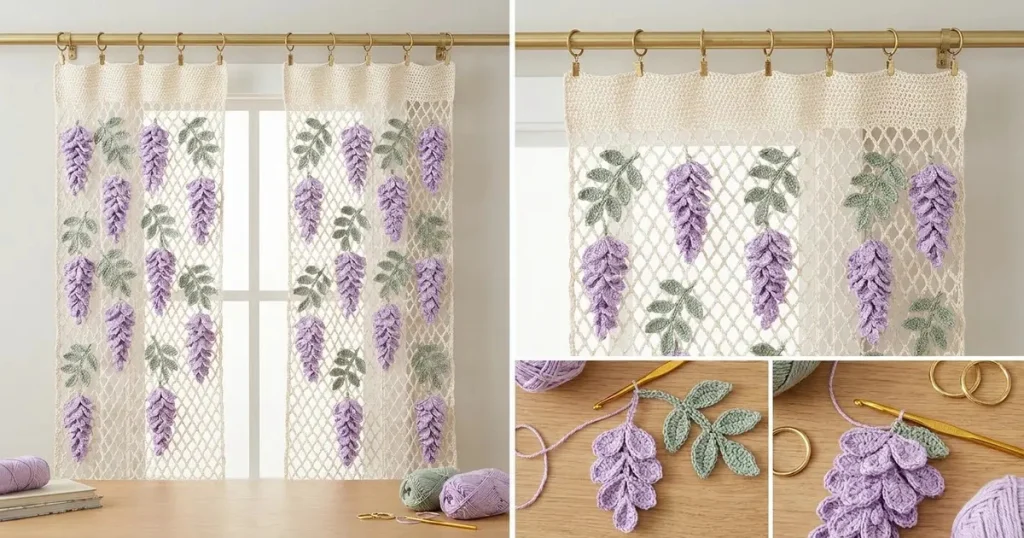
This wisteria crochet curtain pattern pairs an ivory net background with cascading lavender flowers and soft sage foliage. Each flower cluster has overlapping, individually shaped petals, giving the curtains the raised botanical texture shown in the reference. A dense ivory header supports the hanging rings and keeps the upper edge tidy.
The pattern makes two narrow decorative panels, each approximately 40 × 100 cm after blocking. Allow about 40–55 hours for the pair, including the separate flower and leaf motifs, careful placement, and hand sewing. This advanced project suits crocheters comfortable with openwork gauge, small shaped appliqués, and assembling many pieces without distorting the background.
Materials
- Sport-weight cotton, approximately 125 m per 50 g Ivory: 450 g; lavender: 200 g; sage: 150 g for both panels, including a working allowance
- Crochet hooks 3 mm for panels; 2.5 mm for flowers and leaves, or sizes needed for gauge
- Matching sewing thread Ivory, lavender, and sage for unobtrusive attachment
- Tapestry needle and fine sewing needle For weaving ends and securing motifs
- Locking markers, rustproof pins, blocking mats, and measuring tape For mesh counting and full-size placement
- Curtain rings with clips 12 total: six per panel; choose hardware rated for the completed curtain weight
- Preshrunk ivory cotton twill tape, 10–15 mm wide Two lengths of 40 cm to reinforce the headers
Abbreviations
chchainsl stslip stitchscsingle crochethdchalf double crochetdcdouble crochettrtreble crochetst / stsstitch / stitchesRS / WSright side / wrong sideGauge, Dimensions, and Construction
- Use US crochet terminology throughout. Turning chains do not count as stitches unless explicitly stated. Work both panels flat; no stuffing or safety eyes are used for this curtain.
- Blocked header gauge with the larger hook: 20 sc and 30 rows measure 10 × 10 cm. The 81-stitch header measures approximately 40 cm across; 12 rows measure 4 cm high.
- Blocked mesh gauge: five horizontal cells measure 10 cm, and eight mesh rows measure 12 cm. Twenty cells across and 64 rows down measure approximately 40 × 96 cm.
- For a combined swatch, ch 22. Row 1: sc in second ch from hook and each remaining ch, giving 21 sc. Rows 2–12: ch 1, turn, sc in each st. Mesh row 1: ch 1, turn, sc in first st; repeat (ch 5, skip 3 sts, sc in next st) five times. Mesh rows 2–8: ch 1, turn, sc in first sc; repeat (ch 5, sc in next sc) five times. Each mesh row has five ch-5 spaces and six sc anchors.
- Wet-block the swatch, let it dry completely, and measure without pulling. Change hook size if necessary. If one hook cannot achieve both gauges, use separate hook sizes for header and mesh.
- Each panel receives ten flower clusters and ten foliage sprigs. Make twenty clusters and twenty sprigs for the pair. The raised motifs are attached after the background has been blocked.
Ivory Headers — Make Two
- With ivory and the larger hook, ch 82 loosely.
- Row 1: sc in second ch from hook and each remaining ch. Turn. Count: 81 sc.
- Rows 2–12: ch 1, sc in each of the 81 sts, turn. Count: 81 sc per row. Do not fasten off after Row 12.
- Mark one face as RS. The motifs will all face this side. Continue directly into the mesh below the header.
Ivory Mesh Panels — Work Below Each Header
- Mesh Row 1: ch 1, sc in first st; repeat (ch 5, skip 3 sts, sc in next st) twenty times. Turn. Count: 20 ch-5 spaces and 21 sc anchors; all 81 header stitches are accounted for.
- Mesh Rows 2–64: ch 1, sc in first sc; repeat (ch 5, sc in next sc) twenty times, working into the sc anchors rather than into the chain spaces. Turn after each row. Count: 20 ch-5 spaces and 21 sc anchors per row.
- Bottom edging: ch 1, turn, sc in first sc; repeat (3 sc in next ch-5 space, sc in next sc) twenty times. Count: 81 sc. Fasten off.
- Top edging: with RS facing, join ivory at one end of the unused foundation edge. Ch 1 and work one sc opposite each of the 81 header stitches. Count: 81 sc. Fasten off.
- First side edging: join ivory at the upper side corner. Work eight sc evenly across the 12 header row ends, then three sc around the side of each of the 64 mesh rows. Count: 200 sc. Fasten off. Do not add stitches into the top or bottom edging.
- Second side edging: repeat the first side edging. Count: 200 sc. Fasten off and weave in ends. The four edgings are separate runs, so no corner increases are required.
- Wet-block each panel to approximately 40 × 100 cm. Open the chain loops evenly to create the loose net appearance. Let both panels dry completely before placing motifs.
Lavender Petals — Make Twenty Sets
- Use lavender and the smaller hook. Each cluster needs four large petals, four medium petals, and one small tip petal: nine petals per cluster, 180 petals total.
- Large petal, first side: ch 9. Beginning in second ch from hook, work sc, hdc, dc, tr, tr, dc, hdc into the next seven chains; work 5 sc in the final chain. The final chain becomes the rounded outer end.
- Large petal, return side: rotate to work along the unused foundation loops. Work hdc, dc, tr, tr, dc, hdc, sc into the next seven loops. Sl st to first sc. Count: 19 sts, excluding the joining sl st. Fasten off with a 15 cm tail.
- Medium petal, first side: ch 7. Beginning in second ch from hook, work sc, hdc, dc, dc, hdc into the next five chains; work 5 sc in the final chain.
- Medium petal, return side: work hdc, dc, dc, hdc, sc into the next five unused foundation loops. Sl st to first sc. Count: 15 sts, excluding the joining sl st. Fasten off with a 15 cm tail.
- Small tip petal, first side: ch 5. Beginning in second ch from hook, work sc, hdc, dc into the next three chains; work 5 sc in the final chain.
- Small tip petal, return side: work dc, hdc, sc into the next three unused foundation loops. Sl st to first sc. Count: 11 sts, excluding the joining sl st. Fasten off with a 15 cm tail.
- For every petal, the joining point is the narrow base and the 5-sc end is the rounded tip. Weave the starting tail along the foundation line on the WS. Leave the finishing tail for assembly.
- Lightly dampen and shape the petals without flattening them completely. A large petal should be approximately 3.5–4 cm long, a medium petal 2.5–3 cm, and a tip petal 1.5–2 cm; individual tension will affect these measurements.
Wisteria Cluster Spines and Layering — Make Twenty
- With lavender and the smaller hook, ch 25. Sc in second ch from hook and each remaining ch. Count: 24 sc. Fasten off with a 25 cm tail. The spine should measure approximately 10–11 cm after gentle shaping.
- Number the spine stitches 1–24 from the upper end toward the hanging tip. Place the small tip petal with its base at stitch 21 and rounded end pointing beyond stitch 24. Sew its base and central foundation line to the spine.
- Place one pair of medium petals with their bases at stitch 16, then another pair at stitch 12. Point the rounded ends downward and outward, one to each side. Sew each base and approximately the upper third of its foundation line to the spine.
- Place one pair of large petals with their bases at stitch 8, then the final pair at stitch 4. Angle each pair downward so it overlaps the pair beneath. Keep the rounded outer edges free.
- At each paired tier, overlap one base slightly over the other to conceal the spine. Bring the spine tail to the WS and secure all joining knots there. The finished cluster should taper toward the bottom and measure approximately 12–14 cm long and 6–7 cm wide.
- Make twenty identical clusters. For a subtle natural variation, alternate which petal lies uppermost at each paired tier; keep the number and size of petals unchanged.
Sage Leaves — Make 140
- Use sage and the smaller hook. Each sprig uses seven leaves; make twenty sprigs for both panels.
- First side: ch 9. Beginning in second ch from hook, work sc, hdc, dc, tr, dc, hdc, sc into the next seven chains. Work (sc, ch 2, sl st in second ch from hook, sc) in the final chain to form the pointed outer tip.
- Return side: rotate and work sc, hdc, dc, tr, dc, hdc, sc into the next seven unused foundation loops. Sl st to first sc. Count: 16 body stitches, plus the small chain-point detail; the joining sl st is excluded.
- Fasten off with a 20 cm tail. Use the starting tail to embroider a loose straight vein along the foundation line, taking two or three short stitches from base toward tip. Secure on the WS without drawing the leaf into a cup.
- Gently shape each leaf to approximately 3.5–4 cm long. Keep its base narrow and its pointed end distinct.
Sage Foliage Sprigs — Make Twenty
- With sage and the smaller hook, ch 27. Sl st in second ch from hook and each remaining ch. Count: 26 sl sts. Fasten off with a 25 cm tail. Keep these slip stitches loose so the stem lies flat.
- Number stem stitches 1–26 from the lower end upward. Sew one terminal leaf at stitch 26, with its tip extending along the stem direction.
- Sew one leaf to each side at stitch 20, one to each side at stitch 13, and one to each side at stitch 6. Each sprig now has seven leaves.
- Angle the six side leaves toward the terminal leaf. Sew approximately 8–10 mm of each leaf base to the stem, leaving its outer section free. Secure tails on the WS.
- Shape each completed sprig to approximately 11–13 cm long and 7–9 cm across. Make twenty, curving half gently to the left and half to the right during placement.
Motif Placement and Attachment
- Lay the first blocked panel RS up. All coordinates below are in centimetres: measure x from the left edge and y downward from the lower edge of the solid header. Coordinates mark the top centre of a flower cluster or the terminal tip of a foliage sprig.
- Pin the ten flower clusters at (6, 8), (24, 10), (15, 27), (33, 30), (6, 45), (24, 47), (15, 63), (33, 66), (6, 80), and (24, 81). Point every flower tip downward.
- Pin the ten foliage sprigs at (15, 5), (33, 8), (6, 25), (24, 27), (15, 43), (33, 45), (6, 61), (24, 63), (15, 78), and (33, 80). Angle each sprig so its leaves fit between adjacent flowers. Keep every motif inside the panel edges.
- Mirror the placement for the second panel: replace every x coordinate with 40 minus x, retaining its y coordinate. For example, (6, 8) becomes (34, 8).
- Use matching thread to attach each flower spine to at least four separate mesh anchors distributed along its length. Add a small tack beneath each upper petal pair to prevent the cluster twisting. Catch chain strands gently; do not cinch them together.
- Attach each foliage stem at four or more points, then tack the base of each leaf to a nearby mesh strand where available. Keep the outer leaf tips and flower edges free to retain their relief.
- Remove pins and lift the panel vertically. If a motif pulls a mesh cell out of shape, release that attachment and redistribute it over an additional anchor before securing the thread.
Header Reinforcement and Hanging
- Turn under 5 mm at each end of each 40 cm twill-tape strip. Centre a strip horizontally on the WS of each header, approximately 5 mm below the upper edge. Its finished length is approximately 39 cm.
- Hand-sew both long edges of the tape to the backs of the crochet stitches using small running stitches. Keep the header at its blocked width as you sew.
- Place six ring clips on each panel at approximately 1, 8.5, 16, 24, 31.5, and 39 cm from its left edge. Each clip should grip the reinforced header.
- Hang both panels and arrange them with a small central opening, as in the reference. The stated 100 cm length excludes the drop added by the rings.
Finishing
Check the back of each panel for loose thread ends and secure them beneath nearby stitching. Smooth the leaves with your fingers and lift the free petal edges slightly so the wisteria clusters fall in overlapping tiers. The ivory mesh should remain relaxed between the motifs.
For cleaning, remove the hardware and gently hand-wash in cool water with a cotton-safe detergent. Support the whole panel when lifting it from the water, press out moisture in a towel, and dry flat to its original measurements. Hang only when completely dry.
Tips for Success
- Mark every fifth mesh anchor while working the first mesh row. The twenty spaces are much easier to verify before the panel becomes long.
- Assemble each cluster from its tip upward. This puts each new petal tier over the attachment stitches of the tier beneath.
- Keep a finished flower and foliage sprig beside you as size references while making the remaining motifs.
- Sew motifs with the panel supported flat at its blocked dimensions. Hanging the mesh while sewing introduces uneven tension.
- Check the curtain against daylight before trimming sewing threads; backlighting reveals loose tails and overly tight attachment points.
Common Mistakes to Avoid
- Working mesh anchors into chain spaces changes the structure. After the setup row, place each sc into the next sc anchor.
- Adding a chain loop at the end of a mesh row widens the panel. Finish immediately after the twentieth loop and its final sc; every row has 21 anchors.
- Reversing the petals makes the cluster look blunt at the top and crowded below. Sew the narrow joining ends to the spine with rounded ends pointing down.
- Pulling leaf-vein embroidery tight cups the leaves. Remove the tight stitch and replace it with several loose, short stitches.
- Clipping rings directly to unsupported mesh can stretch the upper edge. Keep the clips on the dense, tape-reinforced header.
Ways to Customize This Pattern
- Use pale lilac for the upper petal pairs and a slightly deeper lavender for the lower tiers, changing yarn between separate petals.
- Make a wider panel by adding four foundation chains and four header stitches for each additional mesh cell. Retain one starting sc and repeat the setup sequence once per cell.
- Change the length in eight-row mesh increments, approximately 12 cm at gauge. For each additional mesh row, add three stitches to each side edging and revise the motif layout before sewing.
- Use two close sage shades for alternating foliage sprigs while keeping the ivory background and lavender flowers consistent.
Frequently asked questions
The pair measures approximately 80 cm across when laid flat. They are narrow decorative side panels like those in the reference. For fuller coverage, add mesh cells using the customization rule and make a proportional number of extra motifs.
Use lightweight sport cotton, achieve the blocked mesh gauge, and attach each spine across several anchors. The reinforced header distributes the hanging load. If your chosen yarn makes much heavier motifs, try one completed cluster on the gauge swatch before making the full set.
No. Each cluster is assembled from nine separate petals and a narrow spine, then sewn to the blocked panel. This makes it possible to place the flowers accurately and retain their layered edges.
Hand-washing is preferable because the projecting petals and leaves can catch during agitation. Remove all rings, wash gently, and reshape flat. Follow the yarn manufacturer’s care instructions if they are more restrictive.
The finished Wisteria Lace Crochet Curtain Pattern

