Wisteria the Butterfly Vine Amigurumi Pattern
Beginner Friendly
Perfect for those just starting their crochet journey, with clear instructions and simple techniques
Single-Day Project
A satisfying project you can complete in a single afternoon or evening.
Handmade Gift
A beautiful keepsake — free forever. Read online or print at home.
About This Wisteria the Butterfly Vine Amigurumi Pattern
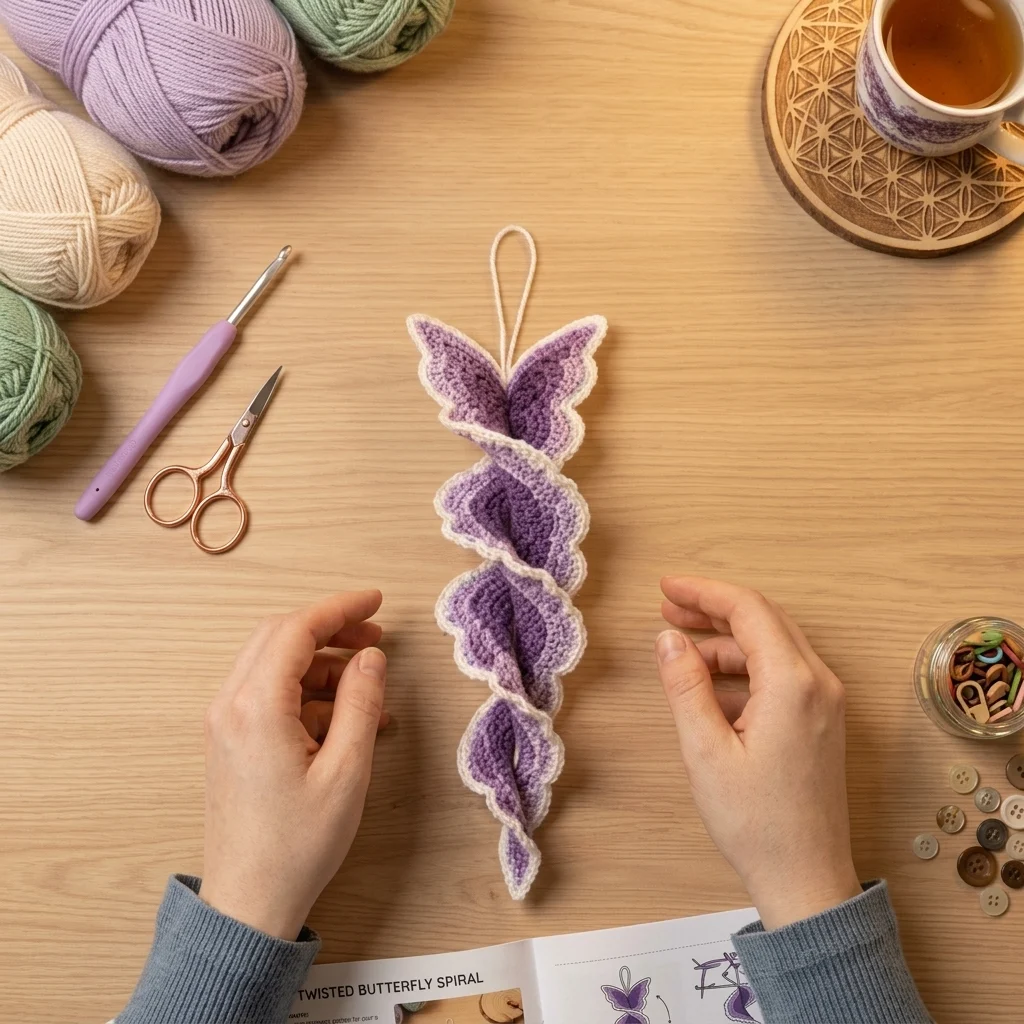
This butterfly vine crochet pattern turns two sizes of the same flat wing motif into a piece that reads as one continuous, twisting form — a pair of open wings at the top settling into four smaller segments that spiral down into a single point. There’s no stuffing and no round bodies here; every piece is worked flat, shaped with paired increases at just the tip and base, and finished with a contrasting picot edge that gives it the ruffled, almost lace-like border you see in the reference photo.
Each motif uses the same short round-by-round formula, so once you’ve made the first wing the rest go quickly — the real skill in this piece is in the assembly, where a twisted cord doubles as both the spine holding the segments together and the hanging loop at the top. Expect somewhere around 8 to 10 hours from first stitch to finished hang, spread across a couple of evenings.
This one is a good fit for crocheters who are comfortable with color changes, picot stitches, and hand-sewing pieces together, but who want a project that isn’t another round animal or doll. It makes a nice window or doorway hanging, a spring or wedding décor piece, or a gift for someone who already has enough stuffed amigurumi on their shelf.
Materials
- Deep plum DK yarn (Color A) ~40 g
- Dusty lavender/orchid DK yarn (Color B) ~35 g
- Ivory or cream DK yarn (Color C) ~25 g, used for trim, cord, and veining
- 3.5 mm crochet hook
- Yarn/tapestry needle
- Stitch marker to track the tip stitch each round
- Small amount of polyester fiberfill optional, for gentle dimension only — this piece is not densely stuffed
Abbreviations
chchainscsingle crochetinc2 sc in same stitchsl stslip stitchst(s)stitch(es)rndroundpicotch 3, sl st in same st to form a small loopFOfasten offLarge Wings (make 2)
- With Color A, ch 9. Rnd 1: sc in 2nd ch from hook and in each of next 7 ch (8 sts, Side 1), 3 sc in last ch (3 sts, Tip), working along the back bumps of the foundation ch, sc in next 7 ch (7 sts, Side 2), 2 sc in last st (2 sts, Base). Join with sl st to first sc. (20 sts)
- Rnd 2 (Color A): sc in each st around. (20 sts, even)
- Rnd 3 (change to Color B at the join): sc in next 8 sts (Side 1, even), inc in each of next 3 sts (Tip: 3→6), sc in next 7 sts (Side 2, even), inc in each of next 2 sts (Base: 2→4). (25 sts)
- Rnd 4 (Color B): sc in each st around. (25 sts, even)
- Rnd 5 (Color B): sc in next 8 sts (Side 1, even), inc in each of next 6 sts (Tip: 6→12), sc in next 7 sts (Side 2, even), inc in each of next 4 sts (Base: 4→8). FO Color B. (35 sts)
- Trim rnd (join Color C at the Tip): *sc in next st, picot, skip next st* around all 35 sts. Sl st to first sc, FO, leaving a long tail for assembly.
- Optional: with a short strand of Color A on a tapestry needle, embroider one straight line down the center of the wing from Tip to Base for a vein detail.
Body Segments (make 4)
- With Color A, repeat Rnd 1 and Rnd 2 of the Large Wing exactly. (20 sts)
- Rnd 3 (change to Color B): repeat Rnd 3 of the Large Wing exactly. FO Color B. (25 sts)
- Skip the Large Wing’s Rnd 4–5 increases — Body Segments stay at 25 sts.
- Trim rnd (join Color C): *sc in next st, picot, skip next st* around all 25 sts. Sl st to first sc, FO, leaving a long tail.
- Optional: embroider a short center vein in Color A as on the wings, for the top three segments only — leave the fourth (bottom-most) segment plain so its tip reads as a clean point.
Hanging Cord
- Cut two strands of Color C, each about 90 cm long. Hold together and twist tightly in one direction until the pair starts to kink.
- Fold the twisted length in half and let it twist back on itself — this doubled, self-twisting length is your cord. It should measure roughly 40–45 cm.
- Knot the two cut ends together and trim to neaten; the folded end becomes the hanging loop.
Finishing
Lay the cord flat with the folded loop at the top. Position the two Large Wings just below the loop with their Base edges meeting at the center — this join is the “body” of the butterfly. Using the yarn tails left on each wing, tack the Base edges to each other and to the cord.
Working down from there, tack Body Segment 1’s Base to the cord directly below the wing join, rotating it about 45° from the wings’ plane. Attach Segment 2 below that, rotated another 45–90° from Segment 1, then Segment 3 and Segment 4 the same way, keeping the rotation turning in the same direction each time — this consistent turn is what creates the spiral cascade rather than a flat stack. Tack Segment 4’s tip closed around the very end of the cord to finish it off, then weave in all remaining ends.
Lightly steam each motif and pin the picot edge into a gentle open curve while it cools, so the wings and segments hold their shape instead of curling shut.
Tips for Success
- Block every motif before assembly, pinning the picot edge open — unblocked pieces dry curled and won’t drape into the cascade shape.
- Work the picot trim a little looser than your body rounds; tight picots pull flat against the motif instead of ruffling outward.
- Twist the spine cord and rotate each segment in the same direction throughout — reversing partway makes the vine look tangled rather than spiraled.
- Keep a stitch marker on the Tip stitch every round. On a small oval it’s easy to lose track of which end is which and increase the wrong side.
- If using leftover or scrap yarn, weigh out each color before starting so the gradient looks consistent across all six motifs.
Common Mistakes to Avoid
- Increasing evenly all the way around instead of only at Tip and Base — this turns the oval into a circle. Increases only happen at the marked segments.
- Skipping blocking. Unblocked motifs tube up along their center line and the finished piece won’t lie or hang flat.
- Attaching every segment with the same rotation. The piece reads as a flat stack instead of a twist — rotate each one from the last.
- Cutting the hanging cord too short. Leave the full 40–45 cm doubled length or the wings won’t have room to sit naturally below the loop.
- Joining Color C too tightly at the start of the trim round, which puckers the first few picots smaller than the rest.
Ways to Customize This Pattern
- Swap plum-to-lavender for peach-to-cream for an autumn leaf version, or deep teal-to-mint for a dragonfly-wing look.
- Use only 2 body segments below the wings for a shorter version that works as an earring pair or a bookmark.
- Thread a small wooden bead or bell onto the cord between segments for extra movement and sound.
- Work the picot trim round in metallic or variegated thread for a more festive, holiday-ready ornament.
- Make two, twisting the cords in opposite directions, and hang them as a mirrored pair either side of a doorway.
Frequently asked questions
The design is based on wing and leaf shapes, which read better flat and draped than round and stuffed. The gentle fiberfill mentioned in the materials is optional and only meant to add a little dimension without flattening the picot edge — you can skip it entirely for a lighter, more lace-like result.
This is almost always tension or missing blocking. Loosen up on the picot trim round specifically, and always steam and pin each piece flat with the picot edge curved outward before you assemble — unblocked pieces will curl no matter how evenly they’re stitched.
Yes — switch to a worsted or aran weight yarn with a 4.5–5 mm hook and the same stitch counts will produce noticeably larger motifs. Just expect to use significantly more yarn in each color, and re-block a test motif first to check the new size before committing to all six.
No. This is a wing/vine motif rather than a creature, so there’s no face to place — the embroidered center veins and picot trim take the place of surface detail here.
The finished Wisteria the Butterfly Vine Amigurumi Pattern

