Witch’s Library Crochet Blanket Pattern
Advanced
For experienced crocheters who enjoy complex shaping, fine detail, and ambitious construction
Weekend Project
A satisfying weekend make — start Friday, finish Sunday, enjoy forever.
Handmade Gift
A beautiful keepsake — free forever. Read online or print at home.
About This Witch’s Library Crochet Blanket Pattern
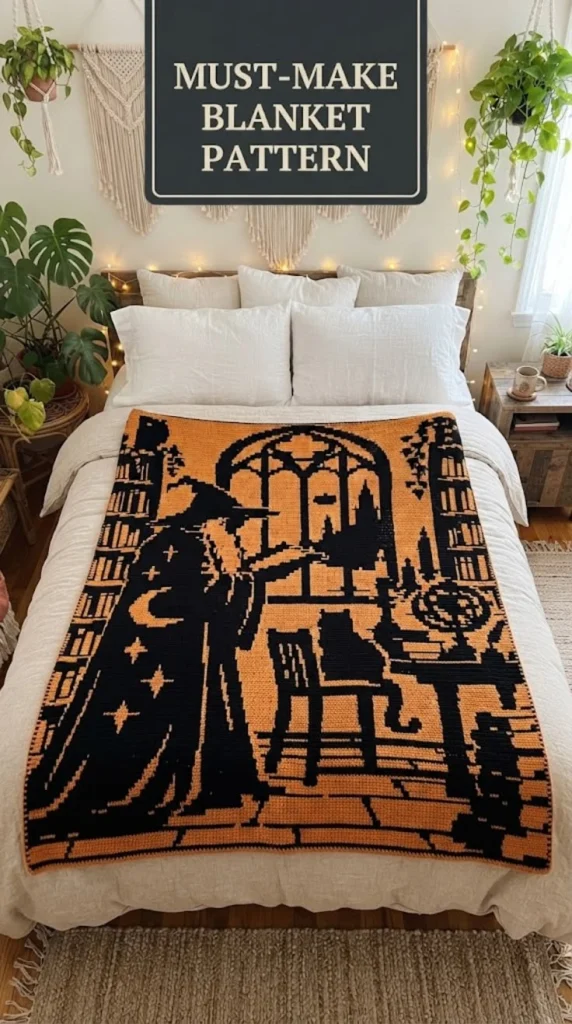
This witch crochet blanket pattern turns a warm copper ground into a black silhouette of a magical library. A tall witch stands beside an arched window, a cat sits on a chair, and narrow bookshelves frame the scene. The two-color palette and strong outlines take their inspiration from the reference blanket.
The blanket is worked flat, then built up with separately crocheted silhouettes and stitched architectural details. Allow approximately 65–90 hours for the background, shaped appliqués, and careful assembly. This advanced project suits crocheters who enjoy shaping flat fabric, placing large motifs, and embroidering clean lines across crochet.
Materials
- Copper-orange bulky yarn Approximately 1,650 m; category 5, smooth plied yarn
- Black bulky yarn Approximately 950 m; same fiber and thickness as copper
- 6 mm crochet hook Adjust to obtain blocked gauge
- Blunt tapestry needles For sewing and surface details
- Locking stitch markers and contrasting waste yarn For marking the placement grid
- Measuring tape, scissors, and blocking equipment Use the yarn manufacturer’s care instructions
Abbreviations
chchainscsingle crochet, US terminologysl stslip stitchinc2 sc in the same stitchdecsingle crochet 2 stitches togetherMRmagic ringststitchGauge, Construction, and Placement Grid
- Make a copper swatch: ch 25; Row 1: sc in second ch from hook and each remaining ch, 24 sc. Rows 2–28: ch 1, turn, sc in each st, 24 sc. Block. Target gauge is 12 sc and 14 rows per 10 cm. Measure the central area.
- The background contains 120 stitches across and 196 rows vertically, measuring approximately 100 × 140 cm before its border. All appliqués use the same hook and yarn; check that their fabric lies flat.
- For every flat piece, ch 1 and turn between rows unless directed otherwise. Turning chains never count as stitches. Work through both loops. Counts in parentheses are completed stitch counts.
- Lay the blanket with Row 1 at the bottom. Coordinates refer to the centers of background stitches: x = 1–120 from left to right, y = 1–196 from bottom to top. The right side is whichever face you choose for the scene. Mark every tenth stitch and row with removable waste yarn.
- Rectangle instructions give the exact width and height. For a rectangle W stitches wide and H rows high, ch W + 1; Row 1: sc in second ch and across, W sc. Rows 2–H: sc across, W sc. Fasten off with a sewing tail.
- For placement, a lower-left coordinate identifies the first stitch of the bottom row of a piece as viewed on the finished blanket. Centered pieces are aligned by their midline. Sew all edges with small whipstitches, catching the background without pulling it tight. This is a flat blanket: no stuffing, safety eyes, or facial features are used.
Copper Blanket Background
- Row 1: With copper, ch 121. Sc in second ch from hook and each ch across. (120)
- Rows 2–196: Ch 1, turn, sc in each st across. (120 each row; 196 rows total)
- Fasten off and weave in the background ends. Block to approximately 100 × 140 cm before attaching motifs.
Bookshelf Frames — Make Two
- Uprights: make four black rectangles, each 3 sc × 158 rows.
- Shelves: make twelve black rectangles, each 14 sc × 2 rows.
- Left frame: place uprights at (4, 24) and (17, 24). Place six shelf strips with their lower-left corners at x = 4 and y = 24, 55, 86, 117, 148, and 179. Shelf ends overlap the uprights.
- Right frame: place uprights at (102, 24) and (115, 24). Place its six shelf strips at x = 102 using the same six y positions.
- Sew the frames flat. In each of the five open shelf spaces, embroider three black book spines. On the left, use vertical lines at x = 9, 12, and 15; on the right, use x = 107, 110, and 113. Start each line 4 rows above the lower shelf and end 5 rows below the next shelf. Use backstitches no longer than 2 background rows.
- Add a copper stitch across selected black spines to suggest book labels. Later silhouettes intentionally overlap portions of the left bookshelf.
Arched Window and Distant Towers
- Window base: make one black rectangle 44 sc × 3 rows; place at (46, 88).
- Side posts: make two black rectangles 3 sc × 58 rows; place at (46, 89) and (87, 89). Sew these pieces down.
- Mark the arch through these points, in order: (47, 146), (49, 153), (54, 160), (61, 166), (68, 169), (75, 166), (82, 160), (87, 153), (88, 146). Connect them with smooth black backstitch lines. Make three adjacent lines, at horizontal offsets of −1, 0, and +1 stitch, to give the arch approximately the same weight as the side posts.
- Embroider mullions from (68, 91) to (68, 163), from (57, 91) to (57, 158), and from (79, 91) to (79, 158). Make each mullion two adjacent stitch lines wide. Add diagonals from (57, 158) to (68, 146) and from (79, 158) to (68, 146).
- Small tower: make a black rectangle 6 sc × 20 rows. Place at (72, 91). Make its roof: ch 7; Row 1: sc across, 6 sc. Row 2: dec, 2 sc, dec, 4 sc. Row 3: dec twice, 2 sc. Row 4: dec, 1 sc. Fasten off. Sew its 6-stitch base immediately above the tower.
- Tall tower: make a black rectangle 8 sc × 34 rows. Place at (81, 91). Roof: ch 9; Row 1: sc across, 8 sc. Row 2: dec, 4 sc, dec, 6 sc. Row 3: dec, 2 sc, dec, 4 sc. Row 4: dec twice, 2 sc. Row 5: dec, 1 sc. Fasten off and sew above the tower.
- Add one black horizontal backstitch line from (72, 134) to (76, 134), forming the small floating dash visible inside the window.
Witch’s Sweeping Robe
- Work in black from hem to shoulders. Row 1: ch 43, sc in second ch and across. (42)
- Rows 2–8: Sc across. (42)
- Row 9: Dec, sc to last 2 st, dec. (40)
- Rows 10–12: Sc across. (40)
- Rows 13–52: Repeat the following four-row sequence ten times: first row, dec, sc to last 2 st, dec; next three rows, sc across. Counts after the decrease rows are 38, 36, 34, 32, 30, 28, 26, 24, 22, and 20.
- Rows 53–64: Sc across. (20)
- Rows 65–72: Dec at both ends of every row, working sc between decreases. Counts are 18, 16, 14, 12, 10, 8, 6, and 4. Fasten off.
- Place the hem at y = 18, spanning x = 8–49. Set the shoulder center near x = 35, y = 89. Angle the panel slightly as needed, keeping it flat. Pin but leave the upper edge unsewn until the sleeve and head are positioned.
- Embroider three copper fold lines from near the shoulder toward the hem. Let the lines curve outward and stop 3 rows above the bottom edge.
Witch’s Sleeve and Extended Arm
- Sleeve Row 1: With black, ch 19; sc across. (18)
- Rows 2–4: Sc across. (18)
- Row 5: Dec, 14 sc, dec. (16)
- Rows 6–8: Sc across. (16)
- Row 9: Dec, 12 sc, dec. (14)
- Rows 10–12: Sc across. (14)
- Row 13: Dec, 10 sc, dec. (12)
- Rows 14–16: Sc across. (12)
- Row 17: Dec, 8 sc, dec. (10)
- Rows 18–20: Sc across. (10)
- Row 21: Dec, 6 sc, dec. (8)
- Rows 22–24: Sc across. (8) Fasten off.
- Hand: with copper, ch 7. Row 1: sc across, 6 sc. Rows 2–7: sc across, 6 sc. Row 8: dec, 2 sc, dec, 4 sc. Fasten off.
- Rotate the sleeve so its wide end meets the shoulder near (36, 86), and its narrow end reaches toward (56, 105). Tuck 2 hand rows beneath the narrow cuff, with the hand extending toward the open book. Sew the hand first, then the sleeve. Add a copper seam line just inside the sleeve’s lower edge.
Witch’s Profile and Pointed Hat
- Head, worked flat in copper: Round 1: 6 sc in MR. Round 2: inc in each st, 12. Round 3: repeat 1 sc, inc six times, 18. Round 4: repeat 2 sc, inc six times, 24. Round 5: repeat 3 sc, inc six times, 30. Sl st in next st and fasten off. Do not stuff.
- Nose: with copper, ch 4. Row 1: sc across, 3 sc. Row 2: dec, 1 sc, 2 sc. Row 3: dec, 1 sc. Fasten off.
- Hat crown, black: Row 1: ch 25, sc across, 24 sc. Rows 2–12: dec at each end, with sc between. Counts are 22, 20, 18, 16, 14, 12, 10, 8, 6, 4, and 2. Row 13: dec, 1 sc. Fasten off.
- Hat brim: make one black rectangle 40 sc × 3 rows.
- Position the head centered at (39, 102), above the robe. Sew the nose to its right edge, with the point facing right. Sew the head flat, tucking its bottom beneath the robe neckline.
- Place the crown base horizontally across x = 25–48 near y = 110, with its point upward. Fold only the final 3 crown rows gently toward the left and tack flat for a bent tip. Place the brim across x = 20–59 at y = 108. Sew the crown before the brim.
- Embroider a black hair line around the back and lower edge of the copper profile, then add three short black locks onto the shoulder. Leave the face without eyes or a mouth to preserve the silhouette style.
Open Book
- Make two copper page panels. For each: Row 1: ch 13, sc across, 12 sc. Rows 2–9: sc across, 12 sc. Fasten off.
- Make two black cover strips, each 14 sc × 2 rows.
- Position the page panels above the extended hand. Set the left page’s bottom edge approximately from (51, 102) to (62, 106), and the right page’s bottom edge from (62, 106) to (73, 102). Their inner edges meet to form a shallow open-book angle.
- Slip a cover strip beneath each lower page edge, leaving one black row visible. Sew covers first, then pages. Embroider the center gutter in black and two short black writing lines on each page.
Chair Frame
- Make two black legs, each 3 sc × 27 rows; one black seat, 26 sc × 3 rows; two black back posts, each 3 sc × 23 rows; and one black top rail, 14 sc × 3 rows.
- Place the legs at (60, 27) and (80, 27), and the seat at (59, 52). Place the back posts at (60, 55) and (71, 55). Place the top rail at (60, 75).
- Make two black back slats, each 2 sc × 18 rows; place at (65, 56) and (68, 56). Sew all frame parts flat, overlapping rail ends onto posts.
- Add a black backstitch rung from (62, 36) to (81, 36). Leave copper spaces between the slats so the chair remains distinct from the cat.
Seated Cat, Ears, and Curving Tail
- Body, black, from base upward: Row 1: ch 15, sc across, 14 sc. Row 2: inc, 12 sc, inc, 16 sc. Row 3: inc, 14 sc, inc, 18 sc.
- Rows 4–10: Sc across. (18)
- Row 11: Dec, 14 sc, dec. (16)
- Rows 12–14: Sc across. (16)
- Row 15: Dec, 12 sc, dec. (14)
- Rows 16–18: Sc across. (14)
- Row 19: Dec, 10 sc, dec. (12)
- Rows 20–22: Sc across. (12) Fasten off.
- Head, black, worked flat: Round 1: 6 sc in MR. Round 2: inc around, 12. Round 3: repeat 1 sc, inc six times, 18. Round 4: repeat 2 sc, inc six times, 24. Sl st in next st; fasten off.
- Ears, make two: ch 5. Row 1: sc across, 4 sc. Row 2: dec twice, 2 sc. Row 3: dec, 1 sc. Fasten off.
- Tail: ch 29. Row 1: sc in second ch and across, 28 sc. Row 2: 20 sc, inc in each of the final 8 st, 36 sc. Fasten off. The increased end curls naturally.
- Place the body’s bottom center near (78, 55), rising above the chair seat. Center the head near (78, 79); overlap its lower edge onto the body. Attach ears to its upper corners. Sew the tail from the body’s lower-right edge, curving down toward (88, 43), then back upward at its tip. Attach every edge; do not leave a free loop.
Round Table, Globe, and Candle
- Tabletop: make a black rectangle 30 sc × 4 rows. Place at (85, 58).
- Pedestal: make a black rectangle 4 sc × 28 rows; place at (98, 30). Base: make a black rectangle 18 sc × 3 rows; place at (91, 28). Sew pedestal and base before the tabletop.
- Globe outline: embroider a closed oval through (94, 78), (96, 85), (103, 89), (110, 85), (112, 78), (110, 71), (103, 68), and (96, 71), returning to the first point. Use two adjacent black backstitch lines, with short stitches around curves.
- Add a vertical globe meridian from (103, 69) to (103, 88), curving it 2 stitches left at the middle. Add horizontal curved lines through y = 75 and y = 82, keeping them inside the oval.
- Embroider the globe stand from (103, 68) to (103, 63), then add a horizontal foot from (98, 62) to (108, 62).
- Candle: make a black rectangle 3 sc × 15 rows; place at (90, 64). Add a 7-stitch-wide black backstitched holder across y = 63, centered beneath it. Embroider a narrow black pointed flame from (91, 80) to (91, 85) and back via (93, 82).
Floor Lines, Robe Stars, and Book Stack
- Embroider black floorboard lines across x = 5–116 at y = 8, 16, and 24, stopping wherever a line would cross an appliqué. Add short staggered joints at x = 20, 54, and 91 between y = 8–16, and at x = 37, 75, and 108 between y = 16–24.
- Add three copper four-point stars to the robe, centered near (24, 43), (30, 59), and (32, 76). For each, make a vertical line spanning 6 background rows and a horizontal line spanning 4 stitches. Add two shorter diagonal stitches at the center.
- Make four black book-stack rectangles: 17 sc × 3 rows, 14 sc × 3 rows, 18 sc × 3 rows, and 13 sc × 3 rows. Place their lower-left corners at (98, 10), (100, 15), (97, 20), and (101, 25), respectively. Copper gaps between books define their separate outlines.
- Use split lengths of the same yarn only if its plies separate cleanly; otherwise use full yarn for all embroidery. Keep backstitches at most 2 background stitches or rows long, securing traveling yarn frequently on the reverse.
Blanket Border
- Round 1: With the scene facing you, join black in a corner. Work 3 sc in each corner. Between corners, work 118 sc along each horizontal edge and 168 sc along each vertical edge. For each vertical edge, divide its 196 row ends into 28 groups of 7; work into the first 6 row ends of each group and skip the seventh. Sl st to first sc. (584)
- Mark the middle stitch of each 3-sc corner. Round 2: Join copper; sc in each st, working 3 sc in each marked corner stitch. Move markers to the new middle corner stitches. Sl st to first sc. (592)
- Round 3: With copper, sc around, working 3 sc in each marked corner stitch. Sl st to first sc. (600)
- Round 4: With black, sc around, working 3 sc in each marked corner stitch. Sl st to first sc. (608) Fasten off.
- The four border rounds add approximately 1.5 cm on each side at the stated row gauge. Block the border flat without stretching the appliqués.
Finishing
Check the entire arrangement before completing the sewing. The witch should overlap the left shelving, the window should remain visible above the open book, and copper gaps should separate the cat, chair, and table. Sew any remaining edges with relaxed stitches, securing each tail through several stitches on the reverse.
Remove the placement threads and block the finished blanket according to the yarn label. Let it dry completely on a flat surface. The attached motifs give the front a lightly raised texture; the reverse shows the neat sewing and embroidery stitches. Check for loose strands before using or gifting it.
Tips for Success
- Photograph the pinned arrangement from directly overhead. This makes a crooked window or an obscured cat outline easier to spot.
- Sew the architectural pieces first, then the witch and furniture. Their overlapping edges create the depth in the scene.
- Keep one hand beneath the blanket while embroidering so you can feel and release any strand that pulls the background inward.
- Block the robe and sleeve separately before placement. Their decrease edges should lie flat without being stretched.
Common Mistakes to Avoid
- Counting placement from the top reverses the scene vertically. Keep Row 1 at the bottom and label the lower-left corner before assembly.
- Sewing adjoining black shapes directly together can hide their outlines. Preserve the copper spaces inside the chair and around the cat’s head.
- Working one border stitch into every row end creates excess fabric. Follow the six-stitches-per-seven-row-ends distribution on both long sides.
- Pulling appliqué stitches tight makes the copper ground pucker. Unpick the affected section and resew it with the blanket resting flat.
Ways to Customize This Pattern
- Replace copper with muted ochre for an aged parchment background while keeping all silhouettes black.
- Add tiny copper embroidered spine labels to more books, keeping the stitches within the black shelf details.
- Mirror the complete scene by mapping each x coordinate to 121 minus x and reversing the orientation of each shaped piece.
- Use a smaller yarn and matching hook for a wall hanging. Keep every stitch count unchanged and calculate its dimensions from a blocked swatch.
Frequently asked questions
No. It is an original interpretation of the copper and black library scene, using a crocheted background, shaped appliqués, and embroidery. The reference does not establish its original stitch method or exact chart.
The front has raised silhouettes, while the back shows their attachment stitches. Keep sewing tails short and well secured. This construction produces a decorative front rather than a reversible picture.
Leave the specified copper gaps between the back slats and position the cat toward the right of the chair. Pin both pieces before sewing and check that its ears, back, and curled tail remain distinct.
Yes. Use a thicker yarn and a suitable hook while retaining all counts. Divide 120 by your stitches per centimeter for the background width, and 196 by your rows per centimeter for its height. Allow extra yarn and add the border measurement afterward.
The finished Witch’s Library Crochet Blanket Pattern

