Woodland Birds Filet Crochet Curtain Pattern
Advanced
For experienced crocheters who enjoy complex shaping, fine detail, and ambitious construction
Single-Day Project
A satisfying project you can complete in a single afternoon or evening.
Handmade Gift
A beautiful keepsake — free forever. Read online or print at home.
About This Woodland Birds Filet Crochet Curtain Pattern
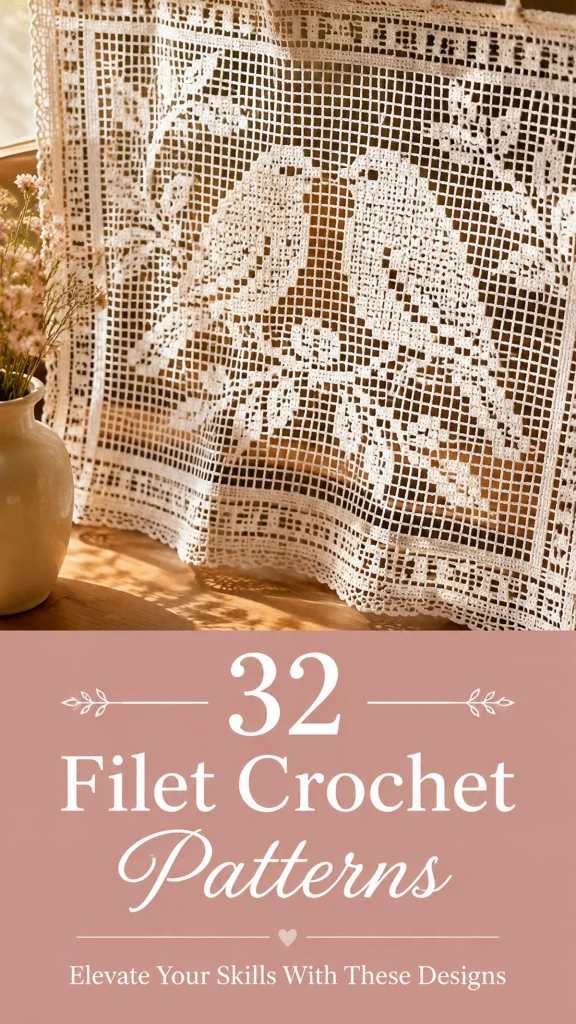
This filet crochet curtain pattern creates an ivory window panel with two birds facing one another among leafy branches. Fine cotton thread, open square mesh, and a geometric border echo the light, traditional lace in the reference photograph. The bird silhouettes are an original interpretation of the visible motifs.
Allow approximately 30–40 hours for crocheting, joining, and finishing, with additional drying time for blocking. This advanced project suits crocheters comfortable with fine thread, alternating chart direction, and precise seams. Its complexity comes from the detailed mesh chart, five separately worked fabric sections, and nine hanging tabs.
Materials
- Size 10 mercerized cotton crochet thread in warm ivory Approximately 650–800 m, including swatching and a working allowance; use one dye lot.
- 1.75 mm steel crochet hook Adjust hook size to achieve blocked gauge.
- Fine tapestry needle and small scissors For seams and secure thread ends.
- Rustproof blocking pins, blocking surface, and measuring tape Essential for opening the mesh evenly.
- Nine removable markers For hanging-tab positions.
- Slim curtain rod Up to approximately 12 mm diameter for the specified tabs.
Abbreviations
chchainscsingle crochetdcdouble crochet, US terminologysl stslip stitchst / stsstitch / stitchesOopen filet cellFfilled filet cellGauge, Dimensions, and Filet Method
- Blocked gauge: 10 open cells and 10 rows measure 7.5 × 7.5 cm. Make a swatch by chaining 36 and working 11 open cells for 12 rows using the method below. Wash, pin square, and dry before measuring the central 10 cells and 10 rows.
- The central panel is 61 cells × 55 rows, approximately 45.75 × 41.25 cm. Each side strip is 7 cells × 55 rows. Each horizontal strip is 75 cells × 7 rows. The assembled rectangle is 75 cells × 69 rows, approximately 56.25 × 51.75 cm before edging.
- Every row begins with a boundary dc. On the foundation row, the skipped three chains count as that dc. On later rows, turn and ch 3; this counts as the first boundary dc. Do not add another dc in that same first stitch.
- O: ch 2, skip two stitch positions, dc in the next boundary dc. F: dc in each of the next three stitch positions. When F follows an open cell from the previous row, work two dc into its ch-2 space and one dc into its ending boundary dc.
- Each completed cell contributes three positions: either two chains and one dc, or three dc. A row of N cells therefore has 3N + 1 positions, counting chains and the initial boundary dc.
- Work chart Row 1 from right to left. Turn after every row; read even rows from left to right and odd rows from right to left. Cell numbers always refer to their positions in the front view, increasing from left to right.
- A coordinate range includes both endpoints. Fill only the listed cells; all unlisted cells are open. Chart coordinates refer to cells, not individual stitches.
Central Panel: Foundation and Chart Rules
- With ivory thread, ch 186. For Row 1, dc in the fourth ch from the hook; the skipped three chains count as the initial boundary dc. Dc in the next two chains to complete the first F cell. Continue across according to Chart Row 1 below. The finished row contains 61 cells and 184 stitch positions.
- Rows 2–55: turn, ch 3, then work the 61 chart cells in the correct reading direction. Each row remains 184 positions. The last boundary dc is worked into the top of the previous turning ch-3.
- The chart lists the left bird and left foliage. For every listed filled cell c, also fill cell 62 minus c. For example, cells 8–11 also fill cells 51–54. This produces a mirrored right bird and matching branches.
- Cell 31 is filled only when expressly stated. Do not mirror a range beyond the stated left-half coordinates. Each row also has filled edge cells 1 and 61, whether or not they appear in the chart list.
- After Row 55, fasten off. Leave the eye openings empty; the dark openings within the bird heads are formed by the chart itself.
Central Panel Chart: Lower Branches, Rows 1–18
- Row 1: fill cells 1–30 and cell 31; mirror the left half. This is one completely filled row.
- Row 2: left-half filled cells 2–3, 28–30; also fill cell 31.
- Row 3: left-half filled cells 4–5, 27–29.
- Row 4: left-half filled cells 6–7, 26–28.
- Row 5: left-half filled cells 8–9, 25–27.
- Row 6: left-half filled cells 10–11, 24–26.
- Row 7: left-half filled cells 7–9, 12–13, 23–25.
- Row 8: left-half filled cells 6–10, 14–15, 22–24.
- Row 9: left-half filled cells 7–10, 16–17, 21–23.
- Row 10: left-half filled cells 10–11, 18–22.
- Row 11: left-half filled cells 11–12, 17–21, 25–27.
- Row 12: left-half filled cells 12–13, 16–20, 24–28.
- Row 13: left-half filled cells 13–19, 23–27.
- Row 14: left-half filled cells 12–18, 22–24.
- Row 15: left-half filled cells 11–17, 21–22.
- Row 16: left-half filled cells 10–16, 20–21.
- Row 17: left-half filled cells 8–15, 19–20.
- Row 18: left-half filled cells 7–14, 18–19.
Central Panel Chart: Bird Silhouettes, Rows 19–44
- Row 19: left-half filled cells 8–10, 13–15, 17–18. The first two groups begin the long tail feathers.
- Row 20: left-half filled cells 9–11, 13–16, 17–18.
- Row 21: left-half filled cells 10–12, 14–18.
- Row 22: left-half filled cells 11–13, 15–19.
- Row 23: left-half filled cells 12–14, 16–20.
- Row 24: left-half filled cells 13–15, 17–21.
- Row 25: left-half filled cells 13–22.
- Row 26: left-half filled cells 12–23.
- Row 27: left-half filled cells 12–17, 19–24.
- Row 28: left-half filled cells 11–16, 18–24.
- Row 29: left-half filled cells 11–15, 17–25.
- Row 30: left-half filled cells 10–14, 16–25.
- Row 31: left-half filled cells 10–14, 16–25.
- Row 32: left-half filled cells 10–15, 17–25.
- Row 33: left-half filled cells 11–16, 18–25.
- Row 34: left-half filled cells 11–17, 19–25.
- Row 35: left-half filled cells 12–18, 20–25.
- Row 36: left-half filled cells 12–19, 21–25.
- Row 37: left-half filled cells 13–25.
- Row 38: left-half filled cells 14–25.
- Row 39: left-half filled cells 15–25.
- Row 40: left-half filled cells 16–26.
- Row 41: left-half filled cells 17–23, 25–28. Cell 24 stays open to form the eye; cells 27–28 extend the beak.
- Row 42: left-half filled cells 18–26.
- Row 43: left-half filled cells 19–25.
- Row 44: left-half filled cells 20–24.
Central Panel Chart: Upper Foliage, Rows 45–55
- Row 45: left-half filled cells 7–8.
- Row 46: left-half filled cells 8–9, 13–15.
- Row 47: left-half filled cells 9–10, 12–16.
- Row 48: left-half filled cells 6–8, 10–15.
- Row 49: left-half filled cells 5–9, 11–12.
- Row 50: left-half filled cells 6–10, 12–13.
- Row 51: left-half filled cells 10–11, 13–14, 17–19.
- Row 52: left-half filled cells 11–12, 14–18.
- Row 53: left-half filled cells 12–13, 15–17.
- Row 54: left-half filled cells 13–14.
- Row 55: fill cells 1–30 and cell 31; mirror the left half. This is one completely filled row.
Geometric Side Strips: Make Two
- Ch 24. Each strip is 7 cells wide, with 22 positions per row. Use the same filet method as the central panel.
- Row 1: dc in the fourth ch from the hook and each remaining ch. Count the skipped chains as the first dc: 22 dc, equivalent to seven F cells.
- Row 2: F, O, F, O, F, O, F. Turn: 7 cells, 22 positions.
- Row 3: F, O, O, F, O, O, F. Turn: 7 cells, 22 positions.
- Row 4: F, O, F, F, F, O, F. Turn: 7 cells, 22 positions.
- Row 5: repeat Row 3.
- Row 6: repeat Row 2.
- Row 7: seven F cells.
- Rows 8–49: repeat Rows 2–7 seven more times. The strip now has 49 rows.
- Rows 50–55: repeat Rows 2–7 once more. Fasten off after Row 55. Make the second strip identically.
Top and Bottom Border Strips: Make Two
- Ch 228. Each strip is 75 cells wide, with 226 positions per row.
- Row 1: dc in the fourth ch from the hook and each remaining ch. Including the skipped chains, this gives 226 dc, equivalent to 75 F cells.
- Row 2: fill cells 1 and 75 and every cell divisible by 4, from 4 through 72. All other cells are O. Turn: 75 cells, 226 positions.
- Row 3: fill every odd-numbered cell, 1 through 75. All even-numbered cells are O. Turn: 75 cells, 226 positions.
- Row 4: repeat Row 2.
- Row 5: repeat Row 3.
- Row 6: repeat Row 2.
- Row 7: 75 F cells. Fasten off. Make a second strip identically.
Joining the Five Fabric Sections
- Lightly wet-block all sections to the stated gauge before joining. Keep the central panel and side strips exactly 55 rows high.
- Place the front surfaces upward. Position one side strip against each long edge of the central panel, with the lower foundation edges aligned.
- Using ivory thread, ladder-sew each side strip to the adjacent panel edge. Take one small catch around the corresponding row-end dc on each piece for every row: 55 matched pairs per seam. Butt the edges together and avoid overlapping them.
- The joined middle section is now 75 cells wide: 7 + 61 + 7. Place one horizontal strip below it and one above it.
- Sew the horizontal strips to the middle section, matching one stitch position to one stitch position across each seam: 226 positions along each edge. Catch corresponding loops lightly so the seams remain flexible.
- The assembled rectangle measures 75 cells across and the equivalent of 69 rows high. Secure all seam ends on filled portions of the lace.
Perimeter Edging
- Round 1: join ivory in the upper-right corner. Ch 1, then sc in each of the 226 stitch positions across the top edge. Work 2 additional sc in the final corner stitch, giving 3 sc in that corner.
- Continue down the left side with 3 sc around each of the 69 row ends. Add 2 additional sc in the last side placement for the lower-left corner.
- Work 1 sc in each of the 226 foundation positions across the bottom. Add 2 additional sc in the final placement for the lower-right corner.
- Work 3 sc around each of the 69 row ends up the right side. Add 2 additional sc in the final placement for the upper-right corner. Sl st to the first sc: 874 sc total. The initial ch 1 does not count.
- Round 2: ch 1. Repeat: sc in the next sc, ch 3, sl st in the third ch from the hook to make a picot, sc in the next sc. Work this two-stitch repeat 437 times around. Sl st to the first sc and fasten off. Round 2 has 874 sc and 437 picots.
- The edging should lie flat with gentle pinning. It adds approximately 1 cm to each side of the curtain; the final blocked size is approximately 58 × 54 cm.
Hanging Tabs: Make Nine
- Ch 8. Row 1: sc in the second ch from the hook and each remaining ch: 7 sc.
- Rows 2–28: ch 1, turn, sc in each st: 7 sc per row. Fasten off, leaving a sewing tail.
- Block each strip to approximately 1.5 × 7 cm. The critical length is 7 cm; if your sc row gauge differs, add or remove rows to reach that length and make all nine tabs alike.
- Fold each strip in half without twisting. Position both short ends together on the back of the top border, approximately 1 cm below its upper edge. Sew each end securely across all seven stitches, using two passes.
- Center the tabs above top-border cells 3, 12, 21, 30, 38, 46, 55, 64, and 73. Keep the free loops clear of the picots. The folded loops add approximately 2.5 cm above the curtain.
Finishing
Weave thread ends through several filled cells, reverse direction, and trim after the final wash. Soak the curtain according to the thread label, squeeze gently in a towel, and pin the outer rectangle square. Open the bird eyes and wing lines with the tip of a blocking pin, taking care not to stretch individual cells more than their neighbors.
Let the curtain dry completely before sliding the rod through the tabs. The finished lace should hang softly, with the two birds facing inward and the leafy branches spreading beneath their tails. Use light starch only if you prefer a crisper decorative panel.
Tips for Success
- Write both the listed left-half coordinates and their mirrored partners on graph paper before starting each chart row. This is especially useful around the beaks and eyes.
- Mark cell 31 with a removable marker. It remains open throughout Rows 2–54 and helps you keep the two birds evenly separated.
- Check for 61 completed cells after every central-panel row. Counting cells catches a missing boundary dc sooner than counting individual stitches.
- Block the side strips beside the central panel so all three pieces dry to exactly the same height before sewing.
- Support the curtain across your lap while joining. The weight of dangling fine-thread fabric can tighten a seam unintentionally.
Common Mistakes to Avoid
- Adding four dc for each filled cell makes the panel widen. After the initial boundary dc, each F contributes exactly three dc.
- Reading every row from the same end shifts asymmetric foliage. Read odd rows right to left and even rows left to right in the front-view chart.
- Filling cell 24 on Row 41 closes the left bird’s eye. Leave it open, along with its mirrored partner at cell 38.
- Pulling the side seams tight creates puckers beside the birds. Undo the affected seam and resew with the fabric resting flat.
- Blocking only the outside corners can leave distorted mesh inside. Align several internal horizontal and vertical grid lines as you pin.
Ways to Customize This Pattern
- Use natural ecru or unbleached cotton for a warmer antique appearance while keeping the birds and ground in one color.
- Choose finer thread for a smaller decorative panel. Make a blocked swatch first and calculate the body size as 75 cell widths by 69 row heights, plus edging.
- Make two complete curtains and hang them side by side for a wider window. Separate panels preserve the proportions of the bird motifs.
- For a rod with a larger diameter, lengthen each hanging strip. Its finished strip length must accommodate the rod circumference plus two 1 cm attachment allowances and some sliding ease.
Frequently asked questions
No. It is an original chart inspired by the photograph’s ivory filet mesh, paired birds, foliage, and geometric framing. The photograph does not provide enough information to recover an exact stitch chart.
Multiply the blocked width of one cell by 75 and the blocked height of one row by 69. Add approximately twice your edging depth to both dimensions. Measure tab projection separately.
The diagonal openings suggest folded wings and feather divisions. Keep those cells open as charted; filling them changes the birds into heavier solid silhouettes.
Block it flat and let it dry first. Hanging wet cotton from the tabs can lengthen the upper mesh unevenly and pull the top border out of shape.
The finished Woodland Birds Filet Crochet Curtain Pattern

