Woodland Leaves Crochet Table Runner Pattern
Advanced
For experienced crocheters who enjoy complex shaping, fine detail, and ambitious construction
Single-Day Project
A satisfying project you can complete in a single afternoon or evening.
Handmade Gift
A beautiful keepsake — free forever. Read online or print at home.
About This Woodland Leaves Crochet Table Runner Pattern
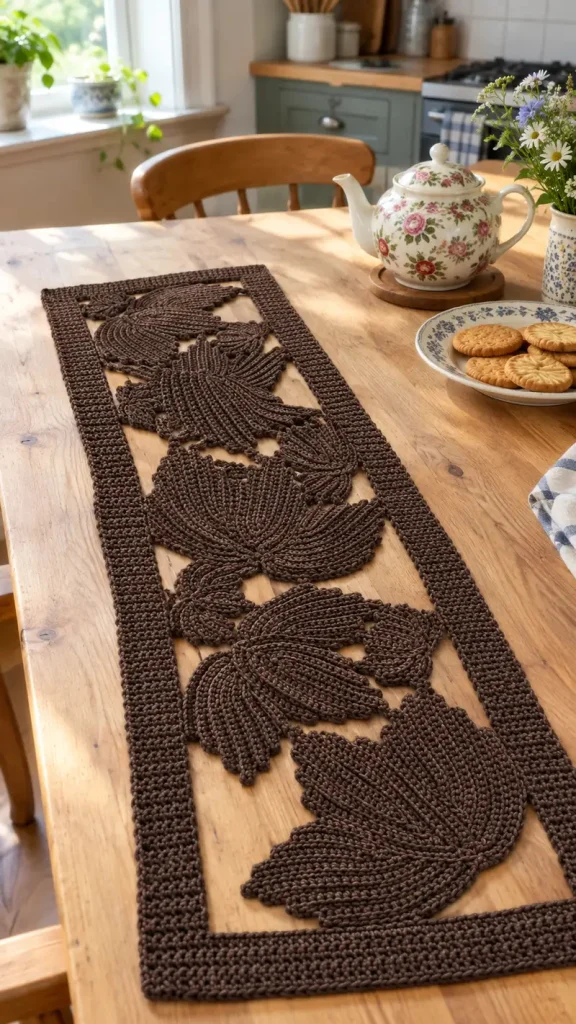
This crochet leaf table runner pattern creates a chocolate-brown woodland centerpiece with large, spreading leaves inside a firm rectangular frame. Ribbed blades overlap at their bases to form broad, lobed silhouettes, while smaller leaves and discreet thread bridges hold the open center together. The exposed tabletop is part of the design.
The reference shows a flat decorative runner with sculptural foliage and a substantial border. This original interpretation uses separately shaped leaf blades, embroidered veins and carefully mapped assembly to capture that appearance. Allow approximately 25–35 hours, including blocking and joining. It suits experienced crocheters who enjoy precise shaping, textured fabric and arranging individual motifs.
Materials
- Chocolate-brown sport-weight cotton Approximately 650 g / 1,950 m; choose a firmly plied yarn around 300 m per 100 g
- 3.0 mm crochet hook Adjust to obtain gauge
- Blunt tapestry needle For seams, veins and connecting bars
- Stitch markers and rustproof blocking pins For marking blade bases and securing the layout
- Blocking mats and measuring tape A working area at least 38 × 120 cm
- Paper or washable fabric layout sheet Mark a 28 × 110 cm inner rectangle
Abbreviations
chchainscsingle crochet, US terminologyinc2 sc in one stitchsc2togsingle crochet two stitches togetherBLOback loop onlysl stslip stitchst / stsstitch / stitchesGauge, Measurements and Construction
- Make a gauge swatch: ch 25. Row 1: sc in the second ch from the hook and each remaining ch; 24 sts. Rows 2–30: ch 1, turn, sc in each st; 24 sts per row. Wash and lay flat without stretching.
- Target blocked gauge: 20 sc and 24 rows = 10 × 10 cm. Measure within the swatch rather than across its edges. Make a second swatch with Rows 2–30 worked in BLO; aim for the same gauge after gentle blocking.
- All turning chains are excluded from stitch counts. Work flat, turning after every row. Unless explicitly stated otherwise, work through both loops. Every leaf-blade row after Row 1 uses BLO, including increases and decreases.
- The frame measures 38 × 120 cm outside, with a 28 × 110 cm opening. Its four strips are each 5 cm wide. Make five large leaves, four small leaves and nine separate stems, all in the same brown.
- Each large leaf contains five blades: two short, two medium and one long. Each small leaf contains three miniature blades. No stuffing or eyes are used for this flat table textile.
Long Frame Strips — Make Two
- Row 1: ch 11; sc in the second ch from the hook and each remaining ch. 10 sts.
- Rows 2–288: ch 1, turn; sc in each st. 10 sts per row. Fasten off, leaving a 30 cm sewing tail.
- Block each strip to 5 × 120 cm. Mark the boundaries after Rows 12 and 276. The 264 rows between these marks form the 110 cm inner edge.
End Frame Strips — Make Two
- Row 1: ch 57; sc in the second ch from the hook and each remaining ch. 56 sts.
- Rows 2–12: ch 1, turn; sc in each st. 56 sts per row. Fasten off, leaving a 40 cm sewing tail.
- Block each strip to 28 × 5 cm. Place these strips between the long strips, flush with their short ends. Sew each 12-row short edge to the matching 12-row section of a long strip, taking one seam stitch through each paired row end. The resulting opening measures 28 × 110 cm.
Large Leaf Blades — Make Twenty-Five
- Make 10 short blades, 10 medium blades and 5 long blades. Mark Row 1 as the base on every piece. Begin all sizes with Row 1: ch 3; sc in the second ch from the hook and the final ch. 2 sts.
- Row 2: ch 1, turn; working in BLO, inc in each st. 4 sts.
- Row 3: ch 1, turn; inc, sc in next 2 sts, inc. 6 sts.
- Row 4: ch 1, turn; inc, sc in next 4 sts, inc. 8 sts.
- Row 5: ch 1, turn; inc, sc in next 6 sts, inc. 10 sts.
- Short blades, Rows 6–14: ch 1, turn; sc in each st. 10 sts per row. Continue with the taper below at Row 15.
- Medium blades, Rows 6–20: ch 1, turn; sc in each st. 10 sts per row. Continue with the taper below at Row 21.
- Long blades, Rows 6–26: ch 1, turn; sc in each st. 10 sts per row. Continue with the taper below at Row 27.
- Taper row 1: ch 1, turn; sc2tog, sc in next 6 sts, sc2tog. 8 sts.
- Taper row 2: ch 1, turn; sc in each st. 8 sts.
- Taper row 3: ch 1, turn; sc2tog, sc in next 4 sts, sc2tog. 6 sts.
- Taper row 4: ch 1, turn; sc in each st. 6 sts.
- Taper row 5: ch 1, turn; sc2tog, sc in next 2 sts, sc2tog. 4 sts.
- Taper row 6: ch 1, turn; sc in each st. 4 sts.
- Taper row 7: ch 1, turn; sc2tog twice. 2 sts.
- Taper row 8: ch 1, turn; sc2tog. 1 st. Fasten off, leaving a 45 cm tail. The short, medium and long blades have 22, 28 and 34 rows respectively, measuring approximately 9.2, 11.7 and 14.2 cm long, with a maximum width of 5 cm.
Miniature Leaf Blades — Make Twelve
- Row 1: ch 3; sc in the second ch from the hook and the final ch. 2 sts. Work subsequent rows in BLO.
- Row 2: ch 1, turn; inc in each st. 4 sts.
- Row 3: ch 1, turn; inc, sc in next 2 sts, inc. 6 sts.
- Rows 4–10: ch 1, turn; sc in each st. 6 sts per row.
- Row 11: ch 1, turn; sc2tog, sc in next 2 sts, sc2tog. 4 sts.
- Row 12: ch 1, turn; sc in each st. 4 sts.
- Row 13: ch 1, turn; sc2tog twice. 2 sts.
- Row 14: ch 1, turn; sc2tog. 1 st. Fasten off, leaving a 30 cm tail. Each blade measures approximately 3 × 5.8 cm.
Assemble the Five Large Leaves
- For each leaf, arrange one long blade vertically with its base at the bottom. Put a medium blade on each side, angled 35 degrees away from the long blade. Add a short blade outside each medium blade, angled 70 degrees away from the long blade. All five Row 1 bases meet at one point.
- Keep the same ribbed face uppermost on every blade. Overlap adjoining lower edges by approximately 0.5 cm. Pin the arrangement to a spread approximately 22–25 cm wide and 14–15 cm high.
- Using the tails, sew each adjoining pair of blades together from the common base along their overlapping edges for 3 cm. Catch the underside loops so the raised ribs remain visible. Make four seams per leaf, leaving the upper blade edges free to form distinct lobes.
- Reinforce the common base with four small stitches through all the blade bases. Avoid pulling it into a hard knot. Repeat for all five leaves.
Assemble the Four Small Leaves
- Arrange three miniature blades with their Row 1 bases together. Keep the center blade straight and angle the side blades 45 degrees outward.
- Overlap each adjoining pair of lower edges by approximately 0.5 cm. Sew from the common base along each overlap for 1.5 cm, making two seams per leaf.
- Reinforce the common base with three small stitches. Block each small leaf to approximately 10 × 6 cm, keeping the three points distinct.
Stems and Embroidered Veins
- Large stems, make five: ch 9; sl st in the second ch from the hook and each remaining ch. 8 sl sts. Fasten off with a 25 cm tail.
- Small stems, make four: ch 5; sl st in the second ch from the hook and each remaining ch. 4 sl sts. Fasten off with a 20 cm tail.
- Sew one stem to each leaf base, overlapping its end by 1 cm on the underside. The free portion projects away from the leaf points.
- With matching yarn, embroider a central vein along every blade. Work a line of backstitches from the common leaf base toward the blade tip, using stitches approximately 0.5 cm long and stopping one row before the tip. Follow the center of the blade without tightening the fabric.
- On each large blade, add two diagonal branch veins on either side of the central vein, positioned approximately one-third and two-thirds along its length. Make each branch 1–1.5 cm long with short backstitches. Keep all embroidery flat.
Map the Openwork Layout
- Block the completed motifs and frame separately, then let them dry. Pin the frame over the layout sheet. Measure coordinates inside the opening: x runs from 0 to 28 cm across the width; y runs from 0 to 110 cm along the length.
- Place the common bases of the five large leaves at approximately these coordinates: (25, 11), (3, 33), (25, 55), (3, 77) and (25, 99) cm. For bases at x = 25, point the long center blade toward the left border. For bases at x = 3, point it toward the right border. The outer blades fan toward both ends of the runner.
- Place the centers of the four small leaves at approximately (14, 22), (14, 44), (14, 66) and (14, 88) cm. Rotate each small leaf so one side blade approaches the large leaf above it and the other approaches the large leaf below it. Alternate the stem direction across the runner.
- Fine-tune the angles and slide motifs up to 2 cm from these starting positions. Bring neighboring edges within 3 cm of one another while keeping every piece flat. Aim for balanced open spaces rather than perfectly identical gaps.
- Pin at least three intended connection points on every large leaf: its stem to the nearer long frame edge, its center-blade tip to the opposite long frame edge, and one outer-blade edge toward an adjacent small leaf. Pin both ends of each small leaf toward neighboring large leaves. Add a connection from the first and last large leaves to the respective end strips.
Join the Motifs and Frame
- Where pinned edges touch, sew them together across 0.5–1 cm using small whipstitches through underside loops. Join motifs to the inner frame edge without folding the frame inward.
- For a gap, make a wrapped thread bar: secure matching yarn on the underside of the first piece with three small anchoring stitches. Pass to the second piece, anchor through two neighboring stitches, then return to the first piece. Make one more pass to the second piece, creating three parallel strands across the gap.
- Wrap the working yarn closely around all three strands from the second piece back toward the first. Place the wraps side by side until the entire span is covered. Anchor and weave in the tail. Each completed bar must lie flat and measure no more than 3 cm; reposition a motif before joining if the gap is longer.
- Complete the marked connections: three for each large leaf, two for each small leaf, and one additional connection to each end strip. A connection between a large and small leaf can satisfy the requirement for both motifs. At the large leaves nearest each end, add a second end-strip connection at a different outer blade for stability.
- Inspect the remaining free lobes. If a blade can lift more than 2 cm from the layout when its tip is gently raised, add a sewn contact or wrapped bar to its nearest neighbor or the frame. Leave clear open spaces between the leaves; do not fill the opening with a continuous mesh.
Finishing
Weave each tail through at least 4 cm of underside stitches, change direction once, then trim. Check that the seams, embroidered veins and bars remain relaxed when the runner lies flat. Support the whole piece when lifting it from the blocking surface.
Wash gently according to the yarn label, press out moisture in a towel and pin the outer rectangle to approximately 38 × 120 cm. Straighten the frame first, then arrange the leaf points and open spaces. Let the runner dry completely before removing the pins. The finished piece should rest flat on the table with its ribs clearly visible.
Tips for Success
- Label short, medium and long blades as you finish them. Each large leaf needs the same five-piece arrangement.
- Keep BLO stitches relaxed enough to open during blocking. Tight back-loop decreases can curl the pointed ends.
- Make the four lower blade seams before embroidering the veins so the vein lines radiate naturally from the assembled base.
- Pin the full layout before making permanent joins. Moving a loose motif is much easier than removing wrapped bars.
- Support the frame and foliage together while handling the wet runner to prevent the openwork connections from stretching.
Common Mistakes to Avoid
- Mixing blade lengths within a pair makes a leaf look unbalanced. Count the straight rows before starting each taper.
- Sewing too far up the blades removes the separate lobes. Limit large-leaf seams to the lower 3 cm and small-leaf seams to 1.5 cm.
- Pulling embroidered veins tight creates a cupped leaf. Remove the tight stitches and embroider again with the piece pinned flat.
- Using long, loose thread bridges allows the runner to sag. Keep bars within 3 cm and move the neighboring pieces closer when necessary.
- Stretching the border to accommodate oversized motifs distorts the rectangle. Check the blocked leaf swatch and adjust hook size before making the full set.
Ways to Customize This Pattern
- Use dark walnut for the frame and a slightly lighter brown for the foliage to emphasize the overlapping blades.
- Embroider the veins in a muted bronze-brown cotton for subtle contrast without changing the woodland appearance.
- For a shorter runner, make three large leaves and two small leaves. Work each long frame strip for 182 rows and block it to approximately 76 cm; keep the end strips unchanged.
- For a softer outline, omit the branch-vein embroidery while retaining the central veins and all structural joins.
Frequently asked questions
No. Each leaf combines five separately shaped, ribbed blades. Their lower edges are sewn together to create the broad fan of lobes visible in this interpretation.
The bars stabilize the foliage while preserving the exposed tabletop. Direct seams work where motifs touch; wrapped bars bridge the remaining short gaps.
Check both stitch and row gauge first. Rotate and reposition the leaves within the layout allowance, then use bars for gaps up to 3 cm. If the motifs are consistently too small, remake a sample with a larger hook before continuing.
Use a separate heat-resistant trivet beneath a hot teapot. The open spaces expose the table, and this decorative cotton runner is not designed or tested as a heat barrier.
The finished Woodland Leaves Crochet Table Runner Pattern

