Woodland Scales Crochet Toilet Paper Holder
Advanced
For experienced crocheters who enjoy complex shaping, fine detail, and ambitious construction
Weekend Project
A satisfying weekend make — start Friday, finish Sunday, enjoy forever.
Handmade Gift
A beautiful keepsake — free forever. Read online or print at home.
About This Woodland Scales Crochet Toilet Paper Holder
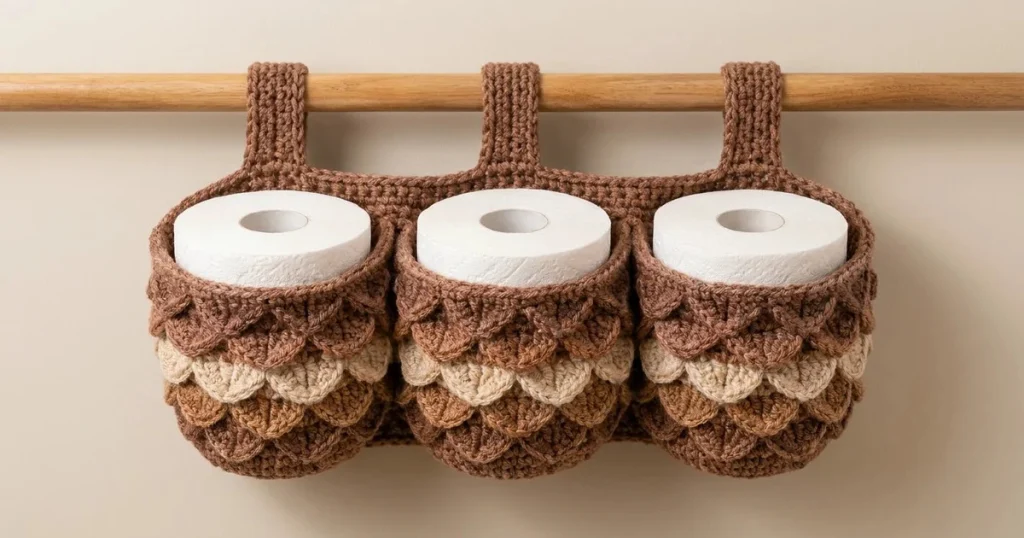
This crochet toilet paper holder pattern creates three upright pockets with overlapping brown and cream scales and matching loops that slip over a wooden rail. The rounded bases and layered scallops echo the warm, textured organizer in the reference photo.
Allow approximately 18–24 hours for the crochet and assembly. This advanced household project combines shaped pocket bases, separately crocheted scales, a reinforced backing, and carefully positioned hanging straps. It suits crocheters who enjoy detailed finishing and want a practical place to keep three spare rolls within reach.
Materials
- Worsted cotton yarn in warm medium brown Approximately 450 g / 765 m, including pockets, backing, straps, rims, and upper scales
- Worsted cotton yarn in cream Approximately 60 g / 102 m
- Worsted cotton yarn in caramel Approximately 60 g / 102 m
- Worsted cotton yarn in dark brown Approximately 60 g / 102 m; use the same yarn range for all colors
- Crochet hooks 3.5 mm for structural pieces; 4 mm for scales
- Locking stitch markers, tapestry needle, scissors, measuring tape, and blocking pins Include six markers for positioning each scale tier
- Wooden hanging rail Approximately 2.5–3 cm diameter, with a removable end and suitable wall fixings
- Three toilet paper rolls For fitting; intended roll size approximately 10–10.5 cm diameter × 10 cm high
Abbreviations
chchainscsingle crochethdchalf double crochetdcdouble crochetsl stslip stitchinc2 single crochet in the same stitchMRmagic ringBLOback loop onlyst / stsstitch / stitchesGauge, Fit, and Construction
- With the 3.5 mm hook, work a swatch of at least 24 sc across and 26 rows. Wash and dry it as you intend to care for the organizer. Target gauge is 18 sc and 20 rows per 10 cm in flat sc.
- Check the circular pocket gauge as well: the completed 60-stitch base should measure approximately 10.5–11 cm across and lie flat. A completed pocket should have an inside circumference near 33 cm and a wall height near 12 cm. Cotton thickness can reduce the usable inside diameter.
- With the 4 mm hook, a completed scale should measure approximately 5.5–6 cm across its curved edge and 3–3.5 cm from its straight edge to its lowest point. Change the scale hook size if needed without changing its stitch count.
- The organizer uses three pockets, one backing panel, six strap layers joined into three reinforced straps, and 72 separate scales. Work structural pieces firmly. Beginning chains never count as stitches.
- Pocket rounds are continuous unless a join is specified. Mark the first stitch and move the marker every round. Counts in parentheses exclude chains and joining slip stitches.
Rounded Pockets — Make Three
- Round 1: With medium brown and the 3.5 mm hook, work 6 sc in MR. Tighten the ring. (6)
- Round 2: Inc in every st. (12)
- Round 3: Repeat (sc, inc) 6 times. (18)
- Round 4: Repeat (2 sc, inc) 6 times. (24)
- Round 5: Repeat (3 sc, inc) 6 times. (30)
- Round 6: Repeat (4 sc, inc) 6 times. (36)
- Round 7: Repeat (5 sc, inc) 6 times. (42)
- Round 8: Repeat (6 sc, inc) 6 times. (48)
- Round 9: Repeat (7 sc, inc) 6 times. (54)
- Round 10: Repeat (8 sc, inc) 6 times. (60)
- Round 11: Sc in BLO around to establish the base turn. (60)
- Rounds 12–34: Sc in both loops of every st for 23 rounds. (60 each round)
- Round 35: Sc around. Sl st to the first sc and fasten off. (60) The wall consists of 25 rounds, including the turning round. Leave the opening unclosed.
- Weave in the center tail securely. Set each pocket upright, choose its back center, and mark that vertical line. Number the rim stitches 1–60 clockwise with stitch 1 at the back center; carry that alignment down the wall with removable markers.
Layered Scales — Make 72
- Color allocation: make 18 dark brown, 18 caramel, 18 cream, and 18 medium brown scales. Each pocket receives six scales in each color.
- Row 1: With the 4 mm hook, make MR, ch 2, and work 6 dc into the ring. Turn. (6 dc)
- Row 2: Ch 2, work 2 dc in every st. Turn. (12 dc)
- Row 3: Ch 1; sc in the first st, hdc in the next, dc in each of the next 8 sts, hdc in the next, sc in the last. (12 sts) Fasten off, leaving a 30 cm sewing tail.
- Draw the ring closed and secure its tail on the wrong side. The two row ends form the straight upper edge; the worked outer edge forms the rounded lower edge. Flatten gently without stretching the scallop.
- Block all scales to matching dimensions. Keep the sewing tails free. Scales are attached along their straight upper edges only, so the curved lower edges remain loose.
Attach the Four Scale Tiers
- Use pocket round numbers to position each straight upper edge. Attach tiers from the bottom upward: dark brown along Round 17, caramel along Round 22, cream along Round 27, and medium brown along Round 32.
- For the dark brown tier, mark wall stitches 1, 11, 21, 31, 41, and 51 on Round 17. These are the centers of the six straight upper edges. Center each scale on its marker with its curved edge pointing toward the base.
- Pin all six before sewing. Spread each straight edge across approximately 10 wall stitches; adjacent corners may overlap. Sew the entire straight edge to the wall with small backstitches through the scale edge and pocket fabric, keeping the interior smooth. Do not sew through the opposite wall.
- For the caramel tier on Round 22, place centers at stitches 6, 16, 26, 36, 46, and 56. Sew as above. Its lower curves should cover the attachment line of the dark brown tier.
- For the cream tier on Round 27, use centers 1, 11, 21, 31, 41, and 51. For the medium brown tier on Round 32, use centers 6, 16, 26, 36, 46, and 56. Sew each tier separately, keeping lower edges free.
- Repeat for all three pockets. At the target gauge, tier attachment lines are about 2.5 cm apart, giving approximately 0.5–1 cm of vertical overlap. Confirm this overlap on the first pocket before completing the remaining two.
Reinforced Pocket Rims — Make Three
- Round 1: With medium brown and the 3.5 mm hook, join at the back center of pocket Round 35. Ch 1 and sc in every rim st. Join with sl st to the first sc. (60)
- Round 2: Ch 1 and sc in every st. Join with sl st to the first sc. (60)
- Round 3: Work one loose sl st in every st. (60 sl sts) Fasten off and weave in the ends. Check that the edging has not pulled the opening inward.
Backing Panel
- Foundation: With medium brown and the 3.5 mm hook, ch 63.
- Row 1: Sc in the second ch from the hook and each remaining ch. Turn. (62)
- Rows 2–24: Ch 1, sc in every st, turn. (62 each row) Fasten off. The panel measures approximately 34.5 cm wide × 12 cm high before edging.
- Edging round: Join medium brown in the first foundation stitch at the lower left corner with the right side facing. Ch 1. Work 62 sc across the foundation edge, ch 1; 24 sc up the first row-end edge, ch 1; 62 sc across Row 24, ch 1; 24 sc down the remaining row-end edge, ch 1. Join to the first sc. (172 sc and four ch-1 corner spaces)
- Fasten off and block flat. The foundation edge is the bottom, and Row 24 is the top. With the right side facing, mark top-edge stitches 11, 31, and 52 for the three strap centers.
Double-Layer Hanging Straps — Make Three Pairs
- Foundation: With medium brown and the 3.5 mm hook, ch 9.
- Row 1: Sc in the second ch from the hook and each remaining ch. Turn. (8)
- Rows 2–28: Ch 1, sc in every st, turn. (8 each row) Fasten off. Make six identical rectangles, approximately 4.5 cm wide × 14 cm long.
- Place two rectangles together with wrong sides touching. Join yarn at one corner. Working through both layers, sc 8 across one short edge, ch 1; sc 28 along the long edge, ch 1; sc 8 across the other short edge, ch 1; sc 28 along the remaining long edge, ch 1. Join to the first sc. (72 sc and four ch-1 spaces)
- Fasten off with a 60 cm sewing tail. Repeat to create three double-layer straps. The joined side edges add definition similar to the raised strap edges in the photo.
Join Pockets, Backing, and Straps
- Stand the three pockets side by side with their back-center markers facing the panel. Position their centers approximately 6 cm, 17 cm, and 28.5 cm from the panel’s left edge. Align the panel top with the pocket rims; the lower panel edge should sit near the base turns.
- Temporarily fold the rear scales away from each seam. With medium brown, sew a vertical line down each marked pocket back center to the panel, starting at the rim and ending at Round 11. Secure a second vertical line approximately 3 wall stitches to either side of this center seam. These three lines form a narrow attachment area without flattening the entire pocket.
- Sew the rear upper rim of each pocket to the panel over an approximately 10-stitch span, centered on its back-center marker. Catch structural pocket stitches underneath the scales. Leave the scales free to fall back over the stitching.
- At each point where neighboring pockets touch, join their walls with a short vertical seam from Rounds 25–34. Fold scales aside and stitch only the structural fabric. Keep the three openings level and fully accessible.
- Center one strap over each marked panel position. Place the first 4 rows of one strap end against the panel front, immediately below its top edge. Sew around that rectangular overlap, then add two diagonal lines across it, catching both strap layers and the panel.
- Pass the free strap end over the intended rail and down the panel back. Overlap its final 4 rows onto the upper panel back. Pin all three loops to equal length, then sew each overlap around its perimeter and across both diagonals. Remove the rail if needed for access. Approximately 10 cm of each strap remains between its attachment areas, forming the loop.
- Weave each sewing tail through several structural stitches before trimming. Replace the rail and confirm that all three loops share the load and that the backing hangs straight.
Finishing
Work every remaining end into the structural fabric, keeping it away from the loose scallop edges. Smooth the scales into their staggered rows and let the pockets settle around three empty cardboard roll cores before adding full rolls. The cream band should remain visible between the caramel and medium brown tiers.
Hang the organizer on a securely mounted rail and add rolls one at a time. Check the strap seams and panel for stretching, then adjust the pocket joins if an opening tips forward. Hand wash when needed, reshape the pockets, and dry flat before hanging again.
Tips for Success
- Fit a real roll into the first completed pocket before making the other two; cotton thickness can change the usable opening even when the base measures correctly.
- Pin all six scales around each tier before sewing. This distributes overlap evenly and prevents a wide gap at the back.
- Keep a piece of cardboard inside the pocket while sewing scales to prevent accidentally catching the opposite wall.
- Use the same cotton range for all four colors so the cream tier has the same thickness and drape as the brown tiers.
- Sew straps through both layers with closely spaced stitches; the reinforced rectangles distribute the weight across the panel.
Common Mistakes to Avoid
- A cupped base before Round 11 usually indicates tight increases or missed stitches. Count all 60 stitches and correct the gauge before starting the wall.
- Scales facing upward hide the layered effect. Their straight edges belong at the top, with the curved edges hanging downward.
- Sewing the curved edges flat removes the texture. Unpick those stitches and attach only the straight upper edge.
- A tight slip-stitch rim can stop a roll passing through. Remove that round and rework it loosely or use the 4 mm hook.
- Attaching straps only to the edging concentrates the load. Sew their full overlap rectangles through the panel fabric.
Ways to Customize This Pattern
- Use oatmeal instead of cream for a softer contrast while keeping the four-tier arrangement.
- Work the dark brown, caramel, and medium brown scales in one shade for a monochrome textured organizer.
- Make a single-pocket version with one reinforced strap and a backing panel of 22 stitches × 24 rows; retain the same pocket and scale instructions.
- For a thicker rail, add the same even number of rows to all six strap rectangles. Each two extra rows adds approximately 1 cm of strap length; update each long-edge joining count to match the new row total.
Frequently asked questions
The stated size is intended for rolls approximately 10–10.5 cm across. Measure your largest roll before starting. Jumbo rolls need a redesigned pocket circumference and matching scale layout; stretching the rim alone will not enlarge the base.
These are separate fan-shaped scales sewn in staggered tiers. They recreate the reference’s overlapping texture while allowing the load-bearing pocket fabric to remain dense and continuous.
Full tiers keep the texture continuous when the organizer is viewed from the side. The rear scales lie against the backing; fold them aside while making the structural seams, then release them.
The instructions produce permanently closed loops for a rail with a removable end. Fit the loops before reinstalling that end. A fixed rail requires a separately designed opening closure with suitable reinforcement.
The finished Woodland Scales Crochet Toilet Paper Holder

